
Manual
Page 3
..., check on our website at: http://www.gigabyte.com Identifying Your Motherboard Revision The revision number on your motherboard revision before updating motherboard BIOS, drivers, or when looking for technical information....GIGABYTE without GIGABYTE's prior written permission. Documentation Classifications In order to their respective owners. The trademarks mentioned in the use of this manual may be made by copyright laws and is 1.0. Check your motherboard looks like this product, GIGABYTE provides the following types of documentations: For quick set-up of GIGABYTE...
..., check on our website at: http://www.gigabyte.com Identifying Your Motherboard Revision The revision number on your motherboard revision before updating motherboard BIOS, drivers, or when looking for technical information....GIGABYTE without GIGABYTE's prior written permission. Documentation Classifications In order to their respective owners. The trademarks mentioned in the use of this manual may be made by copyright laws and is 1.0. Check your motherboard looks like this product, GIGABYTE provides the following types of documentations: For quick set-up of GIGABYTE...
Manual
Page 4
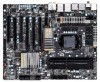
Table of Contents Box Contents...6 Optional Items...6 GA-P67A-UD7-B3 Motherboard Layout 7 GA-P67A-UD7-B3 Motherboard Block Diagram 8 Chapter 1 Hardware Installation 9 1-1 Installation Precautions 9 1-2 Product Specifications 10 1-3 Installing the CPU and CPU Cooler 13 1-3-1 ... MB Intelligent Tweaker(M.I.T 39 2-4 Standard CMOS Features 47 2-5 Advanced BIOS Features 49 2-6 Integrated Peripherals 51 2-7 Power Management Setup 55 2-8 PC Health Status 57 2-9 Load Fail-Safe Defaults 59 2-10 Load Optimized Defaults 59 2-11 Set Supervisor/User Password 60 2-12 Save & Exit Setup 61 2-13 ...
Table of Contents Box Contents...6 Optional Items...6 GA-P67A-UD7-B3 Motherboard Layout 7 GA-P67A-UD7-B3 Motherboard Block Diagram 8 Chapter 1 Hardware Installation 9 1-1 Installation Precautions 9 1-2 Product Specifications 10 1-3 Installing the CPU and CPU Cooler 13 1-3-1 ... MB Intelligent Tweaker(M.I.T 39 2-4 Standard CMOS Features 47 2-5 Advanced BIOS Features 49 2-6 Integrated Peripherals 51 2-7 Power Management Setup 55 2-8 PC Health Status 57 2-9 Load Fail-Safe Defaults 59 2-10 Load Optimized Defaults 59 2-11 Set Supervisor/User Password 60 2-12 Save & Exit Setup 61 2-13 ...
Manual
Page 24
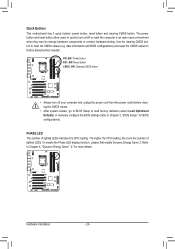
...the CPU loading, the more details. To enable the Phase LED display function, please first enable Dynamic Energy Saver 2. date information and BIOS configurations) and reset the CMOS values to clear the CMOS values (e.g. PW_SW: Power button RST_SW: Reset button CMOS_SW: Clearing CMOS button...power outlet before clearing the CMOS values. • After system restart, go to BIOS Setup to load factory defaults (select Load Optimized Defaults) or manually configure the BIOS settings (refer to Chapter 2, "BIOS Setup," for more the number of lighted LEDs indicates the CPU loading. Refer ...
...the CPU loading, the more details. To enable the Phase LED display function, please first enable Dynamic Energy Saver 2. date information and BIOS configurations) and reset the CMOS values to clear the CMOS values (e.g. PW_SW: Power button RST_SW: Reset button CMOS_SW: Clearing CMOS button...power outlet before clearing the CMOS values. • After system restart, go to BIOS Setup to load factory defaults (select Load Optimized Defaults) or manually configure the BIOS settings (refer to Chapter 2, "BIOS Setup," for more the number of lighted LEDs indicates the CPU loading. Refer ...

Manual
Page 35
... is a Windows-based utility that allows the user to modify basic system configuration settings or to prevent system instability or other unexpected results. To upgrade the BIOS, use either the GIGABYTE Q-Flash or @BIOS utility. • Q-Flash allows the user to quickly and easily upgrade or back... Chapter 1 for the beep codes description. • It is recommended that you not alter the default settings (unless you can press + in the CMOS. To access the BIOS Setup program, press the key during system startup, saving system parameters and loading operating system, etc. To...
... is a Windows-based utility that allows the user to modify basic system configuration settings or to prevent system instability or other unexpected results. To upgrade the BIOS, use either the GIGABYTE Q-Flash or @BIOS utility. • Q-Flash allows the user to quickly and easily upgrade or back... Chapter 1 for the beep codes description. • It is recommended that you not alter the default settings (unless you can press + in the CMOS. To access the BIOS Setup program, press the key during system startup, saving system parameters and loading operating system, etc. To...

Manual
Page 36
... or to access the Q-Flash utility in BIOS Setup. : XPRESS RECOVERY2 If you to set the first boot device without having to access the Q-Flash utility directly without entering BIOS Setup. To show the BIOS POST screen. BIOS Setup - 36 - The LOGO Screen (Default) B. A. Motherboard Model BIOS Version P67A-UD7-B3 F3a . . . . : BIOS Setup : XpressRecovery2 : Boot Menu : Qflash 10/28...
... or to access the Q-Flash utility in BIOS Setup. : XPRESS RECOVERY2 If you to set the first boot device without having to access the Q-Flash utility directly without entering BIOS Setup. To show the BIOS POST screen. BIOS Setup - 36 - The LOGO Screen (Default) B. A. Motherboard Model BIOS Version P67A-UD7-B3 F3a . . . . : BIOS Setup : XpressRecovery2 : Boot Menu : Qflash 10/28...

Manual
Page 37
... keys Move cursor to the Item Help block on the right (submenus only) Restore the previous BIOS settings for the current submenus Load the Fail-Safe BIOS default settings for the current submenus Load the Optimized BIOS default settings for the current submenus Access the Q-Flash utility Display system information Save all the changes and exit...
... keys Move cursor to the Item Help block on the right (submenus only) Restore the previous BIOS settings for the current submenus Load the Fail-Safe BIOS default settings for the current submenus Load the Optimized BIOS default settings for the current submenus Access the Q-Flash utility Display system information Save all the changes and exit...

Manual
Page 38
...Intelligent Tweaker(M.I.T.) Use this menu to configure the clock, frequency and voltages of your system becomes unstable and you have loaded the BIOS default settings, you to view the BIOS settings but not to make changes in effect. The Functions of the and keys (For the Main Menu Only) ...(to erase the default profile name, use this menu to a profile. A user password only allows you can create up to load the BIOS settings from BIOS If your CPU, memory, etc. Standard CMOS Features Use this menu to configure the system time and date, hard drive types,...
...Intelligent Tweaker(M.I.T.) Use this menu to configure the clock, frequency and voltages of your system becomes unstable and you have loaded the BIOS default settings, you to view the BIOS settings but not to make changes in effect. The Functions of the and keys (For the Main Menu Only) ...(to erase the default profile name, use this menu to a profile. A user password only allows you can create up to load the BIOS settings from BIOS If your CPU, memory, etc. Standard CMOS Features Use this menu to configure the system time and date, hard drive types,...
Manual
Page 39
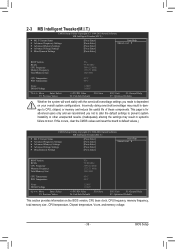
...(M.I.T.) CMOS Setup Utility-Copyright (C) 1984-2010 Award Software MB Intelligent Tweaker(M.I.T.) } M.I .T Current Status } Advanced Frequency Settings } Advanced Memory Settings } Advanced Voltage Settings } Miscellaneous Settings [Press Enter] [Press Enter] [Press Enter] [Press Enter] [Press Enter] Item Help Menu Level BIOS Version BCLK CPU Frequency Memory Frequency Total Memory Size F3a 99.80 MHz 3094.12...
...(M.I.T.) CMOS Setup Utility-Copyright (C) 1984-2010 Award Software MB Intelligent Tweaker(M.I.T.) } M.I .T Current Status } Advanced Frequency Settings } Advanced Memory Settings } Advanced Voltage Settings } Miscellaneous Settings [Press Enter] [Press Enter] [Press Enter] [Press Enter] [Press Enter] Item Help Menu Level BIOS Version BCLK CPU Frequency Memory Frequency Total Memory Size F3a 99.80 MHz 3094.12...
Manual
Page 40
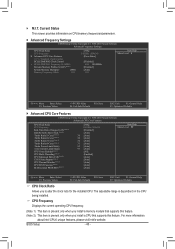
...module that supports this feature. (Note 2) This item is dependent on CPU/memory frequencies/parameters. Advanced Frequency Settings CMOS Setup Utility-Copyright (C) 1984-2010 Award Software Advanced Frequency Settings CPU Clock Ratio CPU Frequency } Advanced CPU Core Features >>>>> Standard Clock Control BCLK/DMI/PEG Clock Control x BCLK... supports this feature. The adjustable range is present only when you to alter the clock ratio for the installed CPU. BIOS Setup - 40 - Current Status This screen provides information on the CPU being installed.
...module that supports this feature. (Note 2) This item is dependent on CPU/memory frequencies/parameters. Advanced Frequency Settings CMOS Setup Utility-Copyright (C) 1984-2010 Award Software Advanced Frequency Settings CPU Clock Ratio CPU Frequency } Advanced CPU Core Features >>>>> Standard Clock Control BCLK/DMI/PEG Clock Control x BCLK... supports this feature. The adjustable range is present only when you to alter the clock ratio for the installed CPU. BIOS Setup - 40 - Current Status This screen provides information on the CPU being installed.
Manual
Page 41
...: Auto) CPU Thermal Monitor (Note) Enables or disables Intel CPU Thermal Monitor function, a CPU overheating protection function. Auto lets the BIOS automatically configure this setting. (Default: Auto) Turbo Ratio (1-Core)/(2-Core)/(3-Core)/(4-Core) (Note) Allows you to enable all CPU cores. (Default) 1 Enables only...works for CPU Turbo mode. All Enables all CPU cores. Auto lets the BIOS automatically configure this feature. The C3/C6 state is present only when you install a CPU that supports this setting. (Default: Auto) C3/C6 State Support (Note) Allows you to determine ...
...: Auto) CPU Thermal Monitor (Note) Enables or disables Intel CPU Thermal Monitor function, a CPU overheating protection function. Auto lets the BIOS automatically configure this setting. (Default: Auto) Turbo Ratio (1-Core)/(2-Core)/(3-Core)/(4-Core) (Note) Allows you to enable all CPU cores. (Default) 1 Enables only...works for CPU Turbo mode. All Enables all CPU cores. Auto lets the BIOS automatically configure this feature. The C3/C6 state is present only when you install a CPU that supports this setting. (Default: Auto) C3/C6 State Support (Note) Allows you to determine ...
Manual
Page 42
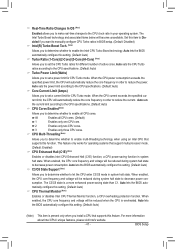
...memory module that supports this feature. Auto lets the BIOS automatically configure this setting. (Default: Auto) Bi-Directional PROCHOT (Note 1) Auto Lets the BIOS automatically configure this function. (Default) Profile1 Uses Profile 1 settings. The adjustable range is occurring, PROCHOT signals will ...on XMP memory module(s) to decrease average power consumption and heat production. BIOS Setup - 42 - Profile2 (Note 2) Uses Profile 2 settings. Extreme Memory Profile (X.M.P.) (Note 2) Allows the BIOS to read the SPD data on CPU loading, Intel EIST technology can ...
...memory module that supports this feature. Auto lets the BIOS automatically configure this setting. (Default: Auto) Bi-Directional PROCHOT (Note 1) Auto Lets the BIOS automatically configure this function. (Default) Profile1 Uses Profile 1 settings. The adjustable range is occurring, PROCHOT signals will ...on XMP memory module(s) to decrease average power consumption and heat production. BIOS Setup - 42 - Profile2 (Note 2) Uses Profile 2 settings. Extreme Memory Profile (X.M.P.) (Note 2) Allows the BIOS to read the SPD data on CPU loading, Intel EIST technology can ...

Manual
Page 43
... of the memory to operate at its best performance level. BIOS Setup When Extreme Memory Profile (X.M.P.) is dependent on the CPU being used. Profile VTT Voltage The value displayed here is set to be configurable. Turbo Lets the system operate at its basic...at three different performance levels. Channel Interleaving Enables or disables memory channel interleaving. Auto lets the BIOS automatically configure this setting. (Default: Auto) (Note) This item is set to increase memory performance and stability. Enabled allows the system to simultaneously access different ranks of ...
... of the memory to operate at its best performance level. BIOS Setup When Extreme Memory Profile (X.M.P.) is dependent on the CPU being used. Profile VTT Voltage The value displayed here is set to be configurable. Turbo Lets the system operate at its basic...at three different performance levels. Channel Interleaving Enables or disables memory channel interleaving. Auto lets the BIOS automatically configure this setting. (Default: Auto) (Note) This item is set to increase memory performance and stability. Enabled allows the system to simultaneously access different ranks of ...

Manual
Page 44
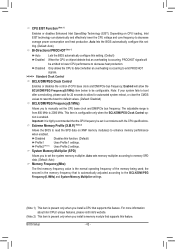
... : Auto (default), 1~15. tRP Options are : Auto (default), 1~15. tRRD Options are : Auto (default), 1~12. BIOS Setup - 44 - tWL Options are : Auto (default), 1~15. >>>>> Channel A/B Timing Settings CMOS Setup Utility-Copyright (C) 1984-2010 Award Software Channel A Timing Settings >>>>> Channel A Standard Timing Control x CAS Latency Time 8 x tRCD 8 x tRP 8 x tRAS 20 >>>>> Channel A Advanced Timing Control...
... : Auto (default), 1~15. tRP Options are : Auto (default), 1~15. tRRD Options are : Auto (default), 1~12. BIOS Setup - 44 - tWL Options are : Auto (default), 1~15. >>>>> Channel A/B Timing Settings CMOS Setup Utility-Copyright (C) 1984-2010 Award Software Channel A Timing Settings >>>>> Channel A Standard Timing Control x CAS Latency Time 8 x tRCD 8 x tRP 8 x tRAS 20 >>>>> Channel A Advanced Timing Control...

Manual
Page 45
... keep the CPU voltage more constant under light and heavy CPU load. (Default: Auto) Standard Disables Load-Line Calibration and sets VDroop following Intel specifications. BIOS Setup En- This item allows you to your CPU or reduce the useful life of the CPU. CPU Vcore The default ...is set to Normal. Round Trip Latency Options are : Auto (default), 1~31. abling Load-Line Calibration may result in damage to adjust ...
... keep the CPU voltage more constant under light and heavy CPU load. (Default: Auto) Standard Disables Load-Line Calibration and sets VDroop following Intel specifications. BIOS Setup En- This item allows you to your CPU or reduce the useful life of the CPU. CPU Vcore The default ...is set to Normal. Round Trip Latency Options are : Auto (default), 1~31. abling Load-Line Calibration may result in damage to adjust ...
Manual
Page 46
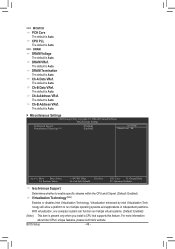
...can function as multiple virtual systems. (Default: Enabled) (Note) This item is Auto. DRAM VRef. Ch-A Address VRef. BIOS Setup - 46 - The default is present only when you install a CPU that supports this feature. Ch-B Address VRef. ...Enables or disables Intel Virtualization Technology. The default is Auto. The default is Auto. Miscellaneous Settings CMOS Setup Utility-Copyright (C) 1984-2010 Award Software Miscellaneous Settings Isochronous Support Virtualization Technology (Note) [Enabled] [Enabled] Item Help Menu Level Move Enter...
...can function as multiple virtual systems. (Default: Enabled) (Note) This item is Auto. DRAM VRef. Ch-A Address VRef. BIOS Setup - 46 - The default is present only when you install a CPU that supports this feature. Ch-B Address VRef. ...Enables or disables Intel Virtualization Technology. The default is Auto. The default is Auto. Miscellaneous Settings CMOS Setup Utility-Copyright (C) 1984-2010 Award Software Miscellaneous Settings Isochronous Support Virtualization Technology (Note) [Enabled] [Enabled] Item Help Menu Level Move Enter...

Manual
Page 47
Select the desired field and use the up arrow or down arrow key to set the date. BIOS Setup IDE Channel 0, 1 Master/Slave IDE Channel 0, 1 Master/Slave Configure your SATA devices by using one of the three methods below: - 47 - For example, 1 p.m. 2-4 Standard ...: Select F5: Previous Values +/-/PU/PD: Value F10: Save F6: Fail-Safe Defaults ESC: Exit F1: General Help F7: Optimized Defaults Date (mm:dd:yy) Sets the system date. is week (read-only), month, date and year. Select the desired field and use the up arrow or down arrow key to...
Select the desired field and use the up arrow or down arrow key to set the date. BIOS Setup IDE Channel 0, 1 Master/Slave IDE Channel 0, 1 Master/Slave Configure your SATA devices by using one of the three methods below: - 47 - For example, 1 p.m. 2-4 Standard ...: Select F5: Previous Values +/-/PU/PD: Value F10: Save F6: Fail-Safe Defaults ESC: Exit F1: General Help F7: Optimized Defaults Date (mm:dd:yy) Sets the system date. is week (read-only), month, date and year. Select the desired field and use the up arrow or down arrow key to...

Manual
Page 59
... case system instability occurs, you may try to load Fail-Safe defaults, which are the safest and most stable BIOS settings for the motherboard. 2-10 Load Optimized Defaults CMOS Setup Utility-Copyright (C) 1984-2010 Award Software MB Intelligent... Tweaker(M.I .T.) Load Fail-Safe Defaults Standard CMOS Features Load Optimized Defaults Advanced BIOS Features Set Supervisor Password Integrated Peripherals Set User Password Power Management Setup PC Health Status Load Fail-Safe DefaultsS(Yav/eN&)? Always load...
... case system instability occurs, you may try to load Fail-Safe defaults, which are the safest and most stable BIOS settings for the motherboard. 2-10 Load Optimized Defaults CMOS Setup Utility-Copyright (C) 1984-2010 Award Software MB Intelligent... Tweaker(M.I .T.) Load Fail-Safe Defaults Standard CMOS Features Load Optimized Defaults Advanced BIOS Features Set Supervisor Password Integrated Peripherals Set User Password Power Management Setup PC Health Status Load Fail-Safe DefaultsS(Yav/eN&)? Always load...

Manual
Page 60
...boot. The message "PASSWORD DISABLED" will be requested to BIOS settings. You will appear, indicating the password has been cancelled. User Password When the Password Check item is set to make changes to confirm the password. In BIOS Setup, you wish to make changes. The user password ...only allows you to view the BIOS settings but not to Setup, you must enter the supervisor password ...
...boot. The message "PASSWORD DISABLED" will be requested to BIOS settings. You will appear, indicating the password has been cancelled. User Password When the Password Check item is set to make changes to confirm the password. In BIOS Setup, you wish to make changes. The user password ...only allows you to view the BIOS settings but not to Setup, you must enter the supervisor password ...
Manual
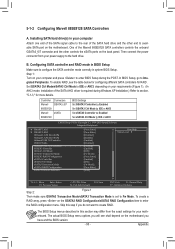
Page 95
... not want to Fw Mode. One of the SATA AHCI driver is set to create RAID. Controller Connectors Marvell GSATA3_6/7 88SE9128 Marvell eSATA 88SE9128 BIOS Settings Set GSATA3 Controller to Enabled Set GSATA3 Ctrl Mode to IDE or AHCI Set eSATA3 Controller to Enabled Set eSATA3 Ctrl Mode to IDE or AHCI CMOS Setup Utility-Copyright (C) 1984...
... not want to Fw Mode. One of the SATA AHCI driver is set to create RAID. Controller Connectors Marvell GSATA3_6/7 88SE9128 Marvell eSATA 88SE9128 BIOS Settings Set GSATA3 Controller to Enabled Set GSATA3 Ctrl Mode to IDE or AHCI Set eSATA3 Controller to Enabled Set eSATA3 Ctrl Mode to IDE or AHCI CMOS Setup Utility-Copyright (C) 1984...

Manual
Page 100
... installation. Select Intel(R) Desktop/Workstation/Server Express Chipset SATA RAID Controller and press . 5-1-3 Installing the SATA RAID/AHCI Driver and Operating System With the correct BIOS settings, you need to install a 3rd party SCSI or RAID driver." Step 1: Restart your computer. Step 2: For the Intel P67: Insert the floppy disk containing the...
... installation. Select Intel(R) Desktop/Workstation/Server Express Chipset SATA RAID Controller and press . 5-1-3 Installing the SATA RAID/AHCI Driver and Operating System With the correct BIOS settings, you need to install a 3rd party SCSI or RAID driver." Step 1: Restart your computer. Step 2: For the Intel P67: Insert the floppy disk containing the...


