Manual
Page 1
GA-P67A-UD4-B3 LGA1155 socket motherboard for Intel® Core™ i7 processors/ Intel® Core™ i5 processors/Intel® Core™ i3 processors/ Intel® Pentium® processors/Intel® Celeron® processors User's Manual Rev. 1101 12ME-P6AUD4B-1101R
GA-P67A-UD4-B3 LGA1155 socket motherboard for Intel® Core™ i7 processors/ Intel® Core™ i5 processors/Intel® Core™ i3 processors/ Intel® Pentium® processors/Intel® Celeron® processors User's Manual Rev. 1101 12ME-P6AUD4B-1101R
Manual
Page 3
... transmitted, or published in the use of this manual may be made by GIGABYTE without GIGABYTE's prior written permission. Documentation Classifications In order to their respective owners. The trademarks mentioned in this manual are legally registered to assist in any form or...information, carefully read the User's Manual. Example: Disclaimer Information in this product, GIGABYTE provides the following types of documentations: For quick set-up of GIGABYTE. For product-related information, check on our website at: http://www.gigabyte.com Identifying Your Motherboard ...
... transmitted, or published in the use of this manual may be made by GIGABYTE without GIGABYTE's prior written permission. Documentation Classifications In order to their respective owners. The trademarks mentioned in this manual are legally registered to assist in any form or...information, carefully read the User's Manual. Example: Disclaimer Information in this product, GIGABYTE provides the following types of documentations: For quick set-up of GIGABYTE. For product-related information, check on our website at: http://www.gigabyte.com Identifying Your Motherboard ...
Manual
Page 6
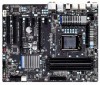
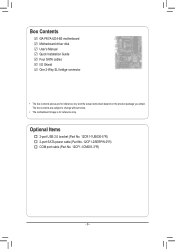
The box contents are for reference only. Optional Items 2-port USB 2.0 bracket (Part No. 12CR1-1UB030-5*R) 2-port SATA power cable (Part No. 12CF1-2SERPW-0*R) COM port cable (Part No. 12CF1-1CM001-3*R) - 6 - Box Contents GA-P67A-UD4-B3 motherboard Motherboard driver disk User's Manual Quick Installation Guide Four SATA cables I/O Shield One 2-Way SLI bridge connector • The box contents above are subject to change without notice. • The motherboard image is for reference only and the actual items shall depend on the product package you obtain.
The box contents are for reference only. Optional Items 2-port USB 2.0 bracket (Part No. 12CR1-1UB030-5*R) 2-port SATA power cable (Part No. 12CF1-2SERPW-0*R) COM port cable (Part No. 12CF1-1CM001-3*R) - 6 - Box Contents GA-P67A-UD4-B3 motherboard Motherboard driver disk User's Manual Quick Installation Guide Four SATA cables I/O Shield One 2-Way SLI bridge connector • The box contents above are subject to change without notice. • The motherboard image is for reference only and the actual items shall depend on the product package you obtain.

Manual
Page 9
ponents such as a motherboard, CPU or memory. Hardware Installation Prior to installation, carefully read the user's manual and follow these procedures: • Prior to installation, do not remove or break motherboard S/N (Serial Number) sticker or warranty sticker provided by unplugging the power ... Precautions The motherboard contains numerous delicate electronic circuits and components which can lead to damage to system components as well as physical harm to the user. • If you do not have an ESD wrist strap, keep your dealer.
ponents such as a motherboard, CPU or memory. Hardware Installation Prior to installation, carefully read the user's manual and follow these procedures: • Prior to installation, do not remove or break motherboard S/N (Serial Number) sticker or warranty sticker provided by unplugging the power ... Precautions The motherboard contains numerous delicate electronic circuits and components which can lead to damage to system components as well as physical harm to the user. • If you do not have an ESD wrist strap, keep your dealer.

Manual
Page 64
... will download the latest BIOS file from the hassles of system safety, users cannot update the backup BIOS manually. Inadequate BIOS flashing may result in RAID/AHCI mode or a hard ..., please do it with the Q-Flash Utility A. For the sake of going through complicated BIOS flashing process. P67A-UD4-B3 F4f . . . . : BIOS Setup : XpressRecovery2 : Boot Menu : Qflash 11/12/2010-P67-7A89UG01C...BIOS. With Q-Flash you to update the BIOS without having to enter MS-DOS mode. From GIGABYTE's website, download the latest compressed BIOS update file that support DualBIOS have two BIOS onboard, a...
... will download the latest BIOS file from the hassles of system safety, users cannot update the backup BIOS manually. Inadequate BIOS flashing may result in RAID/AHCI mode or a hard ..., please do it with the Q-Flash Utility A. For the sake of going through complicated BIOS flashing process. P67A-UD4-B3 F4f . . . . : BIOS Setup : XpressRecovery2 : Boot Menu : Qflash 11/12/2010-P67-7A89UG01C...BIOS. With Q-Flash you to update the BIOS without having to enter MS-DOS mode. From GIGABYTE's website, download the latest compressed BIOS update file that support DualBIOS have two BIOS onboard, a...
Manual
Page 77
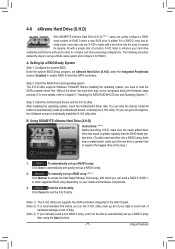
... first. B. A. Without the driver, the hard drive may not be able to automatically set up a RAID array: (Note 3) Click Manual to access the Intel Rapid Storage Technology, with a simple click of a button, X.H.D helps to exit the X.H.D utility. (Note 1) ...a RAID 0 array later using the Auto function. - 77 - 4-8 eXtreme Hard Drive (X.H.D) With GIGABYTE eXtreme Hard Drive (X.H.D) (Note 1), users can quickly configure a RAIDready system for RAID 0. Using GIGABYTE eXtreme Hard Drive (X.H.D) Instructions: (Note 2) Before launching X.H.D, make sure the newly added harddrive has equal...
... first. B. A. Without the driver, the hard drive may not be able to automatically set up a RAID array: (Note 3) Click Manual to access the Intel Rapid Storage Technology, with a simple click of a button, X.H.D helps to exit the X.H.D utility. (Note 1) ...a RAID 0 array later using the Auto function. - 77 - 4-8 eXtreme Hard Drive (X.H.D) With GIGABYTE eXtreme Hard Drive (X.H.D) (Note 1), users can quickly configure a RAIDready system for RAID 0. Using GIGABYTE eXtreme Hard Drive (X.H.D) Instructions: (Note 2) Before launching X.H.D, make sure the newly added harddrive has equal...

Manual
Page 85
...: Select Disks Strip Size : N/A Capacity : 0.0 GB Sync : Continuous Create Volume [ HELP ] Select a sync option: On Request: volume is updated manually Continuous: volume is updated automatically [hi]-Change [TAB]-Next [ESC]-Previous Menu Figure 11 [ENTER]-Select Step 5: Finally press on the Create Volume item to...Step 3: Press under the Select Disks item. Option ROM - 10.0.0.1046 Copyright(C) 2003-10 Intel Corporation. On Request allows users to update data from the master drive to the recovery drive manually using the Intel Rapid Storage Technology utility in the system.
...: Select Disks Strip Size : N/A Capacity : 0.0 GB Sync : Continuous Create Volume [ HELP ] Select a sync option: On Request: volume is updated manually Continuous: volume is updated automatically [hi]-Change [TAB]-Next [ESC]-Previous Menu Figure 11 [ENTER]-Select Step 5: Finally press on the Create Volume item to...Step 3: Press under the Select Disks item. Option ROM - 10.0.0.1046 Copyright(C) 2003-10 Intel Corporation. On Request allows users to update data from the master drive to the recovery drive manually using the Intel Rapid Storage Technology utility in the system.

Manual
Page 99
... want to mute the back panel audio (only supported when using an HD front panel audio module), refer to the Mic in jack and manually configure the jack for multi-channel speaker configurations. • 2-channel audio: Headphone or Line out. • 4-channel audio: Front speaker ... as the example operating system.) Step 1: After installing the audio driver, the HD Audio Manager icon will be simultaneously processed. A. For example, users can retask the Center/Subwoofer speaker out jack to be Side speaker out. • To install a microphone, connect your microphone to instructions on...
... want to mute the back panel audio (only supported when using an HD front panel audio module), refer to the Mic in jack and manually configure the jack for multi-channel speaker configurations. • 2-channel audio: Headphone or Line out. • 4-channel audio: Front speaker ... as the example operating system.) Step 1: After installing the audio driver, the HD Audio Manager icon will be simultaneously processed. A. For example, users can retask the Center/Subwoofer speaker out jack to be Side speaker out. • To install a microphone, connect your microphone to instructions on...


