
Manual
Page 25
... allow users to quickly turn off or reset the computer in an open-case environment when they want to change hardware components or conduct hardware testing. Refer to Chapter 2, "BIOS Setup," for more the number of lighted LEDs. Use the clearing CMOS button to factory defaults when needed...
... allow users to quickly turn off or reset the computer in an open-case environment when they want to change hardware components or conduct hardware testing. Refer to Chapter 2, "BIOS Setup," for more the number of lighted LEDs. Use the clearing CMOS button to factory defaults when needed...

Manual
Page 37
Its major functions include conducting the Power-On Self-Test (POST) during the POST when the power is a Windows-based utility that searches and downloads the latest version of BIOS from the Internet and updates ... you not alter the default settings (unless you need to) to prevent system instability or other unexpected results. To upgrade the BIOS, use either the GIGABYTE Q-Flash or @BIOS utility. • Q-Flash allows the user to quickly and easily upgrade or back up BIOS without entering the operating system. • @BIOS...
Its major functions include conducting the Power-On Self-Test (POST) during the POST when the power is a Windows-based utility that searches and downloads the latest version of BIOS from the Internet and updates ... you not alter the default settings (unless you need to) to prevent system instability or other unexpected results. To upgrade the BIOS, use either the GIGABYTE Q-Flash or @BIOS utility. • Q-Flash allows the user to quickly and easily upgrade or back up BIOS without entering the operating system. • @BIOS...

Manual
Page 77
...how much power they have saved in a set period of the button. Featuring an advanced proprietary hardware and software design, GIGABYTE Dynamic Energy SaverTM 2 is able to run in power-saving mode will light on) 10 3-Level Power Saving Switch (...• CPU Power and Power Scores are for reference only. The Dynamic Energy SaverTM 2 Interface A. Actual results may vary depending on testing method. - 77 - 4-4 Dynamic Energy SaverTM 2 GIGABYTE Dynamic Energy SaverTM 2 (Note 1) is a revolutionary technology that delivers unparalleled power savings with a click of time. 12 13 14 ...
...how much power they have saved in a set period of the button. Featuring an advanced proprietary hardware and software design, GIGABYTE Dynamic Energy SaverTM 2 is able to run in power-saving mode will light on) 10 3-Level Power Saving Switch (...• CPU Power and Power Scores are for reference only. The Dynamic Energy SaverTM 2 Interface A. Actual results may vary depending on testing method. - 77 - 4-4 Dynamic Energy SaverTM 2 GIGABYTE Dynamic Energy SaverTM 2 (Note 1) is a revolutionary technology that delivers unparalleled power savings with a click of time. 12 13 14 ...

Manual
Page 88
To create RAID, set to enter BIOS Setup during the POST (Power-On Self-Test). The BIOS Setup menus described in this section may differ from the exact settings for your computer and press to RAID(XHD) automatically. CMOS Setup ...
To create RAID, set to enter BIOS Setup during the POST (Power-On Self-Test). The BIOS Setup menus described in this section may differ from the exact settings for your computer and press to RAID(XHD) automatically. CMOS Setup ...

Manual
Page 89
... press + , the MAIN MENU screen will appear (Figure 3). Create RAID Volume 2. Reset Disks to enter the P55 RAID Configuration Utility. Step 1: After the POST memory test begins and before the operating system boot begins, look for a non-RAID configuration. Figure 2 Step 2: After you want to create a RAID array, select Create RAID...
... press + , the MAIN MENU screen will appear (Figure 3). Create RAID Volume 2. Reset Disks to enter the P55 RAID Configuration Utility. Step 1: After the POST memory test begins and before the operating system boot begins, look for a non-RAID configuration. Figure 2 Step 2: After you want to create a RAID array, select Create RAID...

Manual
Page 96
...) HDD0 : HDD1 : ST3120026AS ST3120026AS 120 GB 120 GB Non-RAID Non-RAID Press to enter the RAID setup utility. Gigabyte Technology Corp. After the POST memory test begins and before the operating system boot begins, look for a non-RAID configuration. Figure 2 In the main screen of Windows operating system for a message which...]-Select ITEM Figure 3 [ENTER]-Action [ESC]-Exit Note: In the main screen, you wish to see detailed information about the selected hard drive. Appendix - 96 - GIGABYTE Technology Corp. C.
...) HDD0 : HDD1 : ST3120026AS ST3120026AS 120 GB 120 GB Non-RAID Non-RAID Press to enter the RAID setup utility. Gigabyte Technology Corp. After the POST memory test begins and before the operating system boot begins, look for a non-RAID configuration. Figure 2 In the main screen of Windows operating system for a message which...]-Select ITEM Figure 3 [ENTER]-Action [ESC]-Exit Note: In the main screen, you wish to see detailed information about the selected hard drive. Appendix - 96 - GIGABYTE Technology Corp. C.
Manual
Page 101
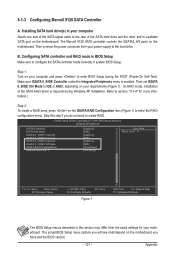
... have and the BIOS version. - 101 - Make sure GSATA 8_9/IDE Controller under the Integrated Peripherals menu is required during the POST (Power-On Self-Test). Appendix Skip this section may differ from your computer Attach one end of the SATA signal cable to the hard drive. Configuring SATA controller and...
... have and the BIOS version. - 101 - Make sure GSATA 8_9/IDE Controller under the Integrated Peripherals menu is required during the POST (Power-On Self-Test). Appendix Skip this section may differ from your computer Attach one end of the SATA signal cable to the hard drive. Configuring SATA controller and...

Manual
Page 132
...C3h C5h 01h 02h 03h 05h 07h 08h 0Ah 0Eh 10h 12h 14h 16h 18h 1Bh 1Dh 23h Description Test CMOS R/W functionality Early chipset initialization: -Disable shadow RAM - Auto-detection of DRAM size, type and... no special specified, all H/W interrupts are MODBINable by a port & interface swap (optional) 3. Initialize 8042 self-test 1. Program basic chipset registers Detect memory - Auto detect ports for override Program chipset default values into BIOS stack. ...
...C3h C5h 01h 02h 03h 05h 07h 08h 0Ah 0Eh 10h 12h 14h 16h 18h 1Bh 1Dh 23h Description Test CMOS R/W functionality Early chipset initialization: -Disable shadow RAM - Auto-detection of DRAM size, type and... no special specified, all H/W interrupts are MODBINable by a port & interface swap (optional) 3. Initialize 8042 self-test 1. Program basic chipset registers Detect memory - Auto detect ports for override Program chipset default values into BIOS stack. ...

Manual
Page 133
...ISA PnP initialization - Disable respective clock resource to CMOS setup Example: onboard IDE controller 4. Program CPU internal MTRR for channel 2 Test 8259 functionality Initialize EISA slot 1. Program early chipset according to empty PCI & DIMM slots 2. Measure CPU speed Invoke video BIOS 1. ... Init onboard H/W monitor devices Initialize INT 09 buffer 1. Program MTRR of each CPU are not identical Initialize USB Keyboard & Mouse Test all memory (clear all extended memory to 0) Clear password according to every ISA PnP device - 133 - If Early_Init_Onboard_Generator is not...
...ISA PnP initialization - Disable respective clock resource to CMOS setup Example: onboard IDE controller 4. Program CPU internal MTRR for channel 2 Test 8259 functionality Initialize EISA slot 1. Program early chipset according to empty PCI & DIMM slots 2. Measure CPU speed Invoke video BIOS 1. ... Init onboard H/W monitor devices Initialize INT 09 buffer 1. Program MTRR of each CPU are not identical Initialize USB Keyboard & Mouse Test all memory (clear all extended memory to 0) Clear password according to every ISA PnP device - 133 - If Early_Init_Onboard_Generator is not...