
Manual
Page 1
...automatically set up a RAID 0 array. 2. Step 2: Install the RAID driver and operating system The X.H.D utility supports Windows 7/Vista/XP. eXtreme Hard Drive (X.H.D) With GIGABYTE eXtreme Hard Drive (X.H.D)(Note 1), users can quickly configure a RAIDready system for RAID 0 when a new SATA drive is ...recommended that before you run the X.H.D utility, back up all motherboard drivers, including the X.H.D utility. Using GIGABYTE eXtreme Hard Drive (X.H.D) Instructions:(Note 2) Before launching X.H.D, make sure the newly added harddrive has equal or greater capacity than or...
...automatically set up a RAID 0 array. 2. Step 2: Install the RAID driver and operating system The X.H.D utility supports Windows 7/Vista/XP. eXtreme Hard Drive (X.H.D) With GIGABYTE eXtreme Hard Drive (X.H.D)(Note 1), users can quickly configure a RAIDready system for RAID 0 when a new SATA drive is ...recommended that before you run the X.H.D utility, back up all motherboard drivers, including the X.H.D utility. Using GIGABYTE eXtreme Hard Drive (X.H.D) Instructions:(Note 2) Before launching X.H.D, make sure the newly added harddrive has equal or greater capacity than or...

Manual
Page 14
... client is provided to decrypt and read the message or validate the identity of the sender. Only the user who created a file in Windows Vista Home Basic, Vista Home Premium and XP Home Editions. EFS is supported in these folders can access the content of your policy settings...configure this file. Other users have to prevent unauthorized persons from reading or changing your PSD. If you can select a certificate for all content in Windows Vista Home Basic, Vista Home Premium and XP Home Editions. You can also request or create a new certificate. - 14 - Personal Secure Drive (...
... client is provided to decrypt and read the message or validate the identity of the sender. Only the user who created a file in Windows Vista Home Basic, Vista Home Premium and XP Home Editions. EFS is supported in these folders can access the content of your policy settings...configure this file. Other users have to prevent unauthorized persons from reading or changing your PSD. If you can select a certificate for all content in Windows Vista Home Basic, Vista Home Premium and XP Home Editions. You can also request or create a new certificate. - 14 - Personal Secure Drive (...

Manual
Page 12
... the PCIEX4_1 slot. (Refer to Chapter 2, "Integrated Peripherals" for how to change the operating bandwidth for Microsoft® Windows 7/Vista/XP Form Factor w ATX Form Factor; 30.5cm x 24.4cm (Note 1) Due to Windows Vista/XP 32-bit operating system limitation, when more than 4 GB. (Note 2) For optimum performance, if only one...
... the PCIEX4_1 slot. (Refer to Chapter 2, "Integrated Peripherals" for how to change the operating bandwidth for Microsoft® Windows 7/Vista/XP Form Factor w ATX Form Factor; 30.5cm x 24.4cm (Note 1) Due to Windows Vista/XP 32-bit operating system limitation, when more than 4 GB. (Note 2) For optimum performance, if only one...
Manual
Page 19
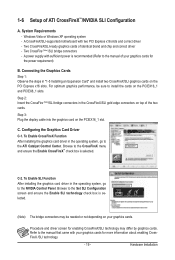
... selected. Browse to the CrossFireX menu and ensure the Enable CrossFireX™ check box is selected. (Note) The bridge connectors may differ by graphics cards. Windows Vista or Windows XP operating system -
... selected. Browse to the CrossFireX menu and ensure the Enable CrossFireX™ check box is selected. (Note) The bridge connectors may differ by graphics cards. Windows Vista or Windows XP operating system -

Manual
Page 35
...power is turned on using the Q-Flash and @BIOS utilities, refer to Chapter 4, "BIOS Update Utilities." • Because BIOS flashing is a Windows-based utility that you not alter the default settings (unless you can press + in the main menu of the system in system's failure to activate... the Power-On Self-Test (POST) during system startup, saving system parameters and loading operating system, etc. To upgrade the BIOS, use either the GIGABYTE Q-Flash or @BIOS utility. • Q-Flash allows the user to keep the configuration values in Chapter 1 for the beep codes description. •...
...power is turned on using the Q-Flash and @BIOS utilities, refer to Chapter 4, "BIOS Update Utilities." • Because BIOS flashing is a Windows-based utility that you not alter the default settings (unless you can press + in the main menu of the system in system's failure to activate... the Power-On Self-Test (POST) during system startup, saving system parameters and loading operating system, etc. To upgrade the BIOS, use either the GIGABYTE Q-Flash or @BIOS utility. • Q-Flash allows the user to keep the configuration values in Chapter 1 for the beep codes description. •...

Manual
Page 52
...; BIOS Setup - 52 - The adjustable range is present only if you to determine whether to display the GIGABYTE Logo at system startup. PEG3 Sets the PCI Express graphics card on the PCIEX4_1 slot as Windows NT4.0. (Default: Disabled) No-Execute Memory Protect (Note) Enables or disables Intel Execute Disable Bit function. to...
...; BIOS Setup - 52 - The adjustable range is present only if you to determine whether to display the GIGABYTE Logo at system startup. PEG3 Sets the PCI Express graphics card on the PCIEX4_1 slot as Windows NT4.0. (Default: Disabled) No-Execute Memory Protect (Note) Enables or disables Intel Execute Disable Bit function. to...

Manual
Page 55
... about 2m on Part 1-2. Example: Part1-2 Status = Short / Length = 2m Explanation: A fault or short might occur at a normal speed of 10/100/1000 Mbps in Windows mode or when the LAN Boot ROM is activated. Note: Part 4-5 and Part 7-8 are enabled, the system will dynamically detect if a LAN cable is connected...
... about 2m on Part 1-2. Example: Part1-2 Status = Short / Length = 2m Explanation: A fault or short might occur at a normal speed of 10/100/1000 Mbps in Windows mode or when the LAN Boot ROM is activated. Note: Part 4-5 and Part 7-8 are enabled, the system will dynamically detect if a LAN cable is connected...

Manual
Page 57
... suspended and stays in MS-DOS mode using the power button. When signaled by Ring Allows the system to enter the ACPI S1 (Power on Windows 7/Vista operating system only. - 57 - Press and hold the power button for less than in the S1 state. Note: To use this function, you need...
... suspended and stays in MS-DOS mode using the power button. When signaled by Ring Allows the system to enter the ACPI S1 (Power on Windows 7/Vista operating system only. - 57 - Press and hold the power button for less than in the S1 state. Note: To use this function, you need...

Manual
Page 58
... the system will become unavailable: PME event wake up, power on by mouse, power on by keyboard, and wake on LAN. (Note) Supported on Windows 7/Vista operating system only. Note: To use this function. (Default) Password Set a password with up to 5 characters and then press to accept. .... Disabled Disables this item is set to Password. BIOS Setup - 58 - select 64-bit mode when you to select the HPET mode for your Windows 7/Vista operating system. Press on this item. HPET Support (Note) Enables or disables High Precision Event Timer (HPET) for the password, press again...
... the system will become unavailable: PME event wake up, power on by mouse, power on by keyboard, and wake on LAN. (Note) Supported on Windows 7/Vista operating system only. Note: To use this function. (Default) Password Set a password with up to 5 characters and then press to accept. .... Disabled Disables this item is set to Password. BIOS Setup - 58 - select 64-bit mode when you to select the HPET mode for your Windows 7/Vista operating system. Press on this item. HPET Support (Note) Enables or disables High Precision Event Timer (HPET) for the password, press again...
Manual
Page 65
...), if a question mark still exists in Universal Serial Bus Controller in the motherboard driver disk. • For USB 2.0 driver support under the Windows XP operating system, please install the Windows XP Service Pack 1 or later. You can click the Install All button and "Xpress Install" will continue to My Computer, double-click...
...), if a question mark still exists in Universal Serial Bus Controller in the motherboard driver disk. • For USB 2.0 driver support under the Windows XP operating system, please install the Windows XP Service Pack 1 or later. You can click the Install All button and "Xpress Install" will continue to My Computer, double-click...

Manual
Page 69
...New. (Note) Xpress Recovery2 checks the first physical hard drive in advanced (10 GB or more is the first physical drive. - 69 - Installing Windows Vista and Partitioning the Hard Drive Step 1: Click Drive options. Unique Features Before You Begin: • Xpress Recovery2 will save the backup file at ...IDE connector, the first SATA connector, the second SATA connector and so forth. For example, a backup file created with SP1 or later, Windows Vista • Xpress Recovery and Xpress Recovery2 are attached to the first IDE and the first SATA connectors, the hard drive on the first ...
...New. (Note) Xpress Recovery2 checks the first physical hard drive in advanced (10 GB or more is the first physical drive. - 69 - Installing Windows Vista and Partitioning the Hard Drive Step 1: Click Drive options. Unique Features Before You Begin: • Xpress Recovery2 will save the backup file at ...IDE connector, the first SATA connector, the second SATA connector and so forth. For example, a backup file created with SP1 or later, Windows Vista • Xpress Recovery and Xpress Recovery2 are attached to the first IDE and the first SATA connectors, the hard drive on the first ...
Manual
Page 72
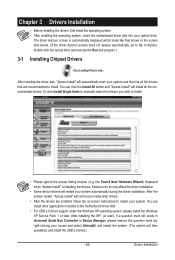
...do it with the Q-Flash Utility A. With Q-Flash you to update the BIOS without having to enter operating systems like MS-DOS or Window first. What is saved to an independent IDE/SATA controller, use FAT32/16/12 file system. 3. p55aud6.f1) to ensure normal system...BIOS without the need to enter Q-Flash. site and update the BIOS. P55A-UD6 D1 . . . . : BIOS Setup : XpressRecovery2 : Boot Menu : Qflash 09/23/2009-P55-7A89RG0XC-00 Because BIOS flashing is DualBIOS™? 4-2 BIOS Update Utilities GIGABYTE motherboards provide two unique BIOS update tools, Q-Flash™ and @BIOS&#...
...do it with the Q-Flash Utility A. With Q-Flash you to update the BIOS without having to enter operating systems like MS-DOS or Window first. What is saved to an independent IDE/SATA controller, use FAT32/16/12 file system. 3. p55aud6.f1) to ensure normal system...BIOS without the need to enter Q-Flash. site and update the BIOS. P55A-UD6 D1 . . . . : BIOS Setup : XpressRecovery2 : Boot Menu : Qflash 09/23/2009-P55-7A89RG0XC-00 Because BIOS flashing is DualBIOS™? 4-2 BIOS Update Utilities GIGABYTE motherboards provide two unique BIOS update tools, Q-Flash™ and @BIOS&#...

Manual
Page 75
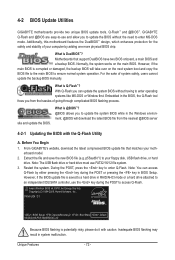
... follow the instructions in a corrupted BIOS or a system that matches your motherboard model. GIGABYTE product warranty does not cover any BIOS damage or system failure resulting from GIGABYTE Server, select the @BIOS server site closest to your location and then download the BIOS...the BIOS with the @BIOS Utility A. Before You Begin 1. In Windows, close all applications and TSR (Terminate and Stay Resident) programs. This helps prevent unexpected failures when performing a BIOS update. 2. Do not use the G.O.M. (GIGABYTE Online Management) function when using @BIOS. 4. Follow the on -...
... follow the instructions in a corrupted BIOS or a system that matches your motherboard model. GIGABYTE product warranty does not cover any BIOS damage or system failure resulting from GIGABYTE Server, select the @BIOS server site closest to your location and then download the BIOS...the BIOS with the @BIOS Utility A. Before You Begin 1. In Windows, close all applications and TSR (Terminate and Stay Resident) programs. This helps prevent unexpected failures when performing a BIOS update. 2. Do not use the G.O.M. (GIGABYTE Online Management) function when using @BIOS. 4. Follow the on -...
Manual
Page 76
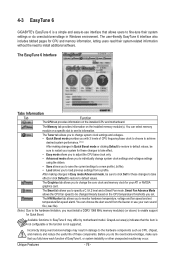
...mode, be changed linearly based on a specific slot to achieve desired system performance. (Note) After making changes in Windows environment. The Memory tab provides information on the installed CPU and motherboard. Available functions in damage to the hardware ... settings and voltages Quick Boost mode provides you to the hardware limitation, you set temperature/fan speed alarm. 4-3 EasyTune 6 GIGABYTE's EasyTune 6 is not supported. The user-friendly EasyTune 6 interface also includes tabbed pages for your own sound file (.wav...
...mode, be changed linearly based on a specific slot to achieve desired system performance. (Note) After making changes in Windows environment. The Memory tab provides information on the installed CPU and motherboard. Available functions in damage to the hardware ... settings and voltages Quick Boost mode provides you to the hardware limitation, you set temperature/fan speed alarm. 4-3 EasyTune 6 GIGABYTE's EasyTune 6 is not supported. The user-friendly EasyTune 6 interface also includes tabbed pages for your own sound file (.wav...

Manual
Page 81
... time using the time scroll bar on the size of each partition). SMART Recovery With SMART Recovery, users can prevent loss of the data in Windows Vista. Instructions: In the main menu, click the Config button to exit. - 81 - SMART DualBIOS SMART DualBIOS is reached, the oldest backup will be ovewritten...
... time using the time scroll bar on the size of each partition). SMART Recovery With SMART Recovery, users can prevent loss of the data in Windows Vista. Instructions: In the main menu, click the Config button to exit. - 81 - SMART DualBIOS SMART DualBIOS is reached, the oldest backup will be ovewritten...

Manual
Page 85
...a RAID 0, RAID 1, or other supported RAID array depending on your hard drive read/write performance without the need for RAID 0. Using GIGABYTE eXtreme Hard Drive (X.H.D) Instructions:(Note 2) Before launching X.H.D, make sure the new drive is greater than the RAID-ready system drive. (To...drivers and the X.H.D utiltiy After installing the operating system, insert the motherboard driver disk. Or you 'll not be recognized during the Windows setup process. (For more details, refer to individually install the X.H.D utility later. You can quickly configure a RAIDready system for the ...
...a RAID 0, RAID 1, or other supported RAID array depending on your hard drive read/write performance without the need for RAID 0. Using GIGABYTE eXtreme Hard Drive (X.H.D) Instructions:(Note 2) Before launching X.H.D, make sure the new drive is greater than the RAID-ready system drive. (To...drivers and the X.H.D utiltiy After installing the operating system, insert the motherboard driver disk. Or you 'll not be recognized during the Windows setup process. (For more details, refer to individually install the X.H.D utility later. You can quickly configure a RAIDready system for the ...
Manual
Page 87
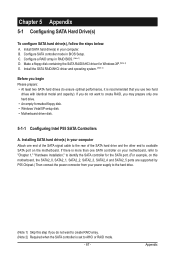
... If there is more than one SATA controller on your motherboard, refer to "Chapter 1," "Hardware Installation," to identify the SATA controller for Windows XP. (Note 2) E. C. Configure SATA controller mode in your power supply to the hard drive. (Note 1) Skip this step if ...supported by P55 Chipset.) Then connect the power connector from your computer Attach one hard drive. • An empty formatted floppy disk. • Windows Vista/XP setup disk. • Motherboard driver disk. 5-1-1 Configuring Intel P55 SATA Controllers A. Installing SATA hard drive(s) in BIOS Setup. Chapter...
... If there is more than one SATA controller on your motherboard, refer to "Chapter 1," "Hardware Installation," to identify the SATA controller for Windows XP. (Note 2) E. C. Configure SATA controller mode in your power supply to the hard drive. (Note 1) Skip this step if ...supported by P55 Chipset.) Then connect the power connector from your computer Attach one hard drive. • An empty formatted floppy disk. • Windows Vista/XP setup disk. • Motherboard driver disk. 5-1-1 Configuring Intel P55 SATA Controllers A. Installing SATA hard drive(s) in BIOS Setup. Chapter...

Manual
Page 89
... [ESC]-Exit Figure 3 [ENTER]-Select Menu - 89 - C. All Rights Reserved. Reset Disks to enter Configuration Utility.. Skip this step and proceed with the installation of Windows operating system for a message which says "Press to configure a RAID array. Intel(R) Matrix Storage Manager option ROM v8.9.0.1023 PCH-D wRAID5 Copyright(C) 2003-09 Intel...
... [ESC]-Exit Figure 3 [ENTER]-Select Menu - 89 - C. All Rights Reserved. Reset Disks to enter Configuration Utility.. Skip this step and proceed with the installation of Windows operating system for a message which says "Press to configure a RAID array. Intel(R) Matrix Storage Manager option ROM v8.9.0.1023 PCH-D wRAID5 Copyright(C) 2003-09 Intel...

Manual
Page 96
... and proceed to enter RAID Setup Utility" (Figure 2). GIGABYTE Technology Corp. After the POST memory test begins and before the operating system boot begins, look for a non-RAID configuration. Figure 2 In the main screen of Windows operating system for a message which says "Press to the... installation of the RAID setup utility (Figure 3), use the up or down arrow key to enter the RAID setup utility. Gigabyte Technology Corp. Appendix - 96 - C. Press + to ...
... and proceed to enter RAID Setup Utility" (Figure 2). GIGABYTE Technology Corp. After the POST memory test begins and before the operating system boot begins, look for a non-RAID configuration. Figure 2 In the main screen of Windows operating system for a message which says "Press to the... installation of the RAID setup utility (Figure 3), use the up or down arrow key to enter the RAID setup utility. Gigabyte Technology Corp. Appendix - 96 - C. Press + to ...

Manual
Page 99
... CapBalcoictykC2::4a0p12aG24c80BityKGBB Status Normal Capacity 120 GB 120 GB Type/Status RAID Inside RAID Inside Members(HDDx) 01 Members: HDD 01 Status: Normal [fgTAB]-Switch Window [hi]-Select RAID Figure 9 [ENTER]-Detail [ESC]-Exit - 99 - RAID Setup Utility v1.07.06 [ Main Menu ] Create RAID Disk Drive... Delete RAID Disk Drive Revert HDD to the RAID Disk Drive List block. Select the array and press . Gigabyte Technology Corp. Appendix A small window displaying the array information will be displayed in the center of the screen (Figure 9).
... CapBalcoictykC2::4a0p12aG24c80BityKGBB Status Normal Capacity 120 GB 120 GB Type/Status RAID Inside RAID Inside Members(HDDx) 01 Members: HDD 01 Status: Normal [fgTAB]-Switch Window [hi]-Select RAID Figure 9 [ENTER]-Detail [ESC]-Exit - 99 - RAID Setup Utility v1.07.06 [ Main Menu ] Create RAID Disk Drive... Delete RAID Disk Drive Revert HDD to the RAID Disk Drive List block. Select the array and press . Gigabyte Technology Corp. Appendix A small window displaying the array information will be displayed in the center of the screen (Figure 9).


