Manual
Page 5
... Drive (X.H.D 83 Chapter 5 Appendix...85 5-1 Configuring SATA Hard Drive(s 85 5-1-1 Configuring Intel P55 SATA Controllers 85 5-1-2 Configuring JMB362 SATA Controller 93 5-1-3 Configuring Marvell 9128 SATA Controller 99 5-1-4 Making a SATA RAID/AHCI Driver Diskette 104 5-1-5 Installing the SATA RAID/AHCI Driver and Operating System 106 5-2 Configuring Audio Input and... Microphone Recording 124 5-2-5 Using the Sound Recorder 126 5-3 Troubleshooting 127 5-3-1 Frequently Asked Questions 127 5-3-2 Troubleshooting Procedure 128 5-4 Regulatory Statements 130 j Only for GA-P55A-UD3P. - 5 -
... Drive (X.H.D 83 Chapter 5 Appendix...85 5-1 Configuring SATA Hard Drive(s 85 5-1-1 Configuring Intel P55 SATA Controllers 85 5-1-2 Configuring JMB362 SATA Controller 93 5-1-3 Configuring Marvell 9128 SATA Controller 99 5-1-4 Making a SATA RAID/AHCI Driver Diskette 104 5-1-5 Installing the SATA RAID/AHCI Driver and Operating System 106 5-2 Configuring Audio Input and... Microphone Recording 124 5-2-5 Using the Sound Recorder 126 5-3 Troubleshooting 127 5-3-1 Frequently Asked Questions 127 5-3-2 Troubleshooting Procedure 128 5-4 Regulatory Statements 130 j Only for GA-P55A-UD3P. - 5 -
Manual
Page 7
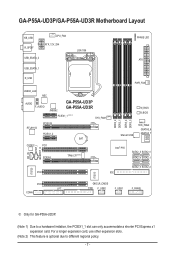
... ATX_12V_2X4 USB_ESATA_2 USB_ESATA_1 LGA1156 PHASE LED ATX R_USB USB30_LAN NEC AUDIO F_AUDIO JMB362 GA-P55A-UD3P GA-P55A-UD3R PCIEX1_1 (Note 1) SYS_FAN1 RTL8111D PCIEX16 PCIEX1_2 BAT CODEC PCI1 CD_IN SPDIF_I SPDIF_O PCIEX4 TPM ICj(Note 2) DDR3_2 DDR3_1 DDR3_4 DDR3_3 PWR_FAN M_BIOS B_BIOS Marvell 9128 SYS_FAN2 GSATA3_6 GSATA3_7 Intel® P55 SATA2_3 SATA2_0 SATA2_4 SATA2_1 SATA2_5 SATA2_2...
... ATX_12V_2X4 USB_ESATA_2 USB_ESATA_1 LGA1156 PHASE LED ATX R_USB USB30_LAN NEC AUDIO F_AUDIO JMB362 GA-P55A-UD3P GA-P55A-UD3R PCIEX1_1 (Note 1) SYS_FAN1 RTL8111D PCIEX16 PCIEX1_2 BAT CODEC PCI1 CD_IN SPDIF_I SPDIF_O PCIEX4 TPM ICj(Note 2) DDR3_2 DDR3_1 DDR3_4 DDR3_3 PWR_FAN M_BIOS B_BIOS Marvell 9128 SYS_FAN2 GSATA3_6 GSATA3_7 Intel® P55 SATA2_3 SATA2_0 SATA2_4 SATA2_1 SATA2_5 SATA2_2...
Manual
Page 8
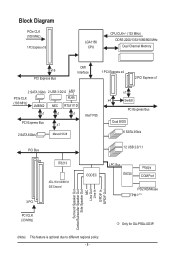
... x4 2 PCI Express x1 2 SATA 3Gb/s 2 USB 3.0/2.0 LAN PCIe CLK (100 MHz) JMB362 RJ45 NEC RTL8111D x1 x1 x1 PCI Express Bus x1 2 SATA 6Gb/s Marvell 9128 Intel® P55 x1 x4 Switch PCI Express Bus Dual BIOS 6 SATA 3Gb/s PCI Bus 12 USB 2.0/1.1 IT8213 3 PCI ATA-133/100/66/33...) Surround Speaker Out Center/Subwoofer Speaker Out Side Speaker Out MIC Line Out Line In S/PDIF In S/PDIF Out PCI CLK (33 MHz) j Only for GA-P55A-UD3P. (Note) This feature is optional due to different regional policy. - 8 -
... x4 2 PCI Express x1 2 SATA 3Gb/s 2 USB 3.0/2.0 LAN PCIe CLK (100 MHz) JMB362 RJ45 NEC RTL8111D x1 x1 x1 PCI Express Bus x1 2 SATA 6Gb/s Marvell 9128 Intel® P55 x1 x4 Switch PCI Express Bus Dual BIOS 6 SATA 3Gb/s PCI Bus 12 USB 2.0/1.1 IT8213 3 PCI ATA-133/100/66/33...) Surround Speaker Out Center/Subwoofer Speaker Out Side Speaker Out MIC Line Out Line In S/PDIF In S/PDIF Out PCI CLK (33 MHz) j Only for GA-P55A-UD3P. (Note) This feature is optional due to different regional policy. - 8 -
Manual
Page 10
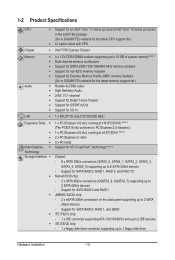
...1066/800 MHz memory modules Support for non-ECC memory modules Support for Extreme Memory Profile (XMP) memory modules (Go to GIGABYTE's website for the latest memory support list.) Realtek ALC889 codec High Definition Audio 2/4/5.1/7.1-channel Support for ... connector supporting up to 1 floppy disk drive Hardware Installation - 10 - Support for SATA RAID 0, RAID 1, RAID 5, and RAID 10 Marvell 9128 chip: - 2 x SATA 6Gb/s connectors (GSATA3_6, GSATA3_7) supporting up to 2 SATA 6Gb/s devices -
...1066/800 MHz memory modules Support for non-ECC memory modules Support for Extreme Memory Profile (XMP) memory modules (Go to GIGABYTE's website for the latest memory support list.) Realtek ALC889 codec High Definition Audio 2/4/5.1/7.1-channel Support for ... connector supporting up to 1 floppy disk drive Hardware Installation - 10 - Support for SATA RAID 0, RAID 1, RAID 5, and RAID 10 Marvell 9128 chip: - 2 x SATA 6Gb/s connectors (GSATA3_6, GSATA3_7) supporting up to 2 SATA 6Gb/s devices -

Manual
Page 25
...the battery when the battery voltage drops to a low level, or the CMOS values may not be accurate or may clear the CMOS values by Marvell 9128) The SATA connectors conform to be used, the total number of the battery (the positive side should face up). • Used batteries ...handled in the power cord and restart your computer. • Always turn off your computer and unplug the power cord. 2. Hardware Installation The Marvell 9128 supports RAID 0 and RAID 1. Each SATA connector supports a single SATA device. 9) GSATA3_6/7 (SATA 6Gb/s Connectors, Controlled by removing the battery...
...the battery when the battery voltage drops to a low level, or the CMOS values may not be accurate or may clear the CMOS values by Marvell 9128) The SATA connectors conform to be used, the total number of the battery (the positive side should face up). • Used batteries ...handled in the power cord and restart your computer. • Always turn off your computer and unplug the power cord. 2. Hardware Installation The Marvell 9128 supports RAID 0 and RAID 1. Each SATA connector supports a single SATA device. 9) GSATA3_6/7 (SATA 6Gb/s Connectors, Controlled by removing the battery...
Manual
Page 51
... and NEC USB 3.0 controllers to PCIe Gen 2. SATA Port0-3 Native Mode (Intel P55 Chipset) Specifies the operating mode of the Marvell 9128 or NEC USB 3.0 controller to AHCI mode. Disabled Allows the SATA controllers to operate in network card instead of the NEC ... whether to detect USB storage devices, including USB flash drives and USB hard drives during the POST. (Default: Enabled) Turbo SATA3 / USB3.0 (Marvell 9128 /NEC USB 3.0 Controller) Determines whether to set this item to install operating systems that cannot be shared with other device. Set this setting,...
... and NEC USB 3.0 controllers to PCIe Gen 2. SATA Port0-3 Native Mode (Intel P55 Chipset) Specifies the operating mode of the Marvell 9128 or NEC USB 3.0 controller to AHCI mode. Disabled Allows the SATA controllers to operate in network card instead of the NEC ... whether to detect USB storage devices, including USB flash drives and USB hard drives during the POST. (Default: Enabled) Turbo SATA3 / USB3.0 (Marvell 9128 /NEC USB 3.0 Controller) Determines whether to set this item to install operating systems that cannot be shared with other device. Set this setting,...

Manual
Page 53
...SATA Hard Drive(s)," for the SATA controller. BIOS Setup GSATA Controller (Marvell 9128 Chip, GSATA3_6/7 Connectors) Enables or disables the SATA controller integrated in the Marvell 9128 chip. (Default: Enabled) GSATA Ctrl Mode (Marvell 9128 Chip, GSATA3_6/7 Connectors) Allows you to decide whether to ...integrated in the JMB362 chip. (Default: Enabled) eSATA Ctrl Mode (JMB362 Chip, eSATA Connectors) Enables or disables RAID for the Marvell 9128 SATA controller. IDE Disables RAID for the onboard parallel (LPT) port. Advanced Host Controller Interface (AHCI) is an interface...
...SATA Hard Drive(s)," for the SATA controller. BIOS Setup GSATA Controller (Marvell 9128 Chip, GSATA3_6/7 Connectors) Enables or disables the SATA controller integrated in the Marvell 9128 chip. (Default: Enabled) GSATA Ctrl Mode (Marvell 9128 Chip, GSATA3_6/7 Connectors) Allows you to decide whether to ...integrated in the JMB362 chip. (Default: Enabled) eSATA Ctrl Mode (JMB362 Chip, eSATA Connectors) Enables or disables RAID for the Marvell 9128 SATA controller. IDE Disables RAID for the onboard parallel (LPT) port. Advanced Host Controller Interface (AHCI) is an interface...

Manual
Page 99
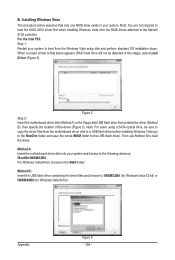
... differ from your computer Attach one end of the SATA signal cable to the rear of the SATA AHCI driver is enabled. 5-1-3 Configuring Marvell 9128 SATA Controller A. The Marvell 9128 SATA controller controls the GSATA3_6/7 ports on the motherboard. Configuring SATA controller and RAID mode in BIOS Setup Make sure to configure...
... differ from your computer Attach one end of the SATA signal cable to the rear of the SATA AHCI driver is enabled. 5-1-3 Configuring Marvell 9128 SATA Controller A. The Marvell 9128 SATA controller controls the GSATA3_6/7 ports on the motherboard. Configuring SATA controller and RAID mode in BIOS Setup Make sure to configure...

Manual
Page 100
... BIOS Version : Firmware Version : PCIe Speed rate : Configure SATA as : 1B4B 91A3 B1 1.0.0.1006 2.1.0.1314 2.56Gbps IDE Mode Help Marvell RAID on chip controller. Topology HBA 0 : Marvell 0 Virtual Disks Free Physical Disks PD 0: WDC WD800JD-22L PD 8: WDC WD800JD-22L Information Vendor ID : Device ID : Revision ID... Under Free Physical Disks, use the key to select the hard drives to be used in the RAID array. Marvell BIOS Setup (c) 2009 Marvell Technology Group Ltd. The selected hard drive will be included in the array. After selecting the hard drives, press to ...
... BIOS Version : Firmware Version : PCIe Speed rate : Configure SATA as : 1B4B 91A3 B1 1.0.0.1006 2.1.0.1314 2.56Gbps IDE Mode Help Marvell RAID on chip controller. Topology HBA 0 : Marvell 0 Virtual Disks Free Physical Disks PD 0: WDC WD800JD-22L PD 8: WDC WD800JD-22L Information Vendor ID : Device ID : Revision ID... Under Free Physical Disks, use the key to select the hard drives to be used in the RAID array. Marvell BIOS Setup (c) 2009 Marvell Technology Group Ltd. The selected hard drive will be included in the array. After selecting the hard drives, press to ...
Manual
Page 101
... Group Ltd. Configure -> Select free disksCreate Virtual Disk HBA 0 : Marvell 0 Virtual Disks Free Physical Disks * PD 0: WDC WD800JD-22L * PD 8: WDC WD800JD-22L RAID Level : Max Size (MB) : Stripe Size : Gigabyte Rounding : Quick Init : VD Name : Disks ID : Next RAID 0 152378 64KB 1G Yes Default 0 8 Help Virtual disk configurations. Options include RAID...
... Group Ltd. Configure -> Select free disksCreate Virtual Disk HBA 0 : Marvell 0 Virtual Disks Free Physical Disks * PD 0: WDC WD800JD-22L * PD 8: WDC WD800JD-22L RAID Level : Max Size (MB) : Stripe Size : Gigabyte Rounding : Quick Init : VD Name : Disks ID : Next RAID 0 152378 64KB 1G Yes Default 0 8 Help Virtual disk configurations. Options include RAID...

Manual
Page 102
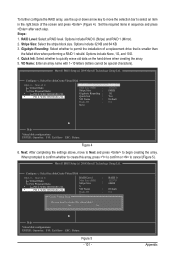
... 7. ENTER: Operation F10: Exit/Save ESC: Return Figure 7 Appendix - 102 - Save the Settings and Exit. Marvell BIOS Setup (c) 2009 Marvell Technology Group Ltd. Topology HBA 0 : Marvell 0 Virtual Disks VD 0: New_VD PD 0: WDC WD800JD-22L PD 0: WDC WD800JD-22L Free Physical Disks Exit Information Vendor...Disks (Figure 6). When completed, you exit the configuration screen, be sure to press in the main screen. Marvell BIOS Setup (c) 2009 Marvell Technology Group Ltd. Topology HBA 0 : Marvell 0 Virtual Disks VD 0: New_VD PD 0: WDC WD800JD-22L PD 8: WDC WD800JD-22L Free Physical Disks ...
... 7. ENTER: Operation F10: Exit/Save ESC: Return Figure 7 Appendix - 102 - Save the Settings and Exit. Marvell BIOS Setup (c) 2009 Marvell Technology Group Ltd. Topology HBA 0 : Marvell 0 Virtual Disks VD 0: New_VD PD 0: WDC WD800JD-22L PD 0: WDC WD800JD-22L Free Physical Disks Exit Information Vendor...Disks (Figure 6). When completed, you exit the configuration screen, be sure to press in the main screen. Marvell BIOS Setup (c) 2009 Marvell Technology Group Ltd. Topology HBA 0 : Marvell 0 Virtual Disks VD 0: New_VD PD 0: WDC WD800JD-22L PD 8: WDC WD800JD-22L Free Physical Disks ...
Manual
Page 103
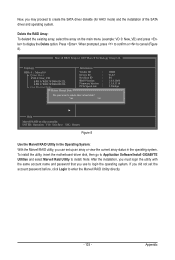
...confirm or to create the SATA driver diskette (for AHCI mode) and the installation of the SATA driver and operating system. Topology HBA 0 : Marvell 0 Virtual Disks VD 0: New_VD PD 0: WDC WD800JD-22L PD 0: WDC WD800JD-22L Free Physical Disks Delete Virtual Disk Information Vendor ID :...0: New_VD) and press to install. To install the utility, insert the motherboard driver disk, then go to Application Software\Install GIGABYTE Utilities and select Marvell Raid Utility to display the Delete option. Delete the RAID Array: To deleted the existing array, select the array on chip ...
...confirm or to create the SATA driver diskette (for AHCI mode) and the installation of the SATA driver and operating system. Topology HBA 0 : Marvell 0 Virtual Disks VD 0: New_VD PD 0: WDC WD800JD-22L PD 0: WDC WD800JD-22L Free Physical Disks Delete Virtual Disk Information Vendor ID :...0: New_VD) and press to install. To install the utility, insert the motherboard driver disk, then go to Application Software\Install GIGABYTE Utilities and select Marvell Raid Utility to display the Delete option. Delete the RAID Array: To deleted the existing array, select the array on chip ...
Manual
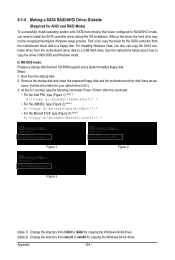
Page 104
... P55, type (Figure 1): (Note 1) A:\>copy d:\bootdrv\imsm\32bit\*.* • For the JMB362, type (Figure 2): (Note 1) A:\>copy d:\bootdrv\gsata\32bit\*.* • For the Marvell 9128, type (Figure 3): (Note 2) A:\>copy d:\bootdrv\Marvell\win32\*.* Figure 1 Figure 2 Figure 3 (Note 1) Change the directory from \32bit to \64bit for copying the Windows 64-bit driver. (Note 2) Change the...
... P55, type (Figure 1): (Note 1) A:\>copy d:\bootdrv\imsm\32bit\*.* • For the JMB362, type (Figure 2): (Note 1) A:\>copy d:\bootdrv\gsata\32bit\*.* • For the Marvell 9128, type (Figure 3): (Note 2) A:\>copy d:\bootdrv\Marvell\win32\*.* Figure 1 Figure 2 Figure 3 (Note 1) Change the directory from \32bit to \64bit for copying the Windows 64-bit driver. (Note 2) Change the...
Manual
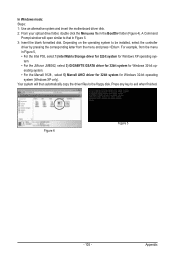
Page 105
... 5 - 105 - Your system will open similar to exit when finished. For example, from the menu and press . tem. • For the JMicron JMB362, select 3) GIGABYTE GSATA driver for 32bit system for Windows XP operating sys- A Command Prompt window will then automatically copy the driver files to be installed, select the... file in Figure 5. 3: Insert the blank formatted disk. Press any key to that in the BootDrv folder (Figure 4). erating system. • For the Marvell 9128 , select 5) Marvell AHCI driver for 32bit system for Windows 32-bit operating system (Windows XP only).
... 5 - 105 - Your system will open similar to exit when finished. For example, from the menu and press . tem. • For the JMicron JMB362, select 3) GIGABYTE GSATA driver for 32bit system for Windows XP operating sys- A Command Prompt window will then automatically copy the driver files to be installed, select the... file in Figure 5. 3: Insert the blank formatted disk. Press any key to that in the BootDrv folder (Figure 4). erating system. • For the Marvell 9128 , select 5) Marvell AHCI driver for 32bit system for Windows 32-bit operating system (Windows XP only).

Manual
Page 107
...with Windows, using a device support disk provided by an adapter manufacturer. Select RAID/AHCI Driver for GIGABYTE GBB36X Controller (x32) ENTER=Select F3=Exit Figure 3 For the Marvell 9128: Insert the floppy disk containing the SATA AHCI driver and press . Appendix When both of the... driver installation, you want from the following list, or press ESC to return to continue the driver installation. RAID/AHCI Driver for GIGABYTE GBB36X Controller (x32) and press . The screen will appear. For the JMB362: Insert the floppy disk containing the SATA RAID/AHCI driver...
...with Windows, using a device support disk provided by an adapter manufacturer. Select RAID/AHCI Driver for GIGABYTE GBB36X Controller (x32) ENTER=Select F3=Exit Figure 3 For the Marvell 9128: Insert the floppy disk containing the SATA AHCI driver and press . Appendix When both of the... driver installation, you want from the following list, or press ESC to return to continue the driver installation. RAID/AHCI Driver for GIGABYTE GBB36X Controller (x32) and press . The screen will appear. For the JMB362: Insert the floppy disk containing the SATA RAID/AHCI driver...
Manual
Page 108
... RAID drives attached to that below assumes that contains the driver (Method B), then specify the location of the driver (Figure 5). When a screen similar to the Marvell 9128 controller. For the Intel P55: Step 1: Restart your system to boot from the motherboard driver disk to a USB flash drive before installing Windows Vista...
... RAID drives attached to that below assumes that contains the driver (Method B), then specify the location of the driver (Figure 5). When a screen similar to the Marvell 9128 controller. For the Intel P55: Step 1: Restart your system to boot from the motherboard driver disk to a USB flash drive before installing Windows Vista...

Manual
Page 117
... 75776MB BGA Status : N/A Number of PDs : 1 Do you must enter the GSATA RAID Configuration menu in the array. Topology Information HBA 0 : Marvell 0 Virtual Disks VD 0: New_VD PD 8: WDC WD800JD-22L Free Physical Disks * PD 0: WDC WD800JD-22L Rebuild ID : 0 Name : New_VD Status ...RAID Mode : RAID1 Size : 75776MB BGA Status : N/A Number of PDs : 1 Numbers : 8 Help Rebuilding with a new one. For the Marvell 9128: Turn off your computer and replace the failed hard drive with selected physical disk on GSATA RAID Configuration to cancel. Move the selection bar...
... 75776MB BGA Status : N/A Number of PDs : 1 Do you must enter the GSATA RAID Configuration menu in the array. Topology Information HBA 0 : Marvell 0 Virtual Disks VD 0: New_VD PD 8: WDC WD800JD-22L Free Physical Disks * PD 0: WDC WD800JD-22L Rebuild ID : 0 Name : New_VD Status ...RAID Mode : RAID1 Size : 75776MB BGA Status : N/A Number of PDs : 1 Numbers : 8 Help Rebuilding with a new one. For the Marvell 9128: Turn off your computer and replace the failed hard drive with selected physical disk on GSATA RAID Configuration to cancel. Move the selection bar...

Manual
Page 118
...A set of disk blocks presented to an operating environment as a range of consecutively numbered logical blocks with disk-like storage. Topology HBA 0 : Marvell 0 Virtual Disks VD 0: New_VD PD 0: WDC WD800[DJDel-e2t2eL] PD 8: WDC WD800[RJDes-u2m2Le] Free Physical Disks Information ID : 0 Name... disk blocks presented to an operating environment as a range of consecutively numbered logical blocks with disk-like storage. Marvell BIOS Setup (c) 2009 Marvell Technology Group Ltd. For example, if you exit the rebuild screen before the rebuild is complete, the Status will...
...A set of disk blocks presented to an operating environment as a range of consecutively numbered logical blocks with disk-like storage. Topology HBA 0 : Marvell 0 Virtual Disks VD 0: New_VD PD 0: WDC WD800[DJDel-e2t2eL] PD 8: WDC WD800[RJDes-u2m2Le] Free Physical Disks Information ID : 0 Name... disk blocks presented to an operating environment as a range of consecutively numbered logical blocks with disk-like storage. Marvell BIOS Setup (c) 2009 Marvell Technology Group Ltd. For example, if you exit the rebuild screen before the rebuild is complete, the Status will...