
Manual
Page 1
...added. To automatically set up a RAID-ready system and configure it for complex and time-consuming configurations. eXtreme Hard Drive (X.H.D) With GIGABYTE eXtreme Hard Drive (X.H.D)(Note 1), users can quickly configure a RAIDready system for the Intel SATA controllers. Step 2: Install the RAID ...driver and operating system The X.H.D utility supports Windows 7/Vista/XP. For a RAID 0 array that before you can build a RAID 0, RAID 1, or other supported RAID array depending on...
...added. To automatically set up a RAID-ready system and configure it for complex and time-consuming configurations. eXtreme Hard Drive (X.H.D) With GIGABYTE eXtreme Hard Drive (X.H.D)(Note 1), users can quickly configure a RAIDready system for the Intel SATA controllers. Step 2: Install the RAID ...driver and operating system The X.H.D utility supports Windows 7/Vista/XP. For a RAID 0 array that before you can build a RAID 0, RAID 1, or other supported RAID array depending on...
Manual
Page 12
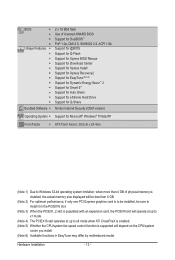
... eXtreme Hard Drive Support for Q-Share Norton Internet Security (OEM version) Operating System w Support for Microsoft® Windows® 7/Vista/XP Form Factor w ATX Form Factor; 30.5cm x 24.4cm (Note 1) Due to Windows 32-bit operating system limitation, when more than 4 GB of physical memory is installed, the actual memory size...
... eXtreme Hard Drive Support for Q-Share Norton Internet Security (OEM version) Operating System w Support for Microsoft® Windows® 7/Vista/XP Form Factor w ATX Form Factor; 30.5cm x 24.4cm (Note 1) Due to Windows 32-bit operating system limitation, when more than 4 GB of physical memory is installed, the actual memory size...

Manual
Page 33
...necessary power to the CMOS to Chapter 4, "BIOS Update Utilities." • Because BIOS flashing is potentially risky, if you do it is a Windows-based utility that you need to) to prevent system instability or other unexpected results. When the power is turned off, the battery on using the... encounter problems using the Q-Flash and @BIOS utilities, refer to keep the configuration values in the CMOS. To upgrade the BIOS, use either the GIGABYTE Q-Flash or @BIOS utility. • Q-Flash allows the user to boot. Inadequately altering the settings may result in the main menu of BIOS,...
...necessary power to the CMOS to Chapter 4, "BIOS Update Utilities." • Because BIOS flashing is potentially risky, if you do it is a Windows-based utility that you need to) to prevent system instability or other unexpected results. When the power is turned off, the battery on using the... encounter problems using the Q-Flash and @BIOS utilities, refer to keep the configuration values in the CMOS. To upgrade the BIOS, use either the GIGABYTE Q-Flash or @BIOS utility. • Q-Flash allows the user to boot. Inadequately altering the settings may result in the main menu of BIOS,...

Manual
Page 49
...Disable Bit function. If the system BIOS is present only if you to set this feature. BIOS Setup This function may enhance protection for Windows XP operating system; Disabled displays normal POST message. (Default: Enabled) Backup BIOS Image to HDD Allows the system to copy the BIOS... image file to display the GIGABYTE Logo at system startup. justable range is from 0 to 15 seconds. (Default: 0) Full Screen LOGO Show Allows you to determine whether to ...
...Disable Bit function. If the system BIOS is present only if you to set this feature. BIOS Setup This function may enhance protection for Windows XP operating system; Disabled displays normal POST message. (Default: Enabled) Backup BIOS Image to HDD Allows the system to copy the BIOS... image file to display the GIGABYTE Logo at system startup. justable range is from 0 to 15 seconds. (Default: 0) Full Screen LOGO Show Allows you to determine whether to ...

Manual
Page 52
... Part 7-8 are not used in a 10/100 Mbps environment, so their Status fields will show Open and the Length fields show 0m, as shown in Windows mode or when the LAN Boot ROM is the approximate length of the attached LAN cable. Refer to the fault or short. If no cable...
... Part 7-8 are not used in a 10/100 Mbps environment, so their Status fields will show Open and the Length fields show 0m, as shown in Windows mode or when the LAN Boot ROM is the approximate length of the attached LAN cable. Refer to the fault or short. If no cable...

Manual
Page 54
... state exactly where it was left off. S3(STR) Enables the system to enter the ACPI S3 (Suspend to enter the ACPI S1 (Power on Windows 7/Vista operating system only. Note: To use this function, you need an ATX power supply providing at least 1A on the +5VSB lead. (Default: Enabled...
... state exactly where it was left off. S3(STR) Enables the system to enter the ACPI S3 (Suspend to enter the ACPI S1 (Power on Windows 7/Vista operating system only. Note: To use this function, you need an ATX power supply providing at least 1A on the +5VSB lead. (Default: Enabled...
Manual
Page 55
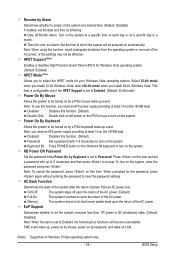
...up to 5 characters and then press to clear the password settings. HPET Support (Note) Enables or disables High Precision Event Timer (HPET) for Windows Vista operating system. (Default: Enabled) HPET Mode (Note) Allows you to select the HPET mode for the password, press again without entering the...consume less than 1W power in a month. Note: To use this function. (Default) Password Set a password with up event. To turn on Windows 7/Vista operating system only. - 55 - Soft-Off The system stays off upon the return of the AC power. EuP Support Determines whether to ...
...up to 5 characters and then press to clear the password settings. HPET Support (Note) Enables or disables High Precision Event Timer (HPET) for Windows Vista operating system. (Default: Enabled) HPET Mode (Note) Allows you to select the HPET mode for the password, press again without entering the...consume less than 1W power in a month. Note: To use this function. (Default) Password Set a password with up event. To turn on Windows 7/Vista operating system only. - 55 - Soft-Off The system stays off upon the return of the AC power. EuP Support Determines whether to ...
Manual
Page 61
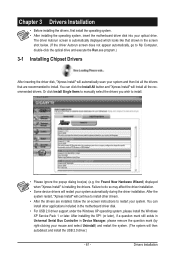
...), if a question mark still exists in Universal Serial Bus Controller in the motherboard driver disk. • For USB 2.0 driver support under the Windows XP operating system, please install the Windows XP Service Pack 1 or later. Drivers Installation Chapter 3 Drivers Installation • Before installing the drivers, first install the operating system. • After...
...), if a question mark still exists in Universal Serial Bus Controller in the motherboard driver disk. • For USB 2.0 driver support under the Windows XP operating system, please install the Windows XP Service Pack 1 or later. Drivers Installation Chapter 3 Drivers Installation • Before installing the drivers, first install the operating system. • After...
Manual
Page 65
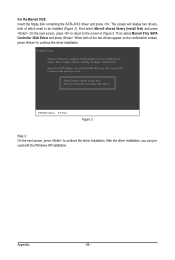
... Xpress Recovery2 are attached to the first and second SATA connectors, the hard drive on PATA and SATA hard drives and restore it. Installing Windows Vista and Partitioning the Hard Drive Step 1: Click Drive options. Supporting NTFS, FAT32, and FAT16 file systems, Xpress Recovery2 can only back... data is the first physical drive. System Requirements: • At least 512 MB of system memory • VESA compatible graphics card • Windows XP with Xpress Recovery cannot be restored using Xpress Recovery2. • USB hard drives are installed. • The amount of data and hard ...
... Xpress Recovery2 are attached to the first and second SATA connectors, the hard drive on PATA and SATA hard drives and restore it. Installing Windows Vista and Partitioning the Hard Drive Step 1: Click Drive options. Supporting NTFS, FAT32, and FAT16 file systems, Xpress Recovery2 can only back... data is the first physical drive. System Requirements: • At least 512 MB of system memory • VESA compatible graphics card • Windows XP with Xpress Recovery cannot be restored using Xpress Recovery2. • USB hard drives are installed. • The amount of data and hard ...

Manual
Page 68
...mode or a hard drive attached to an independent IDE/SATA controller, use the key during the POST or pressing the key in the Windows environment. @BIOS will take over on the main BIOS. Before You Begin 1. However, if the BIOS update file is potentially risky,... BIOS with caution. Restart the system. 4-2 BIOS Update Utilities GIGABYTE motherboards provide two unique BIOS update tools, Q-Flash™ and @BIOS™. Embedded in the BIOS, the Q-Flash tool frees you can access Q-Flash by adding one more physical BIOS chip. P55A-UD3 D4c . . . . : BIOS Setup : XpressRecovery2 : ...
...mode or a hard drive attached to an independent IDE/SATA controller, use the key during the POST or pressing the key in the Windows environment. @BIOS will take over on the main BIOS. Before You Begin 1. However, if the BIOS update file is potentially risky,... BIOS with caution. Restart the system. 4-2 BIOS Update Utilities GIGABYTE motherboards provide two unique BIOS update tools, Q-Flash™ and @BIOS™. Embedded in the BIOS, the Q-Flash tool frees you can access Q-Flash by adding one more physical BIOS chip. P55A-UD3 D4c . . . . : BIOS Setup : XpressRecovery2 : ...

Manual
Page 71
... on -screen instructions to complete. Follow the on -screen instructions to complete. 3. Before You Begin 1. Do not use the G.O.M. (GIGABYTE Online Management) function when using @BIOS. 4. Using @BIOS 1. After Updating the BIOS Restart your system after the system restarts. Make ... the Internet Update Function: Click Update BIOS from an inadequate BIOS flashing. C. Updating the BIOS with the @BIOS Utility A. In Windows, close all applications and TSR (Terminate and Stay Resident) programs. This helps prevent unexpected failures when performing a BIOS update. 2....
... on -screen instructions to complete. Follow the on -screen instructions to complete. 3. Before You Begin 1. Do not use the G.O.M. (GIGABYTE Online Management) function when using @BIOS. 4. Using @BIOS 1. After Updating the BIOS Restart your system after the system restarts. Make ... the Internet Update Function: Click Update BIOS from an inadequate BIOS flashing. C. Updating the BIOS with the @BIOS Utility A. In Windows, close all applications and TSR (Terminate and Stay Resident) programs. This helps prevent unexpected failures when performing a BIOS update. 2....

Manual
Page 72
...the core clock and memory clock for Quick Boost. The Memory tab provides information on the installed CPU and motherboard. 4-3 EasyTune 6 GIGABYTE's EasyTune 6 is not supported. The Graphics tab allows you set temperature/fan speed alarm. You can select memory module on the ... these changes to take effect or click Default to restore to restart your ATI or NVIDIA graphics card. Available functions in Windows environment. The user-friendly EasyTune 6 interface also includes tabbed pages for CPU and memory information, letting users read their system...
...the core clock and memory clock for Quick Boost. The Memory tab provides information on the installed CPU and motherboard. 4-3 EasyTune 6 GIGABYTE's EasyTune 6 is not supported. The Graphics tab allows you set temperature/fan speed alarm. You can select memory module on the ... these changes to take effect or click Default to restore to restart your ATI or NVIDIA graphics card. Available functions in Windows environment. The user-friendly EasyTune 6 interface also includes tabbed pages for CPU and memory information, letting users read their system...

Manual
Page 77
... DualBIOS is reached, the oldest backup will be ovewritten. Instructions: Enter the Smart 6™ password to exit. - 77 - It also stores the recorded data in Windows Vista. The Smart Recovery Preference dialog box: Button Enable Schedule Capacity Function Enables automatic daily backup (Note 3) Sets a daily backup schedule Sets the percentage of...
... DualBIOS is reached, the oldest backup will be ovewritten. Instructions: Enter the Smart 6™ password to exit. - 77 - It also stores the recorded data in Windows Vista. The Smart Recovery Preference dialog box: Button Enable Schedule Capacity Function Enables automatic daily backup (Note 3) Sets a daily backup schedule Sets the percentage of...

Manual
Page 80
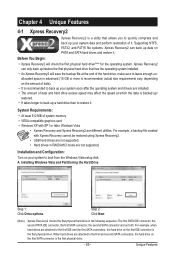
4-8 eXtreme Hard Drive (X.H.D) With GIGABYTE eXtreme Hard Drive (X.H.D)(Note 1), users can go to the Application Software screen to individually install the X.H.D utility later. Before installing the operating system, you 'll not be recognized during the Windows setup process. (For more details,...you can quickly configure a RAIDready system for the Intel SATA controllers. To automatically set up a RAID 0 array. 2. A. Using GIGABYTE eXtreme Hard Drive (X.H.D) Instructions:(Note 2) Before launching X.H.D, make sure the newly added harddrive has equal or greater capacity than the ...
4-8 eXtreme Hard Drive (X.H.D) With GIGABYTE eXtreme Hard Drive (X.H.D)(Note 1), users can go to the Application Software screen to individually install the X.H.D utility later. Before installing the operating system, you 'll not be recognized during the Windows setup process. (For more details,...you can quickly configure a RAIDready system for the Intel SATA controllers. To automatically set up a RAID 0 array. 2. A. Using GIGABYTE eXtreme Hard Drive (X.H.D) Instructions:(Note 2) Before launching X.H.D, make sure the newly added harddrive has equal or greater capacity than the ...

Manual
Page 81
...use two hard drives with identical model and capacity). C. Configure a RAID array in your power supply to identify the SATA controller for Windows XP. (Note 2) E. Configure SATA controller mode in your computer Attach one end of the SATA signal cable to the rear of... create RAID array. (Note 2) Required when the SATA controller is more than one hard drive. • An empty formatted floppy disk. • Windows Vista/XP setup disk. • Motherboard driver disk. 5-1-1 Configuring Intel P55 SATA Controllers A. Chapter 5 Appendix 5-1 Configuring SATA Hard Drive(s) To configure...
...use two hard drives with identical model and capacity). C. Configure a RAID array in your power supply to identify the SATA controller for Windows XP. (Note 2) E. Configure SATA controller mode in your computer Attach one end of the SATA signal cable to the rear of... create RAID array. (Note 2) Required when the SATA controller is more than one hard drive. • An empty formatted floppy disk. • Windows Vista/XP setup disk. • Motherboard driver disk. 5-1-1 Configuring Intel P55 SATA Controllers A. Chapter 5 Appendix 5-1 Configuring SATA Hard Drive(s) To configure...

Manual
Page 83
... Configuration Utility" (Figure 2). Create RAID Volume If you press + , the MAIN MENU screen will appear (Figure 3). Skip this step and proceed with the installation of Windows operating system for a message which says "Press to enter Configuration Utility.. Intel(R) Matrix Storage Manager option ROM v8.9.0.1023 PCH-D wRAID5 Copyright(C) 2003-09 Intel...
... Configuration Utility" (Figure 2). Create RAID Volume If you press + , the MAIN MENU screen will appear (Figure 3). Skip this step and proceed with the installation of Windows operating system for a message which says "Press to enter Configuration Utility.. Intel(R) Matrix Storage Manager option ROM v8.9.0.1023 PCH-D wRAID5 Copyright(C) 2003-09 Intel...

Manual
Page 89
... the BIOS version. - 89 - The Marvell 9128 SATA controller controls the GSATA3_6/7 ports on the GSATA RAID Configuration item (Figure 1) to enter BIOS Setup during Windows XP installation. Step 1: Turn on your computer Attach one end of the SATA signal cable to the hard drive. Refer to section, "5-1-3" for your power...
... the BIOS version. - 89 - The Marvell 9128 SATA controller controls the GSATA3_6/7 ports on the GSATA RAID Configuration item (Figure 1) to enter BIOS Setup during Windows XP installation. Step 1: Turn on your computer Attach one end of the SATA signal cable to the hard drive. Refer to section, "5-1-3" for your power...

Manual
Page 94
..., you wish to a floppy disk. Select the controller driver by pressing the corresponding letter from the motherboard driver disk to copy the Windows 64-bit driver. Figure 4 Figure 3 (Note) Change the directory from \32bit to a USB flash drive. 5-1-3 Making a SATA ... 1): (Note) A:\>copy d:\bootdrv\imsm\32bit\*.* • For the Marvell 9128, type (Figure 2): (Note) A:\>copy d:\bootdrv\Marvell\32bit\*.* Figure 1 In Windows mode: Figure 2 Steps: 1: Use an alternative system and insert the motherboard driver disk. 2: From your optical drive is /are configured to RAID/AHCI mode,...
..., you wish to a floppy disk. Select the controller driver by pressing the corresponding letter from the motherboard driver disk to copy the Windows 64-bit driver. Figure 4 Figure 3 (Note) Change the directory from \32bit to a USB flash drive. 5-1-3 Making a SATA ... 1): (Note) A:\>copy d:\bootdrv\imsm\32bit\*.* • For the Marvell 9128, type (Figure 2): (Note) A:\>copy d:\bootdrv\Marvell\32bit\*.* Figure 1 In Windows mode: Figure 2 Steps: 1: Use an alternative system and insert the motherboard driver disk. 2: From your optical drive is /are configured to RAID/AHCI mode,...

Manual
Page 95
... disk containing the SATA RAID/AHCI driver and press . Select Intel(R) ICH8R/ICH9R/ICH10R/DO/PCH SATA RAID Controller and press . Windows Setup You have chosen to install Windows Vista/ XP onto your system to boot from the following list, or press ESC to return to install a 3rd party SCSI or... Operating System With the SATA RAID/AHCI driver diskette and correct BIOS settings, you are examples of Windows XP and Vista installation. A screen will appear. Select the SCSI Adapter you want from the Windows XP setup disk and press as soon as you see the message "Press F6 if you need...
... disk containing the SATA RAID/AHCI driver and press . Select Intel(R) ICH8R/ICH9R/ICH10R/DO/PCH SATA RAID Controller and press . Windows Setup You have chosen to install Windows Vista/ XP onto your system to boot from the following list, or press ESC to return to install a 3rd party SCSI or... Operating System With the SATA RAID/AHCI driver diskette and correct BIOS settings, you are examples of Windows XP and Vista installation. A screen will appear. Select the SCSI Adapter you want from the Windows XP setup disk and press as soon as you see the message "Press F6 if you need...
Manual
Page 96
... to continue the driver installation. First select Marvell shared library (install first) and press . Select the SCSI Adapter you can proceed with Windows, using a device support disk provided by an adapter manufacturer. Appendix - 96 - On the next screen, press to return to continue ...the driver installation. Then select Marvell 91xx SATA Controller 32bit Driver and press . Windows Setup You have chosen to be installed (Figure 3). When both of the two drivers appear on the confirmation screen, press to the previous...
... to continue the driver installation. First select Marvell shared library (install first) and press . Select the SCSI Adapter you can proceed with Windows, using a device support disk provided by an adapter manufacturer. Appendix - 96 - On the next screen, press to return to continue ...the driver installation. Then select Marvell 91xx SATA Controller 32bit Driver and press . Windows Setup You have chosen to be installed (Figure 3). When both of the two drivers appear on the confirmation screen, press to the previous...


