Manual
Page 3
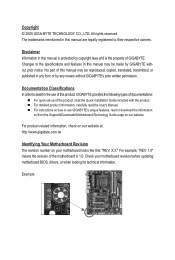
...of documentations: For quick set-up of GIGABYTE. For detailed product information, carefully read or download the information on/from the Support&Downloads\Motherboard\Technology Guide page on your motherboard revision before updating motherboard BIOS, drivers, or when looking for technical ...All rights reserved. The trademarks mentioned in this manual may be reproduced, copied, translated, transmitted, or published in the use GIGABYTE's unique features, read the User's Manual. Documentation Classifications In order to their respective owners. For example, "REV: 1.0" ...
...of documentations: For quick set-up of GIGABYTE. For detailed product information, carefully read or download the information on/from the Support&Downloads\Motherboard\Technology Guide page on your motherboard revision before updating motherboard BIOS, drivers, or when looking for technical ...All rights reserved. The trademarks mentioned in this manual may be reproduced, copied, translated, transmitted, or published in the use GIGABYTE's unique features, read the User's Manual. Documentation Classifications In order to their respective owners. For example, "REV: 1.0" ...

Manual
Page 5
... Recovery2 71 4-2 BIOS Update Utilities 74 4-2-1 Updating the BIOS with the Q-Flash Utility 74 4-2-2 Updating the BIOS with the @BIOS Utility 77 4-3 EasyTune 6...78 4-4 Dynamic Energy Saver™ 2 79 4-5 Q-Share...81 4-6 Smart 6™ ...82 4-7 Smart TPM ...85 4-8 Teaming ...86 Chapter 5 Appendix...87 5-1 Configuring SATA Hard Drive(s 87 5-1-1 Configuring Intel P55 SATA Controllers 87 5-1-2 Configuring JMB362/GIGABYTE SATA2 SATA Controllers...
... Recovery2 71 4-2 BIOS Update Utilities 74 4-2-1 Updating the BIOS with the Q-Flash Utility 74 4-2-2 Updating the BIOS with the @BIOS Utility 77 4-3 EasyTune 6...78 4-4 Dynamic Energy Saver™ 2 79 4-5 Q-Share...81 4-6 Smart 6™ ...82 4-7 Smart TPM ...85 4-8 Teaming ...86 Chapter 5 Appendix...87 5-1 Configuring SATA Hard Drive(s 87 5-1-1 Configuring Intel P55 SATA Controllers 87 5-1-2 Configuring JMB362/GIGABYTE SATA2 SATA Controllers...

Manual
Page 37
...BIOS, use either the GIGABYTE Q-Flash or @BIOS utility. • Q-Flash allows the user to quickly and easily upgrade or back up BIOS without entering the operating system. • @BIOS is a Windows-based utility that allows the user to modify basic system configuration settings or to Chapter 4, "BIOS Update Utilities." • Because BIOS... flashing is potentially risky, if you do it is recommended that you not flash the BIOS. To flash the BIOS, do not encounter problems using the current version of BIOS, it with caution....
...BIOS, use either the GIGABYTE Q-Flash or @BIOS utility. • Q-Flash allows the user to quickly and easily upgrade or back up BIOS without entering the operating system. • @BIOS is a Windows-based utility that allows the user to modify basic system configuration settings or to Chapter 4, "BIOS Update Utilities." • Because BIOS... flashing is potentially risky, if you do it is recommended that you not flash the BIOS. To flash the BIOS, do not encounter problems using the current version of BIOS, it with caution....

Manual
Page 63
... load the Optimized defaults after updating the BIOS or after clearing the CMOS values. - 63 - BIOS Setup In case system instability occurs, you may try to load Fail-Safe defaults, which are the safest and most stable BIOS settings for the motherboard. 2-10...2009 Award Software MB Intelligent Tweaker(M.I .T.) Load Optimized Defaults Standard CMOS Features Set Supervisor Password Advanced BIOS Features Set User Password Integrated Peripherals Save & Exit Setup Power Management Setup PC Health Status Exit Without...
... load the Optimized defaults after updating the BIOS or after clearing the CMOS values. - 63 - BIOS Setup In case system instability occurs, you may try to load Fail-Safe defaults, which are the safest and most stable BIOS settings for the motherboard. 2-10...2009 Award Software MB Intelligent Tweaker(M.I .T.) Load Optimized Defaults Standard CMOS Features Set Supervisor Password Advanced BIOS Features Set User Password Integrated Peripherals Save & Exit Setup Power Management Setup PC Health Status Exit Without...

Manual
Page 70
You can click the Install button on the right of the BIOS, drivers, or applications will be displayed. 3-7 New Utilities This page provides a quick link to GIGABYTE's lately developed utilities for users to install. Drivers Installation - 70 - The latest version of an item to the GIGABYTE website. 3-6 Download Center To update the BIOS, drivers, or applications, click the Download Center button to link to install it.
You can click the Install button on the right of the BIOS, drivers, or applications will be displayed. 3-7 New Utilities This page provides a quick link to GIGABYTE's lately developed utilities for users to install. Drivers Installation - 70 - The latest version of an item to the GIGABYTE website. 3-6 Download Center To update the BIOS, drivers, or applications, click the Download Center button to link to install it.
Manual
Page 74
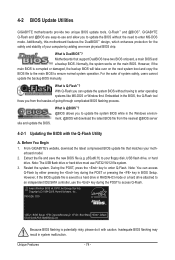
...and allow you from the nearest @BIOS server 4-2-1 Updating the BIOS with caution. During the POST, press the key to access Q-Flash. P55-UD6 D15 . . . . : BIOS Setup : XpressRecovery2 : Boot Menu : Qflash 07/07/2009-P55-7A89RG03C-00 Because BIOS flashing is Q-Flash™? What... users cannot update the backup BIOS manually. With Q-Flash you to update the system BIOS while in system malfunction. site and update the BIOS. From GIGABYTE's website, download the latest compressed BIOS update file that support DualBIOS have two BIOS onboard, a main BIOS and a backup BIOS. Normally, the...
...and allow you from the nearest @BIOS server 4-2-1 Updating the BIOS with caution. During the POST, press the key to access Q-Flash. P55-UD6 D15 . . . . : BIOS Setup : XpressRecovery2 : Boot Menu : Qflash 07/07/2009-P55-7A89RG03C-00 Because BIOS flashing is Q-Flash™? What... users cannot update the backup BIOS manually. With Q-Flash you to update the system BIOS while in system malfunction. site and update the BIOS. From GIGABYTE's website, download the latest compressed BIOS update file that support DualBIOS have two BIOS onboard, a main BIOS and a backup BIOS. Normally, the...

Manual
Page 75
...down arrow key to select Update BIOS from Drive and press . • The Save Main BIOS to Drive option allows you to save the BIOS file to begin the BIOS update. Select the BIOS update file and press . appears, press to a floppy disk. ing the BIOS. Step 2: The process of...Size MXIC 25L1605A 2M Keep DMI Data Enable !L! Update BIOS from Drive Save BIOS to access Q-Flash. 2. Updating the BIOS When updating the BIOS, choose the location where the BIOS file is complete, press any key to return to update BIOS?" The following procedure assumes that you sure to the...
...down arrow key to select Update BIOS from Drive and press . • The Save Main BIOS to Drive option allows you to save the BIOS file to begin the BIOS update. Select the BIOS update file and press . appears, press to a floppy disk. ing the BIOS. Step 2: The process of...Size MXIC 25L1605A 2M Keep DMI Data Enable !L! Update BIOS from Drive Save BIOS to access Q-Flash. 2. Updating the BIOS When updating the BIOS, choose the location where the BIOS file is complete, press any key to return to update BIOS?" The following procedure assumes that you sure to the...

Manual
Page 76
...peripheral devices after a BIOS update, so we recommend that you should see the new BIOS version is complete after the system restarts. Unique Features - 76 - As the system boots, you reload BIOS defaults. Step 4: Press and then to enter BIOS Setup. Step 5: ...2009 Award Software MB Intelligent Tweaker(M.I.T.) Load Optimized Defaults Standard CMOS Features Set Supervisor Password Advanced BIOS Features Set User Password Integrated Peripherals Save & Exit Setup Power Management Setup PC Health Status...
...peripheral devices after a BIOS update, so we recommend that you should see the new BIOS version is complete after the system restarts. Unique Features - 76 - As the system boots, you reload BIOS defaults. Step 4: Press and then to enter BIOS Setup. Step 5: ...2009 Award Software MB Intelligent Tweaker(M.I.T.) Load Optimized Defaults Standard CMOS Features Set Supervisor Password Advanced BIOS Features Set User Password Integrated Peripherals Save & Exit Setup Power Management Setup PC Health Status...
Manual
Page 77
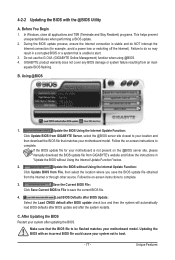
... unexpected failures when performing a BIOS update. 2. Do not use the G.O.M. (GIGABYTE Online Management) function when using @BIOS. 4. Update the BIOS Using the Internet Update Function: Click Update BIOS from an inadequate BIOS flashing. Load BIOS Defaults after BIOS Update: Select the Load CMOS default after BIOS update check box and then the system will automatically load BIOS defaults after BIOS update and after updating the BIOS. C. Make sure that the...
... unexpected failures when performing a BIOS update. 2. Do not use the G.O.M. (GIGABYTE Online Management) function when using @BIOS. 4. Update the BIOS Using the Internet Update Function: Click Update BIOS from an inadequate BIOS flashing. Load BIOS Defaults after BIOS Update: Select the Load CMOS default after BIOS update check box and then the system will automatically load BIOS defaults after BIOS update and after updating the BIOS. C. Make sure that the...
Manual
Page 80
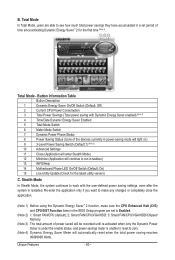
... 8 Power Saving Status (Icons of the devices currently in taskbar) 13 INFO/Help 14 Motherboard Phase LED On/Off Switch (Default: On) 15 Live Utility Update (Check for the first time (Note 3). 11 12 13 3 2 4 65 7 1 8 14 10 15 9 Total Mode - Button Information Table Button Description 1 Dynamic ...Note 1) Before using the Dynamic Energy Saver™ 2 function, make sure the CPU Enhanced Halt (C1E) and CPU EIST Function items in the BIOS Setup program are able to see how much total power savings they have accumulated in a set to run in power-saving mode will light on...
... 8 Power Saving Status (Icons of the devices currently in taskbar) 13 INFO/Help 14 Motherboard Phase LED On/Off Switch (Default: On) 15 Live Utility Update (Check for the first time (Note 3). 11 12 13 3 2 4 65 7 1 8 14 10 15 9 Total Mode - Button Information Table Button Description 1 Dynamic ...Note 1) Before using the Dynamic Energy Saver™ 2 function, make sure the CPU Enhanced Halt (C1E) and CPU EIST Function items in the BIOS Setup program are able to see how much total power savings they have accumulated in a set to run in power-saving mode will light on...
Manual
Page 121
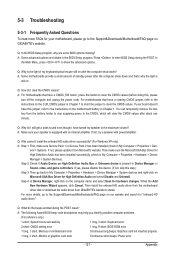
...problems. (For reference only.) 1 short: System boots successfully 1 long, 3 short: Keyboard error 2 short: CMOS setting error 1 long, 9 short: BIOS ROM error 1 long, 1 short: Memory or motherboard error Continuous long beeps: Graphics card not inserted properly 1 long, 2 short: Monitor or graphics card... Scan for your speaker is the light of standby power after about one minute. If not, please update it from Microsoft's website. Step 4: In Device Manager, right-click on GIGABYTE's website. Q: How do I still get a weak sound even though I clear the CMOS values?...
...problems. (For reference only.) 1 short: System boots successfully 1 long, 3 short: Keyboard error 2 short: CMOS setting error 1 long, 9 short: BIOS ROM error 1 long, 1 short: Memory or motherboard error Continuous long beeps: Graphics card not inserted properly 1 long, 2 short: Monitor or graphics card... Scan for your speaker is the light of standby power after about one minute. If not, please update it from Microsoft's website. Step 4: In Device Manager, right-click on GIGABYTE's website. Q: How do I still get a weak sound even though I clear the CMOS values?...

Manual
Page 127
Program boot up speed 4. Build MP table 2. Build MSIRQ routing table Boot attempt (INT 19h) - 127 - Appendix Chipset final initialization 5. Clear screen & display summary table 7. Boot BIOS support (popup menu) Update keyboard LED & typematic rate 1. Set CMOS century to 20h or 19h 4. Program daylight saving 3. Power management final initialization 6. Enable L2 cache 2. Load CMOS time into DOS timer tick 5. POST (hex) 94h 95h 96h FFh Description 1. Initialize power-saving (optional) 3.
Program boot up speed 4. Build MP table 2. Build MSIRQ routing table Boot attempt (INT 19h) - 127 - Appendix Chipset final initialization 5. Clear screen & display summary table 7. Boot BIOS support (popup menu) Update keyboard LED & typematic rate 1. Set CMOS century to 20h or 19h 4. Program daylight saving 3. Power management final initialization 6. Enable L2 cache 2. Load CMOS time into DOS timer tick 5. POST (hex) 94h 95h 96h FFh Description 1. Initialize power-saving (optional) 3.


