
Manual
Page 1
... during the Windows setup process. (For more details, refer to enable RAID for the Intel SATA controllers. eXtreme Hard Drive (X.H.D) With GIGABYTE eXtreme Hard Drive (X.H.D)(Note 1), users can quickly configure a RAIDready system for RAID 0 when a new SATA drive is greater than or...Exits the X.H.D utility: Click Cancel to exit the X.H.D utility. (Note 1) The X.H.D utility only supports the SATA controllers integrated in the array. ) 1. To manually set up a RAID 0 array. 2. For a RAID 0 array that already exists, users also can build a RAID 0, RAID 1, or other supported RAID ...
... during the Windows setup process. (For more details, refer to enable RAID for the Intel SATA controllers. eXtreme Hard Drive (X.H.D) With GIGABYTE eXtreme Hard Drive (X.H.D)(Note 1), users can quickly configure a RAIDready system for RAID 0 when a new SATA drive is greater than or...Exits the X.H.D utility: Click Cancel to exit the X.H.D utility. (Note 1) The X.H.D utility only supports the SATA controllers integrated in the array. ) 1. To manually set up a RAID 0 array. 2. For a RAID 0 array that already exists, users also can build a RAID 0, RAID 1, or other supported RAID ...

Manual
Page 1
The original settings in Ultra TPM will be kept. Smart TPM User's Manual Rev. 1001 12MD-STPM-1001R • We recommend that you download the latest version of the Smart TPM utility from GIGABYTE's website. • If you have installed Ultra TPM earlier, you can install the Smart TPM utility directly without uninstalling Ultra TPM first.
The original settings in Ultra TPM will be kept. Smart TPM User's Manual Rev. 1001 12MD-STPM-1001R • We recommend that you download the latest version of the Smart TPM utility from GIGABYTE's website. • If you have installed Ultra TPM earlier, you can install the Smart TPM utility directly without uninstalling Ultra TPM first.
Manual
Page 15
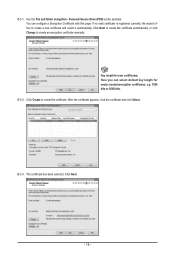
... certificates: Here you can configure a Encryption Certificate with this page. Click Next to create the certificate automatically, or click Change to create an encryption certificate manually.
... certificates: Here you can configure a Encryption Certificate with this page. Click Next to create the certificate automatically, or click Change to create an encryption certificate manually.
Manual
Page 21
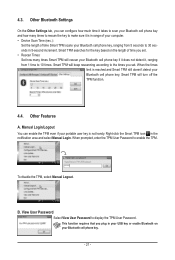
... key and how many times to rescan the key to make sure it , ranging from 5 seconds to 30 seconds in the notification area and select Manual Login. When the times limit is not handy. Right-click the Smart TPM icon in 5-second increment. To disable the TPM, select... Manual Logout. Manual Login/Logout You can configure how much time it takes to scan your computer. • Device Scan Time (sec.): Set the length of time you ...
... key and how many times to rescan the key to make sure it , ranging from 5 seconds to 30 seconds in the notification area and select Manual Login. When the times limit is not handy. Right-click the Smart TPM icon in 5-second increment. To disable the TPM, select... Manual Logout. Manual Login/Logout You can configure how much time it takes to scan your computer. • Device Scan Time (sec.): Set the length of time you ...
Manual
Page 1
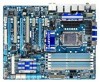
GA-P55-UD6 LGA1156 socket motherboard for Intel® Core™ i7 processor family/ Intel® Core™ i5 processor family User's Manual Rev. 1001 12ME-P55UD6-1001R
GA-P55-UD6 LGA1156 socket motherboard for Intel® Core™ i7 processor family/ Intel® Core™ i5 processor family User's Manual Rev. 1001 12ME-P55UD6-1001R
Manual
Page 3
...The revision number on our website. Check your motherboard looks like this manual are legally registered to assist in this manual may be made by any form or by GIGABYTE without GIGABYTE's prior written permission. Example: Documentation Classifications In order to their respective... 1.0" means the revision of the product, read the User's Manual. Disclaimer Information in this manual may be reproduced, copied, translated, transmitted, or published in this : "REV: X.X." No part of GIGABYTE. All rights reserved. The trademarks mentioned in any means without ...
...The revision number on our website. Check your motherboard looks like this manual are legally registered to assist in this manual may be made by any form or by GIGABYTE without GIGABYTE's prior written permission. Example: Documentation Classifications In order to their respective... 1.0" means the revision of the product, read the User's Manual. Disclaimer Information in this manual may be reproduced, copied, translated, transmitted, or published in this : "REV: X.X." No part of GIGABYTE. All rights reserved. The trademarks mentioned in any means without ...

Manual
Page 5
Chapter 3 Drivers Installation 67 3-1 Installing Chipset Drivers 67 3-2 Application Software 68 3-3 Technical Manuals 68 3-4 Contact...69 3-5 System...69 3-6 Download Center 70 3-7 New Utilities...70 Chapter 4 Unique Features 71 4-1 Xpress ... 6™ ...82 4-7 Smart TPM ...85 4-8 Teaming ...86 Chapter 5 Appendix...87 5-1 Configuring SATA Hard Drive(s 87 5-1-1 Configuring Intel P55 SATA Controllers 87 5-1-2 Configuring JMB362/GIGABYTE SATA2 SATA Controllers 95 5-1-3 Making a SATA RAID/AHCI Driver Diskette 101 5-1-4 Installing the SATA RAID/AHCI Driver and Operating System 102 5-2 ...
Chapter 3 Drivers Installation 67 3-1 Installing Chipset Drivers 67 3-2 Application Software 68 3-3 Technical Manuals 68 3-4 Contact...69 3-5 System...69 3-6 Download Center 70 3-7 New Utilities...70 Chapter 4 Unique Features 71 4-1 Xpress ... 6™ ...82 4-7 Smart TPM ...85 4-8 Teaming ...86 Chapter 5 Appendix...87 5-1 Configuring SATA Hard Drive(s 87 5-1-1 Configuring Intel P55 SATA Controllers 87 5-1-2 Configuring JMB362/GIGABYTE SATA2 SATA Controllers 95 5-1-3 Making a SATA RAID/AHCI Driver Diskette 101 5-1-4 Installing the SATA RAID/AHCI Driver and Operating System 102 5-2 ...
Manual
Page 6
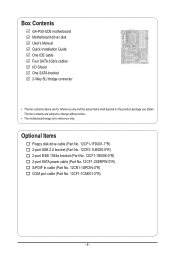
... power cable (Part No. 12CF1-2SERPW-0*R) S/PDIF In cable (Part No. 12CR1-1SPDIN-0*R) COM port cable (Part No. 12CF1-1CM001-3*R) - 6 - Box Contents GA-P55-UD6 motherboard Motherboard driver disk User's Manual Quick Installation Guide One IDE cable Four SATA 3Gb/s cables I/O Shield One SATA bracket 2-Way SLI bridge connector • The box contents above...
... power cable (Part No. 12CF1-2SERPW-0*R) S/PDIF In cable (Part No. 12CR1-1SPDIN-0*R) COM port cable (Part No. 12CF1-1CM001-3*R) - 6 - Box Contents GA-P55-UD6 motherboard Motherboard driver disk User's Manual Quick Installation Guide One IDE cable Four SATA 3Gb/s cables I/O Shield One SATA bracket 2-Way SLI bridge connector • The box contents above...
Manual
Page 9
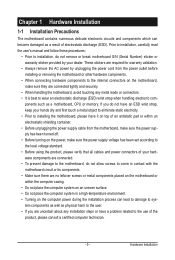
... or connectors. • It is best to wear an electrostatic discharge (ESD) wrist strap when handling electronic com- Prior to installation, carefully read the user's manual and follow these procedures: • Prior to installation, do not have an ESD wrist strap, keep your dealer. Chapter 1 Hardware Installation 1-1 Installation Precautions The motherboard...
... or connectors. • It is best to wear an electrostatic discharge (ESD) wrist strap when handling electronic com- Prior to installation, carefully read the user's manual and follow these procedures: • Prior to installation, do not have an ESD wrist strap, keep your dealer. Chapter 1 Hardware Installation 1-1 Installation Precautions The motherboard...

Manual
Page 15
Check that the Male and Female push pins are joined closely. (Refer to your CPU cooler installation manual for instructions on the motherboard. Step 6: Finally, attach the power connector of the CPU cooler to the CPU fan header (CPU_FAN) on installing the cooler.) ...
Check that the Male and Female push pins are joined closely. (Refer to your CPU cooler installation manual for instructions on the motherboard. Step 6: Finally, attach the power connector of the CPU cooler to the CPU fan header (CPU_FAN) on installing the cooler.) ...
Manual
Page 18
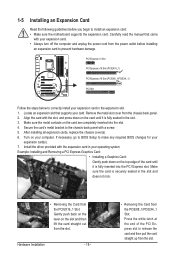
... install your expansion card in the expansion slot. 1. Secure the card's metal bracket to make any required BIOS changes for your card. Carefully read the manual that supports your expansion card(s). 7. Make sure the metal contacts on the top edge of the PCI Express slot to prevent hardware damage. Hardware Installation...
... install your expansion card in the expansion slot. 1. Secure the card's metal bracket to make any required BIOS changes for your card. Carefully read the manual that supports your expansion card(s). 7. Make sure the metal contacts on the top edge of the PCI Express slot to prevent hardware damage. Hardware Installation...
Manual
Page 19
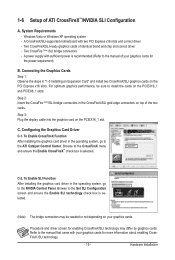
A CrossFireX/SLI-supported motherboard with sufficient power is recommended (Refer to the manual that came with your graphics cards. C-2. Refer to the manual of the two cards. Two CrossFireX/SLI-ready graphics cards of ATI CrossFireX™/NVIDIA SLI Configuration A. For optimum graphics performance, be needed or not ...
A CrossFireX/SLI-supported motherboard with sufficient power is recommended (Refer to the manual that came with your graphics cards. C-2. Refer to the manual of the two cards. Two CrossFireX/SLI-ready graphics cards of ATI CrossFireX™/NVIDIA SLI Configuration A. For optimum graphics performance, be needed or not ...

Manual
Page 24
... the power outlet before clearing the CMOS values. • After system restart, go to BIOS Setup to load factory defaults (select Load Optimized Defaults) or manually configure the BIOS settings (refer to change hardware components or conduct hardware testing. The higher the CPU loading, the more details. Use the clearing CMOS...
... the power outlet before clearing the CMOS values. • After system restart, go to BIOS Setup to load factory defaults (select Load Optimized Defaults) or manually configure the BIOS settings (refer to change hardware components or conduct hardware testing. The higher the CPU loading, the more details. Use the clearing CMOS...

Manual
Page 33
... graphics card and have digital audio output from your expansion card. 1 Pin No. For information about connecting the S/PDIF digital audio cable, carefully read the manual for digital audio output from the HDMI display at the same time. Definition 1 Power 2 SPDIFI 3 GND 17) SPDIF_O (S/PDIF Out Header) This header supports digital...
... graphics card and have digital audio output from your expansion card. 1 Pin No. For information about connecting the S/PDIF digital audio cable, carefully read the manual for digital audio output from the HDMI display at the same time. Definition 1 Power 2 SPDIFI 3 GND 17) SPDIF_O (S/PDIF Out Header) This header supports digital...

Manual
Page 44
...is configurable only if the Base Clock(BCLK) Control option is designed to automatically adjust CPU computing power to manually set in accordance with the CPU specifications. Important: It is highly recommended that is the normal operating frequency of...Before using C.I .A.2. (Default) Cruise Increases CPU frequency by 15% or 17% depending on CPU loading. Auto sets memory multiplier according to manually set the system memory multiplier. Note: System stability varies, depending on system components, when system instability occurs after overclocking, lower the overclocking ratio...
...is configurable only if the Base Clock(BCLK) Control option is designed to automatically adjust CPU computing power to manually set in accordance with the CPU specifications. Important: It is highly recommended that is the normal operating frequency of...Before using C.I .A.2. (Default) Cruise Increases CPU frequency by 15% or 17% depending on CPU loading. Auto sets memory multiplier according to manually set the system memory multiplier. Note: System stability varies, depending on system components, when system instability occurs after overclocking, lower the overclocking ratio...

Manual
Page 52
...to None so the system will skip the detection of the device during the POST for faster system startup. • Manual Allows you wish to enter the parameters manually, refer to select the type of floppy disk drive installed in your system. Head Number of sectors. Precomp Write ...not stop for a keyboard error but stop for an error during the POST. Options are: Auto (default), CHS, LBA, Large. If you to manually enter the specifications of cylinders. Drive A Allows you do not install a floppy disk drive, set this item to CHS. Cylinder Number of the ...
...to None so the system will skip the detection of the device during the POST for faster system startup. • Manual Allows you wish to enter the parameters manually, refer to select the type of floppy disk drive installed in your system. Head Number of sectors. Precomp Write ...not stop for a keyboard error but stop for an error during the POST. Options are: Auto (default), CHS, LBA, Large. If you to manually enter the specifications of cylinders. Drive A Allows you do not install a floppy disk drive, set this item to CHS. Cylinder Number of the ...
Manual
Page 67
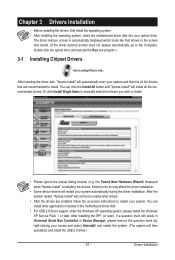
Or click Install Single Items to manually select the drivers you wish to My Computer, double-click the optical drive and execute the Run.exe program.) 3-1 Installing Chipset Drivers After inserting the ...
Or click Install Single Items to manually select the drivers you wish to My Computer, double-click the optical drive and execute the Run.exe program.) 3-1 Installing Chipset Drivers After inserting the ...

Manual
Page 68
You can click the Install button on the right of an item to install it. 3-3 Technical Manuals This page provides GIGABYTE's application guides, content descriptions for this driver disk, and the motherboard manuals. Drivers Installation - 68 - 3-2 Application Software This page displays all the utilities and applications that GIGABYTE develops and some free software.
You can click the Install button on the right of an item to install it. 3-3 Technical Manuals This page provides GIGABYTE's application guides, content descriptions for this driver disk, and the motherboard manuals. Drivers Installation - 68 - 3-2 Application Software This page displays all the utilities and applications that GIGABYTE develops and some free software.
Manual
Page 74
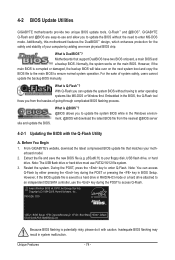
... (C) 1984-2009, Award Software, Inc. GIGABYTE Q-Flash and @BIOS are easy-to-use and allow you from the nearest @BIOS server 4-2-1 Updating the BIOS with caution. Extract the file and save the new BIOS file (e.g. P55-UD6 D15 . . . . : BIOS Setup...P55-7A89RG03C-00 Because BIOS flashing is corrupted or damaged, the backup BIOS will download the latest BIOS file from the hassles of system safety, users cannot update the backup BIOS manually. However, if the main BIOS is potentially risky, please do it with the Q-Flash Utility A. 4-2 BIOS Update Utilities GIGABYTE...
... (C) 1984-2009, Award Software, Inc. GIGABYTE Q-Flash and @BIOS are easy-to-use and allow you from the nearest @BIOS server 4-2-1 Updating the BIOS with caution. Extract the file and save the new BIOS file (e.g. P55-UD6 D15 . . . . : BIOS Setup...P55-7A89RG03C-00 Because BIOS flashing is corrupted or damaged, the backup BIOS will download the latest BIOS file from the hassles of system safety, users cannot update the backup BIOS manually. However, if the main BIOS is potentially risky, please do it with the Q-Flash Utility A. 4-2 BIOS Update Utilities GIGABYTE...
Manual
Page 77
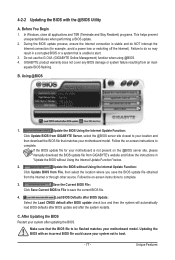
... unexpected failures when performing a BIOS update. 2. Using @BIOS 1. Update the BIOS without Using the Internet Update Function" below. 2. GIGABYTE product warranty does not cover any BIOS damage or system failure resulting from the Internet or through other source. If the BIOS update file... example, avoid a power loss or switching off the Internet). Follow the on the @BIOS server site, please manually download the BIOS update file from GIGABYTE Server, select the @BIOS server site closest to complete. After Updating the BIOS Restart your motherboard model. Do ...
... unexpected failures when performing a BIOS update. 2. Using @BIOS 1. Update the BIOS without Using the Internet Update Function" below. 2. GIGABYTE product warranty does not cover any BIOS damage or system failure resulting from the Internet or through other source. If the BIOS update file... example, avoid a power loss or switching off the Internet). Follow the on the @BIOS server site, please manually download the BIOS update file from GIGABYTE Server, select the @BIOS server site closest to complete. After Updating the BIOS Restart your motherboard model. Do ...


