
Manual
Page 1
... the X.H.D utility, back up all motherboard drivers, including the X.H.D utility. The following procedure details the steps to set up a RAID array: (Note 3): Click Manual to access the Intel Matrix Storage Console, with a simple click of data. (Note 3) If you manually build a non-RAID 0 array,... and configure it for RAID 0. Step 2: Install the RAID driver and operating system The X.H.D utility supports Windows 7/Vista/XP. Using GIGABYTE eXtreme Hard Drive (X.H.D) Instructions:(Note 2) Before launching X.H.D, make sure the newly added harddrive has equal or greater capacity than the RAID...
... the X.H.D utility, back up all motherboard drivers, including the X.H.D utility. The following procedure details the steps to set up a RAID array: (Note 3): Click Manual to access the Intel Matrix Storage Console, with a simple click of data. (Note 3) If you manually build a non-RAID 0 array,... and configure it for RAID 0. Step 2: Install the RAID driver and operating system The X.H.D utility supports Windows 7/Vista/XP. Using GIGABYTE eXtreme Hard Drive (X.H.D) Instructions:(Note 2) Before launching X.H.D, make sure the newly added harddrive has equal or greater capacity than the RAID...
Manual
Page 1
GA-P55-UD3P GA-P55-UD3R LGA1156 socket motherboard for Intel® Core™ i7 processor family/ Intel® Core™ i5 processor family User's Manual Rev. 1001 12ME-P55UD3P-1001R
GA-P55-UD3P GA-P55-UD3R LGA1156 socket motherboard for Intel® Core™ i7 processor family/ Intel® Core™ i5 processor family User's Manual Rev. 1001 12ME-P55UD3P-1001R

Manual
Page 3
... documentations: For quick set-up of the product, read the User's Manual. Changes to assist in this : "REV: X.X." No part of GIGABYTE. For example, "REV: 1.0" means the revision of the motherboard is the property of this manual may be made by GIGABYTE without GIGABYTE's prior written permission. For instructions on how to their respective owners. All...
... documentations: For quick set-up of the product, read the User's Manual. Changes to assist in this : "REV: X.X." No part of GIGABYTE. For example, "REV: 1.0" means the revision of the motherboard is the property of this manual may be made by GIGABYTE without GIGABYTE's prior written permission. For instructions on how to their respective owners. All...
Manual
Page 6
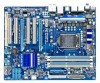
Box Contents GA-P55-UD3P or GA-P55-UD3R motherboard Motherboard driver disk User's Manual Quick Installation Guide One IDE cable Four SATA 3Gb/s cables I/O Shield • The box contents above are subject to change without notice. • The motherboard image is for reference only and the actual items shall depend on the product package you obtain. Optional Items Floppy...
Box Contents GA-P55-UD3P or GA-P55-UD3R motherboard Motherboard driver disk User's Manual Quick Installation Guide One IDE cable Four SATA 3Gb/s cables I/O Shield • The box contents above are subject to change without notice. • The motherboard image is for reference only and the actual items shall depend on the product package you obtain. Optional Items Floppy...
Manual
Page 9
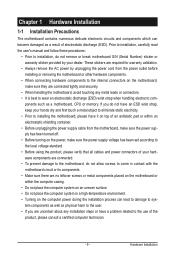
..., carefully read the user's manual and follow these procedures: • Prior to installation, do not remove or break motherboard S/N (Serial Number) sticker or warranty sticker provided by unplugging the power cord from the power outlet before installing or removing the motherboard or other hardware components. &#... for warranty validation. • Always remove the AC power by your hardware components are connected. • To prevent damage to the motherboard, do not have an ESD wrist strap, keep your hands dry and first touch a metal object to eliminate static electricity. •...
..., carefully read the user's manual and follow these procedures: • Prior to installation, do not remove or break motherboard S/N (Serial Number) sticker or warranty sticker provided by unplugging the power cord from the power outlet before installing or removing the motherboard or other hardware components. &#... for warranty validation. • Always remove the AC power by your hardware components are connected. • To prevent damage to the motherboard, do not have an ESD wrist strap, keep your hands dry and first touch a metal object to eliminate static electricity. •...

Manual
Page 15
...and CPU may damage the CPU. - 15 - Check that the Male and Female push pins are joined closely. (Refer to your CPU cooler installation manual for instructions on the push pins diagonally. Step 4: You should hear a "click" when pushing down on installing the cooler.) Step 5: After the ...installation, check the back of thermal grease on the motherboard. Inadequately removing the CPU cooler may adhere to the CPU. Step 6: Finally, attach the power connector of the CPU cooler to the CPU fan ...
...and CPU may damage the CPU. - 15 - Check that the Male and Female push pins are joined closely. (Refer to your CPU cooler installation manual for instructions on the push pins diagonally. Step 4: You should hear a "click" when pushing down on installing the cooler.) Step 5: After the ...installation, check the back of thermal grease on the motherboard. Inadequately removing the CPU cooler may adhere to the CPU. Step 6: Finally, attach the power connector of the CPU cooler to the CPU fan ...
Manual
Page 18
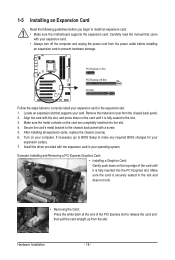
Carefully read the manual that supports your card. Locate an expansion slot that came with the slot, and press down on the card until it is securely seated in ... hardware damage. PCI Express x1 Slot PCI Express x16 Slot PCI Slot Follow the steps below to install an expansion card: • Make sure the motherboard supports the expansion card. After installing all expansion cards, replace the chassis cover(s). 6. Make sure the card is fully seated in the expansion slot. 1. Secure...
Carefully read the manual that supports your card. Locate an expansion slot that came with the slot, and press down on the card until it is securely seated in ... hardware damage. PCI Express x1 Slot PCI Express x16 Slot PCI Slot Follow the steps below to install an expansion card: • Make sure the motherboard supports the expansion card. After installing all expansion cards, replace the chassis cover(s). 6. Make sure the card is fully seated in the expansion slot. 1. Secure...
Manual
Page 28
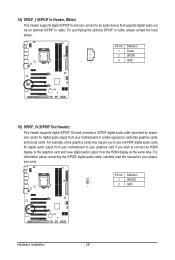
... graphics card if you wish to connect an HDMI display to the graphics card and have digital audio output from your motherboard to your motherboard to certain expansion cards like graphics cards and sound cards. For example, some graphics cards may require you to an ...audio device that supports digital audio out via an optional S/PDIF In cable. Pin No. Pin No. For information about connecting the S/PDIF digital audio cable, carefully read the manual...
... graphics card if you wish to connect an HDMI display to the graphics card and have digital audio output from your motherboard to your motherboard to certain expansion cards like graphics cards and sound cards. For example, some graphics cards may require you to an ...audio device that supports digital audio out via an optional S/PDIF In cable. Pin No. Pin No. For information about connecting the S/PDIF digital audio cable, carefully read the manual...
Manual
Page 30
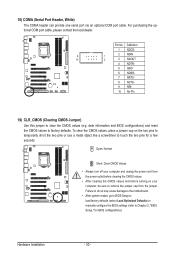
... values to clear the CMOS values (e.g. Pin No. Failure to do so may cause damage to the motherboard. • After system restart, go to BIOS Setup to load factory defaults (select Load Optimized Defaults) or manually configure the BIOS settings (refer to remove the jumper cap from the jumper. Open: Normal Short...
... values to clear the CMOS values (e.g. Pin No. Failure to do so may cause damage to the motherboard. • After system restart, go to BIOS Setup to load factory defaults (select Load Optimized Defaults) or manually configure the BIOS settings (refer to remove the jumper cap from the jumper. Open: Normal Short...
Manual
Page 63
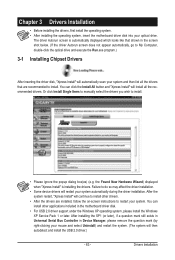
...instructions to install. Failure to install. • Please ignore the popup dialog box(es) (e.g. Or click Install Single Items to manually select the drivers you wish to do so may affect the driver installation. • Some device drivers will restart your system. ... Chapter 3 Drivers Installation • Before installing the drivers, first install the operating system. • After installing the operating system, insert the motherboard driver disk into your mouse and select Uninstall) and restart the system. (The system will then autodetect and install the USB 2.0 driver.) ...
...instructions to install. Failure to install. • Please ignore the popup dialog box(es) (e.g. Or click Install Single Items to manually select the drivers you wish to do so may affect the driver installation. • Some device drivers will restart your system. ... Chapter 3 Drivers Installation • Before installing the drivers, first install the operating system. • After installing the operating system, insert the motherboard driver disk into your mouse and select Uninstall) and restart the system. (The system will then autodetect and install the USB 2.0 driver.) ...
Manual
Page 64
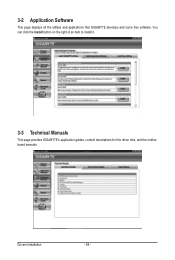
3-2 Application Software This page displays all the utilities and applications that GIGABYTE develops and some free software. Drivers Installation - 64 - You can click the Install button on the right of an item to install it. 3-3 Technical Manuals This page provides GIGABYTE's application guides, content descriptions for this driver disk, and the motherboard manuals.
3-2 Application Software This page displays all the utilities and applications that GIGABYTE develops and some free software. Drivers Installation - 64 - You can click the Install button on the right of an item to install it. 3-3 Technical Manuals This page provides GIGABYTE's application guides, content descriptions for this driver disk, and the motherboard manuals.
Manual
Page 70
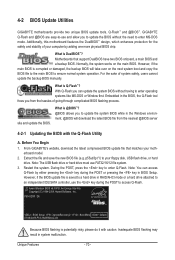
... hard drive attached to update the system BIOS while in BIOS Setup. Restart the system. P55-UD3P D6 . . . . : BIOS Setup : XpressRecovery2 : Boot Menu : Qflash 07/08/2009-P55-7A89RG0JC-00 Because BIOS flashing is @BIOS™? @BIOS allows you can access Q-Flash by...having to enter Q-Flash. Additionally, this motherboard features the DualBIOS™ design, which enhances protection for the safety and stability of system safety, users cannot update the backup BIOS manually. Embedded in system malfunction. From GIGABYTE's website, download the latest compressed BIOS ...
... hard drive attached to update the system BIOS while in BIOS Setup. Restart the system. P55-UD3P D6 . . . . : BIOS Setup : XpressRecovery2 : Boot Menu : Qflash 07/08/2009-P55-7A89RG0JC-00 Because BIOS flashing is @BIOS™? @BIOS allows you can access Q-Flash by...having to enter Q-Flash. Additionally, this motherboard features the DualBIOS™ design, which enhances protection for the safety and stability of system safety, users cannot update the backup BIOS manually. Embedded in system malfunction. From GIGABYTE's website, download the latest compressed BIOS ...
Manual
Page 73
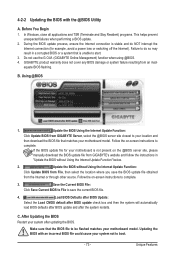
...the Internet Update Function" below. 2. Make sure that is not present on the @BIOS server site, please manually download the BIOS update file from GIGABYTE's website and follow the instructions in "Update the BIOS without Using the Internet Update Function: Click Update BIOS from... a system that the BIOS file to complete. 3. Unique Features 4-2-2 Updating the BIOS with an incorrect BIOS file could cause your motherboard model. Before You Begin 1. In Windows, close all applications and TSR (Terminate and Stay Resident) programs. This helps prevent unexpected...
...the Internet Update Function" below. 2. Make sure that is not present on the @BIOS server site, please manually download the BIOS update file from GIGABYTE's website and follow the instructions in "Update the BIOS without Using the Internet Update Function: Click Update BIOS from... a system that the BIOS file to complete. 3. Unique Features 4-2-2 Updating the BIOS with an incorrect BIOS file could cause your motherboard model. Before You Begin 1. In Windows, close all applications and TSR (Terminate and Stay Resident) programs. This helps prevent unexpected...

Manual
Page 109
5-2 Configuring Audio Input and Output 5-2-1 Configuring 2/4/5.1/7.1-Channel Audio The motherboard provides six audio jacks on both of the front and back panel audio connections simultaneously. woofer speaker out jack, you want to mute the ...) audio. High Definition Audio (HD Audio) HD Audio includes multiple high quality digital-to-analog converters (DACs) that allow multiple audio streams (in jack and manually configure the jack for microphone functionality. • Audio signals will appear in a 4-channel audio configuration, if a Rear speaker is plugged into the default Center/...
5-2 Configuring Audio Input and Output 5-2-1 Configuring 2/4/5.1/7.1-Channel Audio The motherboard provides six audio jacks on both of the front and back panel audio connections simultaneously. woofer speaker out jack, you want to mute the ...) audio. High Definition Audio (HD Audio) HD Audio includes multiple high quality digital-to-analog converters (DACs) that allow multiple audio streams (in jack and manually configure the jack for microphone functionality. • Audio signals will appear in a 4-channel audio configuration, if a Rear speaker is plugged into the default Center/...
Manual
Page 119
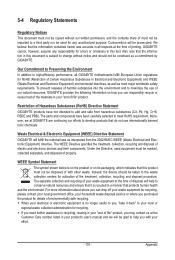
...your "end of life" product, you may contact us at the Customer Care number listed in your product's user's manual and we at GIGABYTE are continuing our efforts to conserve natural resources and ensure that it back" to your local or regional waste collection administration... human health and the environment. Moreover, we will help to develop products that the information contained herein was accurate in all GIGABYTE motherboards fulfill European Union regulations for RoHS (Restriction of Certain Hazardous Substances in Electrical and Electronic Equipment) and WEEE (Waste Electrical and...
...your "end of life" product, you may contact us at the Customer Care number listed in your product's user's manual and we at GIGABYTE are continuing our efforts to conserve natural resources and ensure that it back" to your local or regional waste collection administration... human health and the environment. Moreover, we will help to develop products that the information contained herein was accurate in all GIGABYTE motherboards fulfill European Union regulations for RoHS (Restriction of Certain Hazardous Substances in Electrical and Electronic Equipment) and WEEE (Waste Electrical and...


