
Manual
Page 1
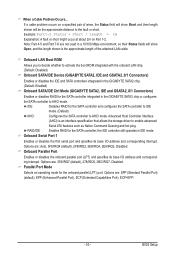
... your hard drive read/write performance without the need for RAID 0 when a new SATA drive is greater than or equal to automatically install all motherboard drivers, including the X.H.D utility. eXtreme Hard Drive (X.H.D) With GIGABYTE eXtreme Hard Drive (X.H.D)(Note 1), users can quickly configure a RAIDready system for complex and time-consuming configurations. Without the...
... your hard drive read/write performance without the need for RAID 0 when a new SATA drive is greater than or equal to automatically install all motherboard drivers, including the X.H.D utility. eXtreme Hard Drive (X.H.D) With GIGABYTE eXtreme Hard Drive (X.H.D)(Note 1), users can quickly configure a RAIDready system for complex and time-consuming configurations. Without the...
Manual
Page 4
...without prior notice. Disclaimer Information in the use GIGABYTE's unique features, read or download the information on/from the Support&Downloads\Motherboard\Technology Guide page on your motherboard revision before updating motherboard BIOS, drivers, or when looking for technical information. Copyright... © 2009 GIGA-BYTE TECHNOLOGY CO., LTD. Changes to assist in this manual may be made by any form or by GIGABYTE without GIGABYTE's prior written permission. Check...
...without prior notice. Disclaimer Information in the use GIGABYTE's unique features, read or download the information on/from the Support&Downloads\Motherboard\Technology Guide page on your motherboard revision before updating motherboard BIOS, drivers, or when looking for technical information. Copyright... © 2009 GIGA-BYTE TECHNOLOGY CO., LTD. Changes to assist in this manual may be made by any form or by GIGABYTE without GIGABYTE's prior written permission. Check...
Manual
Page 6
.../AHCI Driver Diskette 99 5-1-4 Installing the SATA RAID/AHCI Driver and Operating System 100 5-2 Configuring Audio Input and Output 111 5-2-1 Configuring 2/4/5.1/7.1-Channel Audio 111 5-2-2 Configuring S/PDIF In/Out 114 5-2-3 Configuring Microphone Recording 116 5-2-4 Using the Sound Recorder 118 5-3 Troubleshooting 119 5-3-1 Frequently Asked Questions 119 5-3-2 Troubleshooting Procedure 120 5-4 Regulatory Statements 122 j Only for GA-P55-UD3L...
.../AHCI Driver Diskette 99 5-1-4 Installing the SATA RAID/AHCI Driver and Operating System 100 5-2 Configuring Audio Input and Output 111 5-2-1 Configuring 2/4/5.1/7.1-Channel Audio 111 5-2-2 Configuring S/PDIF In/Out 114 5-2-3 Configuring Microphone Recording 116 5-2-4 Using the Sound Recorder 118 5-3 Troubleshooting 119 5-3-1 Frequently Asked Questions 119 5-3-2 Troubleshooting Procedure 120 5-4 Regulatory Statements 122 j Only for GA-P55-UD3L...
Manual
Page 7
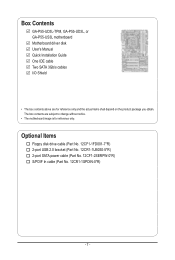
... 2.0 bracket (Part No. 12CR1-1UB030-5*R) 2-port SATA power cable (Part No. 12CF1-2SERPW-0*R) S/PDIF In cable (Part No. 12CR1-1SPDIN-0*R) - 7 - Box Contents GA-P55-UD3L-TPM, GA-P55-UD3L, or GA-P55-US3L motherboard Motherboard driver disk User's Manual Quick Installation Guide One IDE cable Two SATA 3Gb/s cables I/O Shield • The box contents above are subject to change...
... 2.0 bracket (Part No. 12CR1-1UB030-5*R) 2-port SATA power cable (Part No. 12CF1-2SERPW-0*R) S/PDIF In cable (Part No. 12CR1-1SPDIN-0*R) - 7 - Box Contents GA-P55-UD3L-TPM, GA-P55-UD3L, or GA-P55-US3L motherboard Motherboard driver disk User's Manual Quick Installation Guide One IDE cable Two SATA 3Gb/s cables I/O Shield • The box contents above are subject to change...
Manual
Page 14
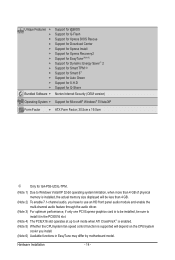
... version) Operating System w Support for Microsoft® Windows® 7/Vista/XP Form Factor w ATX Form Factor; 30.5cm x 19.0cm j Only for GA-P55-UD3L-TPM. (Note 1) Due to Windows Vista/XP 32-bit operating system limitation, when more than 4 GB of physical memory is installed, the actual memory size... 2) To enable 7.1-channel audio, you have to use an HD front panel audio module and enable the multi-channel audio feature through the audio driver. (Note 3) For optimum performance, if only one PCI Express graphics card is to be installed, be sure to install it in the PCIEX16 slot...
... version) Operating System w Support for Microsoft® Windows® 7/Vista/XP Form Factor w ATX Form Factor; 30.5cm x 19.0cm j Only for GA-P55-UD3L-TPM. (Note 1) Due to Windows Vista/XP 32-bit operating system limitation, when more than 4 GB of physical memory is installed, the actual memory size... 2) To enable 7.1-channel audio, you have to use an HD front panel audio module and enable the multi-channel audio feature through the audio driver. (Note 3) For optimum performance, if only one PCI Express graphics card is to be installed, be sure to install it in the PCIEX16 slot...
Manual
Page 20
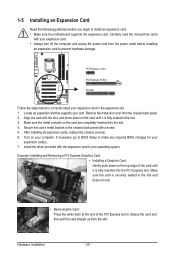
... install your expansion card(s). 7. Secure the card's metal bracket to release the card and then pull the card straight up from the slot. Install the driver provided with the expansion card in the slot and does not rock. • Removing the Card: Press the white latch at the end of the...
... install your expansion card(s). 7. Secure the card's metal bracket to release the card and then pull the card straight up from the slot. Install the driver provided with the expansion card in the slot and does not rock. • Removing the Card: Press the white latch at the end of the...
Manual
Page 22
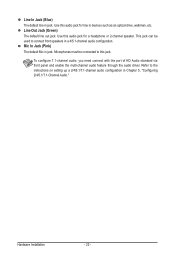
... 7.1-channel audio, you need connect with the port of HD Audio standard via front panel and enable the multi-channel audio feature through the audio driver. Hardware Installation - 22 - Refer to connect front speakers in jack. Microphones must be used to the instructions on setting up a 2/4/5.1/7.1-channel audio configuration in jack...
... 7.1-channel audio, you need connect with the port of HD Audio standard via front panel and enable the multi-channel audio feature through the audio driver. Hardware Installation - 22 - Refer to connect front speakers in jack. Microphones must be used to the instructions on setting up a 2/4/5.1/7.1-channel audio configuration in jack...

Manual
Page 34
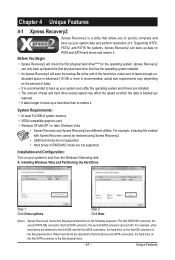
...device, then press to accept. Note: The setting in Boot Menu. A. Motherboard Model BIOS Version P55-UD3L D11 . . . . : BIOS Setup : XpressRecovery2 : Boot Menu : Qflash 07/17/2009-P55-7A89RG0LC-00 Function Keys Function Keys Function Keys: : POST SCREEN Press the key to show the BIOS... POST screen at system startup, refer to Xpress Recovery2 during the POST. The system will still be used for one time only. In Boot Menu, use the up hard drive data using the driver...
...device, then press to accept. Note: The setting in Boot Menu. A. Motherboard Model BIOS Version P55-UD3L D11 . . . . : BIOS Setup : XpressRecovery2 : Boot Menu : Qflash 07/17/2009-P55-7A89RG0LC-00 Function Keys Function Keys Function Keys: : POST SCREEN Press the key to show the BIOS... POST screen at system startup, refer to Xpress Recovery2 during the POST. The system will still be used for one time only. In Boot Menu, use the up hard drive data using the driver...
Manual
Page 51
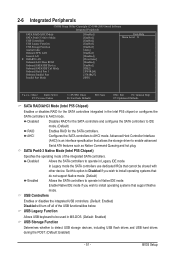
...Legacy Function Allows USB keyboard to AHCI mode. Set this option to Disabled if you wish to install operating systems that allows the storage driver to detect USB storage devices, including USB flash drives and USB hard drives during the POST. (Default: Enabled) - 51 - BIOS... Queuing and hot plug. Enable Native IDE mode if you wish to install operating systems that cannot be used in the Intel P55 chipset or configures the SATA controllers to be shared with other device. 2-6 Integrated Peripherals CMOS Setup Utility-Copyright (C) 1984-2009 ...
...Legacy Function Allows USB keyboard to AHCI mode. Set this option to Disabled if you wish to install operating systems that allows the storage driver to detect USB storage devices, including USB flash drives and USB hard drives during the POST. (Default: Enabled) - 51 - BIOS... Queuing and hot plug. Enable Native IDE mode if you wish to install operating systems that cannot be used in the Intel P55 chipset or configures the SATA controllers to be shared with other device. 2-6 Integrated Peripherals CMOS Setup Utility-Copyright (C) 1984-2009 ...
Manual
Page 53
... fields will show Short and then length shown will show Open, and the length shown is an interface specification that allows the storage driver to enable advanced Serial ATA features such as Native Command Queuing and hot plug. RAID/IDE Enables RAID for the SATA controller and ...ROM Allows you to decide whether to AHCI mode. Parallel Port Mode Selects an operating mode for the SATA controller integrated in the GIGABYTE SATA2 chip or configures the SATA controller to activate the boot ROM integrated with the onboard LAN chip. (Default: Disabled) Onboard SATA/IDE...
... fields will show Short and then length shown will show Open, and the length shown is an interface specification that allows the storage driver to enable advanced Serial ATA features such as Native Command Queuing and hot plug. RAID/IDE Enables RAID for the SATA controller and ...ROM Allows you to decide whether to AHCI mode. Parallel Port Mode Selects an operating mode for the SATA controller integrated in the GIGABYTE SATA2 chip or configures the SATA controller to activate the boot ROM integrated with the onboard LAN chip. (Default: Disabled) Onboard SATA/IDE...
Manual
Page 63
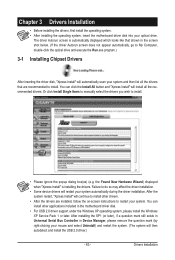
...right-clicking your mouse and select Uninstall) and restart the system. (The system will install all the drivers that shown in the motherboard driver disk. • For USB 2.0 driver support under the Windows XP operating system, please install the Windows XP Service Pack 1 or later. ...(e.g. You can click the Install All button and "Xpress Install" will then autodetect and install the USB 2.0 driver.) - 63 - You can install other drivers. • After the drivers are recommended to install. Failure to My Computer, double-click the optical drive and execute the Run.exe program...
...right-clicking your mouse and select Uninstall) and restart the system. (The system will install all the drivers that shown in the motherboard driver disk. • For USB 2.0 driver support under the Windows XP operating system, please install the Windows XP Service Pack 1 or later. ...(e.g. You can click the Install All button and "Xpress Install" will then autodetect and install the USB 2.0 driver.) - 63 - You can install other drivers. • After the drivers are recommended to install. Failure to My Computer, double-click the optical drive and execute the Run.exe program...
Manual
Page 64
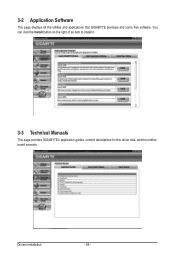
You can click the Install button on the right of an item to install it. 3-3 Technical Manuals This page provides GIGABYTE's application guides, content descriptions for this driver disk, and the motherboard manuals. Drivers Installation - 64 - 3-2 Application Software This page displays all the utilities and applications that GIGABYTE develops and some free software.
You can click the Install button on the right of an item to install it. 3-3 Technical Manuals This page provides GIGABYTE's application guides, content descriptions for this driver disk, and the motherboard manuals. Drivers Installation - 64 - 3-2 Application Software This page displays all the utilities and applications that GIGABYTE develops and some free software.

Manual
Page 65
3-4 Contact For the detailed contact information of the GIGABYTE Taiwan headquarter or worldwide branch offices, click the URL on this page to link to the GIGABYTE website. 3-5 System This page provides the basic system information. - 65 - Drivers Installation
3-4 Contact For the detailed contact information of the GIGABYTE Taiwan headquarter or worldwide branch offices, click the URL on this page to link to the GIGABYTE website. 3-5 System This page provides the basic system information. - 65 - Drivers Installation
Manual
Page 66
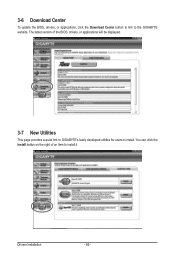
You can click the Install button on the right of the BIOS, drivers, or applications will be displayed. 3-7 New Utilities This page provides a quick link to GIGABYTE's lately developed utilities for users to install it. The latest version of an item to install. Drivers Installation - 66 - 3-6 Download Center To update the BIOS, drivers, or applications, click the Download Center button to link to the GIGABYTE website.
You can click the Install button on the right of the BIOS, drivers, or applications will be displayed. 3-7 New Utilities This page provides a quick link to GIGABYTE's lately developed utilities for users to install it. The latest version of an item to install. Drivers Installation - 66 - 3-6 Download Center To update the BIOS, drivers, or applications, click the Download Center button to link to the GIGABYTE website.
Manual
Page 67
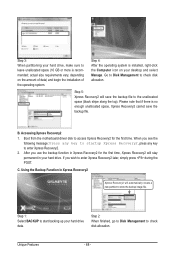
... Windows Vista and Partitioning the Hard Drive Step 1: Click Drive options. actual size requirements vary, depending on your system soon after the operating system and drivers are different utilities. Installation and Configuration: Turn on the amount of it . Supporting NTFS, FAT32, and FAT16 file systems, Xpress Recovery2 can only back up...
... Windows Vista and Partitioning the Hard Drive Step 1: Click Drive options. actual size requirements vary, depending on your system soon after the operating system and drivers are different utilities. Installation and Configuration: Turn on the amount of it . Supporting NTFS, FAT32, and FAT16 file systems, Xpress Recovery2 can only back up...
Manual
Page 68
... in Xpress Recovery2 Xpress Recovery2 will save the backup file. Step 3: When partitioning your desktop and select Manage. Accessing Xpress Recovery2 1. Boot from the motherboard driver disk to store the backup image file.
... in Xpress Recovery2 Xpress Recovery2 will save the backup file. Step 3: When partitioning your desktop and select Manage. Accessing Xpress Recovery2 1. Boot from the motherboard driver disk to store the backup image file.
Manual
Page 77
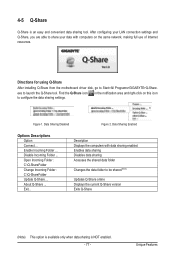
.... - 77 - After configuring your data with computers on this icon Figure 1. Disable Incoming Folder ... Exit... Directions for using Q-Share After installing Q-Share from the motherboard driver disk, go to Start>All Programs>GIGABYTE>Q-Share. Data Sharing Disabled Figure 2. Enable Incoming Folder ... Unique Features
.... - 77 - After configuring your data with computers on this icon Figure 1. Disable Incoming Folder ... Exit... Directions for using Q-Share After installing Q-Share from the motherboard driver disk, go to Start>All Programs>GIGABYTE>Q-Share. Data Sharing Disabled Figure 2. Enable Incoming Folder ... Unique Features
Manual
Page 81
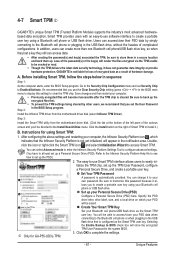
... Only for GA-P55-UD3L-TPM. 3. Unique Features Save changes and then restart your computer. • Previously encrypted files will be directed to store them in sequence: Step 1: As the computer starts, enter the BIOS Setup program. Install the Infineon TPM driver from the motherboard driver disk. (... create a portable user key using your Bluetooth cell phone/USB flash drive as the Smart TPM user key. 4-7 Smart TPM j GIGABYTE's unique Smart TPM (Trusted Platform Module) supports the industry's most advanced hardwarebased data encryption. The easy-to-use software interface to...
... Only for GA-P55-UD3L-TPM. 3. Unique Features Save changes and then restart your computer. • Previously encrypted files will be directed to store them in sequence: Step 1: As the computer starts, enter the BIOS Setup program. Install the Infineon TPM driver from the motherboard driver disk. (... create a portable user key using your Bluetooth cell phone/USB flash drive as the Smart TPM user key. 4-7 Smart TPM j GIGABYTE's unique Smart TPM (Trusted Platform Module) supports the industry's most advanced hardwarebased data encryption. The easy-to-use software interface to...

Manual
Page 83
...able to enhance your hard drive read/write performance without the need for RAID 0 when a new SATA drive is added. Using GIGABYTE eXtreme Hard Drive (X.H.D) Instructions: (Note 2) Before launching X.H.D, make sure the newly added harddrive has equal or greater capacity than... system and configure it for the Intel SATA controllers. Unique Features Step 2: Install the RAID driver and operating system The X.H.D utility supports Windows 7/Vista/XP. 4-9 eXtreme Hard Drive (X.H.D) With GIGABYTE eXtreme Hard Drive (X.H.D) (Note 1), users can quickly configure a RAIDready system for complex and ...
...able to enhance your hard drive read/write performance without the need for RAID 0 when a new SATA drive is added. Using GIGABYTE eXtreme Hard Drive (X.H.D) Instructions: (Note 2) Before launching X.H.D, make sure the newly added harddrive has equal or greater capacity than... system and configure it for the Intel SATA controllers. Unique Features Step 2: Install the RAID driver and operating system The X.H.D utility supports Windows 7/Vista/XP. 4-9 eXtreme Hard Drive (X.H.D) With GIGABYTE eXtreme Hard Drive (X.H.D) (Note 1), users can quickly configure a RAIDready system for complex and ...
Manual
Page 85
...in your computer. Make a floppy disk containing the SATA RAID/AHCI driver for the SATA port. (For example, on this motherboard, the SATA2_0, SATA2_1, SATA2_2, SATA2_3, SATA2_4 and SATA2_5 ports are supported by P55 Chipset.) Then connect the power connector from your computer Attach one hard ...drive. • An empty formatted floppy disk. • Windows Vista/XP setup disk. • Motherboard driver disk. 5-1-1 Configuring Intel P55 SATA Controllers A. If you do not want to ensure optimal performance, it is set to available SATA port on the motherboard. ...
...in your computer. Make a floppy disk containing the SATA RAID/AHCI driver for the SATA port. (For example, on this motherboard, the SATA2_0, SATA2_1, SATA2_2, SATA2_3, SATA2_4 and SATA2_5 ports are supported by P55 Chipset.) Then connect the power connector from your computer Attach one hard ...drive. • An empty formatted floppy disk. • Windows Vista/XP setup disk. • Motherboard driver disk. 5-1-1 Configuring Intel P55 SATA Controllers A. If you do not want to ensure optimal performance, it is set to available SATA port on the motherboard. ...


