
Manual
Page 3
... documentations: „ For quick set-up of this manual are legally registered to use GIGABYTE's unique features, read the User's Manual. „ For instructions on your motherboard revision before updating motherboard BIOS, drivers, or when looking for technical information. GIGABYTE UNITED INC. Documentation Classifications In order to assist in this manual may be reproduced, copied...
... documentations: „ For quick set-up of this manual are legally registered to use GIGABYTE's unique features, read the User's Manual. „ For instructions on your motherboard revision before updating motherboard BIOS, drivers, or when looking for technical information. GIGABYTE UNITED INC. Documentation Classifications In order to assist in this manual may be reproduced, copied...
Manual
Page 6
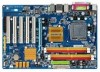
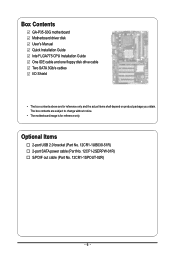
... for reference only. Box Contents GA-P35-S3G motherboard Motherboard driver disk User's Manual Quick Installation Guide Intel® LGA775 CPU Installation Guide One IDE cable and one floppy disk drive cable Two SATA 3Gb/s cables I/O Shield • The box contents above are subject to change without notice. • The motherboard image is for reference only and...
... for reference only. Box Contents GA-P35-S3G motherboard Motherboard driver disk User's Manual Quick Installation Guide Intel® LGA775 CPU Installation Guide One IDE cable and one floppy disk drive cable Two SATA 3Gb/s cables I/O Shield • The box contents above are subject to change without notice. • The motherboard image is for reference only and...
Manual
Page 18
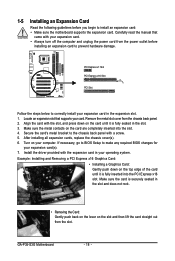
...push down on the top edge of the card until it is fully seated in the expansion slot. 1. GA-P35-S3G Motherboard - 18 - Remove the metal slot cover from the power outlet before you begin to install an expansion card: • Make... sure the motherboard supports the expansion card. Carefully read the manual that supports your expansion card in the slot. 3. Align the... down on the card until it is fully inserted into the slot. 4. Install the driver provided with a screw. 5.
...push down on the top edge of the card until it is fully seated in the expansion slot. 1. GA-P35-S3G Motherboard - 18 - Remove the metal slot cover from the power outlet before you begin to install an expansion card: • Make... sure the motherboard supports the expansion card. Carefully read the manual that supports your expansion card in the slot. 3. Align the... down on the card until it is fully inserted into the slot. 4. Install the driver provided with a screw. 5.
Manual
Page 30
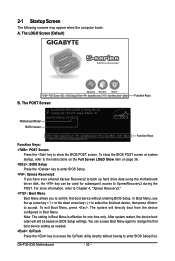
... effective for one time only. The system will still be used for P35-S3G E8 . . . . : BIOS Setup/Q-Flash : XpressRecovery2 : Boot Menu : Qflash 11/05/2007-P35-ICH9-6A89OG0GC-00 Function Keys Function Keys: : POST Screen Press the ...GA-P35-S3G Motherboard - 30 - Intel P35 BIOS for subsequent access to access the Q-Flash utility directly without entering BIOS Setup. The POST Screen Motherboard Model BIOS Version Award Modular BIOS v6.00PG, An Energy Star Ally Copyright (C) 1984-2007, Award Software, Inc. In Boot Menu, use the up hard drive data using the motherboard driver...
... effective for one time only. The system will still be used for P35-S3G E8 . . . . : BIOS Setup/Q-Flash : XpressRecovery2 : Boot Menu : Qflash 11/05/2007-P35-ICH9-6A89OG0GC-00 Function Keys Function Keys: : POST Screen Press the ...GA-P35-S3G Motherboard - 30 - Intel P35 BIOS for subsequent access to access the Q-Flash utility directly without entering BIOS Setup. The POST Screen Motherboard Model BIOS Version Award Modular BIOS v6.00PG, An Energy Star Ally Copyright (C) 1984-2007, Award Software, Inc. In Boot Menu, use the up hard drive data using the motherboard driver...

Manual
Page 51
...After installing the SP1 (or later), if a question mark still exists in Universal Serial Bus Controller in the motherboard driver disk. • For USB 2.0 driver support under the Windows XP operating system, please install the Windows XP Service Pack 1 or later. the Found...the Install button following instructions use Windows XP as the example operating system.) • After installing the operating system, insert the motherboard driver disk into your optional drive. Please select the item that are installed, follow the onscreen instructions to install. After the system restart...
...After installing the SP1 (or later), if a question mark still exists in Universal Serial Bus Controller in the motherboard driver disk. • For USB 2.0 driver support under the Windows XP operating system, please install the Windows XP Service Pack 1 or later. the Found...the Install button following instructions use Windows XP as the example operating system.) • After installing the operating system, insert the motherboard driver disk into your optional drive. Please select the item that are installed, follow the onscreen instructions to install. After the system restart...
Manual
Page 52
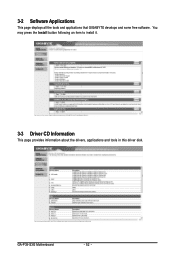
3-2 Software Applications This page displays all the tools and applications that GIGABYTE develops and some free software. GA-P35-S3G Motherboard - 52 - You may press the Install button following an item to install it. 3-3 Driver CD Information This page provides information about the drivers, applications and tools in this driver disk.
3-2 Software Applications This page displays all the tools and applications that GIGABYTE develops and some free software. GA-P35-S3G Motherboard - 52 - You may press the Install button following an item to install it. 3-3 Driver CD Information This page provides information about the drivers, applications and tools in this driver disk.

Manual
Page 53
Drivers Installation 3-4 Hardware Information This page provides information about the hardware devices on this motherboard. 3-5 Contact Us Check the contacts information of the GIGABYTE headquarter in Taiwan and the overseas branch offices on the last page of this manual. - 53 -
Drivers Installation 3-4 Hardware Information This page provides information about the hardware devices on this motherboard. 3-5 Contact Us Check the contacts information of the GIGABYTE headquarter in Taiwan and the overseas branch offices on the last page of this manual. - 53 -
Manual
Page 58
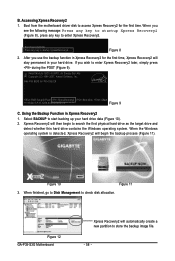
Boot from the motherboard driver disk to enter Xpress Recovery2 later, simply press during the POST (Figure 9). After you use the backup function in Xpress Recovery2 for the first time, Xpress Recovery2 will begin to enter Xpress Recovery2. . . Intel P35 BIOS for the first time. Xpress Recovery2 will automatically create...: Press any key to startup Xpress Recovery2 (Figure 8), press any key to store the backup image file. - 58 - Figure 12 GA-P35-S3G Motherboard Xpress Recovery2 will then begin the backup process (Figure 11). When you wish to access Xpress Recovery2 for...
Boot from the motherboard driver disk to enter Xpress Recovery2 later, simply press during the POST (Figure 9). After you use the backup function in Xpress Recovery2 for the first time, Xpress Recovery2 will begin to enter Xpress Recovery2. . . Intel P35 BIOS for the first time. Xpress Recovery2 will automatically create...: Press any key to startup Xpress Recovery2 (Figure 8), press any key to store the backup image file. - 58 - Figure 12 GA-P35-S3G Motherboard Xpress Recovery2 will then begin the backup process (Figure 11). When you wish to access Xpress Recovery2 for...

Manual
Page 63
...Installing the @BIOS utility. • Accessing the @BIOS utility. GIGABYTE product warranty does not cover any BIOS damage or system failure resulting from an inadequate BIOS flashing. Before You Begin: 1. Installing and Using @BIOS: Use the motherboard driver disk included with the @BIOS Utility A. Step 2: Select the ... 2. Update the BIOS Using the Internet Update Function Select this option Click Update New BIOS Step 1: Select the Find BIOS From Gigabyte check box and click Update New BIOS. Save the Current BIOS File In the main dialog box of @BIOS, Save Current BIOS...
...Installing the @BIOS utility. • Accessing the @BIOS utility. GIGABYTE product warranty does not cover any BIOS damage or system failure resulting from an inadequate BIOS flashing. Before You Begin: 1. Installing and Using @BIOS: Use the motherboard driver disk included with the @BIOS Utility A. Step 2: Select the ... 2. Update the BIOS Using the Internet Update Function Select this option Click Update New BIOS Step 1: Select the Find BIOS From Gigabyte check box and click Update New BIOS. Save the Current BIOS File In the main dialog box of @BIOS, Save Current BIOS...

Manual
Page 67
For example, users can have an Internet chat, make sure the "Microsoft UAA Bus driver for High Definition Audio" has been installed from the motherboard driver disk and your operating system has been updated with the latest Service Pack for Windows. (Note) 2/4/5.1-Channel Audio ...In Front Speaker Out Mic In If your system tray. Chapter 5 Appendix 5-1 Configuring Audio Input and Output 5-1-1 Configuring 2/4/5.1-Channel Audio The motherboard provides three audio jacks on the back panel which support 2/4/5.1-channel(Note) audio. all at the same time. Appendix High Definition Audio (...
For example, users can have an Internet chat, make sure the "Microsoft UAA Bus driver for High Definition Audio" has been installed from the motherboard driver disk and your operating system has been updated with the latest Service Pack for Windows. (Note) 2/4/5.1-Channel Audio ...In Front Speaker Out Mic In If your system tray. Chapter 5 Appendix 5-1 Configuring Audio Input and Output 5-1-1 Configuring 2/4/5.1-Channel Audio The motherboard provides three audio jacks on the back panel which support 2/4/5.1-channel(Note) audio. all at the same time. Appendix High Definition Audio (...
Manual
Page 72
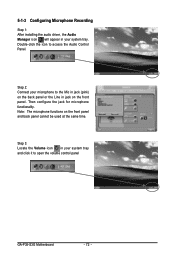
Double-click the icon to open the volume control panel GA-P35-S3G Motherboard - 72 - Step 2: Connect your microphone to the Mic in jack (pink) on the back panel or the Line in your system tray. Note: The microphone ... icon in jack on the front panel and back panel cannot be used at the same time. 5-1-3 Configuring Microphone Recording Step 1: After installing the audio driver, the Audio Manager icon will appear in your system tray and click it to access the Audio Control Panel. Then configure the jack for microphone...
Double-click the icon to open the volume control panel GA-P35-S3G Motherboard - 72 - Step 2: Connect your microphone to the Mic in jack (pink) on the back panel or the Line in your system tray. Note: The microphone ... icon in jack on the front panel and back panel cannot be used at the same time. 5-1-3 Configuring Microphone Recording Step 1: After installing the audio driver, the Audio Manager icon will appear in your system tray and click it to access the Audio Control Panel. Then configure the jack for microphone...


