Manual
Page 3
... any form or by any means without prior notice. Disclaimer Information in this manual may be reproduced, copied, translated, transmitted, or published in the use GIGABYTE's unique features, read the User's Manual. „ For instructions on how to their respective owners. No part of documentations: „ For detailed product information, ...carefully read or download the information on/from the Support\Motherboard\Technology Guide page on your motherboard revision before updating motherboard BIOS, drivers, or when looking for technical information.
... any form or by any means without prior notice. Disclaimer Information in this manual may be reproduced, copied, translated, transmitted, or published in the use GIGABYTE's unique features, read the User's Manual. „ For instructions on how to their respective owners. No part of documentations: „ For detailed product information, ...carefully read or download the information on/from the Support\Motherboard\Technology Guide page on your motherboard revision before updating motherboard BIOS, drivers, or when looking for technical information.

Manual
Page 5
... 53 3-1 Installing Chipset Drivers 53 3-2 Application Software 54 3-3 Technical Manuals 54 3-4 Contact ...55 3-5 System ...55 3-6 Download Center 56 Chapter 4 Unique Features 57 4-1 Xpress Recovery2 57 4-2 BIOS Update Utilities 62 4-2-1 ...
... 53 3-1 Installing Chipset Drivers 53 3-2 Application Software 54 3-3 Technical Manuals 54 3-4 Contact ...55 3-5 System ...55 3-6 Download Center 56 Chapter 4 Unique Features 57 4-1 Xpress Recovery2 57 4-2 BIOS Update Utilities 62 4-2-1 ...
Manual
Page 6
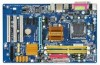
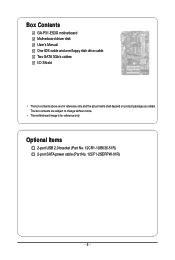
Optional Items 2-port USB 2.0 bracket (Part No. 12CR1-1UB030-51R) 2-port SATA power cable (Part No. 12CF1-2SERPW-01R) - 6 - The box contents are for reference only. Box Contents GA-P31-ES3G motherboard Motherboard driver disk User's Manual One IDE cable and one floppy disk drive cable Two SATA 3Gb/s cables I/O Shield • The box contents above are subject to change without notice. • The motherboard image is for reference only and the actual items shall depend on product package you obtain.
Optional Items 2-port USB 2.0 bracket (Part No. 12CR1-1UB030-51R) 2-port SATA power cable (Part No. 12CF1-2SERPW-01R) - 6 - The box contents are for reference only. Box Contents GA-P31-ES3G motherboard Motherboard driver disk User's Manual One IDE cable and one floppy disk drive cable Two SATA 3Gb/s cables I/O Shield • The box contents above are subject to change without notice. • The motherboard image is for reference only and the actual items shall depend on product package you obtain.
Manual
Page 12
... 5) Due to the hardware limitation, you have to use an HD front panel audio module and enable the multi-channel audio feature through the audio driver. (Note 3) Whether the CPU fan speed control function is supported will depend on standard PC architecture, a certain amount of memory size will instead be shown... system usage and therefore the actual memory size is reserved for Easy Energy Saver. For example, 4 GB of memory is less than the stated amount. GA-P31-ES3G Motherboard - 12 -
... 5) Due to the hardware limitation, you have to use an HD front panel audio module and enable the multi-channel audio feature through the audio driver. (Note 3) Whether the CPU fan speed control function is supported will depend on standard PC architecture, a certain amount of memory size will instead be shown... system usage and therefore the actual memory size is reserved for Easy Energy Saver. For example, 4 GB of memory is less than the stated amount. GA-P31-ES3G Motherboard - 12 -
Manual
Page 18
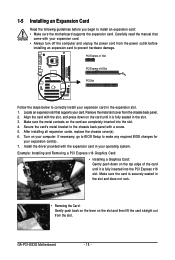
...your expansion card in the expansion slot. 1. Turn on the slot and then lift the card straight out from the chassis back panel. 2. GA-P31-ES3G Motherboard - 18 - 1-5 Installing an Expansion Card Read the following guidelines before installing an expansion card to prevent hardware damage. Secure the card... to make any required BIOS changes for your expansion card(s). 7. After installing all expansion cards, replace the chassis cover(s). 6. Install the driver provided with the slot, and press down on the top edge of the card until it is fully inserted into the slot. 4. Make...
...your expansion card in the expansion slot. 1. Turn on the slot and then lift the card straight out from the chassis back panel. 2. GA-P31-ES3G Motherboard - 18 - 1-5 Installing an Expansion Card Read the following guidelines before installing an expansion card to prevent hardware damage. Secure the card... to make any required BIOS changes for your expansion card(s). 7. After installing all expansion cards, replace the chassis cover(s). 6. Install the driver provided with the slot, and press down on the top edge of the card until it is fully inserted into the slot. 4. Make...
Manual
Page 20
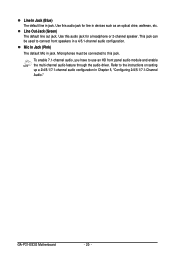
... line in jack. Microphones must be used to use an HD front panel audio module and enable the multi-channel audio feature through the audio driver. GA-P31-ES3G Motherboard - 20 - Use this jack.
... line in jack. Microphones must be used to use an HD front panel audio module and enable the multi-channel audio feature through the audio driver. GA-P31-ES3G Motherboard - 20 - Use this jack.
Manual
Page 32
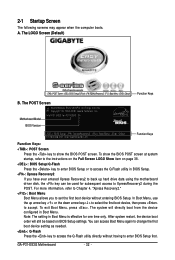
...XpressRecovery2 :Boot Menu :Qflash Function Keys B. To show the BIOS POST screen. In Boot Menu, use the up hard drive data using the motherboard driver disk, the key can access Boot Menu again to change the first boot device setting as needed. : Q-Flash Press the key to access the ... first. Note: The setting in BIOS Setup. : Xpress Recovery2 If you to accept. Motherboard Model BIOS Version Intel P31 BIOS for one time only. To exit Boot Menu, press . A. GA-P31-ES3G Motherboard - 32 - The system will still be used for subsequent access to the instructions on the Full Screen LOGO ...
...XpressRecovery2 :Boot Menu :Qflash Function Keys B. To show the BIOS POST screen. In Boot Menu, use the up hard drive data using the motherboard driver disk, the key can access Boot Menu again to change the first boot device setting as needed. : Q-Flash Press the key to access the ... first. Note: The setting in BIOS Setup. : Xpress Recovery2 If you to accept. Motherboard Model BIOS Version Intel P31 BIOS for one time only. To exit Boot Menu, press . A. GA-P31-ES3G Motherboard - 32 - The system will still be used for subsequent access to the instructions on the Full Screen LOGO ...
Manual
Page 53
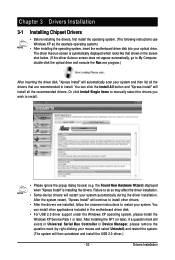
...Computer, double-click the optical drive and execute the Run.exe program.) After inserting the driver disk, "Xpress Install" will automatically scan your system and then list all the recommended drivers. Failure to install other applications included in Device Manager, please remove the question mark ...by right-clicking your optical drive. After the system restart, "Xpress Install" will continue to do so may affect the driver installation. • Some device drivers will restart your system. After installing the SP1 (or later), if a question mark still exists in Universal Serial Bus ...
...Computer, double-click the optical drive and execute the Run.exe program.) After inserting the driver disk, "Xpress Install" will automatically scan your system and then list all the recommended drivers. Failure to install other applications included in Device Manager, please remove the question mark ...by right-clicking your optical drive. After the system restart, "Xpress Install" will continue to do so may affect the driver installation. • Some device drivers will restart your system. After installing the SP1 (or later), if a question mark still exists in Universal Serial Bus ...
Manual
Page 54
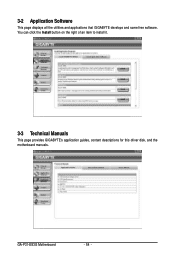
3-2 Application Software This page displays all the utilities and applications that GIGABYTE develops and some free software. You can click the Install button on the right of an item to install it. 3-3 Technical Manuals This page provides GIGABYTE's application guides, content descriptions for this driver disk, and the motherboard manuals. GA-P31-ES3G Motherboard - 54 -
3-2 Application Software This page displays all the utilities and applications that GIGABYTE develops and some free software. You can click the Install button on the right of an item to install it. 3-3 Technical Manuals This page provides GIGABYTE's application guides, content descriptions for this driver disk, and the motherboard manuals. GA-P31-ES3G Motherboard - 54 -
Manual
Page 55
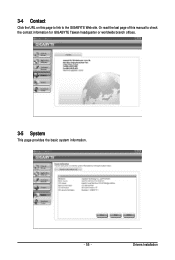
Drivers Installation Or read the last page of this page to link to check the contact information for GIGABYTE Taiwan headquarter or worldwide branch offices. 3-5 System This page provides the basic system information. - 55 - 3-4 Contact Click the URL on this manual to the GIGABYTE Web site.
Drivers Installation Or read the last page of this page to link to check the contact information for GIGABYTE Taiwan headquarter or worldwide branch offices. 3-5 System This page provides the basic system information. - 55 - 3-4 Contact Click the URL on this manual to the GIGABYTE Web site.

Manual
Page 56
The latest version of the BIOS, drivers, or applications will be displayed. GA-P31-ES3G Motherboard - 56 - 3-6 Download Center To update the BIOS, drivers, or applications, click the Download Center button to link to the GIGABYTE Web site.
The latest version of the BIOS, drivers, or applications will be displayed. GA-P31-ES3G Motherboard - 56 - 3-6 Download Center To update the BIOS, drivers, or applications, click the Download Center button to link to the GIGABYTE Web site.

Manual
Page 57
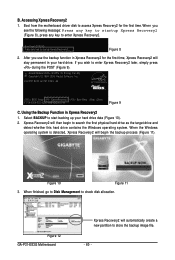
...* for the operating system. Supporting NTFS, FAT32, and FAT16 file systems, Xpress Recovery2 can only back up your system soon after the operating system and drivers are not supported. • Hard drives in the following sequence: The first PATA IDE connector, the second PATA IDE connector, the first SATA connector, the...
...* for the operating system. Supporting NTFS, FAT32, and FAT16 file systems, Xpress Recovery2 can only back up your system soon after the operating system and drivers are not supported. • Hard drives in the following sequence: The first PATA IDE connector, the second PATA IDE connector, the first SATA connector, the...
Manual
Page 60
...driver disk to store the backup image file. - 60 - Award Modular BIOS v6.00PG, An Energy Star Ally Copyright (C) 1984-2008, Award Software, Inc. Using the Backup Function in Xpress Recovery2 for the first time, Xpress Recovery2 will automatically create a new partition to access Xpress Recovery2 for P31-ES3G... E4 . . . . : BIOS Setup : XpressRecovery2 : Boot Menu : Qflash 07/18/2008-P31-ICH7-6A89OG0DC-00 Figure 9 C. Xpress Recovery2 will begin to enter Xpress Recovery2. . . Figure 8 2. Figure 12 GA-P31-ES3G Motherboard Xpress ...
...driver disk to store the backup image file. - 60 - Award Modular BIOS v6.00PG, An Energy Star Ally Copyright (C) 1984-2008, Award Software, Inc. Using the Backup Function in Xpress Recovery2 for the first time, Xpress Recovery2 will automatically create a new partition to access Xpress Recovery2 for P31-ES3G... E4 . . . . : BIOS Setup : XpressRecovery2 : Boot Menu : Qflash 07/18/2008-P31-ICH7-6A89OG0DC-00 Figure 9 C. Xpress Recovery2 will begin to enter Xpress Recovery2. . . Figure 8 2. Figure 12 GA-P31-ES3G Motherboard Xpress ...
Manual
Page 69
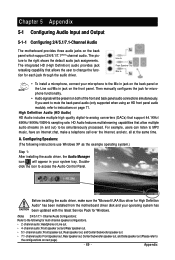
...the configurations on the front panel. channel audio: Front speaker out and Rear speaker out. • 5.1- A. Before installing the audio driver, make a telephone call over the Internet, and etc. Channel Audio Configurations: Refer to MP3 music, have an Internet chat, make...right shows the default audio jack assignments. Configuring Speakers: (The following for High Definition Audio" has been installed from the motherboard driver disk and your microphone to be present on the back panel which support 2/4/5.1/7.1(Note)-channel audio. Chapter 5 Appendix 5-1 Configuring Audio...
...the configurations on the front panel. channel audio: Front speaker out and Rear speaker out. • 5.1- A. Before installing the audio driver, make a telephone call over the Internet, and etc. Channel Audio Configurations: Refer to MP3 music, have an Internet chat, make...right shows the default audio jack assignments. Configuring Speakers: (The following for High Definition Audio" has been installed from the motherboard driver disk and your microphone to be present on the back panel which support 2/4/5.1/7.1(Note)-channel audio. Chapter 5 Appendix 5-1 Configuring Audio...
Manual
Page 73
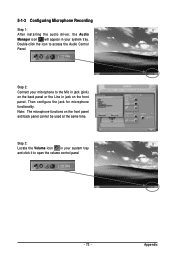
Note: The microphone functions on the front panel and back panel cannot be used at the same time. Appendix Step 2: Connect your microphone to the Mic in jack (pink) on the back panel or the Line in your system tray and click it to access the Audio Control Panel. 5-1-3 Configuring Microphone Recording Step 1: After installing the audio driver, the Audio Manager icon will appear in jack on the front panel. Step 3: Locate the Volume icon in your system tray. Then configure the jack for microphone functionality. Double-click the icon to open the volume control panel - 73 -
Note: The microphone functions on the front panel and back panel cannot be used at the same time. Appendix Step 2: Connect your microphone to the Mic in jack (pink) on the back panel or the Line in your system tray and click it to access the Audio Control Panel. 5-1-3 Configuring Microphone Recording Step 1: After installing the audio driver, the Audio Manager icon will appear in jack on the front panel. Step 3: Locate the Volume icon in your system tray. Then configure the jack for microphone functionality. Double-click the icon to open the volume control panel - 73 -


