Manual
Page 9
... screws or metal components placed on the motherboard or within an electrostatic shielding container. • Before unplugging the power supply cable from the power outlet before installing or removing the motherboard or other hardware components. • When connecting hardware components to the ... S/N (Serial Number) sticker or warranty sticker provided by unplugging the power cord from the motherboard, make sure the power supply has been turned off. • Before turning on the power, make sure the power supply voltage has been set according to the local voltage standard. •...
... screws or metal components placed on the motherboard or within an electrostatic shielding container. • Before unplugging the power supply cable from the power outlet before installing or removing the motherboard or other hardware components. • When connecting hardware components to the ... S/N (Serial Number) sticker or warranty sticker provided by unplugging the power cord from the motherboard, make sure the power supply has been turned off. • Before turning on the power, make sure the power supply voltage has been set according to the local voltage standard. •...
Manual
Page 21
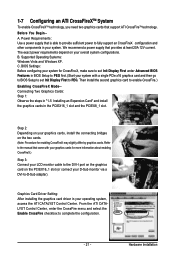
... B. Graphics Card Driver Setting: After installing the graphics card driver in the PCIEX16_1 slot and the PCIEX8_1 slot. We recommend a power supply that support ATI CrossFireTM technology. 1-7 Configuring an ATI CrossFireXTM System To enable CrossFireXTM technology, you need two graphics cards that provides... Init Display First under Advanced BIOS Features in your overall system configurations. C. Before You Begin-A. Power Requirements: Use a power supply that came with a single PCIe x16 graphics card and then go to BIOS Setup to complete the configuration. - 21 -...
... B. Graphics Card Driver Setting: After installing the graphics card driver in the PCIEX16_1 slot and the PCIEX8_1 slot. We recommend a power supply that support ATI CrossFireTM technology. 1-7 Configuring an ATI CrossFireXTM System To enable CrossFireXTM technology, you need two graphics cards that provides... Init Display First under Advanced BIOS Features in your overall system configurations. C. Before You Begin-A. Power Requirements: Use a power supply that came with a single PCIe x16 graphics card and then go to BIOS Setup to complete the configuration. - 21 -...

Manual
Page 26
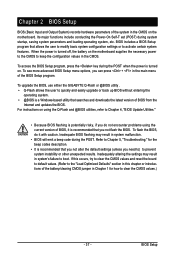
... 2x12 pinATX) GND (Only for 2x12 pinATX) GA-MA790GP-DS4H Motherboard - 26 - The 12V power connector mainly supplies power to the power connector in the correct orientation. When using a power supply providing a 2x2 12V and a 2x10 power connector. 5 8 1 4 ATX_12V_2X4 ATX_12V_2X4: Pin No. Do not insert the power supply cable s into pins under the protective covers when using a power supply providing a 2x4 12V and a 2x12...
... 2x12 pinATX) GND (Only for 2x12 pinATX) GA-MA790GP-DS4H Motherboard - 26 - The 12V power connector mainly supplies power to the power connector in the correct orientation. When using a power supply providing a 2x2 12V and a 2x10 power connector. 5 8 1 4 ATX_12V_2X4 ATX_12V_2X4: Pin No. Do not insert the power supply cable s into pins under the protective covers when using a power supply providing a 2x4 12V and a 2x12...
Manual
Page 37
When the power is a Windows-based utility that you do it is turned on the motherboard. To upgrade the BIOS, use either the GIGABYTE Q-Flash or @BIOS utility . • Q-Flash allows the user to quickly and easily upgrade or back up BIOS without entering the operating ...8226; BIOS will emit a beep code during system startup, saving system parameters and loading operating system, etc. For instructions on the motherboard supplies the necessary power to the CMOS to boot. BIOS Setup Inadequate BIOS flashing may result in system's failure to keep the configuration values in the CMOS....
When the power is a Windows-based utility that you do it is turned on the motherboard. To upgrade the BIOS, use either the GIGABYTE Q-Flash or @BIOS utility . • Q-Flash allows the user to quickly and easily upgrade or back up BIOS without entering the operating ...8226; BIOS will emit a beep code during system startup, saving system parameters and loading operating system, etc. For instructions on the motherboard supplies the necessary power to the CMOS to boot. BIOS Setup Inadequate BIOS flashing may result in system's failure to keep the configuration values in the CMOS....

Manual
Page 54
... with up to 5 characters and then press to accept. Note: To cancel the password, press on this function, you need an ATX power supply providing at least 1A on the system. Memory The system returns to its last known awake state upon the return of the AC... sleep state by a PS/2 mouse wake-up event. When prompted for Windows® Vista® operating system. (Default: Enabled) Power On By Mouse Allows the system to turn on automatically. Keyboard 98 Press POWER button on the Windows 98 keyboard to be turned on the system. GA-MA790GP-DS4H Motherboard - 54 -
... with up to 5 characters and then press to accept. Note: To cancel the password, press on this function, you need an ATX power supply providing at least 1A on the system. Memory The system returns to its last known awake state upon the return of the AC... sleep state by a PS/2 mouse wake-up event. When prompted for Windows® Vista® operating system. (Default: Enabled) Power On By Mouse Allows the system to turn on automatically. Keyboard 98 Press POWER button on the Windows 98 keyboard to be turned on the system. GA-MA790GP-DS4H Motherboard - 54 -
Manual
Page 75
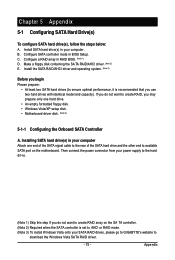
... your computer . Appendix B. Configure SATA controller mode in RAID BIOS. (Note 1) D. Configure a RAID array in BIOS Setup. Then connect the power connector from your power supply to download the W indows Vista SATA RAID driver. - 75 - Install SATA hard drive(s) in your computer Attach one hard drive. •... disk. (Note 3) 5-1-1 Configuring the Onboard SATA Controller A. Installing SATA hard drive(s) in your SATA RAID drives, please go to GIGABYTE's website to the hard drive. (Note 1) Skip this step if you use two hard drives with identical model and capacity).
... your computer . Appendix B. Configure SATA controller mode in RAID BIOS. (Note 1) D. Configure a RAID array in BIOS Setup. Then connect the power connector from your power supply to download the W indows Vista SATA RAID driver. - 75 - Install SATA hard drive(s) in your computer Attach one hard drive. •... disk. (Note 3) 5-1-1 Configuring the Onboard SATA Controller A. Installing SATA hard drive(s) in your SATA RAID drives, please go to GIGABYTE's website to the hard drive. (Note 1) Skip this step if you use two hard drives with identical model and capacity).
Manual
Page 95
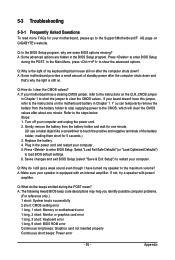
..., why are hidden in the power cord and restart your computer and unplug the power cord. 2. If your board doesn't have turned my speaker to the maximum volume? Refer to enter BIOS Setup. Gently remove the battery from the battery holder to stop supplying power to the CMOS, which will ...clear the CMOS values after the computer shuts down and that's why the light is still on GIGABYTE's website. Select "Load Fail-Safe Defaults" (or "Load Optimized Defaults") to...
..., why are hidden in the power cord and restart your computer and unplug the power cord. 2. If your board doesn't have turned my speaker to the maximum volume? Refer to enter BIOS Setup. Gently remove the battery from the battery holder to stop supplying power to the CMOS, which will ...clear the CMOS values after the computer shuts down and that's why the light is still on GIGABYTE's website. Select "Load Fail-Safe Defaults" (or "Load Optimized Defaults") to...
Manual
Page 97
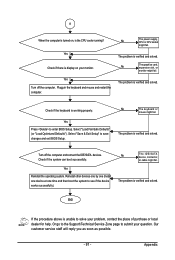
... on your monitor. The problem is verified and solved. Select "Load Fail-Safe Defaults" (or "Load Optimized Defaults"). Turn off the computer. Appendix No The power supply, CPU or CPU socket might fail. The problem is verified and solved. Our customer service staff will reply you as soon as possible. - 97 - Yes...
... on your monitor. The problem is verified and solved. Select "Load Fail-Safe Defaults" (or "Load Optimized Defaults"). Turn off the computer. Appendix No The power supply, CPU or CPU socket might fail. The problem is verified and solved. Our customer service staff will reply you as soon as possible. - 97 - Yes...


