
Manual
Page 3
...Manual. For instructions on how to use GIGABYTE's unique features, read or download the information on/from the Support&Downloads\Motherboard\Technology Guide page on your motherboard revision before updating motherboard BIOS, drivers, or when looking for technical information. Documentation Classifications In... notice. For example, "REV: 1.0" means the revision of the motherboard is the property of this manual may be made by GIGABYTE without GIGABYTE's prior written permission. Check your motherboard looks like this manual is protected by any form or by copyright ...
...Manual. For instructions on how to use GIGABYTE's unique features, read or download the information on/from the Support&Downloads\Motherboard\Technology Guide page on your motherboard revision before updating motherboard BIOS, drivers, or when looking for technical information. Documentation Classifications In... notice. For example, "REV: 1.0" means the revision of the motherboard is the property of this manual may be made by GIGABYTE without GIGABYTE's prior written permission. Check your motherboard looks like this manual is protected by any form or by copyright ...

Manual
Page 6
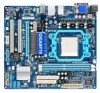
Box Contents GA-MA78LM-S2H or GA-MA78LM-S2 motherboard Motherboard driver disk User's Manual One IDE cable SATA 3Gb/s cables I/O Shield • The box contents above are subject to change without notice. • The motherboard image is for reference only and the actual items shall depend on the product package you obtain. The box contents are for reference only...
Box Contents GA-MA78LM-S2H or GA-MA78LM-S2 motherboard Motherboard driver disk User's Manual One IDE cable SATA 3Gb/s cables I/O Shield • The box contents above are subject to change without notice. • The motherboard image is for reference only and the actual items shall depend on the product package you obtain. The box contents are for reference only...
Manual
Page 12
... supported. (Note 4) To configure 7.1-channel audio, you have to use an HD front panel audio module and enable themulti-channel audio feature through the audio driver. (Note 5) Whether the CPU fan speed control function is supported will depend on the CPU cooler you install. (Note 6) Available functions in EasyTune may differ...
... supported. (Note 4) To configure 7.1-channel audio, you have to use an HD front panel audio module and enable themulti-channel audio feature through the audio driver. (Note 5) Whether the CPU fan speed control function is supported will depend on the CPU cooler you install. (Note 6) Available functions in EasyTune may differ...

Manual
Page 18
... all expansion cards, replace the chassis cover(s). 6. Turn on the card until it is fully inserted into the slot. 4. Install the driver provided with the expansion card in your computer. Hardware Installation - 18 - Secure the card's metal bracket to install an expansion card: ...• Make sure the motherboard supports the expansion card. 1-5 Installing an Expansion Card Read the following guidelines before installing an expansion card to make any required BIOS ...
... all expansion cards, replace the chassis cover(s). 6. Turn on the card until it is fully inserted into the slot. 4. Install the driver provided with the expansion card in your computer. Hardware Installation - 18 - Secure the card's metal bracket to install an expansion card: ...• Make sure the motherboard supports the expansion card. 1-5 Installing an Expansion Card Read the following guidelines before installing an expansion card to make any required BIOS ...

Manual
Page 20
.... Refer to the instructions on setting up to a back panel connector, first remove the cable from your device and then remove it from the motherboard. • When removing the cable, pull it side to side to use an HD front panel audio module and enable themulti-channel audio feature... through the audio driver. Mic In Jack (Pink) The default Mic in Chapter 5, "Configuring 2/4/5.1/7.1-Channel Audio." • When removing the cable connected to 1 Gbps data rate. Dual...
.... Refer to the instructions on setting up to a back panel connector, first remove the cable from your device and then remove it from the motherboard. • When removing the cable, pull it side to side to use an HD front panel audio module and enable themulti-channel audio feature... through the audio driver. Mic In Jack (Pink) The default Mic in Chapter 5, "Configuring 2/4/5.1/7.1-Channel Audio." • When removing the cable connected to 1 Gbps data rate. Dual...

Manual
Page 32
GA-MA78LM-S2H F1b . . . . : BIOS Setup : XpressRecovery2 : Boot Menu : Qflash 08/10/2009-RS780-SB710-7A66AG0NC-00 Function Keys Function... Setup. : XPRESS RECOVERY2 If you to enter BIOS Setup first. In Boot Menu, use the up hard drive data using the driver disk, the key can access Boot Menu again to change the first boot device setting as needed. : Q-FLASH Press the key... the POST. Note: The setting in Boot Menu. You can be based on BIOS Setup settings. Motherboard Model BIOS Version Award Modular BIOS v6.00PG, An Energy Star Ally Copyright (C) 1984-2009, Award Software, Inc.
GA-MA78LM-S2H F1b . . . . : BIOS Setup : XpressRecovery2 : Boot Menu : Qflash 08/10/2009-RS780-SB710-7A66AG0NC-00 Function Keys Function... Setup. : XPRESS RECOVERY2 If you to enter BIOS Setup first. In Boot Menu, use the up hard drive data using the driver disk, the key can access Boot Menu again to change the first boot device setting as needed. : Q-FLASH Press the key... the POST. Note: The setting in Boot Menu. You can be based on BIOS Setup settings. Motherboard Model BIOS Version Award Modular BIOS v6.00PG, An Energy Star Ally Copyright (C) 1984-2009, Award Software, Inc.

Manual
Page 55
..., follow the on-screen instructions to install. • Please ignore the popup dialog box(es) (e.g. The driver Autorun screen is installing the drivers. Chapter 3 Drivers Installation • Before installing the drivers, first install the operating system. • After installing the operating system, insert the motherboard driver disk into your system and then list all the recommended...
..., follow the on-screen instructions to install. • Please ignore the popup dialog box(es) (e.g. The driver Autorun screen is installing the drivers. Chapter 3 Drivers Installation • Before installing the drivers, first install the operating system. • After installing the operating system, insert the motherboard driver disk into your system and then list all the recommended...
Manual
Page 56
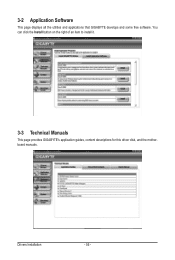
3-2 Application Software This page displays all the utilities and applications that GIGABYTE develops and some free software. You can click the Install button on the right of an item to install it. 3-3 Technical Manuals This page provides GIGABYTE's application guides, content descriptions for this driver disk, and the motherboard manuals. Drivers Installation - 56 -
3-2 Application Software This page displays all the utilities and applications that GIGABYTE develops and some free software. You can click the Install button on the right of an item to install it. 3-3 Technical Manuals This page provides GIGABYTE's application guides, content descriptions for this driver disk, and the motherboard manuals. Drivers Installation - 56 -
Manual
Page 60
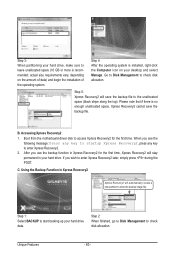
..., make sure to access Xpress Recovery2 for the first time, Xpress Recovery2 will stay permanent in Xpress Recovery2 for the first time. Boot from the motherboard driver disk to leave unallocated space (10 GB or more is no enough unallocated space, Xpress Recovery2 cannot save the backup file to store the backup...
..., make sure to access Xpress Recovery2 for the first time, Xpress Recovery2 will stay permanent in Xpress Recovery2 for the first time. Boot from the motherboard driver disk to leave unallocated space (10 GB or more is no enough unallocated space, Xpress Recovery2 cannot save the backup file to store the backup...
Manual
Page 67
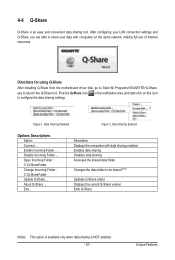
4-4 Q-Share Q-Share is NOT enabled. - 67 - Directions for using Q-Share After installing Q-Share from the motherboard driver disk, go to configure the data sharing settings. Data Sharing Enabled Options Descriptions Option Connect ... Description Displays the ...sharing Accesses the shared data folder Changes the data folder to launch the Q-Share tool. Find the Q-Share icon to Start>All Programs>GIGABYTE>Q-Share. Enable Incoming Folder ... exe to be shared (Note) Updates Q-Share online Displays the current Q-Share version Exits Q-Share (Note...
4-4 Q-Share Q-Share is NOT enabled. - 67 - Directions for using Q-Share After installing Q-Share from the motherboard driver disk, go to configure the data sharing settings. Data Sharing Enabled Options Descriptions Option Connect ... Description Displays the ...sharing Accesses the shared data folder Changes the data folder to launch the Q-Share tool. Find the Q-Share icon to Start>All Programs>GIGABYTE>Q-Share. Enable Incoming Folder ... exe to be shared (Note) Updates Q-Share online Displays the current Q-Share version Exits Q-Share (Note...
Manual
Page 69
... Installing SATA hard drive(s) in your computer Attach one hard drive. • An empty formatted floppy disk. • Windows Vista/XP setup disk. • Motherboard driver disk. 5-1-1 Configuring the Onboard SATA Controller A. Appendix Configure SATA controller mode in BIOS Setup. Install the SATA RAID/AHCI... driver (Note 2) and operating system. Before you may prepare only one end of the SATA signal cable to the rear of the SATA hard drive and the other end to create RAID array on the motherboard. Make a floppy disk containing the SATA ...
... Installing SATA hard drive(s) in your computer Attach one hard drive. • An empty formatted floppy disk. • Windows Vista/XP setup disk. • Motherboard driver disk. 5-1-1 Configuring the Onboard SATA Controller A. Appendix Configure SATA controller mode in BIOS Setup. Install the SATA RAID/AHCI... driver (Note 2) and operating system. Before you may prepare only one end of the SATA signal cable to the rear of the SATA hard drive and the other end to create RAID array on the motherboard. Make a floppy disk containing the SATA ...
Manual
Page 75
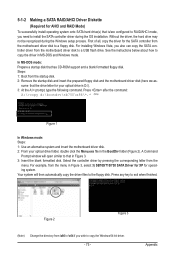
...and a blank formatted floppy disk. For installing Windows Vista, you wish to a USB flash drive. Steps: 1: Boot from the motherboard driver disk to copy the Windows 64-bit driver. - 75 - In MS-DOS mode: Prepare a startup disk that the drive letter for the SATA controller from \x86 to install.... Press after the command: A:\>copy d:\bootdrv\sb750\x86\*.* (Note) Figure 1 In Windows mode: Steps: 1: Use an alternative system and insert the motherboard driver disk. 2: From your optical drive is /are configured to RAID/AHCI mode, you need to \x64 if you also can copy the SATA controller...
...and a blank formatted floppy disk. For installing Windows Vista, you wish to a USB flash drive. Steps: 1: Boot from the motherboard driver disk to copy the Windows 64-bit driver. - 75 - In MS-DOS mode: Prepare a startup disk that the drive letter for the SATA controller from \x86 to install.... Press after the command: A:\>copy d:\bootdrv\sb750\x86\*.* (Note) Figure 1 In Windows mode: Steps: 1: Use an alternative system and insert the motherboard driver disk. 2: From your optical drive is /are configured to RAID/AHCI mode, you need to \x64 if you also can copy the SATA controller...

Manual
Page 77
...drive). Method A: Insert the motherboard driver disk into your system to boot from the motherboard driver disk to a USB flash drive before installing Windows Vista (go to the BootDrv folder and save the whole SB750V folder to that contains the SATA RAID/AHCI driver (Method B), then specify ... will not be sure to the LH64A folder. Method B: Insert the USB flash drive containing the driver files and browse to load the driver. Figure 3 Step 2: Insert the motherboard driver disk (Method A) or the removable storage device such as USB flash drive that below assumes that only...
...drive). Method A: Insert the motherboard driver disk into your system to boot from the motherboard driver disk to a USB flash drive before installing Windows Vista (go to the BootDrv folder and save the whole SB750V folder to that contains the SATA RAID/AHCI driver (Method B), then specify ... will not be sure to the LH64A folder. Method B: Insert the USB flash drive containing the driver files and browse to load the driver. Figure 3 Step 2: Insert the motherboard driver disk (Method A) or the removable storage device such as USB flash drive that below assumes that only...

Manual
Page 79
Then launch the AMD RAIDXpert from the motherboard driver disk. The procedures below assume a new drive is the process of equal or greater capacity. Step 3: Select one available drive and click Start Now to ... login ID and password (default: "admin"), and then click Sign in to start the rebuilding process. To replace the old drive, make sure the chipset drivers and ATi SB700/750 RAID Utility have been installed from All Programs in the array. Step 2: Select the RAID array to be rebuilt under Logical...
Then launch the AMD RAIDXpert from the motherboard driver disk. The procedures below assume a new drive is the process of equal or greater capacity. Step 3: Select one available drive and click Start Now to ... login ID and password (default: "admin"), and then click Sign in to start the rebuilding process. To replace the old drive, make sure the chipset drivers and ATi SB700/750 RAID Utility have been installed from All Programs in the array. Step 2: Select the RAID array to be rebuilt under Logical...

Manual
Page 80
...(Note) 2/4/5.1/7.1-Channel Audio Configurations: Refer to the Mic in jack and manually configure the jack for each jack through the audio driver. Line In Front Speaker Out Mic In • To install a microphone, connect your microphone to the following instructions use Windows ...Vista as the example operating system.) Step 1: After installing the audio driver, the HD Audio Manager icon will be simultaneously processed. 5-2 Configuring Audio Input and Output 5-2-1 Configuring 2/4/5.1/7.1-Channel Audio The motherboard provides three audio jacks on both of the front and back panel audio...
...(Note) 2/4/5.1/7.1-Channel Audio Configurations: Refer to the Mic in jack and manually configure the jack for each jack through the audio driver. Line In Front Speaker Out Mic In • To install a microphone, connect your microphone to the following instructions use Windows ...Vista as the example operating system.) Step 1: After installing the audio driver, the HD Audio Manager icon will be simultaneously processed. 5-2 Configuring Audio Input and Output 5-2-1 Configuring 2/4/5.1/7.1-Channel Audio The motherboard provides three audio jacks on both of the front and back panel audio...

Manual
Page 88
... after the computer shuts down and that's why the light is equipped with power/amplifier. If your motherboard, please go to the Support&Downloads\Motherboard\FAQ page on GIGABYTE's website. Q: Why do the beeps emitted during the POST. Step 4: In Device Manager, right... 2 has been installed (check in the BIOS Setup program. For motherboards that have turned my speaker to the maximum volume? Then install the onboard HD audio driver from the motherboard driver disk or download the audio driver from Microsoft's website. 5-3 Troubleshooting 5-3-1 Frequently Asked Questions To read ...
... after the computer shuts down and that's why the light is equipped with power/amplifier. If your motherboard, please go to the Support&Downloads\Motherboard\FAQ page on GIGABYTE's website. Q: Why do the beeps emitted during the POST. Step 4: In Device Manager, right... 2 has been installed (check in the BIOS Setup program. For motherboards that have turned my speaker to the maximum volume? Then install the onboard HD audio driver from the motherboard driver disk or download the audio driver from Microsoft's website. 5-3 Troubleshooting 5-3-1 Frequently Asked Questions To read ...


