
Manual
Page 3
...Documentation Classifications In order to assist in this : "REV: X.X." For product-related information, check on our website at: http://www.gigabyte.com.tw Identifying Your Motherboard Revision The revision number on our website. For example, "REV: 1.0" means the revision of the ... read or download the information on/from the Support&Downloads\Motherboard\Technology Guide page on your motherboard revision before updating motherboard BIOS, drivers, or when looking for technical information. Example: Disclaimer Information in the use of documentations: For detailed...
...Documentation Classifications In order to assist in this : "REV: X.X." For product-related information, check on our website at: http://www.gigabyte.com.tw Identifying Your Motherboard Revision The revision number on our website. For example, "REV: 1.0" means the revision of the ... read or download the information on/from the Support&Downloads\Motherboard\Technology Guide page on your motherboard revision before updating motherboard BIOS, drivers, or when looking for technical information. Example: Disclaimer Information in the use of documentations: For detailed...

Manual
Page 4
Table of Contents Box Contents...6 Optional Items...6 GA-MA78LM-S2H/GA-MA78LM-S2 Motherboard Layout 7 Block Diagram...8 Chapter 1 Hardware Installation 9 1-1 Installation Precautions 9 1-2 Product Specifications 10 1-3 Installing the CPU and CPU...Installing an Expansion Card 18 1-6 Back Panel Connectors 19 1-7 Internal Connectors 21 Chapter 2 BIOS Setup 31 2-1 Startup Screen 32 2-2 The Main Menu 33 2-3 MB Intelligent Tweaker(M.I.T 35 2-4 Standard CMOS Features 39 2-5 Advanced BIOS Features 41 2-6 Integrated Peripherals 43 2-7 Power Management Setup 46 2-8 PnP/PCI Configurations ...
Table of Contents Box Contents...6 Optional Items...6 GA-MA78LM-S2H/GA-MA78LM-S2 Motherboard Layout 7 Block Diagram...8 Chapter 1 Hardware Installation 9 1-1 Installation Precautions 9 1-2 Product Specifications 10 1-3 Installing the CPU and CPU...Installing an Expansion Card 18 1-6 Back Panel Connectors 19 1-7 Internal Connectors 21 Chapter 2 BIOS Setup 31 2-1 Startup Screen 32 2-2 The Main Menu 33 2-3 MB Intelligent Tweaker(M.I.T 35 2-4 Standard CMOS Features 39 2-5 Advanced BIOS Features 41 2-6 Integrated Peripherals 43 2-7 Power Management Setup 46 2-8 PnP/PCI Configurations ...
Manual
Page 5
... 56 3-3 Technical Manuals 56 3-4 Contact...57 3-5 System...57 3-6 Download Center 58 Chapter 4 Unique Features 59 4-1 Xpress Recovery2 59 4-2 BIOS Update Utilities 62 4-2-1 Updating the BIOS with the Q-Flash Utility 62 4-2-2 Updating the BIOS with the @BIOS Utility 65 4-3 EasyTune 6...66 4-4 Q-Share...67 4-5 Time Repair...68 Chapter 5 Appendix...69 5-1 Configuring SATA Hard Drive(s 69 5-1-1 Configuring...
... 56 3-3 Technical Manuals 56 3-4 Contact...57 3-5 System...57 3-6 Download Center 58 Chapter 4 Unique Features 59 4-1 Xpress Recovery2 59 4-2 BIOS Update Utilities 62 4-2-1 Updating the BIOS with the Q-Flash Utility 62 4-2-2 Updating the BIOS with the @BIOS Utility 65 4-3 EasyTune 6...66 4-4 Q-Share...67 4-5 Time Repair...68 Chapter 5 Appendix...69 5-1 Configuring SATA Hard Drive(s 69 5-1-1 Configuring...
Manual
Page 8
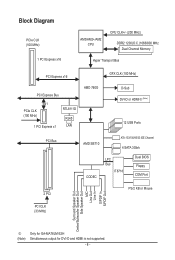
... Channel 4 SATA 3Gb/s CODEC LPC Bus IT8718 Dual BIOS Floppy COM Port 2 PCI PS/2 KB or Mouse PCI CLK (33 MHz) Surround Speaker Out Center/Subwoofer Speaker Out Side Speaker Out MIC Line Out Line In S/PDIF In S/PDIF Out j (Note) Only for GA-MA78LM-S2H Simultaneous output for DVI-D and HDMI is...
... Channel 4 SATA 3Gb/s CODEC LPC Bus IT8718 Dual BIOS Floppy COM Port 2 PCI PS/2 KB or Mouse PCI CLK (33 MHz) Surround Speaker Out Center/Subwoofer Speaker Out Side Speaker Out MIC Line Out Line In S/PDIF In S/PDIF Out j (Note) Only for GA-MA78LM-S2H Simultaneous output for DVI-D and HDMI is...

Manual
Page 11
... w iTE IT8718 chip Hardware Monitor w w w w w w BIOS w w w w System voltage detection CPU/System temperature detection CPU/System fan speed detection CPU overheating warning CPU/System fan fail warning CPU fan speed control (Note 5) 2 x 8 Mbit flash Use of licensed AWARD BIOS Support for DualBIOS™ PnP 1.0a, DMI 2.0, SM BIOS 2.4, ACPI 1.0b j Only for GA-MA78LM-S2H - 11 -
... w iTE IT8718 chip Hardware Monitor w w w w w w BIOS w w w w System voltage detection CPU/System temperature detection CPU/System fan speed detection CPU overheating warning CPU/System fan fail warning CPU fan speed control (Note 5) 2 x 8 Mbit flash Use of licensed AWARD BIOS Support for DualBIOS™ PnP 1.0a, DMI 2.0, SM BIOS 2.4, ACPI 1.0b j Only for GA-MA78LM-S2H - 11 -
Manual
Page 12
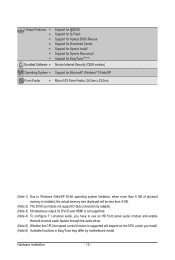
Hardware Installation - 12 - Unique Features w w w w w w w Bundled Software w Support for @BIOS Support for Q-Flash Support for Xpress BIOS Rescue Support for Download Center Support for Xpress Install Support for Xpress Recovery2 Support for EasyTune (Note 6) Norton Internet Security (OEM version) Operating System w Support ...
Hardware Installation - 12 - Unique Features w w w w w w w Bundled Software w Support for @BIOS Support for Q-Flash Support for Xpress BIOS Rescue Support for Download Center Support for Xpress Install Support for Xpress Recovery2 Support for EasyTune (Note 6) Norton Internet Security (OEM version) Operating System w Support ...

Manual
Page 16
If you begin to install the memory: • Make sure that memory of the same capacity, brand, speed, and chips be used . (Go to GIGABYTE's website for the latest memory support list.) • Always turn off the computer and unplug the power cord from the power outlet before you are ... unable to prevent hardware damage. • Memory modules have a foolproof design. Dual Channel mode cannot be installed in Dual Channel mode. 1. It is installed, the BIOS will double the original memory bandwidth. After the memory is recommended that memory of the memory.
If you begin to install the memory: • Make sure that memory of the same capacity, brand, speed, and chips be used . (Go to GIGABYTE's website for the latest memory support list.) • Always turn off the computer and unplug the power cord from the power outlet before you are ... unable to prevent hardware damage. • Memory modules have a foolproof design. Dual Channel mode cannot be installed in Dual Channel mode. 1. It is installed, the BIOS will double the original memory bandwidth. After the memory is recommended that memory of the memory.

Manual
Page 18
...card: • Make sure the motherboard supports the expansion card. After installing all expansion cards, replace the chassis cover(s). 6. If necessary, go to BIOS Setup to correctly install your expansion card. • Always turn off the computer and unplug the power cord from the chassis back panel. 2. Locate an... slot that came with a screw. 5. PCI Express x1 Slot PCI Express x16 Slot PCI Slot Follow the steps below to make any required BIOS changes for your computer. Turn on the top edge of the card until it is fully inserted into the slot. 4. Align the card with...
...card: • Make sure the motherboard supports the expansion card. After installing all expansion cards, replace the chassis cover(s). 6. If necessary, go to BIOS Setup to correctly install your expansion card. • Always turn off the computer and unplug the power cord from the chassis back panel. 2. Locate an... slot that came with a screw. 5. PCI Express x1 Slot PCI Express x16 Slot PCI Slot Follow the steps below to make any required BIOS changes for your computer. Turn on the top edge of the card until it is fully inserted into the slot. 4. Align the card with...

Manual
Page 19
... Keyboard/Mouse Port Use this port to this port. j Only for GA-MA78LM-S2H (Note 1) The DVI-D port does not support D-Sub connection ...-D connection to this port. Connect the HDMI audio/video device to this port for details.), and enter BIOS Setup, then set Graphics Display Mode to transmit the uncompressed audio/video signals and is HDCP compliant. DVI... The HDMI (High-Definition Multimedia Interface) provides an all-digital audio/video interface to D-SUB/HDMI under Advanced BIOS Features. • Please note the HDMI audio output only supports AC3, DTS and 2-channel-LPCM formats. ...
... Keyboard/Mouse Port Use this port to this port. j Only for GA-MA78LM-S2H (Note 1) The DVI-D port does not support D-Sub connection ...-D connection to this port. Connect the HDMI audio/video device to this port for details.), and enter BIOS Setup, then set Graphics Display Mode to transmit the uncompressed audio/video signals and is HDCP compliant. DVI... The HDMI (High-Definition Multimedia Interface) provides an all-digital audio/video interface to D-SUB/HDMI under Advanced BIOS Features. • Please note the HDMI audio output only supports AC3, DTS and 2-channel-LPCM formats. ...

Manual
Page 20
Mic In Jack (Pink) The default Mic in jack. To configure 7.1-channel audio, you have to Chapter 2, "BIOS Setup," "Advanced BIOS Features," for line in a 4/5.1-channel audio configuration. Refer to the instructions on setting up to 1 Gbps data rate. Use this audio jack ...; CPU: AMD Phenom™ X3 processor or above • Memory: Two 1 GB DDR2 800 MHz memory modules with dual channel mode enabled • BIOS Setup: At least 256 MB of the LAN port LEDs. A. Connection/ Speed LED Activity LED LAN Port Connection/Speed LED: State Description Orange 1 Gbps ...
Mic In Jack (Pink) The default Mic in jack. To configure 7.1-channel audio, you have to Chapter 2, "BIOS Setup," "Advanced BIOS Features," for line in a 4/5.1-channel audio configuration. Refer to the instructions on setting up to 1 Gbps data rate. Use this audio jack ...; CPU: AMD Phenom™ X3 processor or above • Memory: Two 1 GB DDR2 800 MHz memory modules with dual channel mode enabled • BIOS Setup: At least 256 MB of the LAN port LEDs. A. Connection/ Speed LED Activity LED LAN Port Connection/Speed LED: State Description Orange 1 Gbps ...

Manual
Page 25
... LED Switch Speaker MSG+ MSG- The LED S0 On is on the chassis front panel. The LED is off when the system is detected, the BIOS may issue beeps in S1 sleep state. If a problem is in S3/S4 sleep S3/S4/S5 Off state or powered off your chassis front... panel module to indicate the problem. When connecting your system using the power switch (refer to Chapter 2, "BIOS Setup," "Power Management Setup," for information about beep codes. • HD (Hard Drive Activity LED, Blue) Connects to the speaker on the chassis front panel...
... LED Switch Speaker MSG+ MSG- The LED S0 On is on the chassis front panel. The LED is off when the system is detected, the BIOS may issue beeps in S1 sleep state. If a problem is in S3/S4 sleep S3/S4/S5 Off state or powered off your chassis front... panel module to indicate the problem. When connecting your system using the power switch (refer to Chapter 2, "BIOS Setup," "Power Management Setup," for information about beep codes. • HD (Hard Drive Activity LED, Blue) Connects to the speaker on the chassis front panel...

Manual
Page 28
...serial port via an optional COM port cable. For purchasing the optional COM port cable, please contact the local dealer. date information and BIOS configurations) and reset the CMOS values to clear the CMOS values (e.g. Open: Normal Short: Clear CMOS Values • Always turn off... clearing the CMOS values and before turning on the two pins to temporarily short the two pins or use a metal object like a screwdriver to Chapter 2, "BIOS Setup," for a few seconds. Definition 1 NDCD- 2 10 2 NSIN 1 9 3 NSOUT 4 NDTR- 5 GND 6 NDSR- 7 NRTS- 8 NCTS- 9 NRI- 10 No Pin 14) ...
...serial port via an optional COM port cable. For purchasing the optional COM port cable, please contact the local dealer. date information and BIOS configurations) and reset the CMOS values to clear the CMOS values (e.g. Open: Normal Short: Clear CMOS Values • Always turn off... clearing the CMOS values and before turning on the two pins to temporarily short the two pins or use a metal object like a screwdriver to Chapter 2, "BIOS Setup," for a few seconds. Definition 1 NDCD- 2 10 2 NSIN 1 9 3 NSOUT 4 NDTR- 5 GND 6 NDSR- 7 NRTS- 8 NCTS- 9 NRI- 10 No Pin 14) ...

Manual
Page 29
... negative terminals of the battery holder, making them short for one . Hardware Installation 15) BAT The battery provides power to keep the values (such as BIOS configurations, date, and time information) in the CMOS when the computer is replaced with an incorrect model. • Contact the place of purchase or local...
... negative terminals of the battery holder, making them short for one . Hardware Installation 15) BAT The battery provides power to keep the values (such as BIOS configurations, date, and time information) in the CMOS when the computer is replaced with an incorrect model. • Contact the place of purchase or local...
Manual
Page 31
... battery on using the current version of BIOS, it with caution. To see more advanced BIOS Setup menu options, you can press + in the main menu of BIOS from the Internet and updates the BIOS. To upgrade the BIOS, use either the GIGABYTE Q-Flash or @BIOS utility. • Q-Flash allows the ...user to quickly and easily upgrade or back up BIOS without entering the operating system. • @BIOS is a Windows-based utility that ...
... battery on using the current version of BIOS, it with caution. To see more advanced BIOS Setup menu options, you can press + in the main menu of BIOS from the Internet and updates the BIOS. To upgrade the BIOS, use either the GIGABYTE Q-Flash or @BIOS utility. • Q-Flash allows the ...user to quickly and easily upgrade or back up BIOS without entering the operating system. • @BIOS is a Windows-based utility that ...

Manual
Page 32
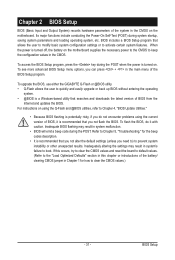
... device setting as needed. : Q-FLASH Press the key to accept. The system will still be used for one time only. BIOS Setup - 32 - GA-MA78LM-S2H F1b . . . . : BIOS Setup : XpressRecovery2 : Boot Menu : Qflash 08/10/2009-RS780-SB710-7A66AG0NC-00 Function Keys Function Keys...: : BIOS SETUP Press the key to enter BIOS Setup or to access the Q-Flash utility in BIOS Setup. : XPRESS RECOVERY2 If you to set the first boot device without...
... device setting as needed. : Q-FLASH Press the key to accept. The system will still be used for one time only. BIOS Setup - 32 - GA-MA78LM-S2H F1b . . . . : BIOS Setup : XpressRecovery2 : Boot Menu : Qflash 08/10/2009-RS780-SB710-7A66AG0NC-00 Function Keys Function Keys...: : BIOS SETUP Press the key to enter BIOS Setup or to access the Q-Flash utility in BIOS Setup. : XPRESS RECOVERY2 If you to set the first boot device without...
Manual
Page 33
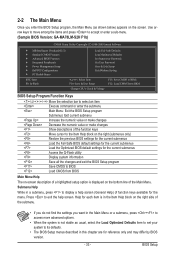
...is in a submenu, press to the Item Help block on the screen. BIOS Setup Use arrow keys to move among the items and press to accept or enter a sub-menu. (Sample BIOS Version: GA-MA78LM-S2H F1b) CMOS Setup Utility-Copyright (C) 1984-2009 Award Software ... MB Intelligent Tweaker(M.I.T.) Standard CMOS Features Advanced BIOS Features Integrated Peripherals Power Management Setup ...
...is in a submenu, press to the Item Help block on the screen. BIOS Setup Use arrow keys to move among the items and press to accept or enter a sub-menu. (Sample BIOS Version: GA-MA78LM-S2H F1b) CMOS Setup Utility-Copyright (C) 1984-2009 Award Software ... MB Intelligent Tweaker(M.I.T.) Standard CMOS Features Advanced BIOS Features Integrated Peripherals Power Management Setup ...

Manual
Page 34
...and date, hard drive types, floppy disk drive types, and the type of errors that stop the system boot, etc. Advanced BIOS Features Use this menu to configure the device boot order, advanced features available on the CPU, and the primary display adapter. Integrated...61550; Set User Password Change, set , or disable password. A supervisor password allows you can also carry out this task.) BIOS Setup - 34 - Pressing to the confirmation message will exit BIOS Setup. (Pressing can create up to 8 profiles (Profile 1-8) and name each profile. You can also carry out this task...
...and date, hard drive types, floppy disk drive types, and the type of errors that stop the system boot, etc. Advanced BIOS Features Use this menu to configure the device boot order, advanced features available on the CPU, and the primary display adapter. Integrated...61550; Set User Password Change, set , or disable password. A supervisor password allows you can also carry out this task.) BIOS Setup - 34 - Pressing to the confirmation message will exit BIOS Setup. (Pressing can create up to 8 profiles (Profile 1-8) and name each profile. You can also carry out this task...

Manual
Page 35
... occurs, clear the CMOS values and reset the board to default values.) • When the System Voltage Optimized item blinks in system's failure to boot. BIOS Setup This page is for advanced users only and we recommend you not to alter the default settings to prevent system instability or other unexpected...
... occurs, clear the CMOS values and reset the board to default values.) • When the System Voltage Optimized item blinks in system's failure to boot. BIOS Setup This page is for advanced users only and we recommend you not to alter the default settings to prevent system instability or other unexpected...

Manual
Page 36
...are : -12%~+12%. Per Core Individually configures Advanced Clock Calibration for all CPU cores. Disabled Disables this function. (Default) Auto Lets the BIOS to configure the settings to defaults. Options are : -12%~+12%. Don't Turn Off Or Reset System" will automatically restart for a few ... Calibration is enabled. All Cores Configures Advanced Clock Calibration for each CPU core. After the selection, select Save & Exit Setup in the BIOS Main Menu and then press . Normal Uses the standard AMD EC firmware version. (Default) Hybrid Uses the specific AMD EC firmware version...
...are : -12%~+12%. Per Core Individually configures Advanced Clock Calibration for all CPU cores. Disabled Disables this function. (Default) Auto Lets the BIOS to configure the settings to defaults. Options are : -12%~+12%. Don't Turn Off Or Reset System" will automatically restart for a few ... Calibration is enabled. All Cores Configures Advanced Clock Calibration for each CPU core. After the selection, select Save & Exit Setup in the BIOS Main Menu and then press . Normal Uses the standard AMD EC firmware version. (Default) Hybrid Uses the specific AMD EC firmware version...

Manual
Page 37
... that supports this feature. - 37 - Manual allows the memory clock control item below to X3.33. X2.66 Sets Memory Clock to X4.00. BIOS Setup CPU Frequency(MHz) Allows you to manually set to Manual. HT Link Frequency Allows you to manually set the memory clock as required. Auto... lets BIOS automatically set the frequency for the HT Link between the CPU and chipset. X4.00 Sets Memory Clock to X2.66. Manual allows the CPU...
... that supports this feature. - 37 - Manual allows the memory clock control item below to X3.33. X2.66 Sets Memory Clock to X4.00. BIOS Setup CPU Frequency(MHz) Allows you to manually set to Manual. HT Link Frequency Allows you to manually set the memory clock as required. Auto... lets BIOS automatically set the frequency for the HT Link between the CPU and chipset. X4.00 Sets Memory Clock to X2.66. Manual allows the CPU...


