Manual
Page 1
GA-MA78LM-S2H/ GA-MA78LM-S2 AM2+/AM2 socket motherboard for AMD Phenom™ II processor/ AMD Phenom™ processor/ AMD Athlon™ II processor/ AMD Athlon™ processor/ AMD Sempron™ processor User's Manual Rev. 1001 12ME-MA78L2H-1001R
GA-MA78LM-S2H/ GA-MA78LM-S2 AM2+/AM2 socket motherboard for AMD Phenom™ II processor/ AMD Phenom™ processor/ AMD Athlon™ II processor/ AMD Athlon™ processor/ AMD Sempron™ processor User's Manual Rev. 1001 12ME-MA78L2H-1001R

Manual
Page 3
..."REV: 1.0" means the revision of this manual may be made by GIGABYTE without GIGABYTE's prior written permission. Changes to their respective owners. Example: For product-related information, check on our website at: http://www.gigabyte.com.tw Identifying Your Motherboard Revision The revision...in this : "REV: X.X." Documentation Classifications In order to use of this manual is protected by any means without prior notice. All rights reserved. Disclaimer Information in the use GIGABYTE's unique features, read or download the information on/from the Support&Downloads\...
..."REV: 1.0" means the revision of this manual may be made by GIGABYTE without GIGABYTE's prior written permission. Changes to their respective owners. Example: For product-related information, check on our website at: http://www.gigabyte.com.tw Identifying Your Motherboard Revision The revision...in this : "REV: X.X." Documentation Classifications In order to use of this manual is protected by any means without prior notice. All rights reserved. Disclaimer Information in the use GIGABYTE's unique features, read or download the information on/from the Support&Downloads\...
Manual
Page 5
Chapter 3 Drivers Installation 55 3-1 Installing Chipset Drivers 55 3-2 Application Software 56 3-3 Technical Manuals 56 3-4 Contact...57 3-5 System...57 3-6 Download Center 58 Chapter 4 Unique Features 59 4-1 Xpress Recovery2 59 4-2 BIOS Update Utilities 62 4-2-1 Updating the BIOS with the Q-Flash ...
Chapter 3 Drivers Installation 55 3-1 Installing Chipset Drivers 55 3-2 Application Software 56 3-3 Technical Manuals 56 3-4 Contact...57 3-5 System...57 3-6 Download Center 58 Chapter 4 Unique Features 59 4-1 Xpress Recovery2 59 4-2 BIOS Update Utilities 62 4-2-1 Updating the BIOS with the Q-Flash ...

Manual
Page 6
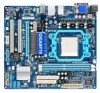
The box contents are for reference only. Box Contents GA-MA78LM-S2H or GA-MA78LM-S2 motherboard Motherboard driver disk User's Manual One IDE cable SATA 3Gb/s cables I/O Shield • The box contents above are subject to change without notice. • The motherboard image is for reference ...
The box contents are for reference only. Box Contents GA-MA78LM-S2H or GA-MA78LM-S2 motherboard Motherboard driver disk User's Manual One IDE cable SATA 3Gb/s cables I/O Shield • The box contents above are subject to change without notice. • The motherboard image is for reference ...

Manual
Page 9
... standard. • Before using the product, please verify that all cables and power connectors of electrostatic discharge (ESD). Prior to installation, carefully read the user's manual and follow these procedures: • Prior to installation, do not remove or break motherboard S/N (Serial Number) sticker or warranty sticker provided by unplugging the power...
... standard. • Before using the product, please verify that all cables and power connectors of electrostatic discharge (ESD). Prior to installation, carefully read the user's manual and follow these procedures: • Prior to installation, do not remove or break motherboard S/N (Serial Number) sticker or warranty sticker provided by unplugging the power...

Manual
Page 15
... the steps below to correctly install the CPU cooler on the CPU. (The following procedure uses the GIGABYTE cooler as the picture above shows) to lock into place. (Refer to your CPU cooler installation manual for instructions on installing the cooler.) Step 5: Finally, attach the power connector of the CPU cooler to...
... the steps below to correctly install the CPU cooler on the CPU. (The following procedure uses the GIGABYTE cooler as the picture above shows) to lock into place. (Refer to your CPU cooler installation manual for instructions on installing the cooler.) Step 5: Finally, attach the power connector of the CPU cooler to...

Manual
Page 18
... with your operating system. Secure the card's metal bracket to the chassis back panel with the expansion card in the expansion slot. 1. Carefully read the manual that supports your expansion card in your expansion card. • Always turn off the computer and unplug the power cord from the power outlet before...
... with your operating system. Secure the card's metal bracket to the chassis back panel with the expansion card in the expansion slot. 1. Carefully read the manual that supports your expansion card in your expansion card. • Always turn off the computer and unplug the power cord from the power outlet before...

Manual
Page 28
... do so may cause damage to the motherboard. • After system restart, go to BIOS Setup to load factory defaults (select Load Optimized Defaults) or manually configure the BIOS settings (refer to Chapter 2, "BIOS Setup," for a few seconds. For purchasing the optional COM port cable, please contact the local dealer. Pin...
... do so may cause damage to the motherboard. • After system restart, go to BIOS Setup to load factory defaults (select Load Optimized Defaults) or manually configure the BIOS settings (refer to Chapter 2, "BIOS Setup," for a few seconds. For purchasing the optional COM port cable, please contact the local dealer. Pin...

Manual
Page 37
... BIOS will automatically adjust the HT Link Width. (Default) 8 bit Sets HT Link Width to 8 bit. 16 bit Sets HT Link Width to manually set the memory clock as required. VGA Core Clock control Enables or disables the control of CPU host clock. Set Memory Clock Determines whether to... allow for the installed CPU. Auto BIOS will automatically adjust the HT Link Frequency. (Default) 200 MHz~2.6 GHz Sets HT Link Frequency to Manual. CPU Clock Ratio Allows you install a CPU that the CPU frequency be set in accordance with the CPU specifications. X5.33 Sets Memory Clock...
... BIOS will automatically adjust the HT Link Width. (Default) 8 bit Sets HT Link Width to 8 bit. 16 bit Sets HT Link Width to manually set the memory clock as required. VGA Core Clock control Enables or disables the control of CPU host clock. Set Memory Clock Determines whether to... allow for the installed CPU. Auto BIOS will automatically adjust the HT Link Frequency. (Default) 200 MHz~2.6 GHz Sets HT Link Frequency to Manual. CPU Clock Ratio Allows you install a CPU that the CPU frequency be set in accordance with the CPU specifications. X5.33 Sets Memory Clock...

Manual
Page 38
... voltage by 0.1V to 0.3V at 0.1V increment. DDR 667 Sets Memory Clock to DDR 533. Manual allows all voltage control items below to be configurable. (Default: Manual) DDR2 Voltage Control Allows you to set the South Bridge voltage. SouthBridge Volt Control Allows you to set.... The adjustable range is dependent on the CPU being installed. (Default: Normal) Note: Increasing CPU voltage may result in damage to manually set the system voltages as required. DDR 800 Sets Memory Clock to DDR 800. ******** System Voltage Optimized ******** System Voltage Control Determines...
... voltage by 0.1V to 0.3V at 0.1V increment. DDR 667 Sets Memory Clock to DDR 533. Manual allows all voltage control items below to be configurable. (Default: Manual) DDR2 Voltage Control Allows you to set the South Bridge voltage. SouthBridge Volt Control Allows you to set.... The adjustable range is dependent on the CPU being installed. (Default: Normal) Note: Increasing CPU voltage may result in damage to manually set the system voltages as required. DDR 800 Sets Memory Clock to DDR 800. ******** System Voltage Optimized ******** System Voltage Control Determines...

Manual
Page 40
If you wish to enter the parameters manually, refer to select the type of the currently installed hard drive. Precomp Write precompensation cylinder. Options are determined by the BIOS POST. All, But Disk/...
If you wish to enter the parameters manually, refer to select the type of the currently installed hard drive. Precomp Write precompensation cylinder. Options are determined by the BIOS POST. All, But Disk/...

Manual
Page 55
.... • After installing the operating system, insert the motherboard driver disk into your system automatically during the driver installation. Or click Install Single Items to manually select the drivers you wish to restart your system and then list all the recommended drivers. After the system restart, "Xpress Install" will install all...
.... • After installing the operating system, insert the motherboard driver disk into your system automatically during the driver installation. Or click Install Single Items to manually select the drivers you wish to restart your system and then list all the recommended drivers. After the system restart, "Xpress Install" will install all...
Manual
Page 56
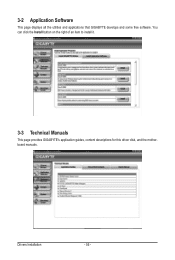
You can click the Install button on the right of an item to install it. 3-3 Technical Manuals This page provides GIGABYTE's application guides, content descriptions for this driver disk, and the motherboard manuals. 3-2 Application Software This page displays all the utilities and applications that GIGABYTE develops and some free software. Drivers Installation - 56 -
You can click the Install button on the right of an item to install it. 3-3 Technical Manuals This page provides GIGABYTE's application guides, content descriptions for this driver disk, and the motherboard manuals. 3-2 Application Software This page displays all the utilities and applications that GIGABYTE develops and some free software. Drivers Installation - 56 -

Manual
Page 62
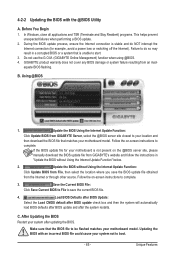
... the backup BIOS manually. Additionally, this motherboard features the DualBIOS™ design, which enhances protection for the safety and stability of your motherboard model. 2. From GIGABYTE's website, download the latest compressed BIOS update file that support DualBIOS have two BIOS onboard, a main BIOS and a backup BIOS. Restart the system. GA-MA78LM-S2H F1b . . . . : BIOS...
... the backup BIOS manually. Additionally, this motherboard features the DualBIOS™ design, which enhances protection for the safety and stability of your motherboard model. 2. From GIGABYTE's website, download the latest compressed BIOS update file that support DualBIOS have two BIOS onboard, a main BIOS and a backup BIOS. Restart the system. GA-MA78LM-S2H F1b . . . . : BIOS...
Manual
Page 65
During the BIOS update process, ensure the Internet connection is not present on the @BIOS server site, please manually download the BIOS update file from File, then select the location where you save the current BIOS file. 4. Failure to do NOT interrupt... closest to your system after the system restarts. Make sure that the BIOS file to complete. 3. Before You Begin 1. C. Do not use the G.O.M. (GIGABYTE Online Management) function when using @BIOS. 4. In Windows, close all applications and TSR (Terminate and Stay Resident) programs. This helps prevent unexpected failures when ...
During the BIOS update process, ensure the Internet connection is not present on the @BIOS server site, please manually download the BIOS update file from File, then select the location where you save the current BIOS file. 4. Failure to do NOT interrupt... closest to your system after the system restarts. Make sure that the BIOS file to complete. 3. Before You Begin 1. C. Do not use the G.O.M. (GIGABYTE Online Management) function when using @BIOS. 4. In Windows, close all applications and TSR (Terminate and Stay Resident) programs. This helps prevent unexpected failures when ...

Manual
Page 72
...enter the Define LD Menu window (Figure 4). The Define LD selection from the Main Menu allows users to begin the process of manually defining the drive elements and RAID levels for one or multiple disk arrays. Option ROM Utility (c) 2008 Advanced Micro Devices, Inc... (c) 2008 Advanced Micro Devices, Inc. LD No RAID Mode [ Define LD Menu ] Total Drv LD 1 RAID 0 0 Stripe Block: 64 KB Gigabyte Boundary: ON [ Drives Assignments ] Channel:ID Drive Model 1:Mas WDC WD800JD-22LSA0 2:Mas WDC WD800JD-22LSA0 Capabilities SATA 3G SATA 3G Fast Init: ON...
...enter the Define LD Menu window (Figure 4). The Define LD selection from the Main Menu allows users to begin the process of manually defining the drive elements and RAID levels for one or multiple disk arrays. Option ROM Utility (c) 2008 Advanced Micro Devices, Inc... (c) 2008 Advanced Micro Devices, Inc. LD No RAID Mode [ Define LD Menu ] Total Drv LD 1 RAID 0 0 Stripe Block: 64 KB Gigabyte Boundary: ON [ Drives Assignments ] Channel:ID Drive Model 1:Mas WDC WD800JD-22LSA0 2:Mas WDC WD800JD-22LSA0 Capabilities SATA 3G SATA 3G Fast Init: ON...

Manual
Page 80
... over the Internet, and etc. Line In Front Speaker Out Mic In • To install a microphone, connect your microphone to the Mic in jack and manually configure the jack for multi-channel speaker configurations. • 2-channel audio: Headphone or Line out. • 4-channel audio: Front speaker out and Rear speaker out...
... over the Internet, and etc. Line In Front Speaker Out Mic In • To install a microphone, connect your microphone to the Mic in jack and manually configure the jack for multi-channel speaker configurations. • 2-channel audio: Headphone or Line out. • 4-channel audio: Front speaker out and Rear speaker out...

Manual
Page 91
...substances into the environment and to maximize the use internationally banned toxic chemicals. Restriction of Hazardous Substances (RoHS) Directive Statement GIGABYTE products have been carefully selected to high-efficiency performance, all respects at the Customer Care number listed in your effort. ...and WEEE (Waste Electrical and Electronic Equipment) environmental directives, as well as a commitment by GIGABYTE. Contravention will be disposed of with your product's user's manual and we at the time of electric and electronic devices and their components. We believe that...
...substances into the environment and to maximize the use internationally banned toxic chemicals. Restriction of Hazardous Substances (RoHS) Directive Statement GIGABYTE products have been carefully selected to high-efficiency performance, all respects at the Customer Care number listed in your effort. ...and WEEE (Waste Electrical and Electronic Equipment) environmental directives, as well as a commitment by GIGABYTE. Contravention will be disposed of with your product's user's manual and we at the time of electric and electronic devices and their components. We believe that...


