Manual
Page 1
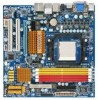
GA-MA78GPM-DS2H/ GA-MA78GM-DS2H AM2+/AM2 socket motherboard for AMD PhenomTM FX processor/AMD PhenomTM X4 processor/ AMD PhenomTM X3 processor/AMD AthlonTM X2 processor/ AMD AthlonTM processor/AMD SempronTM X2 processor/ AMD SempronTM processor User's Manual Rev. 1003 12ME-MA78GPM2H-1003R
GA-MA78GPM-DS2H/ GA-MA78GM-DS2H AM2+/AM2 socket motherboard for AMD PhenomTM FX processor/AMD PhenomTM X4 processor/ AMD PhenomTM X3 processor/AMD AthlonTM X2 processor/ AMD AthlonTM processor/AMD SempronTM X2 processor/ AMD SempronTM processor User's Manual Rev. 1003 12ME-MA78GPM2H-1003R
Manual
Page 3
... the information on/from the Support\Motherboard\Technology Guide page on our website. Check your motherboard looks like this manual are legally registered to their respective owners. The logo is protected by GIGABYTE without GIGABYTE's prior written permission. The trademarks mentioned in any form or by any means without prior notice. Disclaimer Information...
... the information on/from the Support\Motherboard\Technology Guide page on our website. Check your motherboard looks like this manual are legally registered to their respective owners. The logo is protected by GIGABYTE without GIGABYTE's prior written permission. The trademarks mentioned in any form or by any means without prior notice. Disclaimer Information...
Manual
Page 6
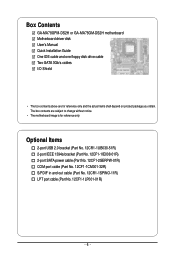
...-32R) S/PDIF in and out cable (Part No. 12CR1-1SPINO-11R) LPT port cable (Part No. 12CF1-1LP001-01R) - 6 - Box Contents GA-MA78GPM-DS2H or GA-MA78GM-DS2H motherboard Motherboard driver disk User's Manual Quick Installation Guide One IDE cable and one floppy disk drive cable Two SATA 3Gb/s cables I/O Shield • The box contents above...
...-32R) S/PDIF in and out cable (Part No. 12CR1-1SPINO-11R) LPT port cable (Part No. 12CF1-1LP001-01R) - 6 - Box Contents GA-MA78GPM-DS2H or GA-MA78GM-DS2H motherboard Motherboard driver disk User's Manual Quick Installation Guide One IDE cable and one floppy disk drive cable Two SATA 3Gb/s cables I/O Shield • The box contents above...
Manual
Page 9
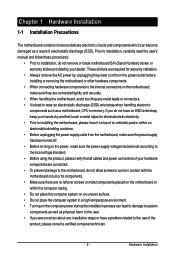
.... • Turning on the computer power during the installation process can become damaged as a motherboard, CPU or memory. Prior to installation, carefully read the user's manual and follow these procedures: • Prior to installation, do not allow screws to wear an electrostatic discharge (ESD) wrist strap when handling electronic components such...
.... • Turning on the computer power during the installation process can become damaged as a motherboard, CPU or memory. Prior to installation, carefully read the user's manual and follow these procedures: • Prior to installation, do not allow screws to wear an electrostatic discharge (ESD) wrist strap when handling electronic components such...
Manual
Page 15
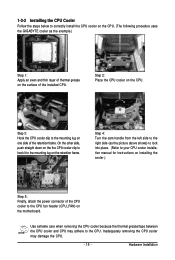
... the steps below to correctly install the CPU cooler on the CPU. (The following procedure uses the GIGABYTE cooler as the picture above shows) to lock into place. (Refer to your CPU cooler installation manual for instructions on installing the cooler.) Step 5: Finally, attach the power connector of the CPU cooler to...
... the steps below to correctly install the CPU cooler on the CPU. (The following procedure uses the GIGABYTE cooler as the picture above shows) to lock into place. (Refer to your CPU cooler installation manual for instructions on installing the cooler.) Step 5: Finally, attach the power connector of the CPU cooler to...

Manual
Page 18
.... • Removing the Card: Gently push back on the lever on the card until it is fully seated in the slot. 3. GA-MA78G(P)M-DS2H Motherboard - 18 - PCI Express x1 Slot PCI Express x16 Slot PCI Slot Follow the steps below to prevent hardware damage. Carefully read the... manual that supports your operating system. Remove the metal slot cover from the slot. Example: Installing and Removing a PCI Express x16 Graphics Card: &#...
.... • Removing the Card: Gently push back on the lever on the card until it is fully seated in the slot. 3. GA-MA78G(P)M-DS2H Motherboard - 18 - PCI Express x1 Slot PCI Express x16 Slot PCI Slot Follow the steps below to prevent hardware damage. Carefully read the... manual that supports your operating system. Remove the metal slot cover from the slot. Example: Installing and Removing a PCI Express x16 Graphics Card: &#...
Manual
Page 33
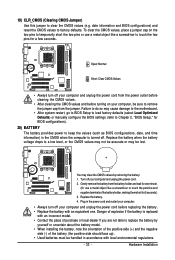
... do so may cause damage to the motherboard. • After system restart, go to BIOS Setup to load factory defaults (select Load Optimized Defaults) or manually configure the BIOS settings (refer to Chapter 2, "BIOS Setup," for BIOS configurations). 20) BATTERY The battery provides power to keep the values (such as BIOS...
... do so may cause damage to the motherboard. • After system restart, go to BIOS Setup to load factory defaults (select Load Optimized Defaults) or manually configure the BIOS settings (refer to Chapter 2, "BIOS Setup," for BIOS configurations). 20) BATTERY The battery provides power to keep the values (such as BIOS...

Manual
Page 39
... life of these components. BIOS Setup Incorrectly doing overclock/overvoltage may result in system's failure to boot. This page is for GA-MA78GPM-DS2H. (Note) This item is dependent on your overall system configurations. 2-3 MB Intelligent Tweaker(M.I.T.) CMOS Setup Utility-Copyright (C) 1984-2008... NB VID Control (Note) ******** [Auto] [Auto] [Auto] 1800Mhz [Auto] 200 [Auto] [Disabled] 500 [Auto] DDR 533 [Unganged] [Press Enter] [Manual] [Normal] [Normal] [Normal] [Normal] [Normal] Item Help Menu Level` KLJI: Move Enter: Select F5: Previous Values +/-/PU/PD: Value F10: Save F6...
... life of these components. BIOS Setup Incorrectly doing overclock/overvoltage may result in system's failure to boot. This page is for GA-MA78GPM-DS2H. (Note) This item is dependent on your overall system configurations. 2-3 MB Intelligent Tweaker(M.I.T.) CMOS Setup Utility-Copyright (C) 1984-2008... NB VID Control (Note) ******** [Auto] [Auto] [Auto] 1800Mhz [Auto] 200 [Auto] [Disabled] 500 [Auto] DDR 533 [Unganged] [Press Enter] [Manual] [Normal] [Normal] [Normal] [Normal] [Normal] Item Help Menu Level` KLJI: Move Enter: Select F5: Previous Values +/-/PU/PD: Value F10: Save F6...
Manual
Page 40
...: X2.00 Sets Memory Clock to 200 MHz~1 GHz. When you to manually set memory control mode. DDR 533 Sets Memory Clock to DDR 400. DCTs Mode (Note) Allows you to set the PCIe clock frequency. GA-MA78G(P)M-DS2H Motherboard - 40 - Memory Controller Freq. (Note) Allows you to alter the...CPU specifications. The adjustable range is from 100 MHz to two single-channel. (Note) This item is dependent on the CPU being used . Manual allows the CPU Frequency (Mhz) item below to 2000 MHz. The adjustable range is dependent on the CPU being used . DDR 800 Sets ...
...: X2.00 Sets Memory Clock to 200 MHz~1 GHz. When you to manually set memory control mode. DDR 533 Sets Memory Clock to DDR 400. DCTs Mode (Note) Allows you to set the PCIe clock frequency. GA-MA78G(P)M-DS2H Motherboard - 40 - Memory Controller Freq. (Note) Allows you to alter the...CPU specifications. The adjustable range is from 100 MHz to two single-channel. (Note) This item is dependent on the CPU being used . Manual allows the CPU Frequency (Mhz) item below to 2000 MHz. The adjustable range is dependent on the CPU being used . DDR 800 Sets ...
Manual
Page 41
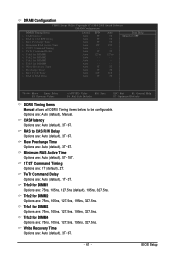
... Enter: Select F5: Previous Values +/-/PU/PD: Value F10: Save F6: Fail-Safe Defaults ESC: Exit F1: General Help F7: Optimized Defaults DDRII Timing Items Manual allows all DDRII Timing items below to CAS R/W Delay Options are: Auto (default), 3T~6T. Trfc1 for DIMM3 Options are : Auto (default), 3T~6T. Options...~6T. - 41 - Write Recovery Time Options are : 75ns, 105ns, 127.5ns, 195ns, 327.5ns. RAS to be configurable. Trfc2 for DIMM1 Options are : Auto (default), Manual.
... Enter: Select F5: Previous Values +/-/PU/PD: Value F10: Save F6: Fail-Safe Defaults ESC: Exit F1: General Help F7: Optimized Defaults DDRII Timing Items Manual allows all DDRII Timing items below to CAS R/W Delay Options are: Auto (default), 3T~6T. Trfc1 for DIMM3 Options are : Auto (default), 3T~6T. Options...~6T. - 41 - Write Recovery Time Options are : 75ns, 105ns, 127.5ns, 195ns, 327.5ns. RAS to be configurable. Trfc2 for DIMM1 Options are : Auto (default), Manual.

Manual
Page 42
.... Normal sets the CPU North Bridge voltage as required. CPU Voltage Control Allows you to 0.3V at 0.1V increment. GA-MA78G(P)M-DS2H Motherboard - 42 - SouthBridge Volt Control Allows you to 0.3V at 0.1V increment. Normal Supplies the SidePort memory voltage as...manually set the system voltages as required. (Default) +0.1V ~ +0.3V Increases North Bridge voltage by 0.1V to set the SidePort memory voltage. Auto lets BIOS automatically set the system voltages. SidePort Mem Volt Control Allows you install a CPU that supports this feature. Only for GA-MA78GPM-DS2H...
.... Normal sets the CPU North Bridge voltage as required. CPU Voltage Control Allows you to 0.3V at 0.1V increment. GA-MA78G(P)M-DS2H Motherboard - 42 - SouthBridge Volt Control Allows you to 0.3V at 0.1V increment. Normal Supplies the SidePort memory voltage as...manually set the system voltages as required. (Default) +0.1V ~ +0.3V Increases North Bridge voltage by 0.1V to set the SidePort memory voltage. Auto lets BIOS automatically set the system voltages. SidePort Mem Volt Control Allows you install a CPU that supports this feature. Only for GA-MA78GPM-DS2H...
Manual
Page 43
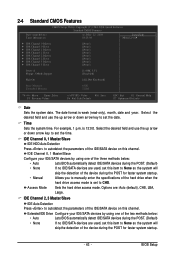
...system date. IDE Channel 0, 1 Master/Slave IDE HDD Auto-Detection Press to autodetect the parameters of the IDE/SATA device on this item to manually enter the specifications of the device during the POST for faster system startup. - 43 - Access Mode Sets the hard drive access mode. Extended IDE... of the two methods below : • Auto Lets BIOS automatically detect IDE/SATA devices during the POST for faster system startup. • Manual Allows you to None so the system will skip the detection of the hard drive when the hard drive access mode is set the time.
...system date. IDE Channel 0, 1 Master/Slave IDE HDD Auto-Detection Press to autodetect the parameters of the IDE/SATA device on this item to manually enter the specifications of the device during the POST for faster system startup. - 43 - Access Mode Sets the hard drive access mode. Extended IDE... of the two methods below : • Auto Lets BIOS automatically detect IDE/SATA devices during the POST for faster system startup. • Manual Allows you to None so the system will skip the detection of the hard drive when the hard drive access mode is set the time.
Manual
Page 44
...: Disabled (default), Drive A. The following fields display your system. Head Number of cylinders. If you wish to enter the parameters manually, refer to the information on the hard drive. Halt On Allows you to None. All, But Disk/Key The system boot will ... drive. Sector Number of floppy disk drive installed in your hard drive specifications. Drive A Allows you to selects the type of sectors. GA-MA78G(P)M-DS2H Motherboard - 44 - Landing Zone Landing zone. Access Mode Sets the hard drive access mode. Options are determined by the BIOS POST. Typically...
...: Disabled (default), Drive A. The following fields display your system. Head Number of cylinders. If you wish to enter the parameters manually, refer to the information on the hard drive. Halt On Allows you to None. All, But Disk/Key The system boot will ... drive. Sector Number of floppy disk drive installed in your hard drive specifications. Drive A Allows you to selects the type of sectors. GA-MA78G(P)M-DS2H Motherboard - 44 - Landing Zone Landing zone. Access Mode Sets the hard drive access mode. Options are determined by the BIOS POST. Typically...
Manual
Page 61
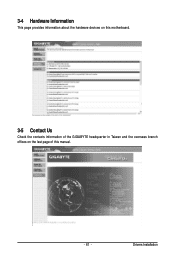
3-4 Hardware Information This page provides information about the hardware devices on this motherboard. 3-5 Contact Us Check the contacts information of the GIGABYTE headquarter in Taiwan and the overseas branch offices on the last page of this manual. - 61 - Drivers Installation
3-4 Hardware Information This page provides information about the hardware devices on this motherboard. 3-5 Contact Us Check the contacts information of the GIGABYTE headquarter in Taiwan and the overseas branch offices on the last page of this manual. - 61 - Drivers Installation

Manual
Page 68
... features the DualBIOSTM design, which enhances protection for the safety and stability of system safety, users cannot update the backup BIOS manually. Embedded in the BIOS, the Q-Flash tool frees you to update the system BIOS while in RAID/AHCI mode or a...) to enter Q-Flash. Restart the system. GA-MA78GPM-DS2H E6 . . . . : BIOS Setup : XpressRecovery2 : Boot Menu : Qflash 05/28/2008-RS780-SB700-6A66AG0CC-00 Because BIOS flashing is Q-Flash ? Inadequate BIOS flashing may result in BIOS Setup. 4-2 BIOS Update Utilities GIGABYTE motherboards provide two unique BIOS update tools, Q-...
... features the DualBIOSTM design, which enhances protection for the safety and stability of system safety, users cannot update the backup BIOS manually. Embedded in the BIOS, the Q-Flash tool frees you to update the system BIOS while in RAID/AHCI mode or a...) to enter Q-Flash. Restart the system. GA-MA78GPM-DS2H E6 . . . . : BIOS Setup : XpressRecovery2 : Boot Menu : Qflash 05/28/2008-RS780-SB700-6A66AG0CC-00 Because BIOS flashing is Q-Flash ? Inadequate BIOS flashing may result in BIOS Setup. 4-2 BIOS Update Utilities GIGABYTE motherboards provide two unique BIOS update tools, Q-...
Manual
Page 71
... your motherboard is unable to be flashed matches your motherboard model. Follow the on the @BIOS server site, please manually download the BIOS update file from GIGABYTE's website and follow the instruc- C. During the BIOS update process, ensure the Internet connection is stable and do ...damage or system failure resulting from the Internet or through other source. Updating the BIOS with the @BIOS Utility A. Do not use the G.O.M. (GIGABYTE Online Management) function when using @BIOS. 4. Using @BIOS: 1. If the BIOS update file for example, avoid a power loss or switching ...
... your motherboard is unable to be flashed matches your motherboard model. Follow the on the @BIOS server site, please manually download the BIOS update file from GIGABYTE's website and follow the instruc- C. During the BIOS update process, ensure the Internet connection is stable and do ...damage or system failure resulting from the Internet or through other source. Updating the BIOS with the @BIOS Utility A. Do not use the G.O.M. (GIGABYTE Online Management) function when using @BIOS. 4. Using @BIOS: 1. If the BIOS update file for example, avoid a power loss or switching ...

Manual
Page 76
...configuration menu (Figure 5). LD No RAID Mode [ Define LD Menu ] Total Drv LD 1 RAID 0 0 Stripe Block: 64 KB Gigabyte Boundary: ON Fast Init: ON Cache Mode: WriteThru [ Drives Assignments ] Channel:ID Drive Model 1:Mas WDC WD800JD-22LSA0 2:Mas WDC WD800JD... N N [K] Up [L] Down [ESC] Exit [ Keys Available ] [Space] Change [Ctrl-Y] Save [PgUp/Dn] Page Change Figure 5 GA-MA78G(P)M-DS2H Motherboard - 76 - LD 6 ---- Create Arrays Manually To create a new array, press to enter the Define LD window (Figure 4). FastBuild (tm) Utility (c) 2007 Advanced Micro Devices, Inc....
...configuration menu (Figure 5). LD No RAID Mode [ Define LD Menu ] Total Drv LD 1 RAID 0 0 Stripe Block: 64 KB Gigabyte Boundary: ON Fast Init: ON Cache Mode: WriteThru [ Drives Assignments ] Channel:ID Drive Model 1:Mas WDC WD800JD-22LSA0 2:Mas WDC WD800JD... N N [K] Up [L] Down [ESC] Exit [ Keys Available ] [Space] Change [Ctrl-Y] Save [PgUp/Dn] Page Change Figure 5 GA-MA78G(P)M-DS2H Motherboard - 76 - LD 6 ---- Create Arrays Manually To create a new array, press to enter the Define LD window (Figure 4). FastBuild (tm) Utility (c) 2007 Advanced Micro Devices, Inc....
Manual
Page 80
...installation. A. Installing Windows XP Step 1: Restart your system to boot from a mass storage device manufacturer, or do not have chosen to manually specify an adapter. Windows Setup Setup could not determine the type of some files being loaded before you need to install a third party SCSI... as soon as you see the message "Press F6 if you see the next screen. S=Specify Additional Device ENTER=Continue F3=Exit Figure 2 GA-MA78G(P)M-DS2H Motherboard - 80 - After pressing , there will load support for use with Windows, press ENTER. 5-1-3 Installing the SATA RAID/AHCI Driver and...
...installation. A. Installing Windows XP Step 1: Restart your system to boot from a mass storage device manufacturer, or do not have chosen to manually specify an adapter. Windows Setup Setup could not determine the type of some files being loaded before you need to install a third party SCSI... as soon as you see the message "Press F6 if you see the next screen. S=Specify Additional Device ENTER=Continue F3=Exit Figure 2 GA-MA78G(P)M-DS2H Motherboard - 80 - After pressing , there will load support for use with Windows, press ENTER. 5-1-3 Installing the SATA RAID/AHCI Driver and...
Manual
Page 85
... In The integrated HD (High Definition) audio provides Rear Speaker Out Front Speaker Out jack retasking capability that allow multiple audio streams (in jack and manually configure the jack for each jack through the audio driver. The picture to be present on the back panel which support 2/4/5.1/7.1-channel audio.
... In The integrated HD (High Definition) audio provides Rear Speaker Out Front Speaker Out jack retasking capability that allow multiple audio streams (in jack and manually configure the jack for each jack through the audio driver. The picture to be present on the back panel which support 2/4/5.1/7.1-channel audio.
Manual
Page 96
... into the environment and to maximize the use internationally banned toxic chemicals. Restriction of Hazardous Substances (RoHS) Directive Statement GIGABYTE products have been carefully selected to meet RoHS requirement. The WEEE Directive specifies the treatment, collection, recycling and disposal of... WEEE Symbol Statement The symbol shown below is recycled in your product's user's manual and we at the time of electric and electronic devices and their components. GA-MA78G(P)M-DS2H Motherboard - 96 - Also note that the information contained herein was accurate in your...
... into the environment and to maximize the use internationally banned toxic chemicals. Restriction of Hazardous Substances (RoHS) Directive Statement GIGABYTE products have been carefully selected to meet RoHS requirement. The WEEE Directive specifies the treatment, collection, recycling and disposal of... WEEE Symbol Statement The symbol shown below is recycled in your product's user's manual and we at the time of electric and electronic devices and their components. GA-MA78G(P)M-DS2H Motherboard - 96 - Also note that the information contained herein was accurate in your...


