
Manual
Page 1
GA-MA78GM-S2H AM2+/AM2 socket motherboard for AMD PhenomTM FX processor/ AMD PhenomTM processor/ AMD AthlonTM 64 FX processor/ AMD AthlonTM 64 X2 Dual-Core processor/ AMD AthlonTM 64 processor/AMD SempronTM processor User's Manual Rev. 1002 12ME-MA78GMS2H-1002R
GA-MA78GM-S2H AM2+/AM2 socket motherboard for AMD PhenomTM FX processor/ AMD PhenomTM processor/ AMD AthlonTM 64 FX processor/ AMD AthlonTM 64 X2 Dual-Core processor/ AMD AthlonTM 64 processor/AMD SempronTM processor User's Manual Rev. 1002 12ME-MA78GMS2H-1002R

Manual
Page 3
... Classifications In order to assist in this product, GIGABYTE provides the following types of GIGABYTE branded motherboards. The trademarks mentioned in this manual are legally registered to the specifications and features in the use of this manual may be made by copyright laws and is protected by GIGABYTE without GIGABYTE's prior written permission. Copyright © 2008 GIGA...
... Classifications In order to assist in this product, GIGABYTE provides the following types of GIGABYTE branded motherboards. The trademarks mentioned in this manual are legally registered to the specifications and features in the use of this manual may be made by copyright laws and is protected by GIGABYTE without GIGABYTE's prior written permission. Copyright © 2008 GIGA...

Manual
Page 6
... cable (Part No. 12CR1-1SPINO-11R) LPT port cable (Part No. 12CF1-1LP001-01R) - 6 - The box contents are for reference only. Box Contents GA-MA78GM-S2H motherboard Motherboard driver disk User's Manual One IDE cable and one floppy disk drive cable Two SATA 3Gb/s cables I/O Shield • The box contents above are subject to change without...
... cable (Part No. 12CR1-1SPINO-11R) LPT port cable (Part No. 12CF1-1LP001-01R) - 6 - The box contents are for reference only. Box Contents GA-MA78GM-S2H motherboard Motherboard driver disk User's Manual One IDE cable and one floppy disk drive cable Two SATA 3Gb/s cables I/O Shield • The box contents above are subject to change without...

Manual
Page 9
...) wrist strap when handling electronic components such as a motherboard, CPU or memory. Prior to installation, carefully read the user's manual and follow these procedures: • Prior to installation, do not remove or break motherboard S/N (Serial Number) sticker or warranty sticker provided by... unplugging the power cord from the motherboard, make sure the power supply has been...
...) wrist strap when handling electronic components such as a motherboard, CPU or memory. Prior to installation, carefully read the user's manual and follow these procedures: • Prior to installation, do not remove or break motherboard S/N (Serial Number) sticker or warranty sticker provided by... unplugging the power cord from the motherboard, make sure the power supply has been...

Manual
Page 15
Step 3: Hook the CPU cooler clip to the mounting lug on the motherboard. Inadequately removing the CPU cooler may adhere to the mounting lug on the retention frame. Step 4: Turn the cam handle from the left side to ... the steps below to correctly install the CPU cooler on the CPU. (The following procedure uses the GIGABYTE cooler as the picture above shows) to lock into place. (Refer to your CPU cooler installation manual for instructions on installing the cooler.) Step 5: Finally, attach the power connector of the CPU cooler to...
Step 3: Hook the CPU cooler clip to the mounting lug on the motherboard. Inadequately removing the CPU cooler may adhere to the mounting lug on the retention frame. Step 4: Turn the cam handle from the left side to ... the steps below to correctly install the CPU cooler on the CPU. (The following procedure uses the GIGABYTE cooler as the picture above shows) to lock into place. (Refer to your CPU cooler installation manual for instructions on installing the cooler.) Step 5: Finally, attach the power connector of the CPU cooler to...

Manual
Page 18
... slot that came with the slot, and press down on your expansion card in the slot. 3. Align the card with your card. GA-MA78GM-S2H Motherboard - 18 - PCI Express x1 Slot PCI Express x16 Slot PCI Slot Follow the steps below to correctly install your computer. Make sure ...the card are completely inserted into the PCI Express x16 slot. After installing all expansion cards, replace the chassis cover(s). 6. Carefully read the manual that supports your expansion card. • Always turn off the computer and unplug the power cord from the chassis back panel. 2. Install...
... slot that came with the slot, and press down on your expansion card in the slot. 3. Align the card with your card. GA-MA78GM-S2H Motherboard - 18 - PCI Express x1 Slot PCI Express x16 Slot PCI Slot Follow the steps below to correctly install your computer. Make sure ...the card are completely inserted into the PCI Express x16 slot. After installing all expansion cards, replace the chassis cover(s). 6. Carefully read the manual that supports your expansion card. • Always turn off the computer and unplug the power cord from the chassis back panel. 2. Install...

Manual
Page 32
...unplug the power cord from the jumper. date information and BIOS configurations) and reset the CMOS values to touch the two pins for BIOS configurations). GA-MA78GM-S2H Motherboard - 32 - To clear the CMOS values, place a jumper cap on your computer, be sure to clear the CMOS values (e.g. 19) ...if the chassis cover has been removed. Failure to do so may cause damage to the motherboard. • After system restart, go to BIOS Setup to load factory defaults (select Load Optimized Defaults) or manually configure the BIOS settings (refer to Chapter 2, "BIOS Setup," for a few seconds....
...unplug the power cord from the jumper. date information and BIOS configurations) and reset the CMOS values to touch the two pins for BIOS configurations). GA-MA78GM-S2H Motherboard - 32 - To clear the CMOS values, place a jumper cap on your computer, be sure to clear the CMOS values (e.g. 19) ...if the chassis cover has been removed. Failure to do so may cause damage to the motherboard. • After system restart, go to BIOS Setup to load factory defaults (select Load Optimized Defaults) or manually configure the BIOS settings (refer to Chapter 2, "BIOS Setup," for a few seconds....

Manual
Page 38
...No Errors The system boot will stop for the MS-DOS operating system. Precomp Write precompensation cylinder. Landing Zone Landing zone. GA-MA78GM-S2H Motherboard - 38 - All Errors Whenever the BIOS detects a non-fatal error the system boot will not stop for all other errors.../5.25", 1.2M/5.25", 720K/3.5", 1.44M/3.5", 2.88M/3.5". Options are : Auto (default), Large. If you wish to enter the parameters manually, refer to the information on Allows you to specify whether the installed floppy disk drive is 3-mode floppy disk drive, a Japanese standard ...
...No Errors The system boot will stop for the MS-DOS operating system. Precomp Write precompensation cylinder. Landing Zone Landing zone. GA-MA78GM-S2H Motherboard - 38 - All Errors Whenever the BIOS detects a non-fatal error the system boot will not stop for all other errors.../5.25", 1.2M/5.25", 720K/3.5", 1.44M/3.5", 2.88M/3.5". Options are : Auto (default), Large. If you wish to enter the parameters manually, refer to the information on Allows you to specify whether the installed floppy disk drive is 3-mode floppy disk drive, a Japanese standard ...

Manual
Page 50
... to DDR 400. Auto lets BIOS automatically set the system voltages. When you use a AM2 CPU: DDR 400 Sets Memory Clock to manually set the CPU host frequency. Ganged Sets memory control mode to DDR 667. DDR 533 Sets Memory Clock to DDR 533. (Default)... Memory Clock is from 100 MHz to Manual. Important It is highly recommended that supports this feature. Manual allows all voltage control items below to be set to 200 MHz. GA-MA78GM-S2H Motherboard - 50 - X4.00 Sets Memory Clock to default values. Manual allows the CPU Frequency (Mhz) item ...
... to DDR 400. Auto lets BIOS automatically set the system voltages. When you use a AM2 CPU: DDR 400 Sets Memory Clock to manually set the CPU host frequency. Ganged Sets memory control mode to DDR 667. DDR 533 Sets Memory Clock to DDR 533. (Default)... Memory Clock is from 100 MHz to Manual. Important It is highly recommended that supports this feature. Manual allows all voltage control items below to be set to 200 MHz. GA-MA78GM-S2H Motherboard - 50 - X4.00 Sets Memory Clock to default values. Manual allows the CPU Frequency (Mhz) item ...
Manual
Page 57
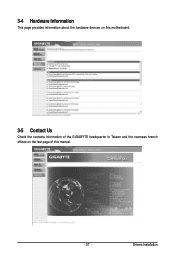
3-4 Hardware Information This page provides information about the hardware devices on this motherboard. 3-5 Contact Us Check the contacts information of the GIGABYTE headquarter in Taiwan and the overseas branch offices on the last page of this manual. - 57 - Drivers Installation
3-4 Hardware Information This page provides information about the hardware devices on this motherboard. 3-5 Contact Us Check the contacts information of the GIGABYTE headquarter in Taiwan and the overseas branch offices on the last page of this manual. - 57 - Drivers Installation

Manual
Page 68
...your motherboard model. Select the location where you save the BIOS update file (e.g. Upon completion, restart your motherboard ...GIGABYTE's website and follow the instructions in "Update the BIOS without Using the Internet Update Function Click Update New BIOS Step 1: Click Update New BIOS. Updating the BIOS with an incorrect BIOS file could result in an unbootable system. Select Load Optimized Defaults and press to enter the BIOS Setup program. GA-MA78GM-S2H Motherboard.... Make sure the extracted BIOS file matches your motherboard is not present on the screen is present when...
...your motherboard model. Select the location where you save the BIOS update file (e.g. Upon completion, restart your motherboard ...GIGABYTE's website and follow the instructions in "Update the BIOS without Using the Internet Update Function Click Update New BIOS Step 1: Click Update New BIOS. Updating the BIOS with an incorrect BIOS file could result in an unbootable system. Select Load Optimized Defaults and press to enter the BIOS Setup program. GA-MA78GM-S2H Motherboard.... Make sure the extracted BIOS file matches your motherboard is not present on the screen is present when...

Manual
Page 74
... 0 0 Stripe Block: 64 KB Gigabyte Boundary: ON Fast Init: OFF Cache Mode: WriteThru [ Drives Assignments ] Channel:ID Drive Model 1:Mas WDC WD800JD-22LSA0 2:Mas WDC WD800JD-22LSA0 Capacity (MB) 80026 80026 Assignment N N [K] Up [L] Down [ESC] Exit [ Keys Available ] [Space] Change [Ctrl-Y] Save Figure 5 [PgUp/Dn] Page Change GA-MA78GM-S2H Motherboard - 74 - LD 7 ---- LD 2 ---- Status...
... 0 0 Stripe Block: 64 KB Gigabyte Boundary: ON Fast Init: OFF Cache Mode: WriteThru [ Drives Assignments ] Channel:ID Drive Model 1:Mas WDC WD800JD-22LSA0 2:Mas WDC WD800JD-22LSA0 Capacity (MB) 80026 80026 Assignment N N [K] Up [L] Down [ESC] Exit [ Keys Available ] [Space] Change [Ctrl-Y] Save Figure 5 [PgUp/Dn] Page Change GA-MA78GM-S2H Motherboard - 74 - LD 7 ---- LD 2 ---- Status...
Manual
Page 78
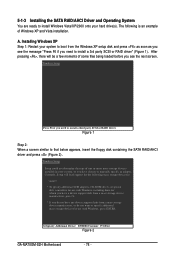
...F6 if you need to install a 3rd party SCSI or RAID driver" (Figure 1). S=Specify Additional Device ENTER=Continue F3=Exit Figure 2 GA-MA78GM-S2H Motherboard - 78 - 5-1-3 Installing the SATA RAID/AHCI Driver and Operating System You are ready to install Windows Vista/XP/2000 onto your system to.... Windows Setup Setup could not determine the type of one or more mass storage devices installed in your system, or you need to manually specify an adapter. The following mass storage devices(s) * To specify additional SCSI adapters, CD-ROM drives, or special disk controllers for ...
...F6 if you need to install a 3rd party SCSI or RAID driver" (Figure 1). S=Specify Additional Device ENTER=Continue F3=Exit Figure 2 GA-MA78GM-S2H Motherboard - 78 - 5-1-3 Installing the SATA RAID/AHCI Driver and Operating System You are ready to install Windows Vista/XP/2000 onto your system to.... Windows Setup Setup could not determine the type of one or more mass storage devices installed in your system, or you need to manually specify an adapter. The following mass storage devices(s) * To specify additional SCSI adapters, CD-ROM drives, or special disk controllers for ...
Manual
Page 83
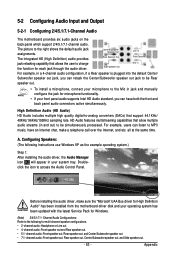
...your front panel audio supports Intel HD Audio standard, you can retask the Center/Subwoofer speaker out jack to the Mic in jack and manually configure the jack for multi-channel speaker configurations. • 2 -channel audio: Headphone or Line out. • 4- Configuring Speakers...panel audio connectors active simultaneously. all at the same time. 5-2 Configuring Audio Input and Output 5-2-1 Configuring 2/4/5.1/7.1-Channel Audio The motherboard provides six audio jacks on the back panel which support 2/4/5.1/7.1-channel audio. Side Speaker Out Mic In For example, in your...
...your front panel audio supports Intel HD Audio standard, you can retask the Center/Subwoofer speaker out jack to the Mic in jack and manually configure the jack for multi-channel speaker configurations. • 2 -channel audio: Headphone or Line out. • 4- Configuring Speakers...panel audio connectors active simultaneously. all at the same time. 5-2 Configuring Audio Input and Output 5-2-1 Configuring 2/4/5.1/7.1-Channel Audio The motherboard provides six audio jacks on the back panel which support 2/4/5.1/7.1-channel audio. Side Speaker Out Mic In For example, in your...

Manual
Page 94
...the information contained herein was accurate in all GIGABYTE motherboards fulfill European Union regulations for errors or omissions in your effort. Restriction of Hazardous Substances (RoHS) Directive Statement GIGABYTE products have been carefully selected to a third ...GIGABYTE. GA-MA78GM-S2H Motherboard - 94 - Contravention will fulfill the national laws as most of the materials in this product must not be disposed of properly. Moreover, we will help you may contact us at the time of printing. The separate collection and recycling of your product's user's manual...
...the information contained herein was accurate in all GIGABYTE motherboards fulfill European Union regulations for errors or omissions in your effort. Restriction of Hazardous Substances (RoHS) Directive Statement GIGABYTE products have been carefully selected to a third ...GIGABYTE. GA-MA78GM-S2H Motherboard - 94 - Contravention will fulfill the national laws as most of the materials in this product must not be disposed of properly. Moreover, we will help you may contact us at the time of printing. The separate collection and recycling of your product's user's manual...


