
Manual
Page 5
... Recovery2 59 4-2 BIOS Update Utilities 64 4-2-1 Updating the BIOS with the Q-Flash Utility 64 4-2-2 Updating the BIOS with the @BIOS Utility 67 4-3 EasyTune 5 Pro 69 4-4 Windows Vista ReadyBoost 70 Chapter 5 Appendix ...71 5-1 Configuring SATA Hard Drive(s 71 5-1-1 Configuring the Onboard SATA Controller 71 5-1-2 Making a SATA RAID/AHCI Driver Diskette 77 5-1-3 Installing...
... Recovery2 59 4-2 BIOS Update Utilities 64 4-2-1 Updating the BIOS with the Q-Flash Utility 64 4-2-2 Updating the BIOS with the @BIOS Utility 67 4-3 EasyTune 5 Pro 69 4-4 Windows Vista ReadyBoost 70 Chapter 5 Appendix ...71 5-1 Configuring SATA Hard Drive(s 71 5-1-1 Configuring the Onboard SATA Controller 71 5-1-2 Making a SATA RAID/AHCI Driver Diskette 77 5-1-3 Installing...

Manual
Page 12
GA-MA78GM-S2H Motherboard - 12 - Unique Features Bundled Software Operating System Form Factor Š Support for @BIOS Š Support for Download Center Š Support for Q-Flash Š Support ... Š Support for Virtual Dual BIOS Š Norton Internet Security (OEM version) Š Support for Microsoft® Windows® Vista/XP/2000 Š Micro ATX Form Factor; 24.3cm x 24.3cm (Note 1) Due to Windows XP 32-bit operating system limitation, when more than 4 GB of physical memory is installed, the actual...
GA-MA78GM-S2H Motherboard - 12 - Unique Features Bundled Software Operating System Form Factor Š Support for @BIOS Š Support for Download Center Š Support for Q-Flash Š Support ... Š Support for Virtual Dual BIOS Š Norton Internet Security (OEM version) Š Support for Microsoft® Windows® Vista/XP/2000 Š Micro ATX Form Factor; 24.3cm x 24.3cm (Note 1) Due to Windows XP 32-bit operating system limitation, when more than 4 GB of physical memory is installed, the actual...
Manual
Page 19
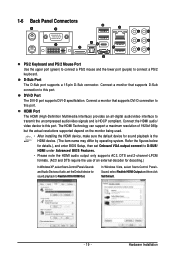
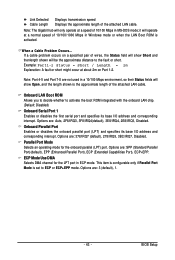
The HDMI Technology can support a maximum resolution of an external decoder for decoding.) In Windows XP, select Start>Control Panel>Sounds and Audio Devices>Audio, set the Default device for sound playback is HDCP compliant. Refer the figures below for ... that supports D-Sub connection to transmit the uncompressed audio/video signals and is the HDMI device. (The item name may differ by operating system. In Windows Vista, select Start>Control Panel> Sound, select Realtek HDMI Output and then click Set Default. - 19 - 1-6 Back Panel Connectors PS/2 Keyboard and PS/2 Mouse Port...
The HDMI Technology can support a maximum resolution of an external decoder for decoding.) In Windows XP, select Start>Control Panel>Sounds and Audio Devices>Audio, set the Default device for sound playback is HDCP compliant. Refer the figures below for ... that supports D-Sub connection to transmit the uncompressed audio/video signals and is the HDMI device. (The item name may differ by operating system. In Windows Vista, select Start>Control Panel> Sound, select Realtek HDMI Output and then click Set Default. - 19 - 1-6 Back Panel Connectors PS/2 Keyboard and PS/2 Mouse Port...
Manual
Page 21
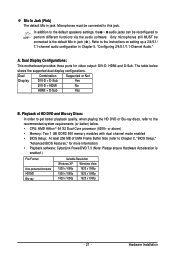
... more information) • Playback software: CyberLink PowerDVD 7.3 (Note: Please ensure Hardware Acceleration is enabled ) File Format Non-protected contents HD-DVD Blu-ray Suitable Resolution Windows XP Windows Vista 1920 x 1080p 1920 x 1080p 1920 x 1080p 1920 x 1080p 1920 x 1080p 1920 x 1080p - 21 - Hardware Installation Dual Combination Supported or Not Display DVI-D + D-Sub...
... more information) • Playback software: CyberLink PowerDVD 7.3 (Note: Please ensure Hardware Acceleration is enabled ) File Format Non-protected contents HD-DVD Blu-ray Suitable Resolution Windows XP Windows Vista 1920 x 1080p 1920 x 1080p 1920 x 1080p 1920 x 1080p 1920 x 1080p 1920 x 1080p - 21 - Hardware Installation Dual Combination Supported or Not Display DVI-D + D-Sub...
Manual
Page 33
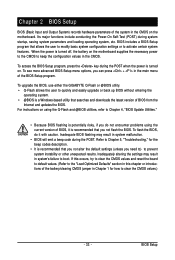
Its major functions include conducting the Power-On Self-Test (POST) during the POST. To upgrade the BIOS, use either the GIGABYTE Q-Flash or @BIOS utility. • Q-Flash allows the user to prevent system instability or other unexpected results. To flash the BIOS, do not ...the default settings (unless you need to) to quickly and easily upgrade or back up BIOS without entering the operating system. • @BIOS is a Windows-based utility that searches and downloads the latest version of BIOS from the Internet and updates the BIOS. Chapter 2 BIOS Setup BIOS (Basic Input and...
Its major functions include conducting the Power-On Self-Test (POST) during the POST. To upgrade the BIOS, use either the GIGABYTE Q-Flash or @BIOS utility. • Q-Flash allows the user to prevent system instability or other unexpected results. To flash the BIOS, do not ...the default settings (unless you need to) to quickly and easily upgrade or back up BIOS without entering the operating system. • @BIOS is a Windows-based utility that searches and downloads the latest version of BIOS from the Internet and updates the BIOS. Chapter 2 BIOS Setup BIOS (Basic Input and...
Manual
Page 40
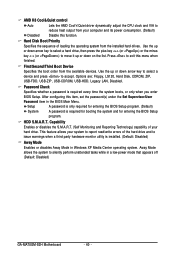
... to silently perform unattended tasks while in Windows XP Media Center operating system. After configuring this menu when finished. Password Check Specifies whether a password is installed. (Default: Disabled) Away Mode Enables or disables Away Mode in a low-power mode that appears off (Default: Disabled) GA-MA78GM-S2H Motherboard - 40 - Setup A password is only required...
... to silently perform unattended tasks while in Windows XP Media Center operating system. After configuring this menu when finished. Password Check Specifies whether a password is installed. (Default: Disabled) Away Mode Enables or disables Away Mode in a low-power mode that appears off (Default: Disabled) GA-MA78GM-S2H Motherboard - 40 - Setup A password is only required...
Manual
Page 41
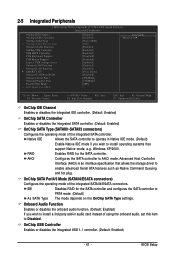
... Enables or disables the integrated SATA controller. (Default: Enabled) OnChip SATA Type (SATAII0~SATAII3 connectors) Configures the operating mode of the integrated SATAII4/ESATA connectors. Windows XP/2000. Advanced Host Controller Interface (AHCI) is an interface specification that support Native mode, e.g.
... Enables or disables the integrated SATA controller. (Default: Enabled) OnChip SATA Type (SATAII0~SATAII3 connectors) Configures the operating mode of the integrated SATAII4/ESATA connectors. Windows XP/2000. Advanced Host Controller Interface (AHCI) is an interface specification that support Native mode, e.g.
Manual
Page 43
...... Note: Part 4-5 and Part 7-8 are not used in ECP mode. Note: The Gigabit hub will only operate at a normal speed of 10/100 Mbps in Windows mode or when the LAN Boot ROM is activated. Options are : SPP (Standard Parallel Port)(default), EPP (Enhanced Parallel Port), ECP (Extended Capabilities Port), ECP...
...... Note: Part 4-5 and Part 7-8 are not used in ECP mode. Note: The Gigabit hub will only operate at a normal speed of 10/100 Mbps in Windows mode or when the LAN Boot ROM is activated. Options are : SPP (Standard Parallel Port)(default), EPP (Enhanced Parallel Port), ECP (Extended Capabilities Port), ECP...

Manual
Page 44
... Configures the way to be resumed at any time. If the power button is pressed for 4 seconds to enter the ACPI S1 (Power on Windows® Vista® operating system only. Soft-Off by Alarm x Date (of Month) x Resume Time (hh:mm:ss) [S1(POS)] [Instant-off the system. GA-MA78GM-S2H Motherboard - 44 -
... Configures the way to be resumed at any time. If the power button is pressed for 4 seconds to enter the ACPI S1 (Power on Windows® Vista® operating system only. Soft-Off by Alarm x Date (of Month) x Resume Time (hh:mm:ss) [S1(POS)] [Instant-off the system. GA-MA78GM-S2H Motherboard - 44 -

Manual
Page 45
...the return of Month): Turn on the system at which the system will be effective. (Note) Supported on Windows® Vista® operating system only. - 45 - Resume Time (hh: mm: ss): Set the ...month. Power On By Keyboard Allows the system to Password. Keyboard 98 Press POWER button on the Windows 98 keyboard to accept. Press on this item and set the date and time as following: Date ...on the PS/2 mouse to be turned on by a PS/2 keyboard wake-up event. When prompted for Windows® Vista® operating system. (Default: Enabled) Power On By Mouse Allows the system to turn ...
...the return of Month): Turn on the system at which the system will be effective. (Note) Supported on Windows® Vista® operating system only. - 45 - Resume Time (hh: mm: ss): Set the ...month. Power On By Keyboard Allows the system to Password. Keyboard 98 Press POWER button on the Windows 98 keyboard to accept. Press on this item and set the date and time as following: Date ...on the PS/2 mouse to be turned on by a PS/2 keyboard wake-up event. When prompted for Windows® Vista® operating system. (Default: Enabled) Power On By Mouse Allows the system to turn ...
Manual
Page 55
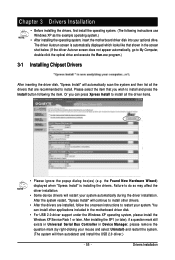
... can install other drivers. • After the drivers are recommended to install. Or you wish to install and press the Install button following instructions use Windows XP as the example operating system.) • After installing the operating system, insert the motherboard driver disk into your mouse and select Uninstall) and restart... drivers. You can press Xpress Install to install all the drivers that shown in the motherboard driver disk. • For USB 2.0 driver support under the Windows XP operating system, please install the Windows XP Service Pack 1 or later.
... can install other drivers. • After the drivers are recommended to install. Or you wish to install and press the Install button following instructions use Windows XP as the example operating system.) • After installing the operating system, insert the motherboard driver disk into your mouse and select Uninstall) and restart... drivers. You can press Xpress Install to install all the drivers that shown in the motherboard driver disk. • For USB 2.0 driver support under the Windows XP operating system, please install the Windows XP Service Pack 1 or later.
Manual
Page 59
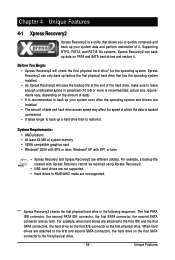
...first physical drive. System Requirements: • AMD platform • At least 64 MB of system memory • VESA compatible graphics card • Windows® 2000 with Xpress Recovery cannot be restored using Xpress Recovery2. • USB hard drives are not supported. • Hard drives in RAID/... a utility that has the operating system installed. • As Xpress Recovery2 will check the first physical hard drive* for the operating system. Windows® XP with SP1 or later • Xpress Recovery and Xpress Recovery2 are installed. • The amount of data and hard drive access...
...first physical drive. System Requirements: • AMD platform • At least 64 MB of system memory • VESA compatible graphics card • Windows® 2000 with Xpress Recovery cannot be restored using Xpress Recovery2. • USB hard drives are not supported. • Hard drives in RAID/... a utility that has the operating system installed. • As Xpress Recovery2 will check the first physical hard drive* for the operating system. Windows® XP with SP1 or later • Xpress Recovery and Xpress Recovery2 are installed. • The amount of data and hard drive access...

Manual
Page 60
... and Partitioning the Hard Drive 1. actual size requirements vary, depending on the amount of the operating system (Figure 3). Figure 3 GA-MA78GM-S2H Motherboard - 60 - Installation and Configuration (The following procedure uses Windows XP as the first boot device under "Advanced BIOS Features" in the BIOS Setup program. Set CD-ROM drive as the example...
... and Partitioning the Hard Drive 1. actual size requirements vary, depending on the amount of the operating system (Figure 3). Figure 3 GA-MA78GM-S2H Motherboard - 60 - Installation and Configuration (The following procedure uses Windows XP as the first boot device under "Advanced BIOS Features" in the BIOS Setup program. Set CD-ROM drive as the example...
Manual
Page 62
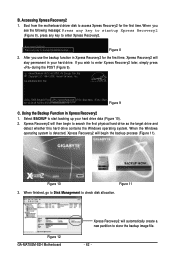
...disk allocation. Figure 12 GA-MA78GM-S2H Motherboard Xpress Recovery2 will then begin the backup process (Figure 11). Accessing Xpress Recovery2 1. GA-MA78GM-S2H F3c . . . . : BIOS Setup/Q-Flash : XpressRecovery2 : Boot Menu : Qflash 02/13/2008-RS780-SB700-6A66AG06C-00 Figure 9 C. When the Windows operating system is detected,...press any key to search the first physical hard drive as the target drive and detect whether this hard drive contains the Windows operating system. After you wish to enter Xpress Recovery2. . . Boot from the motherboard driver disk to start backing ...
...disk allocation. Figure 12 GA-MA78GM-S2H Motherboard Xpress Recovery2 will then begin the backup process (Figure 11). Accessing Xpress Recovery2 1. GA-MA78GM-S2H F3c . . . . : BIOS Setup/Q-Flash : XpressRecovery2 : Boot Menu : Qflash 02/13/2008-RS780-SB700-6A66AG06C-00 Figure 9 C. When the Windows operating system is detected,...press any key to search the first physical hard drive as the target drive and detect whether this hard drive contains the Windows operating system. After you wish to enter Xpress Recovery2. . . Boot from the motherboard driver disk to start backing ...

Manual
Page 64
...the POST to enter MSDOS mode. During the POST, press the key to your motherboard model. 2. However, if the BIOS update file is @BIOS ? GA-MA78GM-S2H F3c . . . . : BIOS Setup/Q-Flash : XpressRecovery2 : Boot Menu : Qflash 02/13/2008-RS780-SB700-6A66AG06C-00 Because BIOS flashing is Q-Flash ...the need to access Q-Flash. Inadequate BIOS flashing may result in the Windows environment. @BIOS will download the latest BIOS file from the hassles of going through complicated BIOS flashing process. GA-MA78GM-S2H Motherboard - 64 - GIGABYTE Q-Flash and @BIOS are easy-to-use and allow you to ...
...the POST to enter MSDOS mode. During the POST, press the key to your motherboard model. 2. However, if the BIOS update file is @BIOS ? GA-MA78GM-S2H F3c . . . . : BIOS Setup/Q-Flash : XpressRecovery2 : Boot Menu : Qflash 02/13/2008-RS780-SB700-6A66AG06C-00 Because BIOS flashing is Q-Flash ...the need to access Q-Flash. Inadequate BIOS flashing may result in the Windows environment. @BIOS will download the latest BIOS file from the hassles of going through complicated BIOS flashing process. GA-MA78GM-S2H Motherboard - 64 - GIGABYTE Q-Flash and @BIOS are easy-to-use and allow you to ...

Manual
Page 67
.... 2. Installing and Using @BIOS: Use the motherboard driver disk included with the @BIOS Utility A. B. GIGABYTE product warranty does not cover any BIOS damage or system failure resulting from an inadequate BIOS flashing. Before You Begin: 1. In Windows, close all applications and TSR (Terminate and Stay Resident) programs. This helps prevent unexpected failures...
.... 2. Installing and Using @BIOS: Use the motherboard driver disk included with the @BIOS Utility A. B. GIGABYTE product warranty does not cover any BIOS damage or system failure resulting from an inadequate BIOS flashing. Before You Begin: 1. In Windows, close all applications and TSR (Terminate and Stay Resident) programs. This helps prevent unexpected failures...

Manual
Page 69
...execution button Toggles among Easy Mode, Advanced Mode, and Graphics Mode Displays the CPU frequency Shows the supported function(s) Go to GIGABYTE website to update EasyTune 5 Pro Opens EasyTune 5 Pro help file Quits or minimizes the EasyTune 5 Pro interface Performance Enhancement Incorrectly...EasyTune 5 Pro, or system instability or other unexpected results may occur. (Note 1) Available functions in EasyTune 5 Pro may result in Windows environment, eliminating the need to enter the BIOS Setup program. EASY MODE/ADVANCED MODE/ GRAPHICS 7. PC HEALTH 5. Turbo Boost Description ...
...execution button Toggles among Easy Mode, Advanced Mode, and Graphics Mode Displays the CPU frequency Shows the supported function(s) Go to GIGABYTE website to update EasyTune 5 Pro Opens EasyTune 5 Pro help file Quits or minimizes the EasyTune 5 Pro interface Performance Enhancement Incorrectly...EasyTune 5 Pro, or system instability or other unexpected results may occur. (Note 1) Available functions in EasyTune 5 Pro may result in Windows environment, eliminating the need to enter the BIOS Setup program. EASY MODE/ADVANCED MODE/ GRAPHICS 7. PC HEALTH 5. Turbo Boost Description ...
Manual
Page 70
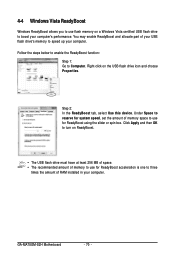
4-4 Windows Vista ReadyBoost Windows ReadyBoost allows you to use flash memory on the USB flash drive icon and choose Properties. GA-MA78GM-S2H Motherboard - 70 - Under Space to reserve for system speed, set the amount of your USB flash drive's memory to speed up your computer. Step ...below to enable the ReadyBoost function: Step 1: Go to three times the amount of RAM installed in your computer's performance. Right-click on a Windows Vista certified USB flash drive to use for ReadyBoost using the slider or spin box. You may enable ReadyBoost and allocate part of memory space...
4-4 Windows Vista ReadyBoost Windows ReadyBoost allows you to use flash memory on the USB flash drive icon and choose Properties. GA-MA78GM-S2H Motherboard - 70 - Under Space to reserve for system speed, set the amount of your USB flash drive's memory to speed up your computer. Step ...below to enable the ReadyBoost function: Step 1: Go to three times the amount of RAM installed in your computer's performance. Right-click on a Windows Vista certified USB flash drive to use for ReadyBoost using the slider or spin box. You may enable ReadyBoost and allocate part of memory space...
Manual
Page 71
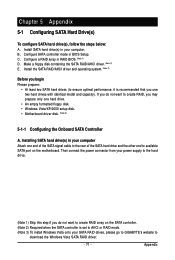
...containing the SATA RAID/AHCI driver. (Note 2) E. Then connect the power connector from your SATA RAID drives, please go to GIGABYTE's website to ensure optimal performance, it is recommended that you begin Please prepare: • At least two SATA hard drives (to download...drive(s), follow the steps below: A. Installing SATA hard drive(s) in your computer Attach one hard drive. • An empty formatted floppy disk. • Windows Vista/XP/2000 setup disk. • Motherboard driver disk. (Note 3) 5-1-1 Configuring the Onboard SATA Controller A. C . Install the SATA RAID/AHCI driver...
...containing the SATA RAID/AHCI driver. (Note 2) E. Then connect the power connector from your SATA RAID drives, please go to GIGABYTE's website to ensure optimal performance, it is recommended that you begin Please prepare: • At least two SATA hard drives (to download...drive(s), follow the steps below: A. Installing SATA hard drive(s) in your computer Attach one hard drive. • An empty formatted floppy disk. • Windows Vista/XP/2000 setup disk. • Motherboard driver disk. (Note 3) 5-1-1 Configuring the Onboard SATA Controller A. C . Install the SATA RAID/AHCI driver...
Manual
Page 73
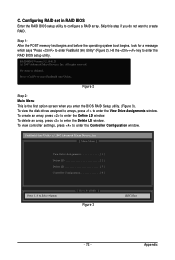
...After the POST memory test begins and before the operating system boot begins, look for a message which says "Press to enter the Define LD window. To create an array, press to enter FastBuild (tm) Utility" (Figure 2). To delete an array, press to Select Option [ Keys ... [ Main Menu ] View Drive Assignments 1 ] Define LD 2 ] Delete LD 3 ] Controller Configuration 4 ] Press 1..4 to enter the Delete LD window. Skip this step if you enter the BIOS RAID Setup utility. (Figure 3). All rights reserved. To view controller settings, press to create RAID. Configuring RAID...
...After the POST memory test begins and before the operating system boot begins, look for a message which says "Press to enter the Define LD window. To create an array, press to enter FastBuild (tm) Utility" (Figure 2). To delete an array, press to Select Option [ Keys ... [ Main Menu ] View Drive Assignments 1 ] Define LD 2 ] Delete LD 3 ] Controller Configuration 4 ] Press 1..4 to enter the Delete LD window. Skip this step if you enter the BIOS RAID Setup utility. (Figure 3). All rights reserved. To view controller settings, press to create RAID. Configuring RAID...


