
Manual
Page 5
... Audio 83 5-2-2 Installing the S/PDIF In and Out Cable (Optional 85 5-2-3 Enabling the DTS (Digital Theater Systems) Function 87 5-2-4 Configuring Microphone Recording 88 5-2-5 Using the Sound Recorder 90 5-3 Troubleshooting 91 5-3-1 Frequently Asked Questions 91 5-3-2 Troubleshooting Procedure 92 Regulatory Statements 94 - 5 -
... Audio 83 5-2-2 Installing the S/PDIF In and Out Cable (Optional 85 5-2-3 Enabling the DTS (Digital Theater Systems) Function 87 5-2-4 Configuring Microphone Recording 88 5-2-5 Using the Sound Recorder 90 5-3 Troubleshooting 91 5-3-1 Frequently Asked Questions 91 5-3-2 Troubleshooting Procedure 92 Regulatory Statements 94 - 5 -
Manual
Page 19
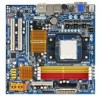
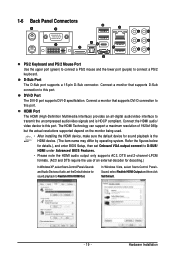
...connect a PS/2 keyboard. The HDMI Technology can support a maximum resolution of an external decoder for decoding.) In Windows XP, select Start>Control Panel>Sounds and Audio Devices>Audio, set Onboard VGA output connect to D-SUB/ HDMI under Advanced BIOS Features. • Please note the HDMI audio output ... actual resolutions supported depend on the monitor being used. • After installing the HDMI device, make sure the default device for sound playback to this port. Hardware Installation Refer the figures below for details.), and enter BIOS Setup, then set the Default device for...
...connect a PS/2 keyboard. The HDMI Technology can support a maximum resolution of an external decoder for decoding.) In Windows XP, select Start>Control Panel>Sounds and Audio Devices>Audio, set Onboard VGA output connect to D-SUB/ HDMI under Advanced BIOS Features. • Please note the HDMI audio output ... actual resolutions supported depend on the monitor being used. • After installing the HDMI device, make sure the default device for sound playback to this port. Hardware Installation Refer the figures below for details.), and enter BIOS Setup, then set the Default device for...

Manual
Page 47
... threshold, BIOS will show "No". To clear the chassis intrusion status record, set Reset Case Open Status to Enabled, save the settings to emit warning sound if the CPU/system fan is removed, this occurs. (Default: Disabled) - 47 - Current System/CPU Temperature Displays current system/CPU temperature. CPU Warning Temperature Sets... the warning threshold for CPU temperature. BIOS Setup Enabled clears the record of previous chassis intrusion status and the Case Opened field will emit warning sound. If the system chassis cover is not connected or fails.
... threshold, BIOS will show "No". To clear the chassis intrusion status record, set Reset Case Open Status to Enabled, save the settings to emit warning sound if the CPU/system fan is removed, this occurs. (Default: Disabled) - 47 - Current System/CPU Temperature Displays current system/CPU temperature. CPU Warning Temperature Sets... the warning threshold for CPU temperature. BIOS Setup Enabled clears the record of previous chassis intrusion status and the Case Opened field will emit warning sound. If the system chassis cover is not connected or fails.

Manual
Page 84
... Select the device according to the type of speaker configuration you can only have audio signals present on the Sound Effect tab. Click OK to complete the configuration. Configuring Sound Effect: You may configure an audio environment on either the front or the back panel audio connections, but ... 8CH Speaker according to the type of device you connect an audio device to set up. Then click OK to activiate the AC'97 functionality. GA-MA78GM-S2H Motherboard - 84 - In the speaker list on the Audio I /O tab. Step 2: Click the Audio I /O tab On the Global Connector ...
... Select the device according to the type of speaker configuration you can only have audio signals present on the Sound Effect tab. Click OK to complete the configuration. Configuring Sound Effect: You may configure an audio environment on either the front or the back panel audio connections, but ... 8CH Speaker according to the type of device you connect an audio device to set up. Then click OK to activiate the AC'97 functionality. GA-MA78GM-S2H Motherboard - 84 - In the speaker list on the Audio I /O tab. Step 2: Click the Audio I /O tab On the Global Connector ...

Manual
Page 87
...channel music. channel audio effects. Enabling dts NEO : PC allows the system to produce 4-, 5.1-, or 7.1- channel surround sound, depending on your surround sound system is enabled, you would get only 2-channel output signals (from two-channel content. (Note) When DTS Interactive is...Audio Control Panel. channel music sources to transform ordinary 2-channel stereo content into multi-channel audio output, creating a virtual surround sound environment(Note). Either click DTS Interactive in the Audio Control Panel. You must play 4-, 5.1-, or 7.1- After installing the ...
...channel music. channel audio effects. Enabling dts NEO : PC allows the system to produce 4-, 5.1-, or 7.1- channel surround sound, depending on your surround sound system is enabled, you would get only 2-channel output signals (from two-channel content. (Note) When DTS Interactive is...Audio Control Panel. channel music sources to transform ordinary 2-channel stereo content into multi-channel audio output, creating a virtual surround sound environment(Note). Either click DTS Interactive in the Audio Control Panel. You must play 4-, 5.1-, or 7.1- After installing the ...

Manual
Page 89
... not select the Mute check box under Front Pink In or Front Green In in the Mixer device list Recording Control - 89 - To hear the sound being recorded during the recording process when using the microphone function on the back panel, do not select the Mute check box under Rear Pink... In in Master Volume. In the Mixer device list, select Realtek HD Audio Input. Do NOT mute the recording sound, or you will not hear any sound when playing back the recording you need in Master Volume, go to complete. It is recommended that you wish to show and...
... not select the Mute check box under Front Pink In or Front Green In in the Mixer device list Recording Control - 89 - To hear the sound being recorded during the recording process when using the microphone function on the back panel, do not select the Mute check box under Rear Pink... In in Master Volume. In the Mixer device list, select Realtek HD Audio Input. Do NOT mute the recording sound, or you will not hear any sound when playing back the recording you need in Master Volume, go to complete. It is recommended that you wish to show and...

Manual
Page 90
... to All Programs, point to Accessories, point to Entertainment, and then click Sound Recorder to Options in Master Volume and select Advanced Controls. Make sure you wish to the computer. 2. GA-MA78GM-S2H Motherboard - 90 - Front Green In, Front Pink In). To play .... 3. Step 6: To raise the recording and playing sound for the microphone, go to begin the sound recording. 5-2-5 Using the Sound Recorder Recording the Sound: 1. Playing the Sound: 1. On the File...
... to All Programs, point to Accessories, point to Entertainment, and then click Sound Recorder to Options in Master Volume and select Advanced Controls. Make sure you wish to the computer. 2. GA-MA78GM-S2H Motherboard - 90 - Front Green In, Front Pink In). To play .... 3. Step 6: To raise the recording and playing sound for the microphone, go to begin the sound recording. 5-2-5 Using the Sound Recorder Recording the Sound: 1. Playing the Sound: 1. On the File...

Manual
Page 91
... light of standby power after the computer shuts down and that's why the light is equipped with power/ amplifier. A: If your speaker is still on GIGABYTE's website. Refer to enter BIOS Setup. Press to the steps below: Steps: 1. Q: What do the beeps emitted during the POST. A: Some advanced ... in the BIOS Setup program. Appendix Q: Why do I have this jumper, refer to show the advanced options. Q: How do I still get a weak sound even though I clear the CMOS values? Q: In the BIOS Setup program, why are hidden in Chapter 1 to short the jumper to the Support\Motherboard\FAQ...
... light of standby power after the computer shuts down and that's why the light is equipped with power/ amplifier. A: If your speaker is still on GIGABYTE's website. Refer to enter BIOS Setup. Press to the steps below: Steps: 1. Q: What do the beeps emitted during the POST. A: Some advanced ... in the BIOS Setup program. Appendix Q: Why do I have this jumper, refer to show the advanced options. Q: How do I still get a weak sound even though I clear the CMOS values? Q: In the BIOS Setup program, why are hidden in Chapter 1 to short the jumper to the Support\Motherboard\FAQ...

