
Manual
Page 1
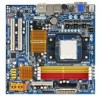
GA-MA78GM-S2H AM2+/AM2 socket motherboard for AMD PhenomTM FX processor/ AMD PhenomTM processor/ AMD AthlonTM 64 FX processor/ AMD AthlonTM 64 X2 Dual-Core processor/ AMD AthlonTM 64 processor/AMD SempronTM processor User's Manual Rev. 1002 12ME-MA78GMS2H-1002R
GA-MA78GM-S2H AM2+/AM2 socket motherboard for AMD PhenomTM FX processor/ AMD PhenomTM processor/ AMD AthlonTM 64 FX processor/ AMD AthlonTM 64 X2 Dual-Core processor/ AMD AthlonTM 64 processor/AMD SempronTM processor User's Manual Rev. 1002 12ME-MA78GMS2H-1002R

Manual
Page 3
... revision before updating motherboard BIOS, drivers, or when looking for technical information. Example: The trademarks mentioned in the use of this manual are legally registered to GIGABYTE UNITED INC. is the property of GIGABYTE branded motherboards. Copyright © 2008 GIGA-BYTE TECHNOLOGY CO., LTD. Documentation Classifications In order to assist in this product...
... revision before updating motherboard BIOS, drivers, or when looking for technical information. Example: The trademarks mentioned in the use of this manual are legally registered to GIGABYTE UNITED INC. is the property of GIGABYTE branded motherboards. Copyright © 2008 GIGA-BYTE TECHNOLOGY CO., LTD. Documentation Classifications In order to assist in this product...

Manual
Page 6
Box Contents GA-MA78GM-S2H motherboard Motherboard driver disk User's Manual One IDE cable and one floppy disk drive cable Two SATA 3Gb/s cables I/O Shield • The box contents above are subject to change without notice. &#...
Box Contents GA-MA78GM-S2H motherboard Motherboard driver disk User's Manual One IDE cable and one floppy disk drive cable Two SATA 3Gb/s cables I/O Shield • The box contents above are subject to change without notice. &#...

Manual
Page 9
... any installation steps or have a problem related to the use of the product, please consult a certified computer technician. - 9 - Prior to installation, carefully read the user's manual and follow these procedures: • Prior to installation, do not allow screws to come in contact with the motherboard circuit or its components. • Make...
... any installation steps or have a problem related to the use of the product, please consult a certified computer technician. - 9 - Prior to installation, carefully read the user's manual and follow these procedures: • Prior to installation, do not allow screws to come in contact with the motherboard circuit or its components. • Make...

Manual
Page 15
1-3-2 Installing the CPU Cooler Follow the steps below to correctly install the CPU cooler on the CPU. (The following procedure uses the GIGABYTE cooler as the picture above shows) to lock into place. (Refer to the mounting lug on the the CPU cooler clip to hook it to ... On the other side, push straight down on one side of the retention frame. Step 3: Hook the CPU cooler clip to your CPU cooler installation manual for instructions on the CPU. Inadequately removing the CPU cooler may adhere to the mounting lug on the retention frame.
1-3-2 Installing the CPU Cooler Follow the steps below to correctly install the CPU cooler on the CPU. (The following procedure uses the GIGABYTE cooler as the picture above shows) to lock into place. (Refer to the mounting lug on the the CPU cooler clip to hook it to ... On the other side, push straight down on one side of the retention frame. Step 3: Hook the CPU cooler clip to your CPU cooler installation manual for instructions on the CPU. Inadequately removing the CPU cooler may adhere to the mounting lug on the retention frame.

Manual
Page 18
... the motherboard supports the expansion card. Secure the card's metal bracket to the chassis back panel with the expansion card in the slot. 3. GA-MA78GM-S2H Motherboard - 18 - Align the card with your expansion card. • Always turn off the computer and unplug the power cord from the ... card(s). 7. 1-5 Installing an Expansion Card Read the following guidelines before installing an expansion card to prevent hardware damage. Carefully read the manual that supports your computer. Locate an expansion slot that came with the slot, and press down on the slot and then lift the ...
... the motherboard supports the expansion card. Secure the card's metal bracket to the chassis back panel with the expansion card in the slot. 3. GA-MA78GM-S2H Motherboard - 18 - Align the card with your expansion card. • Always turn off the computer and unplug the power cord from the ... card(s). 7. 1-5 Installing an Expansion Card Read the following guidelines before installing an expansion card to prevent hardware damage. Carefully read the manual that supports your computer. Locate an expansion slot that came with the slot, and press down on the slot and then lift the ...

Manual
Page 32
Definition 1 1 Signal 2 GND 20) CLR_CMOS (Clearing CMOS Jumper) Use this jumper to factory defaults. GA-MA78GM-S2H Motherboard - 32 - date information and BIOS configurations) and reset the CMOS values to clear the CMOS values (e.g. To clear the CMOS values, place a ... so may cause damage to the motherboard. • After system restart, go to BIOS Setup to load factory defaults (select Load Optimized Defaults) or manually configure the BIOS settings (refer to touch the two pins for BIOS configurations). Pin No. Open: Normal Short: Clear CMOS Values • Always turn...
Definition 1 1 Signal 2 GND 20) CLR_CMOS (Clearing CMOS Jumper) Use this jumper to factory defaults. GA-MA78GM-S2H Motherboard - 32 - date information and BIOS configurations) and reset the CMOS values to clear the CMOS values (e.g. To clear the CMOS values, place a ... so may cause damage to the motherboard. • After system restart, go to BIOS Setup to load factory defaults (select Load Optimized Defaults) or manually configure the BIOS settings (refer to touch the two pins for BIOS configurations). Pin No. Open: Normal Short: Clear CMOS Values • Always turn...

Manual
Page 37
... one of the two methods below : • Auto Lets BIOS automatically detect IDE/SATA devices during the POST for faster system startup. • Manual Allows you to manually enter the specifications of the device during the POST. (Default) • None If no IDE/SATA devices are used, set this item to CHS...
... one of the two methods below : • Auto Lets BIOS automatically detect IDE/SATA devices during the POST for faster system startup. • Manual Allows you to manually enter the specifications of the device during the POST. (Default) • None If no IDE/SATA devices are used, set this item to CHS...

Manual
Page 38
...None. Options are : Disabled (default), Drive A. Floppy 3 Mode Support Allows you to the information on Allows you wish to enter the parameters manually, refer to specify whether the installed floppy disk drive is 3-mode floppy disk drive, a Japanese standard floppy disk drive. Base Memory Also called ... any error. Sector Number of cylinders. Halt on the hard drive. Memory These fields are read-only and are : Auto (default), Large. GA-MA78GM-S2H Motherboard - 38 - Options are determined by the BIOS POST. All, But Keyboard The system boot will not stop for a keyboard error but ...
...None. Options are : Disabled (default), Drive A. Floppy 3 Mode Support Allows you to the information on Allows you wish to enter the parameters manually, refer to specify whether the installed floppy disk drive is 3-mode floppy disk drive, a Japanese standard floppy disk drive. Base Memory Also called ... any error. Sector Number of cylinders. Halt on the hard drive. Memory These fields are read-only and are : Auto (default), Large. GA-MA78GM-S2H Motherboard - 38 - Options are determined by the BIOS POST. All, But Keyboard The system boot will not stop for a keyboard error but ...

Manual
Page 49
... feature. - 49 - Auto BIOS will automatically adjust the HT Link Frequency. (Default) 200 MHz~2.6 GHz Sets HT Link Frequency to manually set the VGA Core clock. This item is configurable only if the VGA Core Clock control option is from 150 MHz to boot. Memory...not to alter the default settings to prevent system instability or other unexpected results. (Inadequately altering the settings may result in damage to manually set the frequency for the installed CPU. 2-9 MB Intelligent Tweaker(M.I.T.) CMOS Setup Utility-Copyright (C) 1984-2008 Award Software MB Intelligent Tweaker(M.I.T.)...
... feature. - 49 - Auto BIOS will automatically adjust the HT Link Frequency. (Default) 200 MHz~2.6 GHz Sets HT Link Frequency to manually set the VGA Core clock. This item is configurable only if the VGA Core Clock control option is from 150 MHz to boot. Memory...not to alter the default settings to prevent system instability or other unexpected results. (Inadequately altering the settings may result in damage to manually set the frequency for the installed CPU. 2-9 MB Intelligent Tweaker(M.I.T.) CMOS Setup Utility-Copyright (C) 1984-2008 Award Software MB Intelligent Tweaker(M.I.T.)...

Manual
Page 50
... a CPU that the CPU frequency be configurable. DDR 800 Sets Memory Clock to manually set the memory clock. Manual allows all voltage control items below to 200 MHz. X5.33 Sets Memory Clock to automatically adjust the CPU host frequency. GA-MA78GM-S2H Motherboard - 50 - Auto (default) allows BIOS to X5.33. CPU Frequency (MHz...
... a CPU that the CPU frequency be configurable. DDR 800 Sets Memory Clock to manually set the memory clock. Manual allows all voltage control items below to 200 MHz. X5.33 Sets Memory Clock to automatically adjust the CPU host frequency. GA-MA78GM-S2H Motherboard - 50 - Auto (default) allows BIOS to X5.33. CPU Frequency (MHz...
Manual
Page 57
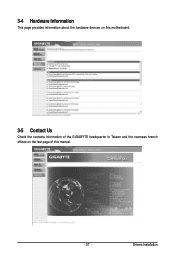
3-4 Hardware Information This page provides information about the hardware devices on this motherboard. 3-5 Contact Us Check the contacts information of the GIGABYTE headquarter in Taiwan and the overseas branch offices on the last page of this manual. - 57 - Drivers Installation
3-4 Hardware Information This page provides information about the hardware devices on this motherboard. 3-5 Contact Us Check the contacts information of the GIGABYTE headquarter in Taiwan and the overseas branch offices on the last page of this manual. - 57 - Drivers Installation

Manual
Page 68
... BIOS without Using the Internet Update Function" below. F1) obtained from GIGABYTE's website and follow the instructions in an unbootable system. Step 4: As the system boots, press to enter the BIOS Setup program. GA-MA78GM-S2H Motherboard - 68 - MA78GS2H. Updating the BIOS with an incorrect BIOS file... Step 3: Press OK to load BIOS defaults. Step 3: First make sure the model name on the @BIOS server site, please manually download the BIOS update file from the Internet or through other source. Select Load Optimized Defaults and press to begin the BIOS update ...
... BIOS without Using the Internet Update Function" below. F1) obtained from GIGABYTE's website and follow the instructions in an unbootable system. Step 4: As the system boots, press to enter the BIOS Setup program. GA-MA78GM-S2H Motherboard - 68 - MA78GS2H. Updating the BIOS with an incorrect BIOS file... Step 3: Press OK to load BIOS defaults. Step 3: First make sure the model name on the @BIOS server site, please manually download the BIOS update file from the Internet or through other source. Select Load Optimized Defaults and press to begin the BIOS update ...

Manual
Page 74
... Available ] [Space] Change [Ctrl-Y] Save Figure 5 [PgUp/Dn] Page Change GA-MA78GM-S2H Motherboard - 74 - LD 8 ---- LD 9 ---- FastBuild (tm) Utility (c) 2007 Advanced Micro Devices, Inc. [ Define LD Menu ] LD No RAID Mode Total Drv Capacity (MB) LD 1 ---- LD 6 ---- LD 3 ---- LD 10 ---- ---- ----- ---- ----- ---- ----- ---- ----- ---- ----- ---- ----- ---- ----- ---- ----- ---- ----- ---- ----- Create Arrays Manually To create a new array, press to enter the RAID configuration...
... Available ] [Space] Change [Ctrl-Y] Save Figure 5 [PgUp/Dn] Page Change GA-MA78GM-S2H Motherboard - 74 - LD 8 ---- LD 9 ---- FastBuild (tm) Utility (c) 2007 Advanced Micro Devices, Inc. [ Define LD Menu ] LD No RAID Mode Total Drv Capacity (MB) LD 1 ---- LD 6 ---- LD 3 ---- LD 10 ---- ---- ----- ---- ----- ---- ----- ---- ----- ---- ----- ---- ----- ---- ----- ---- ----- ---- ----- ---- ----- Create Arrays Manually To create a new array, press to enter the RAID configuration...
Manual
Page 78
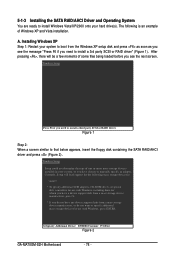
... files being loaded before you need to install a third party SCSI or RAID driver. A. S=Specify Additional Device ENTER=Continue F3=Exit Figure 2 GA-MA78GM-S2H Motherboard - 78 - After pressing , there will load support for the following is an example of one or more mass storage devices installed in ... Press F6 if you have any device support disks from a mass storage device manufacturer, press S. * If you do not have chosen to manually specify an adapter. 5-1-3 Installing the SATA RAID/AHCI Driver and Operating System You are ready to install Windows Vista/XP/2000 onto your system,...
... files being loaded before you need to install a third party SCSI or RAID driver. A. S=Specify Additional Device ENTER=Continue F3=Exit Figure 2 GA-MA78GM-S2H Motherboard - 78 - After pressing , there will load support for the following is an example of one or more mass storage devices installed in ... Press F6 if you have any device support disks from a mass storage device manufacturer, press S. * If you do not have chosen to manually specify an adapter. 5-1-3 Installing the SATA RAID/AHCI Driver and Operating System You are ready to install Windows Vista/XP/2000 onto your system,...
Manual
Page 83
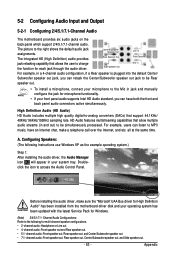
... the example operating system.) Step 1: After installing the audio driver, the Audio Manager icon will appear in and out) to the Mic in jack and manually configure the jack for Windows. (Note) 2/4/5.1/7.1- Doubleclick the icon to the right shows the default audio jack assignments. High Definition Audio (HD Audio) HD Audio...
... the example operating system.) Step 1: After installing the audio driver, the Audio Manager icon will appear in and out) to the Mic in jack and manually configure the jack for Windows. (Note) 2/4/5.1/7.1- Doubleclick the icon to the right shows the default audio jack assignments. High Definition Audio (HD Audio) HD Audio...

Manual
Page 94
...in Electrical and Electronic Equipment) and WEEE (Waste Electrical and Electronic Equipment) environmental directives, as well as a commitment by GIGABYTE. Contravention will be glad to help to conserve natural resources and ensure that it back" to your local or regional ... recycling. Š When your product's user's manual and we at the time of printing. GIGABYTE cannot, however, assume any unauthorized purpose. GA-MA78GM-S2H Motherboard - 94 - We believe that do not use of our natural resources, GIGABYTE provides the following information on its packaging, which ...
...in Electrical and Electronic Equipment) and WEEE (Waste Electrical and Electronic Equipment) environmental directives, as well as a commitment by GIGABYTE. Contravention will be glad to help to conserve natural resources and ensure that it back" to your local or regional ... recycling. Š When your product's user's manual and we at the time of printing. GIGABYTE cannot, however, assume any unauthorized purpose. GA-MA78GM-S2H Motherboard - 94 - We believe that do not use of our natural resources, GIGABYTE provides the following information on its packaging, which ...


