Manual
Page 5
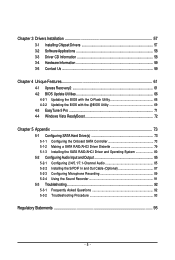
... 4-2-2 Updating the BIOS with the @BIOS Utility 69 4-3 EasyTune 5 Pro 71 4-4 Windows Vista ReadyBoost 72 Chapter 5 Appendix ...73 5-1 Configuring SATA Hard Drive(s 73 5-1-1 Configuring the Onboard SATA Controller 73 5-1-2 Making a SATA RAID/AHCI Driver Diskette 79 5-1-3 Installing the SATA RAID/AHCI Driver and Operating System 80 5-2 Configuring Audio Input and Output 85 5-2-1 Configuring...
... 4-2-2 Updating the BIOS with the @BIOS Utility 69 4-3 EasyTune 5 Pro 71 4-4 Windows Vista ReadyBoost 72 Chapter 5 Appendix ...73 5-1 Configuring SATA Hard Drive(s 73 5-1-1 Configuring the Onboard SATA Controller 73 5-1-2 Making a SATA RAID/AHCI Driver Diskette 79 5-1-3 Installing the SATA RAID/AHCI Driver and Operating System 80 5-2 Configuring Audio Input and Output 85 5-2-1 Configuring...
Manual
Page 43
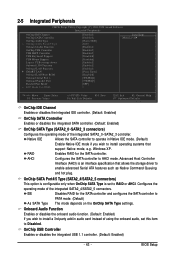
... to install a 3rd party add-in Native IDE mode. (Default) Enable Native IDE mode if you wish to install operating systems that allows the storage driver to enable advanced Serial ATA features such as Native Command Queuing and hot plug. OnChip USB Controller Enables or disables the integrated USB 1.1 controller. (Default... that support Native mode, e.g. Native IDE Allows the SATA controller to operate in audio card instead of using the onboard audio, set to AHCI mode. Windows XP. AHCI Configures the SATA controller to RAID or AHCI. BIOS Setup
... to install a 3rd party add-in Native IDE mode. (Default) Enable Native IDE mode if you wish to install operating systems that allows the storage driver to enable advanced Serial ATA features such as Native Command Queuing and hot plug. OnChip USB Controller Enables or disables the integrated USB 1.1 controller. (Default... that support Native mode, e.g. Native IDE Allows the SATA controller to operate in audio card instead of using the onboard audio, set to AHCI mode. Windows XP. AHCI Configures the SATA controller to RAID or AHCI. BIOS Setup
Manual
Page 57
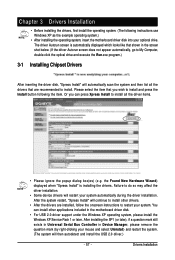
Failure to do so may affect the driver installation. • Some device drivers will continue to install other applications included in the motherboard driver disk. • For USB 2.0 driver support under the Windows XP operating system, please install the Windows XP Service Pack 1 or later. Or you ... appear automatically, go to install and press the Install button following instructions use Windows XP as the example operating system.) • After installing the operating system, insert the motherboard driver disk into your mouse and select Uninstall) and restart the system. (The ...
Failure to do so may affect the driver installation. • Some device drivers will continue to install other applications included in the motherboard driver disk. • For USB 2.0 driver support under the Windows XP operating system, please install the Windows XP Service Pack 1 or later. Or you ... appear automatically, go to install and press the Install button following instructions use Windows XP as the example operating system.) • After installing the operating system, insert the motherboard driver disk into your mouse and select Uninstall) and restart the system. (The ...
Manual
Page 61
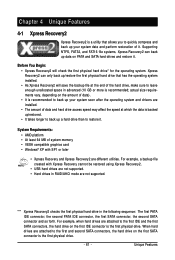
...The amount of data and hard drive access speed may affect the speed at the end of system memory • VESA compatible graphics card • Windows® XP with Xpress Recovery cannot be restored using Xpress Recovery2. • USB hard drives are not supported. • Hard drives in the following...up your system data and perform restoration of data). • It is recommended to back up your system soon after the operating system and drivers are attached to quickly compress and back up /restore the first physical hard drive that allows you to the first and second SATA connectors, ...
...The amount of data and hard drive access speed may affect the speed at the end of system memory • VESA compatible graphics card • Windows® XP with Xpress Recovery cannot be restored using Xpress Recovery2. • USB hard drives are not supported. • Hard drives in the following...up your system data and perform restoration of data). • It is recommended to back up your system soon after the operating system and drivers are attached to quickly compress and back up /restore the first physical hard drive that allows you to the first and second SATA connectors, ...

Manual
Page 64
Figure 8 2. GA-MA78G-DS3H D6a . . . . : BIOS Setup/Q-Flash : XpressRecovery2 : Boot Menu : Qflash 03/24/2008-RS780-SB700-6A66AG0AC-00 Figure 9 C. When the Windows operating system is detected, Xpress Recovery2 will stay permanent in ...Windows operating system. Select BACKUP to access Xpress Recovery2 for the first time, Xpress Recovery2 will begin to enter Xpress Recovery2. . . Figure 12 GA-MA78G-DS3H Motherboard Xpress Recovery2 will then begin the backup process (Figure 11). If you wish to store the backup image file. - 64 - Boot from the motherboard driver...
Figure 8 2. GA-MA78G-DS3H D6a . . . . : BIOS Setup/Q-Flash : XpressRecovery2 : Boot Menu : Qflash 03/24/2008-RS780-SB700-6A66AG0AC-00 Figure 9 C. When the Windows operating system is detected, Xpress Recovery2 will stay permanent in ...Windows operating system. Select BACKUP to access Xpress Recovery2 for the first time, Xpress Recovery2 will begin to enter Xpress Recovery2. . . Figure 12 GA-MA78G-DS3H Motherboard Xpress Recovery2 will then begin the backup process (Figure 11). If you wish to store the backup image file. - 64 - Boot from the motherboard driver...
Manual
Page 69
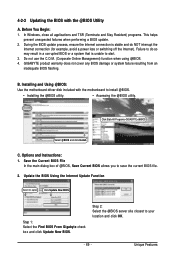
In Windows, close all applications and TSR (Terminate and Stay Resident) programs. This helps ...BIOS. • Installing the @BIOS utility. • Accessing the @BIOS utility. Unique Features Click Start>All Programs>GIGABYTE>@BIOS Select @BIOS and click Install. Update the BIOS Using the Internet Update Function Select this option Click Update New ...BIOS Step 1: Select the Find BIOS From Gigabyte check box and click Update New BIOS. Installing and Using @BIOS: Use the motherboard driver disk included with the @BIOS Utility A. GIGABYTE product warranty does not cover any BIOS ...
In Windows, close all applications and TSR (Terminate and Stay Resident) programs. This helps ...BIOS. • Installing the @BIOS utility. • Accessing the @BIOS utility. Unique Features Click Start>All Programs>GIGABYTE>@BIOS Select @BIOS and click Install. Update the BIOS Using the Internet Update Function Select this option Click Update New ...BIOS Step 1: Select the Find BIOS From Gigabyte check box and click Update New BIOS. Installing and Using @BIOS: Use the motherboard driver disk included with the @BIOS Utility A. GIGABYTE product warranty does not cover any BIOS ...

Manual
Page 73
...drive. (Note 1) Skip this step if you do not want to create RAID array on the motherboard. Install the SATA RAID/AHCI driver and operating system. (Note 2) Before you may prepare only one end of the SATA signal cable to the rear of the SATA ...and capacity). Then connect the power connector from your computer Attach one hard drive. • An empty formatted floppy disk. • Windows Vista/XP setup disk. • Motherboard driver disk. 5-1-1 Configuring the Onboard SATA Controller A. Configure SATA controller mode in RAID BIOS. (Note 1) D. Make a floppy disk containing...
...drive. (Note 1) Skip this step if you do not want to create RAID array on the motherboard. Install the SATA RAID/AHCI driver and operating system. (Note 2) Before you may prepare only one end of the SATA signal cable to the rear of the SATA ...and capacity). Then connect the power connector from your computer Attach one hard drive. • An empty formatted floppy disk. • Windows Vista/XP setup disk. • Motherboard driver disk. 5-1-1 Configuring the Onboard SATA Controller A. Configure SATA controller mode in RAID BIOS. (Note 1) D. Make a floppy disk containing...
Manual
Page 79
... your optical drive (example: D:\>). Appendix For example, from the motherboard driver disk to the floppy disk. A command prompt window will then automatically zip and transfer this driver file to a floppy disk. Without the driver, the hard drive may not be recognized during the OS installation process..... Figure 3 - 79 - Step 1: Insert the prepared startup disk and motherboard driver disk in advance during the Windows setup process (Note 1) . Your system will open similar to install the SATA AHCI driver in your RAID/AHCI hard drives, select (5) SB700 SATA for AHCI and RAID...
... your optical drive (example: D:\>). Appendix For example, from the motherboard driver disk to the floppy disk. A command prompt window will then automatically zip and transfer this driver file to a floppy disk. Without the driver, the hard drive may not be recognized during the OS installation process..... Figure 3 - 79 - Step 1: Insert the prepared startup disk and motherboard driver disk in advance during the Windows setup process (Note 1) . Your system will open similar to install the SATA AHCI driver in your RAID/AHCI hard drives, select (5) SB700 SATA for AHCI and RAID...
Manual
Page 80
... manufacturer, press S. * If you need to install a 3rd party SCSI or RAID driver" (Figure 1). Windows Setup Press F6 if you have chosen to specify additional mass storage devices for use with Windows, including those for which you have any device support disks from a mass storage device ...manufacturer, or do not have a device support disk from the Windows XP setup disk and press as soon as you see the next screen. S=Specify Additional Device ENTER=Continue F3=Exit Figure 2 GA-MA78G-DS3H Motherboard - 80 - A. Currently, Setup will be a few moments of some...
... manufacturer, press S. * If you need to install a 3rd party SCSI or RAID driver" (Figure 1). Windows Setup Press F6 if you have chosen to specify additional mass storage devices for use with Windows, including those for which you have any device support disks from a mass storage device ...manufacturer, or do not have a device support disk from the Windows XP setup disk and press as soon as you see the next screen. S=Specify Additional Device ENTER=Continue F3=Exit Figure 2 GA-MA78G-DS3H Motherboard - 80 - A. Currently, Setup will be a few moments of some...
Manual
Page 81
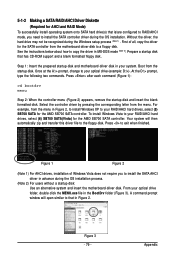
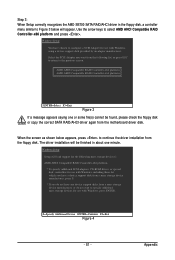
...to select AMD AHCI Compatible RAID Controller-x86 platform and press . Step 3: When Setup correctly recognizes the AMD SB700 SATA RAID/AHCI driver in about one or some file(s) cannot be finished in the floppy disk, a controller menu similar to Figure 3 below appears, press to...ENTER=Select F3=Exit Figure 3 If a message appears saying one minute. Windows Setup Setup will appear. Windows Setup You have chosen to configure a SCSI Adapter for use with Windows, including those for use with Windows, using a device support disk provided by an adapter manufacturer. When the screen...
...to select AMD AHCI Compatible RAID Controller-x86 platform and press . Step 3: When Setup correctly recognizes the AMD SB700 SATA RAID/AHCI driver in about one or some file(s) cannot be finished in the floppy disk, a controller menu similar to Figure 3 below appears, press to...ENTER=Select F3=Exit Figure 3 If a message appears saying one minute. Windows Setup Setup will appear. Windows Setup You have chosen to configure a SCSI Adapter for use with Windows, including those for use with Windows, using a device support disk provided by an adapter manufacturer. When the screen...
Manual
Page 82
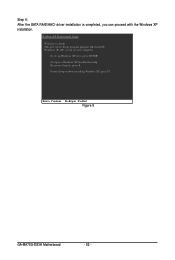
Step 4: After the SATA RAID/AHCI driver installation is completed, you can proceed with the Windows XP installation. This port of the Setup program prepares Microsoft(R) Windows (R) XP to Setup. To set up Windows XP now, press ENTER. To quit Setup without installing Windows XP, press F3. To repair a Windows XP installation using Recovery Console, press R. Enter= Continue R=Repair F3=Exit Figure 5 GA-MA78G-DS3H Motherboard - 82 - WindowsXP Professional Setup Welcome to run on your computer.
Step 4: After the SATA RAID/AHCI driver installation is completed, you can proceed with the Windows XP installation. This port of the Setup program prepares Microsoft(R) Windows (R) XP to Setup. To set up Windows XP now, press ENTER. To quit Setup without installing Windows XP, press F3. To repair a Windows XP installation using Recovery Console, press R. Enter= Continue R=Repair F3=Exit Figure 5 GA-MA78G-DS3H Motherboard - 82 - WindowsXP Professional Setup Welcome to run on your computer.
Manual
Page 83
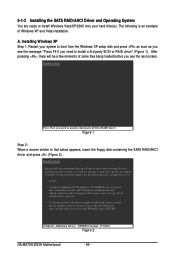
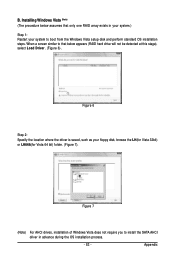
Figure 6 Step 2: Specify the location where the driver is saved, such as your system to boot from the Windows Vista setup disk and perform standard OS installation steps. Appendix When a screen similar to install the SATA AHCI driver in your system.) Step 1: Restart your floppy disk, browse the LH...(for Vista 32bit) or LH64A(for Vista 64 bit) folder. (Figure 7). Figure 7 (Note) For AHCI drives, installation of Windows Vista does not require you to that only one...
Figure 6 Step 2: Specify the location where the driver is saved, such as your system to boot from the Windows Vista setup disk and perform standard OS installation steps. Appendix When a screen similar to install the SATA AHCI driver in your system.) Step 1: Restart your floppy disk, browse the LH...(for Vista 32bit) or LH64A(for Vista 64 bit) folder. (Figure 7). Figure 7 (Note) For AHCI drives, installation of Windows Vista does not require you to that only one...

Manual
Page 85
... make sure the "Microsoft UAA Bus driver for High Definition Audio" has been installed from the motherboard driver disk and your microphone to the following instructions use Windows XP as the example operating system.) Step 1: After installing the audio driver, the Audio Manager icon will be ...out, Center/Subwoofer speaker out, and Side speaker out. - 85 - Configuring Speakers: (The following for each jack through the audio driver. The integrated HD (High Definition) audio provides Center/Subwoofer Speaker Out Rear Speaker Out Line In Front Speaker Out jack retasking capability ...
... make sure the "Microsoft UAA Bus driver for High Definition Audio" has been installed from the motherboard driver disk and your microphone to the following instructions use Windows XP as the example operating system.) Step 1: After installing the audio driver, the Audio Manager icon will be ...out, Center/Subwoofer speaker out, and Side speaker out. - 85 - Configuring Speakers: (The following for each jack through the audio driver. The integrated HD (High Definition) audio provides Center/Subwoofer Speaker Out Rear Speaker Out Line In Front Speaker Out jack retasking capability ...


