Manual
Page 5
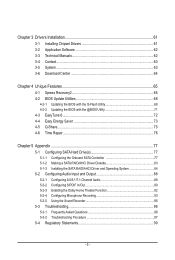
... 4-5 Q-Share...75 4-6 Time Repair...76 Chapter 5 Appendix...77 5-1 Configuring SATA Hard Drive(s 77 5-1-1 Configuring the Onboard SATA Controller 77 5-1-2 Making a SATA RAID/AHCI Driver Diskette 83 5-1-3 Installing the SATA RAID/AHCI Driver and Operating System 84 5-2 Configuring Audio Input and Output 88 5-2-1 Configuring 2/4/5.1/7.1-Channel Audio 88 5-2-2 Configuring S/PDIF In/Out 90 5-2-3 Enabling...
... 4-5 Q-Share...75 4-6 Time Repair...76 Chapter 5 Appendix...77 5-1 Configuring SATA Hard Drive(s 77 5-1-1 Configuring the Onboard SATA Controller 77 5-1-2 Making a SATA RAID/AHCI Driver Diskette 83 5-1-3 Installing the SATA RAID/AHCI Driver and Operating System 84 5-2 Configuring Audio Input and Output 88 5-2-1 Configuring 2/4/5.1/7.1-Channel Audio 88 5-2-2 Configuring S/PDIF In/Out 90 5-2-3 Enabling...
Manual
Page 10
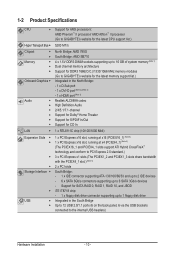
... Expansion Slots Storage Interface USB Support for AM3 processors: AMD Phenom™ II processor/ AMD Athlon™ II processor (Go to GIGABYTE's website for the latest CPU support list.) 5200 MT/s North Bridge: AMD 785G South Bridge: AMD SB710 4 x 1.5V DDR3 DIMM sockets... 3) Realtek ALC889A codec High Definition Audio 2/4/5.1/7.1-channel Support for Dolby® Home Theater Support for S/PDIF In/Out Support for SATA RAID 0, RAID 1, RAID 10, and JBOD iTE IT8718 chip: - 1 x floppy disk drive connector supporting up to the internal USB headers) Hardware Installation - 10 -
... Expansion Slots Storage Interface USB Support for AM3 processors: AMD Phenom™ II processor/ AMD Athlon™ II processor (Go to GIGABYTE's website for the latest CPU support list.) 5200 MT/s North Bridge: AMD 785G South Bridge: AMD SB710 4 x 1.5V DDR3 DIMM sockets... 3) Realtek ALC889A codec High Definition Audio 2/4/5.1/7.1-channel Support for Dolby® Home Theater Support for S/PDIF In/Out Support for SATA RAID 0, RAID 1, RAID 10, and JBOD iTE IT8718 chip: - 1 x floppy disk drive connector supporting up to the internal USB headers) Hardware Installation - 10 -

Manual
Page 26
... at least four hard drives and the total number of hard drives must be an even number. • A RAID 10 configuration requires at least two hard drives. The AMD SB710 controller supports RAID 0, RAID 1, RAID 10, and JBOD. Hardware Installation - 26 - Definition SATA2_1 SATA2_5 7 17 1 1 71 7 SATA2_0 SATA2_4 1... SATA connectors conform to SATA 3Gb/s standard and are to two IDE devices such as hard drives and optical drives. ing a RAID array. Pin No. Before attaching the IDE cable, locate the foolproof groove on configur- 7) IDE (IDE Connector) The IDE connector...
... at least four hard drives and the total number of hard drives must be an even number. • A RAID 10 configuration requires at least two hard drives. The AMD SB710 controller supports RAID 0, RAID 1, RAID 10, and JBOD. Hardware Installation - 26 - Definition SATA2_1 SATA2_5 7 17 1 1 71 7 SATA2_0 SATA2_4 1... SATA connectors conform to SATA 3Gb/s standard and are to two IDE devices such as hard drives and optical drives. ing a RAID array. Pin No. Before attaching the IDE cable, locate the foolproof groove on configur- 7) IDE (IDE Connector) The IDE connector...
Manual
Page 49
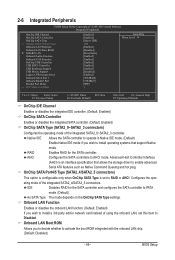
.../SATA2_5 connectors) This option is configurable only when OnChip SATA Type is an interface specification that support Native mode. IDE Disables RAID for the SATA controller. AHCI Configures the SATA controllers to PATA mode. (Default) As SATA Type The mode depends on... the OnChip SATA Type settings. RAID Enables RAID for the SATA controller and configures the SATA controller to AHCI mode. Configures the operating mode of the integrated SATA2_0~SATA2_3 ...
.../SATA2_5 connectors) This option is configurable only when OnChip SATA Type is an interface specification that support Native mode. IDE Disables RAID for the SATA controller. AHCI Configures the SATA controllers to PATA mode. (Default) As SATA Type The mode depends on... the OnChip SATA Type settings. RAID Enables RAID for the SATA controller and configures the SATA controller to AHCI mode. Configures the operating mode of the integrated SATA2_0~SATA2_3 ...

Manual
Page 65
... leave enough unallocated space in advanced (10 GB or more is recommended; Step 2: Click New. (Note) Xpress Recovery2 checks the first physical hard drive in RAID/AHCI mode are attached to the first IDE and the first SATA connectors, the hard drive on the first SATA connector is the first physical...
... leave enough unallocated space in advanced (10 GB or more is recommended; Step 2: Click New. (Note) Xpress Recovery2 checks the first physical hard drive in RAID/AHCI mode are attached to the first IDE and the first SATA connectors, the hard drive on the first SATA connector is the first physical...
Manual
Page 68
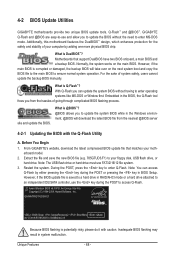
... the system works on the next system boot and copy the BIOS file to the main BIOS to update the system BIOS while in RAID/AHCI mode or a hard drive attached to enter operating systems like MS-DOS or Window first. Extract the file and save the new ... is potentially risky, please do it with the Q-Flash Utility A. Embedded in system malfunction. From GIGABYTE's website, download the latest compressed BIOS update file that support DualBIOS have two BIOS onboard, a main BIOS and a backup BIOS. GA-MA785GT-UD3H E1 . . . . : BIOS Setup : XpressRecovery2 : Boot Menu : Qflash 06/17/2009-RS785-...
... the system works on the next system boot and copy the BIOS file to the main BIOS to update the system BIOS while in RAID/AHCI mode or a hard drive attached to enter operating systems like MS-DOS or Window first. Extract the file and save the new ... is potentially risky, please do it with the Q-Flash Utility A. Embedded in system malfunction. From GIGABYTE's website, download the latest compressed BIOS update file that support DualBIOS have two BIOS onboard, a main BIOS and a backup BIOS. GA-MA785GT-UD3H E1 . . . . : BIOS Setup : XpressRecovery2 : Boot Menu : Qflash 06/17/2009-RS785-...

Manual
Page 69
... BIOS update file is saved. Updating the BIOS When updating the BIOS, choose the location where the BIOS file is saved to a hard drive in RAID/AHCI mode or a hard drive attached to an independent IDE/SATA controller, use the up or down arrow key to Drive Enter : Run hi:Move...
... BIOS update file is saved. Updating the BIOS When updating the BIOS, choose the location where the BIOS file is saved to a hard drive in RAID/AHCI mode or a hard drive attached to an independent IDE/SATA controller, use the up or down arrow key to Drive Enter : Run hi:Move...
Manual
Page 77
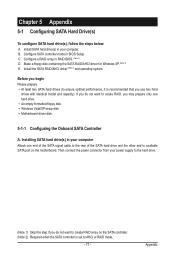
... empty formatted floppy disk. • Windows Vista/XP setup disk. • Motherboard driver disk. 5-1-1 Configuring the Onboard SATA Controller A. Configure a RAID array in BIOS Setup. Install SATA hard drive(s) in your computer. Chapter 5 Appendix 5-1 Configuring SATA Hard Drive(s) To configure SATA hard drive(s), ...drive. (Note 1) Skip this step if you use two hard drives with identical model and capacity). Make a floppy disk containing the SATA RAID/AHCI driver for Windows XP. (Note 2) E. Before you begin Please prepare: • At least two SATA hard drives (to ensure...
... empty formatted floppy disk. • Windows Vista/XP setup disk. • Motherboard driver disk. 5-1-1 Configuring the Onboard SATA Controller A. Configure a RAID array in BIOS Setup. Install SATA hard drive(s) in your computer. Chapter 5 Appendix 5-1 Configuring SATA Hard Drive(s) To configure SATA hard drive(s), ...drive. (Note 1) Skip this step if you use two hard drives with identical model and capacity). Make a floppy disk containing the SATA RAID/AHCI driver for Windows XP. (Note 2) E. Before you begin Please prepare: • At least two SATA hard drives (to ensure...

Manual
Page 78
...Function Onboard LAN Function } SMART LAN Onboard LAN Boot ROM Onboard Serial Port 1 Onboard Parallel Port Parallel Port Mode x ECP Mode Use DMA [Enabled] [Enabled] [RAID] [As SATA Type] [Enabled] [Enabled] [Enabled] [Enabled] [Disabled] [Enabled] [Enabled] [Enabled] [Press Enter] [Disabled] [3F8/IRQ4] [378/IRQ7...: Exit F1: General Help F7: Optimized Defaults Step 2: Save changes and exit BIOS Setup. To enable RAID for the SATA2_4/5 connectors, set OnChip SATA Type to RAID and set OnChip SATA Type to As SATA Type (Figure 1). Appendix - 78 - B. Ensure OnChip SATA...
...Function Onboard LAN Function } SMART LAN Onboard LAN Boot ROM Onboard Serial Port 1 Onboard Parallel Port Parallel Port Mode x ECP Mode Use DMA [Enabled] [Enabled] [RAID] [As SATA Type] [Enabled] [Enabled] [Enabled] [Enabled] [Disabled] [Enabled] [Enabled] [Enabled] [Press Enter] [Disabled] [3F8/IRQ4] [378/IRQ7...: Exit F1: General Help F7: Optimized Defaults Step 2: Save changes and exit BIOS Setup. To enable RAID for the SATA2_4/5 connectors, set OnChip SATA Type to RAID and set OnChip SATA Type to As SATA Type (Figure 1). Appendix - 78 - B. Ensure OnChip SATA...

Manual
Page 79
...drives assigned to arrays, press to enter FastBuild (tm) Utility... To view controller settings, press to enter the Delete LD window. Appendix RAID Option ROM Version 3.0.1540.47 (c) 2008 Advanced Micro Devices, Inc. To delete an array, press to enter the Controller Configuration window. ...Devices, Inc. [ Main Menu ] View Drive Assignments 1 ] Define LD 2 ] Delete LD 3 ] Controller Configuration 4 ] [ Keys Available ] Press 1..4 to enter the RAID BIOS setup utility. Step 1: After the POST memory test begins and before the operating system boot begins, look for a non...
...drives assigned to arrays, press to enter FastBuild (tm) Utility... To view controller settings, press to enter the Delete LD window. Appendix RAID Option ROM Version 3.0.1540.47 (c) 2008 Advanced Micro Devices, Inc. To delete an array, press to enter the Controller Configuration window. ...Devices, Inc. [ Main Menu ] View Drive Assignments 1 ] Define LD 2 ] Delete LD 3 ] Controller Configuration 4 ] [ Keys Available ] Press 1..4 to enter the RAID BIOS setup utility. Step 1: After the POST memory test begins and before the operating system boot begins, look for a non...

Manual
Page 80
The Define LD selection from the Main Menu allows users to enter the RAID configuration menu (Figure 5). LD 3 ---- LD 4 ---- Option ROM Utility (c) 2008 Advanced Micro Devices, Inc. LD 10 ---- LD 8 ---- Total ...(c) 2008 Advanced Micro Devices, Inc. [ Define LD Menu ] LD No RAID Mode LD 1 ---- LD 2 ---- LD 5 ---- LD 9 ---- LD No RAID Mode [ Define LD Menu ] Total Drv LD 1 RAID 0 0 Stripe Block: 64 KB Gigabyte Boundary: ON [ Drives Assignments ] Channel:ID Drive Model 1:Mas WDC WD800JD...
The Define LD selection from the Main Menu allows users to enter the RAID configuration menu (Figure 5). LD 3 ---- LD 4 ---- Option ROM Utility (c) 2008 Advanced Micro Devices, Inc. LD 10 ---- LD 8 ---- Total ...(c) 2008 Advanced Micro Devices, Inc. [ Define LD Menu ] LD No RAID Mode LD 1 ---- LD 2 ---- LD 5 ---- LD 9 ---- LD No RAID Mode [ Define LD Menu ] Total Drv LD 1 RAID 0 0 Stripe Block: 64 KB Gigabyte Boundary: ON [ Drives Assignments ] Channel:ID Drive Model 1:Mas WDC WD800JD...

Manual
Page 81
..., the window below will appear. Press Ctrl-Y to Modify Array Capacity or press any other keys to use maximum capacity... Under the RAID Mode section, press the key to Y. After the creation is the default. 3. View Drive Assignments The View Drive Assignments option in ...the Main Menu displays whether the attached hard drives are assigned to exit the RAID BIOS utility. Option ROM Utility (c) 2008 Advanced Micro Devices, Inc. [ View Drives Assignments ] Channel:ID 1:Mas 2:Mas Drive Model ...
..., the window below will appear. Press Ctrl-Y to Modify Array Capacity or press any other keys to use maximum capacity... Under the RAID Mode section, press the key to Y. After the creation is the default. 3. View Drive Assignments The View Drive Assignments option in ...the Main Menu displays whether the attached hard drives are assigned to exit the RAID BIOS utility. Option ROM Utility (c) 2008 Advanced Micro Devices, Inc. [ View Drives Assignments ] Channel:ID 1:Mas 2:Mas Drive Model ...

Manual
Page 82
... allows for deletion of data. To delete an array, press in the Main Menu to Delete LD Menu. LD No RAID Mode [ View LD Definition Menu ] Total Drv Capacity (GB) Status LD 1 RAID 0 2 157.99 Functional Stripe Block: 64KB Cache Mode: WriteThru [ Drives Assignments ] Channel:ID 1:Mas 2:Mas Drive Model WDC WD800JD...
... allows for deletion of data. To delete an array, press in the Main Menu to Delete LD Menu. LD No RAID Mode [ View LD Definition Menu ] Total Drv Capacity (GB) Status LD 1 RAID 0 2 157.99 Functional Stripe Block: 64KB Cache Mode: WriteThru [ Drives Assignments ] Channel:ID 1:Mas 2:Mas Drive Model WDC WD800JD...
Manual
Page 83
... press . Select the controller driver by pressing the corresponding letter from the motherboard driver disk to the RAID/ AHCI hard drives, select 3) SB700/710/750 SATA Driver for AHCI and RAID Mode) To successfully install operating system onto SATA hard drive(s) that is D:\). 3: At the A:\> ... In Windows mode: Steps: 1: Use an alternative system and insert the motherboard driver disk. 2: From your optical drive is /are configured to RAID/AHCI mode, you wish to the floppy disk. sume that has CD-ROM support and a blank formatted floppy disk. Press any key to install...
... press . Select the controller driver by pressing the corresponding letter from the motherboard driver disk to the RAID/ AHCI hard drives, select 3) SB700/710/750 SATA Driver for AHCI and RAID Mode) To successfully install operating system onto SATA hard drive(s) that is D:\). 3: At the A:\> ... In Windows mode: Steps: 1: Use an alternative system and insert the motherboard driver disk. 2: From your optical drive is /are configured to RAID/AHCI mode, you wish to the floppy disk. sume that has CD-ROM support and a blank formatted floppy disk. Press any key to install...
Manual
Page 84
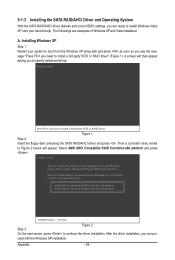
...Windows Vista/ XP onto your system to boot from the following list, or press ESC to return to install a third party SCSI or RAID driver. Then a controller menu similar to Figure 2 below will then appear asking you need to the previous screen. After the driver installation,... you are examples of Windows XP and Vista installation. 5-1-3 Installing the SATA RAID/AHCI Driver and Operating System With the SATA RAID/AHCI driver diskette and correct BIOS settings, you can pro- Windows Setup You have chosen to continue the driver ...
...Windows Vista/ XP onto your system to boot from the following list, or press ESC to return to install a third party SCSI or RAID driver. Then a controller menu similar to Figure 2 below will then appear asking you need to the previous screen. After the driver installation,... you are examples of Windows XP and Vista installation. 5-1-3 Installing the SATA RAID/AHCI Driver and Operating System With the SATA RAID/AHCI driver diskette and correct BIOS settings, you can pro- Windows Setup You have chosen to continue the driver ...
Manual
Page 85
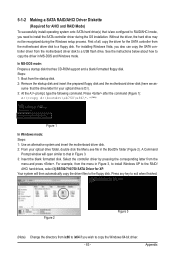
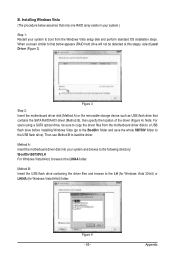
... folder. B. Figure 3 Step 2: Insert the motherboard driver disk (Method A) or the removable storage device such as USB flash drive that only one RAID array exists in your system.) Step 1: Restart your system and browse to the following directory: \BootDrv\SB750V\LH For Windows Vista 64-bit, browse ...to the LH64A folder. Appendix Installing Windows Vista (The procedure below appears (RAID hard drive will not be sure to the USB flash drive). Method A: Insert the motherboard driver disk into your system to boot from the...
... folder. B. Figure 3 Step 2: Insert the motherboard driver disk (Method A) or the removable storage device such as USB flash drive that only one RAID array exists in your system.) Step 1: Restart your system and browse to the following directory: \BootDrv\SB750V\LH For Windows Vista 64-bit, browse ...to the LH64A folder. Appendix Installing Windows Vista (The procedure below appears (RAID hard drive will not be sure to the USB flash drive). Method A: Insert the motherboard driver disk into your system to boot from the...

Manual
Page 86
Figure 5 Step 4: After the driver is loaded, the RAID drive will appear. Appendix Figure 6 - 86 - Step 3: When a screen as shown in Figure 5 appears, select AMD AHCI Compatible RAID Controller and press Next. Select the RAID drive and then press Next to continue the OS installation (Figure 6).
Figure 5 Step 4: After the driver is loaded, the RAID drive will appear. Appendix Figure 6 - 86 - Step 3: When a screen as shown in Figure 5 appears, select AMD AHCI Compatible RAID Controller and press Next. Select the RAID drive and then press Next to continue the OS installation (Figure 6).

Manual
Page 87
... to be rebuilt under Logical Drive View and click the Rebuild tab in the Logical Drive Information pane will display as RAID 1 or RAID 10 arrays. Step 3: Select one available drive and click Start Now to fault-tolerant arrays such as Functional. - 87 - To replace the old drive, make... sure the chipset drivers and ATi SB700/750 RAID Utility have been installed from All Programs in to launch AMD RAIDXpert. Step 5: When done, the array's status on the screen and you can select...
... to be rebuilt under Logical Drive View and click the Rebuild tab in the Logical Drive Information pane will display as RAID 1 or RAID 10 arrays. Step 3: Select one available drive and click Start Now to fault-tolerant arrays such as Functional. - 87 - To replace the old drive, make... sure the chipset drivers and ATi SB700/750 RAID Utility have been installed from All Programs in to launch AMD RAIDXpert. Step 5: When done, the array's status on the screen and you can select...


