Manual
Page 28
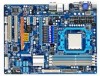
...when the system is operating. The LED S0 On is reading or writing data. • RES (Reset Switch, Green): Connects to the reset switch on the chassis front panel. Press the reset switch to restart the computer if the computer freezes and fails to perform a normal restart. •... make sure the wire assignments and the pin assignments are matched correctly. When connecting your system using the power switch (refer to Chapter 2, "BIOS Setup," "Power Management Setup," for information about beep codes. • HD (Hard Drive Activity LED, Blue) Connects to the speaker on the...
...when the system is operating. The LED S0 On is reading or writing data. • RES (Reset Switch, Green): Connects to the reset switch on the chassis front panel. Press the reset switch to restart the computer if the computer freezes and fails to perform a normal restart. •... make sure the wire assignments and the pin assignments are matched correctly. When connecting your system using the power switch (refer to Chapter 2, "BIOS Setup," "Power Management Setup," for information about beep codes. • HD (Hard Drive Activity LED, Blue) Connects to the speaker on the...

Manual
Page 33
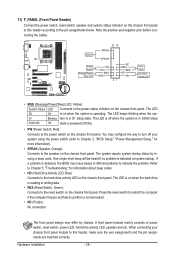
... pins to temporarily short the two pins or use a metal object like a screwdriver to touch the two pins for BIOS configurations). - 33 - date information and BIOS configurations) and reset the CMOS values to Chapter 2, "BIOS Setup," for a few seconds. Hardware Installation Failure to do so may cause damage to the motherboard. • After system...
... pins to temporarily short the two pins or use a metal object like a screwdriver to touch the two pins for BIOS configurations). - 33 - date information and BIOS configurations) and reset the CMOS values to Chapter 2, "BIOS Setup," for a few seconds. Hardware Installation Failure to do so may cause damage to the motherboard. • After system...
Manual
Page 35
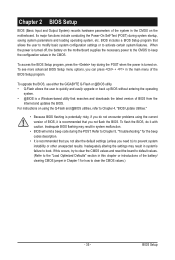
If this occurs, try to clear the CMOS values and reset the board to default values. (Refer to the "Load Optimized Defaults" section in this chapter or introductions of the battery/ clearing CMOS jumper in ...activate certain system features. Refer to Chapter 5, "Troubleshooting," for how to Chapter 4, "BIOS Update Utilities." • Because BIOS flashing is a Windows-based utility that you can press + in the CMOS on . BIOS Setup To upgrade the BIOS, use either the GIGABYTE Q-Flash or @BIOS utility. • Q-Flash allows the user to prevent system instability or other...
If this occurs, try to clear the CMOS values and reset the board to default values. (Refer to the "Load Optimized Defaults" section in this chapter or introductions of the battery/ clearing CMOS jumper in ...activate certain system features. Refer to Chapter 5, "Troubleshooting," for how to Chapter 4, "BIOS Update Utilities." • Because BIOS flashing is a Windows-based utility that you can press + in the CMOS on . BIOS Setup To upgrade the BIOS, use either the GIGABYTE Q-Flash or @BIOS utility. • Q-Flash allows the user to prevent system instability or other...

Manual
Page 39
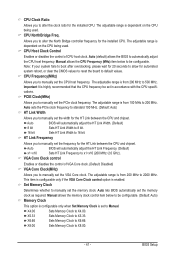
.../overvoltage settings you made is dependent on your overall system configurations. Incorrectly doing overclock/overvoltage may result in damage to boot. BIOS Setup If this occurs, clear the CMOS values and reset the board to default values.) • When the System Voltage Optimized item blinks in red, it is for advanced users...
.../overvoltage settings you made is dependent on your overall system configurations. Incorrectly doing overclock/overvoltage may result in damage to boot. BIOS Setup If this occurs, clear the CMOS values and reset the board to default values.) • When the System Voltage Optimized item blinks in red, it is for advanced users...

Manual
Page 40
...Options are : -12%~+12%. All Cores Configures Advanced Clock Calibration for each CPU core. Disabled Disables this function. (Default) Auto Lets the BIOS to configure the settings to All Cores. Value (Core 0), Value (Core 1), Value (Core 2), Value (Core 3) This option is configurable... only when Advanced Clock Calibration is enabled. Don't Turn Off Or Reset System" will automatically restart for the settings to select the EC firmware version when Advanced Clock Calibration is set to enable Advanced Clock Calibration...
...Options are : -12%~+12%. All Cores Configures Advanced Clock Calibration for each CPU core. Disabled Disables this function. (Default) Auto Lets the BIOS to configure the settings to All Cores. Value (Core 0), Value (Core 1), Value (Core 2), Value (Core 3) This option is configurable... only when Advanced Clock Calibration is enabled. Don't Turn Off Or Reset System" will automatically restart for the settings to select the EC firmware version when Advanced Clock Calibration is set to enable Advanced Clock Calibration...
Manual
Page 41
... default values. CPU Frequency(MHz) Allows you to alter the North Bridge controller frequency for automated system reboot, or clear the CMOS values to reset the board to be configurable. (Default: Auto) Memory Clock This option is configurable only when Set Memory Clock is highly recommended that the CPU...from 200 MHz to manually set in accordance with the CPU specifications. Set Memory Clock Determines whether to X8.00. - 41 - Auto lets BIOS automatically set the memory clock. X6.66 Sets Memory Clock to X4.00. X8.00 Sets Memory Clock to manually set the memory clock as...
... default values. CPU Frequency(MHz) Allows you to alter the North Bridge controller frequency for automated system reboot, or clear the CMOS values to reset the board to be configurable. (Default: Auto) Memory Clock This option is configurable only when Set Memory Clock is highly recommended that the CPU...from 200 MHz to manually set in accordance with the CPU specifications. Set Memory Clock Determines whether to X8.00. - 41 - Auto lets BIOS automatically set the memory clock. X6.66 Sets Memory Clock to X4.00. X8.00 Sets Memory Clock to manually set the memory clock as...

Manual
Page 55
...and then restart your system. - 55 - To clear the chassis intrusion status record, set Reset Case Open Status to Enabled, save the settings to the motherboard CI header. BIOS Setup 2-9 PC Health Status CMOS Setup Utility-Copyright (C) 1984-2009 Award Software PC Health Status... Hardware Thermal Control Reset Case Open Status Case Opened Vcore DDR3 1.5V +3.3V +12V Current ...
...and then restart your system. - 55 - To clear the chassis intrusion status record, set Reset Case Open Status to Enabled, save the settings to the motherboard CI header. BIOS Setup 2-9 PC Health Status CMOS Setup Utility-Copyright (C) 1984-2009 Award Software PC Health Status... Hardware Thermal Control Reset Case Open Status Case Opened Vcore DDR3 1.5V +3.3V +12V Current ...

Manual
Page 69
...Step 2: The process of Q-Flash, use the up or down arrow key to select Update BIOS from the floppy disk is updat- appears, press to Drive Enter : Run hi:Move ESC:Reset F10:Power Off Total size : 0 Free size : 0 3. Unique Features Q-Flash Utility... A Loa d CMO S Default Enable HDD 1-0 Upda te BIOS from Drive Please SparevsesBaInOySketoy Dtoricvoentinue Enter : Run hi:Move ESC:Reset F10:Power Off - 69 - ing the BIOS. Update BIOS from Drive Save BIOS to begin the BIOS update. Q-Flash Utility v2.09 Flash Type/Size MXIC 25L8005...
...Step 2: The process of Q-Flash, use the up or down arrow key to select Update BIOS from the floppy disk is updat- appears, press to Drive Enter : Run hi:Move ESC:Reset F10:Power Off Total size : 0 Free size : 0 3. Unique Features Q-Flash Utility... A Loa d CMO S Default Enable HDD 1-0 Upda te BIOS from Drive Please SparevsesBaInOySketoy Dtoricvoentinue Enter : Run hi:Move ESC:Reset F10:Power Off - 69 - ing the BIOS. Update BIOS from Drive Save BIOS to begin the BIOS update. Q-Flash Utility v2.09 Flash Type/Size MXIC 25L8005...


