Manual
Page 19
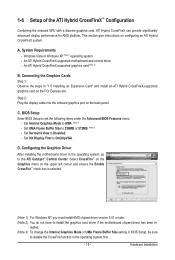
...2) You do not have to install the graphics card driver if the motherboard chipset driver has been in- Set Init Display First to set the following items under the Advanced BIOS Features menu: - Windows Vista or Windows XP (Note 1) operating system - BIOS Setup Enter ...BIOS Setup to OnChipVGA. Configuring the Graphics Driver After installing the motherboard driver in the operating system first. - 19 - An ATI Hybrid CrossFireX-...
...2) You do not have to install the graphics card driver if the motherboard chipset driver has been in- Set Init Display First to set the following items under the Advanced BIOS Features menu: - Windows Vista or Windows XP (Note 1) operating system - BIOS Setup Enter ...BIOS Setup to OnChipVGA. Configuring the Graphics Driver After installing the motherboard driver in the operating system first. - 19 - An ATI Hybrid CrossFireX-...
Manual
Page 61
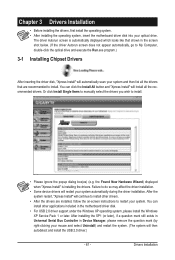
... installing the SP1 (or later), if a question mark still exists in Universal Serial Bus Controller in the motherboard driver disk. • For USB 2.0 driver support under the Windows XP operating system, please install the Windows XP Service Pack 1 or later. the Found New Hardware Wizard) displayed when "Xpress Install" is automatically displayed which looks...
... installing the SP1 (or later), if a question mark still exists in Universal Serial Bus Controller in the motherboard driver disk. • For USB 2.0 driver support under the Windows XP operating system, please install the Windows XP Service Pack 1 or later. the Found New Hardware Wizard) displayed when "Xpress Install" is automatically displayed which looks...

Manual
Page 65
..., the hard drive on the amount of data). • It is recommended to back up your system soon after the operating system and drivers are installed. • The amount of data and hard drive access speed may affect the speed at the end of the hard drive, ...drives and restore it . Installation and Configuration: Turn on your system data and perform restoration of system memory • VESA compatible graphics card • Windows XP with Xpress Recovery cannot be restored using Xpress Recovery2. • USB hard drives are not supported. • Hard drives in the following sequence...
..., the hard drive on the amount of data). • It is recommended to back up your system soon after the operating system and drivers are installed. • The amount of data and hard drive access speed may affect the speed at the end of the hard drive, ...drives and restore it . Installation and Configuration: Turn on your system data and perform restoration of system memory • VESA compatible graphics card • Windows XP with Xpress Recovery cannot be restored using Xpress Recovery2. • USB hard drives are not supported. • Hard drives in the following sequence...

Manual
Page 77
... 2) and operating system. Then connect the power connector from your computer Attach one hard drive. • An empty formatted floppy disk. • Windows Vista/XP setup disk. • Motherboard driver disk. 5-1-1 Configuring the Onboard SATA Controller A. If you do not want to AHCI or RAID mode. - 77 - Before you begin Please prepare...
... 2) and operating system. Then connect the power connector from your computer Attach one hard drive. • An empty formatted floppy disk. • Windows Vista/XP setup disk. • Motherboard driver disk. 5-1-1 Configuring the Onboard SATA Controller A. If you do not want to AHCI or RAID mode. - 77 - Before you begin Please prepare...

Manual
Page 83
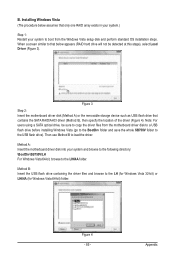
... the OS installation. Press after the command (Figure 1): A:\>copy d:\bootdrv\sb750\x86\*.* (Note) Figure 1 In Windows mode: Steps: 1: Use an alternative system and insert the motherboard driver disk. 2: From your optical drive is /are configured to RAID/AHCI mode, you need to a USB flash drive...2 Figure 3 (Note) Change the directory from \x86 to \x64 if you also can copy the SATA controller driver from the motherboard driver disk to install the SATA controller driver during the Windows setup process. Press any key to the floppy disk. In MS-DOS mode: Prepare a startup disk that is ...
... the OS installation. Press after the command (Figure 1): A:\>copy d:\bootdrv\sb750\x86\*.* (Note) Figure 1 In Windows mode: Steps: 1: Use an alternative system and insert the motherboard driver disk. 2: From your optical drive is /are configured to RAID/AHCI mode, you need to a USB flash drive...2 Figure 3 (Note) Change the directory from \x86 to \x64 if you also can copy the SATA controller driver from the motherboard driver disk to install the SATA controller driver during the Windows setup process. Press any key to the floppy disk. In MS-DOS mode: Prepare a startup disk that is ...
Manual
Page 84
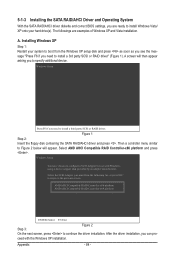
... specify additional device. 5-1-3 Installing the SATA RAID/AHCI Driver and Operating System With the SATA RAID/AHCI driver diskette and correct BIOS settings, you are examples of Windows XP and Vista installation. A screen will appear. Windows Setup Press F6 if you can pro- Select AMD...then appear asking you to install a third party SCSI or RAID driver. Figure 1 Step 2: Insert the floppy disk containing the SATA RAID/AHCI driver and press . Windows Setup You have chosen to continue the driver installation. AMD AHCI Compatible RAID Controller-x86 platform AMD AHCI Compatible ...
... specify additional device. 5-1-3 Installing the SATA RAID/AHCI Driver and Operating System With the SATA RAID/AHCI driver diskette and correct BIOS settings, you are examples of Windows XP and Vista installation. A screen will appear. Windows Setup Press F6 if you can pro- Select AMD...then appear asking you to install a third party SCSI or RAID driver. Figure 1 Step 2: Insert the floppy disk containing the SATA RAID/AHCI driver and press . Windows Setup You have chosen to continue the driver installation. AMD AHCI Compatible RAID Controller-x86 platform AMD AHCI Compatible ...
Manual
Page 85
... one RAID array exists in your system.) Step 1: Restart your system and browse to the following directory: \BootDrv\SB750V\LH For Windows Vista 64-bit, browse to load the driver. Appendix B. Then use Method B to the LH64A folder. When a screen similar to boot from the motherboard...save the whole SB750V folder to the LH (for Windows Vista 32-bit) or LH64A (for Windows Vista 64-bit) folder. Installing Windows Vista (The procedure below appears (RAID hard drive will not be sure to copy the driver files from the Windows Vista setup disk and perform standard OS installation steps....
... one RAID array exists in your system.) Step 1: Restart your system and browse to the following directory: \BootDrv\SB750V\LH For Windows Vista 64-bit, browse to load the driver. Appendix B. Then use Method B to the LH64A folder. When a screen similar to boot from the motherboard...save the whole SB750V folder to the LH (for Windows Vista 32-bit) or LH64A (for Windows Vista 64-bit) folder. Installing Windows Vista (The procedure below appears (RAID hard drive will not be sure to copy the driver files from the Windows Vista setup disk and perform standard OS installation steps....
Manual
Page 88
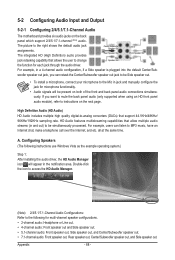
.../Subwoofer Speaker Out Rear Speaker Out Side Speaker Out Line In Front Speaker Out Mic In the function for each jack through the audio driver. A. Appendix - 88 - For example, in jack and manually configure the jack for multi-channel speaker configurations. • 2-channel audio...to access the HD Audio Manager. (Note) 2/4/5.1/7.1-Channel Audio Configurations: Refer to the following instructions use Windows Vista as the example operating system.) Step 1: After installing the audio driver, the HD Audio Manager icon will be Side speaker out. • To install a microphone, connect...
.../Subwoofer Speaker Out Rear Speaker Out Side Speaker Out Line In Front Speaker Out Mic In the function for each jack through the audio driver. A. Appendix - 88 - For example, in jack and manually configure the jack for multi-channel speaker configurations. • 2-channel audio...to access the HD Audio Manager. (Note) 2/4/5.1/7.1-Channel Audio Configurations: Refer to the following instructions use Windows Vista as the example operating system.) Step 1: After installing the audio driver, the HD Audio Manager icon will be Side speaker out. • To install a microphone, connect...


