Manual
Page 63
... • USB hard drives are not supported. • Hard drives in RAID/AHCI mode are different utilities. Supporting NTFS, FAT32, and FAT16 file systems, Xpress Recovery2 can only back up/restore the first physical hard drive that allows you to quickly compress and back up your system data... and perform restoration of the hard drive, make sure to restore it. Before You Begin: • Xpress Recovery2 will save the backup file at which the data is recommended; Xpress Recovery2 can back up a hard drive than to leave enough unallocated space in the following sequence: ...
... • USB hard drives are not supported. • Hard drives in RAID/AHCI mode are different utilities. Supporting NTFS, FAT32, and FAT16 file systems, Xpress Recovery2 can only back up/restore the first physical hard drive that allows you to quickly compress and back up your system data... and perform restoration of the hard drive, make sure to restore it. Before You Begin: • Xpress Recovery2 will save the backup file at which the data is recommended; Xpress Recovery2 can back up a hard drive than to leave enough unallocated space in the following sequence: ...
Manual
Page 64
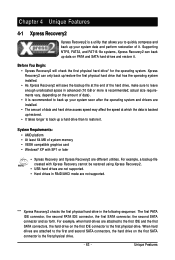
... space for example, NTFS) and begin the installation of data) (Figure 2). Select a file system (for Xpress Recovery2 (10 GB or more is recommended; Installing Windows XP and Partitioning the Hard Drive 1. Figure 1 Figure 2 3. Save the changes and exit. 2. Figure 3 GA-MA770 Series Motherboard - 64 - Set CD-ROM drive as the example operating system...
... space for example, NTFS) and begin the installation of data) (Figure 2). Select a file system (for Xpress Recovery2 (10 GB or more is recommended; Installing Windows XP and Partitioning the Hard Drive 1. Figure 1 Figure 2 3. Save the changes and exit. 2. Figure 3 GA-MA770 Series Motherboard - 64 - Set CD-ROM drive as the example operating system...

Manual
Page 65
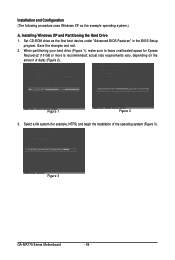
... operating system, you may create new partitions using free space on your hard drive is no enough unallocated space, Xpress Recovery2 cannot save the backup file to create new partitions or use . Figure 7 - 65 - If this occurs, reinstall the operating system and re-partition your hard drive (Figure 6, 7). After the operating... will not be able to the unallocated space (black stripe along the top)(Figure 5). Figure 6 In the New Partition Wizard, you will save the backup file.
... operating system, you may create new partitions using free space on your hard drive is no enough unallocated space, Xpress Recovery2 cannot save the backup file to create new partitions or use . Figure 7 - 65 - If this occurs, reinstall the operating system and re-partition your hard drive (Figure 6, 7). After the operating... will not be able to the unallocated space (black stripe along the top)(Figure 5). Figure 6 In the New Partition Wizard, you will save the backup file.

Manual
Page 66
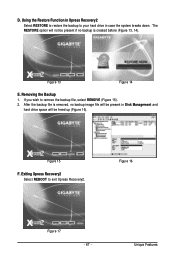
... the first time, Xpress Recovery2 will then begin the backup process (Figure 11). Boot from CD/DVD: Press any key to access Xpress Recovery2 for GA-MA770-DS3 FAd . . . . : BIOS Setup : XpressRecovery2 : Boot Menu : Qflash 01/29/2008-RD780-SB700-6A66AG09C-00 Figure 9 C. Boot from...start backing up your hard drive. When finished, go to Disk Management to startup XpressRecovery2..... B. Figure 12 GA-MA770 Series Motherboard Xpress Recovery2 will begin to store the backup image file. - 66 - AMD 770 BIOS for the first time. When the Windows operating system is detected, ...
... the first time, Xpress Recovery2 will then begin the backup process (Figure 11). Boot from CD/DVD: Press any key to access Xpress Recovery2 for GA-MA770-DS3 FAd . . . . : BIOS Setup : XpressRecovery2 : Boot Menu : Qflash 01/29/2008-RD780-SB700-6A66AG09C-00 Figure 9 C. Boot from...start backing up your hard drive. When finished, go to Disk Management to startup XpressRecovery2..... B. Figure 12 GA-MA770 Series Motherboard Xpress Recovery2 will begin to store the backup image file. - 66 - AMD 770 BIOS for the first time. When the Windows operating system is detected, ...
Manual
Page 67
...hard drive in case the system breaks down. Unique Features After the backup file is created before (Figure 13, 14). The RESTORE option will not be present if no backup is removed, no backup image file will be present in Xpress Recovery2 Select RESTORE to restore the backup to remove... the backup file, select REMOVE (Figure 15). 2. Figure 16 Figure 17 - 67 - D. Using the Restore Function in ...
...hard drive in case the system breaks down. Unique Features After the backup file is created before (Figure 13, 14). The RESTORE option will not be present if no backup is removed, no backup image file will be present in Xpress Recovery2 Select RESTORE to restore the backup to remove... the backup file, select REMOVE (Figure 15). 2. Figure 16 Figure 17 - 67 - D. Using the Restore Function in ...

Manual
Page 68
4-2 BIOS Update Utilities GIGABYTE motherboards provide two unique BIOS update tools, Q-FlashTM and @BIOSTM. Additionally, this motherboard features the DualBIOSTM design, which enhances protection for GA-MA770-DS3 FAd . . . . : BIOS Setup : ...GA-MA770 Series Motherboard - 68 - TM Motherboards that matches your floppy disk, USB flash drive, or hard drive. However, if the main BIOS is saved to enter Q-Flash. What is potentially risky, please do it with the Q-Flash Utility A. Before You Begin: 1. From GIGABYTE's website, download the latest compressed BIOS update file...
4-2 BIOS Update Utilities GIGABYTE motherboards provide two unique BIOS update tools, Q-FlashTM and @BIOSTM. Additionally, this motherboard features the DualBIOSTM design, which enhances protection for GA-MA770-DS3 FAd . . . . : BIOS Setup : ...GA-MA770 Series Motherboard - 68 - TM Motherboards that matches your floppy disk, USB flash drive, or hard drive. However, if the main BIOS is saved to enter Q-Flash. What is potentially risky, please do it with the Q-Flash Utility A. Before You Begin: 1. From GIGABYTE's website, download the latest compressed BIOS update file...

Manual
Page 69
... - 69 - When the message "Are you sure to begin the BIOS update. CopUypBdIaOteSBcIoOmSpflerotemd -DPriavses !! Insert the floppy disk containing the BIOS file into the floppy disk drive. Select Floppy A and press . Step 2: The process of Q- Step 3: When the update process is displayed on...Os)SfotounDdrive :Move ESC:Reset :Power Off Total size : 0 Free size : 0 3. Step 1: 1. Make sure the BIOS update file matches your motherboard model. Q-Flash Utility v2.02 Flash Type/Size SST 25VF040B 512K Enter : Run Keep DMI Data Enable !! appears, press to ...
... - 69 - When the message "Are you sure to begin the BIOS update. CopUypBdIaOteSBcIoOmSpflerotemd -DPriavses !! Insert the floppy disk containing the BIOS file into the floppy disk drive. Select Floppy A and press . Step 2: The process of Q- Step 3: When the update process is displayed on...Os)SfotounDdrive :Move ESC:Reset :Power Off Total size : 0 Free size : 0 3. Step 1: 1. Make sure the BIOS update file matches your motherboard model. Q-Flash Utility v2.02 Flash Type/Size SST 25VF040B 512K Enter : Run Keep DMI Data Enable !! appears, press to ...
Manual
Page 71
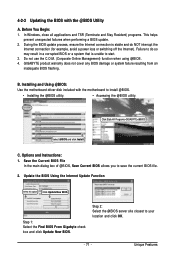
... when using @BIOS. 4. Save the Current BIOS File In the main dialog box of @BIOS, Save Current BIOS allows you to install @BIOS. • Installing the @BIOS utility. • Accessing the @BIOS utility. C. B. Click Start>All Programs>GIGABYTE>@BIOS Select @BIOS and click Install. Update the ...BIOS Using the Internet Update Function Select this option Click Update New BIOS Step 1: Select the Find BIOS From Gigabyte check box and click Update New BIOS. Unique Features Before You Begin: 1. Failure to your location and click OK. - 71 - Step ...
... when using @BIOS. 4. Save the Current BIOS File In the main dialog box of @BIOS, Save Current BIOS allows you to install @BIOS. • Installing the @BIOS utility. • Accessing the @BIOS utility. C. B. Click Start>All Programs>GIGABYTE>@BIOS Select @BIOS and click Install. Update the ...BIOS Using the Internet Update Function Select this option Click Update New BIOS Step 1: Select the Find BIOS From Gigabyte check box and click Update New BIOS. Unique Features Before You Begin: 1. Failure to your location and click OK. - 71 - Step ...

Manual
Page 72
...BIOS Step 1: Click Update New BIOS. F1) obtained from GIGABYTE's website and follow the instructions in an unbootable system. Step 4: As the system boots, press to load BIOS defaults. Make sure the extracted BIOS file matches your system. Select the location where you save the ..." below. Updating the BIOS with an incorrect BIOS file could result in the Files of type list. GA-MA770 Series Motherboard - 72 - Step 2: In the Open dialog box, select All Files (*.*) in an unbootable system. • If the BIOS update file for your motherboard model. Step 3: Press OK to...
...BIOS Step 1: Click Update New BIOS. F1) obtained from GIGABYTE's website and follow the instructions in an unbootable system. Step 4: As the system boots, press to load BIOS defaults. Make sure the extracted BIOS file matches your system. Select the location where you save the ..." below. Updating the BIOS with an incorrect BIOS file could result in the Files of type list. GA-MA770 Series Motherboard - 72 - Step 2: In the Open dialog box, select All Files (*.*) in an unbootable system. • If the BIOS update file for your motherboard model. Step 3: Press OK to...

Manual
Page 73
...Button Information Table Button/Display 1. Function LEDs 9. may result in Windows environment, eliminating the need to update EasyTune 5 Pro Opens EasyTune 5 Pro help file Quits or minimizes the EasyTune 5 Pro interface Performance Enhancement Incorrectly doing overclock/overvoltage may provide optimizations for CPU and memory, enhancing the performance of these.../execution button Toggles among Easy Mode, Advanced Mode, and Graphics Mode Displays the CPU frequency Shows the supported function(s) Go to GIGABYTE website to enter the BIOS Setup program. OVERCLOCKING 2. GO 6.
...Button Information Table Button/Display 1. Function LEDs 9. may result in Windows environment, eliminating the need to update EasyTune 5 Pro Opens EasyTune 5 Pro help file Quits or minimizes the EasyTune 5 Pro interface Performance Enhancement Incorrectly doing overclock/overvoltage may provide optimizations for CPU and memory, enhancing the performance of these.../execution button Toggles among Easy Mode, Advanced Mode, and Graphics Mode Displays the CPU frequency Shows the supported function(s) Go to GIGABYTE website to enter the BIOS Setup program. OVERCLOCKING 2. GO 6.

Manual
Page 81
... following two commands. For example, from the menu in the BootDrv folder (Figure 3). From your optical drive folder, double click the MENU.exe file in Figure 2, to install Windows XP to your system. For more details, refer to exit when finished. Prepare a startup disk that is/are...Figure 2) appears, remove the startup disk and insert the blank formatted disk. A command prompt window will then automatically zip and transfer this driver file to your optical drive (example: D:\>). Without the driver, the hard drive may load the SATA RAID driver from the motherboard driver disk to ...
... following two commands. For example, from the menu in the BootDrv folder (Figure 3). From your optical drive folder, double click the MENU.exe file in Figure 2, to install Windows XP to your system. For more details, refer to exit when finished. Prepare a startup disk that is/are...Figure 2) appears, remove the startup disk and insert the blank formatted disk. A command prompt window will then automatically zip and transfer this driver file to your optical drive (example: D:\>). Without the driver, the hard drive may load the SATA RAID driver from the motherboard driver disk to ...

Manual
Page 82
... from the Windows XP setup disk and press as soon as you see the next screen. S=Specify Additional Device ENTER=Continue F3=Exit Figure 2 GA-MA770 Series Motherboard - 82 - The following mass storage devices(s) * To specify additional SCSI adapters, CD-ROM drives, or special disk controllers for use...Windows, including those for use with Windows, press ENTER. After pressing , there will load support for the following is an example of some files being loaded before you see the message "Press F6 if you need to install a third party SCSI or RAID driver. Installing Windows XP ...
... from the Windows XP setup disk and press as soon as you see the next screen. S=Specify Additional Device ENTER=Continue F3=Exit Figure 2 GA-MA770 Series Motherboard - 82 - The following mass storage devices(s) * To specify additional SCSI adapters, CD-ROM drives, or special disk controllers for use...Windows, including those for use with Windows, press ENTER. After pressing , there will load support for the following is an example of some files being loaded before you see the message "Press F6 if you need to install a third party SCSI or RAID driver. Installing Windows XP ...
Manual
Page 83
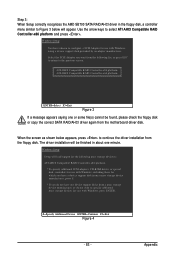
... device support disks from the motherboard driver disk. Step 3: When Setup correctly recognizes the AMD SB700 SATA RAID/AHCI driver in about one or some file(s) cannot be finished in the floppy disk, a controller menu similar to select ATI AHCI Compatible RAID Controller-x86 platform and press .
... device support disks from the motherboard driver disk. Step 3: When Setup correctly recognizes the AMD SB700 SATA RAID/AHCI driver in about one or some file(s) cannot be finished in the floppy disk, a controller menu similar to select ATI AHCI Compatible RAID Controller-x86 platform and press .
Manual
Page 92
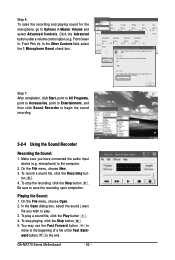
... Controls. In the Other Controls field, select the 1 Microphone Boost check box. Make sure you wish to save the recording upon completion. On the File menu, choose Open. 2. GA-MA770 Series Motherboard - 92 - Step 6: To raise the recording and playing sound for the microphone, go to the computer. 2. In the Open dialog box...
... Controls. In the Other Controls field, select the 1 Microphone Boost check box. Make sure you wish to save the recording upon completion. On the File menu, choose Open. 2. GA-MA770 Series Motherboard - 92 - Step 6: To raise the recording and playing sound for the microphone, go to the computer. 2. In the Open dialog box...


