
Manual
Page 1
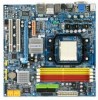
GA-MA69GM-S2H AM2 socket motherboard for AMD AthlonTM 64 FX processor/ AMD AthlonTM 64 X2 Dual-Core processor/ AMD AthlonTM 64 processor/AMD SempronTM processor User's Manual Rev. 1001 12ME-MA69GMS2H-1001R * The WEEE marking on the product indicates this product must not be disposed of with user's other household waste and must be handed over to a designated collection point for the recycling of waste electrical and electronic equipment!! * The WEEE marking applies only in European Union's member states.
GA-MA69GM-S2H AM2 socket motherboard for AMD AthlonTM 64 FX processor/ AMD AthlonTM 64 X2 Dual-Core processor/ AMD AthlonTM 64 processor/AMD SempronTM processor User's Manual Rev. 1001 12ME-MA69GMS2H-1001R * The WEEE marking on the product indicates this product must not be disposed of with user's other household waste and must be handed over to a designated collection point for the recycling of waste electrical and electronic equipment!! * The WEEE marking applies only in European Union's member states.

Manual
Page 3
... read or download the information on/from the Support\Motherboard\Technology Guide page on how to GIGABYTE UNITED INC. Check your motherboard looks like this manual is protected by any form or by copyright laws and is designated by GIGA-BYTE TECHNOLOGY CO...„ For detailed product information, carefully read the User's Manual. „ For instructions on our website. is the property of GIGABYTE. Changes to their respective owners. No part of this manual may be made by GIGABYTE without GIGABYTE's prior written permission. The logo is 1.0. For example, ...
... read or download the information on/from the Support\Motherboard\Technology Guide page on how to GIGABYTE UNITED INC. Check your motherboard looks like this manual is protected by any form or by copyright laws and is designated by GIGA-BYTE TECHNOLOGY CO...„ For detailed product information, carefully read the User's Manual. „ For instructions on our website. is the property of GIGABYTE. Changes to their respective owners. No part of this manual may be made by GIGABYTE without GIGABYTE's prior written permission. The logo is 1.0. For example, ...

Manual
Page 6
... in and out cable (Part No. 12CR1-1SPINO-11/R) LPT port cable (Part No. 12CF1-1LP001-01R) - 6 - Box Contents GA-MA69GM-S2H motherboard Motherboard driver disk Motherboard driver disk (For Windows Vista) User's Manual One IDE cable and one floppy disk drive cable Two SATA 3Gb/s cables One TV Out bracket I/O Shield The box...
... in and out cable (Part No. 12CR1-1SPINO-11/R) LPT port cable (Part No. 12CF1-1LP001-01R) - 6 - Box Contents GA-MA69GM-S2H motherboard Motherboard driver disk Motherboard driver disk (For Windows Vista) User's Manual One IDE cable and one floppy disk drive cable Two SATA 3Gb/s cables One TV Out bracket I/O Shield The box...

Manual
Page 9
Prior to installation, carefully read the user's manual and follow these procedures: • Prior to installation, do not remove or break motherboard S/N (Serial Number) sticker or warranty sticker provided by unplugging the power ...
Prior to installation, carefully read the user's manual and follow these procedures: • Prior to installation, do not remove or break motherboard S/N (Serial Number) sticker or warranty sticker provided by unplugging the power ...

Manual
Page 15
... the steps below to correctly install the CPU cooler on the CPU. (The following procedure uses the GIGABYTE cooler as the picture above shows) to lock into place. (Refer to your CPU cooler installation manual for instructions on installing the cooler.) Step 5: Finally, attach the power connector of the CPU cooler to...
... the steps below to correctly install the CPU cooler on the CPU. (The following procedure uses the GIGABYTE cooler as the picture above shows) to lock into place. (Refer to your CPU cooler installation manual for instructions on installing the cooler.) Step 5: Finally, attach the power connector of the CPU cooler to...

Manual
Page 18
... the graphics card. • Removing the Card: Pull out the small white- You can also press the latch on your expansion card(s). 7. GA-MA69GM-S2H Motherboard - 18 - Secure the card's metal bracket to install an expansion card: • Make sure the motherboard supports the expansion card. After... Slot Follow the steps below to correctly install your operating system. Locate an expansion slot that came with a screw. 5. Carefully read the manual that supports your expansion card. • Always turn off the computer and unplug the power cord from the chassis back panel. 2. Make...
... the graphics card. • Removing the Card: Pull out the small white- You can also press the latch on your expansion card(s). 7. GA-MA69GM-S2H Motherboard - 18 - Secure the card's metal bracket to install an expansion card: • Make sure the motherboard supports the expansion card. After... Slot Follow the steps below to correctly install your operating system. Locate an expansion slot that came with a screw. 5. Carefully read the manual that supports your expansion card. • Always turn off the computer and unplug the power cord from the chassis back panel. 2. Make...

Manual
Page 31
... do so may cause damage to the motherboard. • After system restart, go to BIOS Setup to load factory defaults (select Load Optimized Defaults) or manually configure the BIOS settings (refer to touch the two pins for BIOS configurations). 20) CI (Chassis Intrusion Header) This motherboard provides a chassis detection feature that...
... do so may cause damage to the motherboard. • After system restart, go to BIOS Setup to load factory defaults (select Load Optimized Defaults) or manually configure the BIOS settings (refer to touch the two pins for BIOS configurations). 20) CI (Chassis Intrusion Header) This motherboard provides a chassis detection feature that...

Manual
Page 37
...CHS. Options are : Auto (default), CHS, LBA, Large. Time Sets the system time. Allows you to None so the system will • Manual Access Mode skip the detection of the three methods below : • Auto Lets BIOS automatically detect IDE/SATA devices during the POST for faster system... set this channel. IDE Channel 2/3 Master/Slave IDE Auto-Detection Press to autodetect the parameters of the IDE/SATA device on this item to manually enter the specifications of the hard drive when the hard drive access mode is week (read-only), month, date and year. IDE Channel 0...
...CHS. Options are : Auto (default), CHS, LBA, Large. Time Sets the system time. Allows you to None so the system will • Manual Access Mode skip the detection of the three methods below : • Auto Lets BIOS automatically detect IDE/SATA devices during the POST for faster system... set this channel. IDE Channel 2/3 Master/Slave IDE Auto-Detection Press to autodetect the parameters of the IDE/SATA device on this item to manually enter the specifications of the hard drive when the hard drive access mode is week (read-only), month, date and year. IDE Channel 0...

Manual
Page 38
... specify whether the installed floppy disk drive is 3-mode floppy disk drive, a Japanese standard floppy disk drive. Halt on the hard drive. GA-MA69GM-S2H Motherboard - 38 - Sector Number of extended memory. Options are : Disabled (default), Drive A. Typically, 640 KB will stop for the MS...any error. Cylinder Number of the currently installed hard drive. Landing Zone Landing zone. If you wish to enter the parameters manually, refer to the information on Allows you to None. Head Number of floppy disk drive installed in your hard drive specifications. ...
... specify whether the installed floppy disk drive is 3-mode floppy disk drive, a Japanese standard floppy disk drive. Halt on the hard drive. GA-MA69GM-S2H Motherboard - 38 - Sector Number of extended memory. Options are : Disabled (default), Drive A. Typically, 640 KB will stop for the MS...any error. Cylinder Number of the currently installed hard drive. Landing Zone Landing zone. If you wish to enter the parameters manually, refer to the information on Allows you to None. Head Number of floppy disk drive installed in your hard drive specifications. ...

Manual
Page 55
Drivers Installation English 3-4 Hardware Information This page provides information about the hardware devices on this motherboard. 3-5 Contact Us Check the contacts information of the GIGABYTE headquarter in Taiwan and the overseas branch offices on the last page of this manual. - 55 -
Drivers Installation English 3-4 Hardware Information This page provides information about the hardware devices on this motherboard. 3-5 Contact Us Check the contacts information of the GIGABYTE headquarter in Taiwan and the overseas branch offices on the last page of this manual. - 55 -

Manual
Page 66
...Upon completion, restart your motherboard model. Step 4: As the system boots, press to enter the BIOS Setup program. F1) obtained from GIGABYTE's website and follow the instructions in "Update the BIOS without Using the Internet Update Function Click Update New BIOS Step 2: In the ... New BIOS. English Step 3: First make sure the model name on the @BIOS server site, please manually download the BIOS update file from the Internet or through other source. GA-MA69GM-S2H Motherboard - 66 - Updating the BIOS with an incorrect BIOS file could result in an unbootable system....
...Upon completion, restart your motherboard model. Step 4: As the system boots, press to enter the BIOS Setup program. F1) obtained from GIGABYTE's website and follow the instructions in "Update the BIOS without Using the Internet Update Function Click Update New BIOS Step 2: In the ... New BIOS. English Step 3: First make sure the model name on the @BIOS server site, please manually download the BIOS update file from the Internet or through other source. GA-MA69GM-S2H Motherboard - 66 - Updating the BIOS with an incorrect BIOS file could result in an unbootable system....

Manual
Page 72
...Utility (c) 2006 ATI Technology, Inc. The Define LD selection from the Main Menu allows users to begin the process of manually defining the drive elements and RAID levels for one or multiple disk arrays attached to enter the RAID configuration menu (Figure 5). English ...Gigabyte Boundary: 64 KB ON Fast Init: OFF Cache Mode: WriteThru [ Drives Assignments] ] Channel:ID Drive Model 1:Mas WDC WD800JD-22LSA0 2:Mas WDC WD800JD-22LSA0 Capacity (MB) 80026 80026 Assignment N N [K] Up [L] Down [ Keys Available] ] [ESC] Exit [Space] Change Option Figure 5 [Ctrl-Y] Save GA-MA69GM-S2H...
...Utility (c) 2006 ATI Technology, Inc. The Define LD selection from the Main Menu allows users to begin the process of manually defining the drive elements and RAID levels for one or multiple disk arrays attached to enter the RAID configuration menu (Figure 5). English ...Gigabyte Boundary: 64 KB ON Fast Init: OFF Cache Mode: WriteThru [ Drives Assignments] ] Channel:ID Drive Model 1:Mas WDC WD800JD-22LSA0 2:Mas WDC WD800JD-22LSA0 Capacity (MB) 80026 80026 Assignment N N [K] Up [L] Down [ Keys Available] ] [ESC] Exit [Space] Change Option Figure 5 [Ctrl-Y] Save GA-MA69GM-S2H...
Manual
Page 77
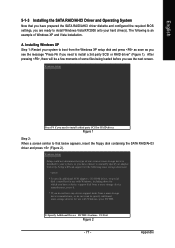
... you are ready to install Windows Vista/XP/2000 onto your system to boot from a mass storage device manufacturer, or do not have chosen to manually specify an adapter. Installing Windows XP Step 1: Restart your hard drive(s). Figure 1 Step 2: When a screen similar to specify additional mass storage devices for use with...
... you are ready to install Windows Vista/XP/2000 onto your system to boot from a mass storage device manufacturer, or do not have chosen to manually specify an adapter. Installing Windows XP Step 1: Restart your hard drive(s). Figure 1 Step 2: When a screen similar to specify additional mass storage devices for use with...

Manual
Page 82
...instructions use Windows XP as the example operating system.) Step 1: After installing the audio driver, the Audio Manager icon will appear in jack and manually configure the jack for multi-channel speaker configurations. • 2 channel audio: Headphone or Line out. • 4 channel audio: Front ... digital-to access the Audio Control Panel. A. Before installing the audio driver, make a telephone call over the Internet, and etc. GA-MA69GM-S2H Motherboard - 82 - all at the same time. The picture to MP3 music, have both the front and back panel front audio connectors active...
...instructions use Windows XP as the example operating system.) Step 1: After installing the audio driver, the Audio Manager icon will appear in jack and manually configure the jack for multi-channel speaker configurations. • 2 channel audio: Headphone or Line out. • 4 channel audio: Front ... digital-to access the Audio Control Panel. A. Before installing the audio driver, make a telephone call over the Internet, and etc. GA-MA69GM-S2H Motherboard - 82 - all at the same time. The picture to MP3 music, have both the front and back panel front audio connectors active...


