
Manual
Page 4
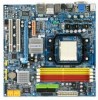
Table of Contents OptionalItems ...6 Box Contents ...6 GA-MA69GM-S2H Motherboard Layout 7 Block Diagram ...8 Chapter 1 Hardware Installation 9 1-1 Installation Precautions 9 1-2 Product Specifications 10 1-3 Installing the CPU and CPU Cooler 13 1-3-1 Installing the CPU 13 1-3-2 Installing the CPU Cooler 15 1-4 Installing the Memory 16 1-4-1 Dual Channel Memory Configuration 16 1-4-2 Installing a Memory 17 1-5 Installing an Expansion Card 18 1-6 Back Panel Connectors...
Table of Contents OptionalItems ...6 Box Contents ...6 GA-MA69GM-S2H Motherboard Layout 7 Block Diagram ...8 Chapter 1 Hardware Installation 9 1-1 Installation Precautions 9 1-2 Product Specifications 10 1-3 Installing the CPU and CPU Cooler 13 1-3-1 Installing the CPU 13 1-3-2 Installing the CPU Cooler 15 1-4 Installing the Memory 16 1-4-1 Dual Channel Memory Configuration 16 1-4-2 Installing a Memory 17 1-5 Installing an Expansion Card 18 1-6 Back Panel Connectors...
Manual
Page 8
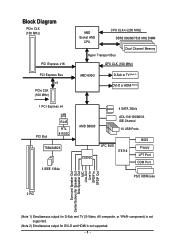
... PCI Bus LAN RJ45 RTL 8110SC TSB43AB23 3 IEEE 1394a AMD Socket AM2 CPU CPU CLK+/-(200 MHz) DDR2 800/667/533 MHz DIMM Dual Channel Memory Hyper Transport Bus GFX CLK (100 MHz) AMD 690G D-Sub or TV (Note 1) DVI-D or HDMI (Note 2) AMD SB600 4 SATA 3Gb/s ATA-133/100/66...
... PCI Bus LAN RJ45 RTL 8110SC TSB43AB23 3 IEEE 1394a AMD Socket AM2 CPU CPU CLK+/-(200 MHz) DDR2 800/667/533 MHz DIMM Dual Channel Memory Hyper Transport Bus GFX CLK (100 MHz) AMD 690G D-Sub or TV (Note 1) DVI-D or HDMI (Note 2) AMD SB600 4 SATA 3Gb/s ATA-133/100/66...

Manual
Page 9
... the power supply has been turned off. • Before turning on the computer power during the installation process can become damaged as a motherboard, CPU or memory.
... the power supply has been turned off. • Before turning on the computer power during the installation process can become damaged as a motherboard, CPU or memory.

Manual
Page 10
...to the internal USB headers) GA-MA69GM-S2H Motherboard - 10 - TSB43AB23 chip Š Up to 3 IEEE 1394a ports (1 on the back panel, 6 via the USB brackets connected to 4 SATA 3Gb/s devices - English 1-2 Product Specifications CPU Front Side Bus Chipset Memory Onboard Graphics Audio LAN Expansion ...138; 4 x 1.8V DDR2 DIMM sockets supporting up to 16 GB of system memory (Note 1) Š Dual channel memory architecture Š Support for DDR2 800/667/533 MHz memory modules (Go to GIGABYTE's website for the latest memory support list.) Š Integrated in the South Bridge Š Up to 10...
...to the internal USB headers) GA-MA69GM-S2H Motherboard - 10 - TSB43AB23 chip Š Up to 3 IEEE 1394a ports (1 on the back panel, 6 via the USB brackets connected to 4 SATA 3Gb/s devices - English 1-2 Product Specifications CPU Front Side Bus Chipset Memory Onboard Graphics Audio LAN Expansion ...138; 4 x 1.8V DDR2 DIMM sockets supporting up to 16 GB of system memory (Note 1) Š Dual channel memory architecture Š Support for DDR2 800/667/533 MHz memory modules (Go to GIGABYTE's website for the latest memory support list.) Š Integrated in the South Bridge Š Up to 10...

Manual
Page 12
GA-MA69GM-S2H Motherboard - 12 - English Unique Features Bundled Software Operating System Form Factor Š Support for @BIOS Š Support for Download Center Š Support for Q-Flash Š ... ATX form factor; 24.4cm x 24.4cm (Note 1) Due to Windows XP 32-bit operating system limitation, when more than 4 GB of physical memory is installed, the actual memory size displayed will be less than 4 GB. (Note 2) The DVI-D port does not support D-Sub connection by adapter. (Note 3) Whether the CPU fan...
GA-MA69GM-S2H Motherboard - 12 - English Unique Features Bundled Software Operating System Form Factor Š Support for @BIOS Š Support for Download Center Š Support for Q-Flash Š ... ATX form factor; 24.4cm x 24.4cm (Note 1) Due to Windows XP 32-bit operating system limitation, when more than 4 GB of physical memory is installed, the actual memory size displayed will be less than 4 GB. (Note 2) The DVI-D port does not support D-Sub connection by adapter. (Note 3) Whether the CPU fan...

Manual
Page 13
...outlet before you wish to set beyond the standard specifications, please do so according to your hardware specifications including the CPU, graphics card, memory, hard drive, etc. 1-3-1 Installing the CPU A. It is not installed, otherwise overheating and damage of the CPU may occur. &#...in accordance with the CPU specifications. Locate the pin one of the CPU. mended that the motherboard supports the CPU. (Go to GIGABYTE's website for the peripherals. English 1-3 Installing the CPU and CPU Cooler Read the following guidelines before installing the CPU to prevent hardware...
...outlet before you wish to set beyond the standard specifications, please do so according to your hardware specifications including the CPU, graphics card, memory, hard drive, etc. 1-3-1 Installing the CPU A. It is not installed, otherwise overheating and damage of the CPU may occur. &#...in accordance with the CPU specifications. Locate the pin one of the CPU. mended that the motherboard supports the CPU. (Go to GIGABYTE's website for the peripherals. English 1-3 Installing the CPU and CPU Cooler Read the following guidelines before installing the CPU to prevent hardware...

Manual
Page 16
... and supports Dual Channel Technology. DDRII_1 DDRII_2 DDRII_3 DDRII_4 Due to GIGABYTE's website for optimum performance. When enabling Dual Channel mode with two or four memory modules, it is installed. 2. GA-MA69GM-S2H Motherboard - 16 - English 1-4 Installing the Memory Read the following guidelines before you install them in the DDRII_1 and DDRII_2 sockets. It is recommended...
... and supports Dual Channel Technology. DDRII_1 DDRII_2 DDRII_3 DDRII_4 Due to GIGABYTE's website for optimum performance. When enabling Dual Channel mode with two or four memory modules, it is installed. 2. GA-MA69GM-S2H Motherboard - 16 - English 1-4 Installing the Memory Read the following guidelines before you install them in the DDRII_1 and DDRII_2 sockets. It is recommended...

Manual
Page 17
...Step 1: Note the orientation of the memory, push down on the memory and insert it can only fit in the memory sockets. Step 2: The clips at both ends of the memory socket. Notch DDR2 DIMM A DDR2 memory module has a notch, so it vertically into place when the memory module is securely inserted. - 17... on the socket. Follow the steps below to correctly install your fingers on the top edge of the memory module. English 1-4-2 Installing a Memory Before installing a memory module , make sure to turn off the computer and unplug the power cord from the power outlet to prevent damage to ...
...Step 1: Note the orientation of the memory, push down on the memory and insert it can only fit in the memory sockets. Step 2: The clips at both ends of the memory socket. Notch DDR2 DIMM A DDR2 memory module has a notch, so it vertically into place when the memory module is securely inserted. - 17... on the socket. Follow the steps below to correctly install your fingers on the top edge of the memory module. English 1-4-2 Installing a Memory Before installing a memory module , make sure to turn off the computer and unplug the power cord from the power outlet to prevent damage to ...

Manual
Page 37
... 2 Slave ` IDE Channel 3 Master ` IDE Channel 3 Slave [None] [None] [None] [None] [None] [None] Drive A Floppy 3 Mode Support [1.44M, 3.5"] [Disabled] Halt On [All Errors] Base Memory Extended Memory 640K 239M KLJI: Move Enter: Select F5: Previous Values +/-/PU/PD: Value F10: Save F6: Fail-Safe Default ESC: Exit F1: General Help F7: Optimized...
... 2 Slave ` IDE Channel 3 Master ` IDE Channel 3 Slave [None] [None] [None] [None] [None] [None] Drive A Floppy 3 Mode Support [1.44M, 3.5"] [Disabled] Halt On [All Errors] Base Memory Extended Memory 640K 239M KLJI: Move Enter: Select F5: Previous Values +/-/PU/PD: Value F10: Save F6: Fail-Safe Default ESC: Exit F1: General Help F7: Optimized...

Manual
Page 38
...error during the POST. Typically, 640 KB will not stop for a keyboard error but stop for all other errors. Extended Memory The amount of sectors. Landing Zone Landing zone. Drive A Allows you do not install a floppy disk drive, set this...drive installed in your hard drive specifications. Memory These fields are read-only and are : Disabled (default), Drive A. Base Memory Also called conventional memory. English The following fields display your system. Options are: None, 360K/5.25", 1.2M/5.25", 720K/3.5", 1.44M/3.5", 2.88M/3.5". GA-MA69GM-S2H Motherboard - 38 -
...error during the POST. Typically, 640 KB will not stop for a keyboard error but stop for all other errors. Extended Memory The amount of sectors. Landing Zone Landing zone. Drive A Allows you do not install a floppy disk drive, set this...drive installed in your hard drive specifications. Memory These fields are read-only and are : Disabled (default), Drive A. Base Memory Also called conventional memory. English The following fields display your system. Options are: None, 360K/5.25", 1.2M/5.25", 720K/3.5", 1.44M/3.5", 2.88M/3.5". GA-MA69GM-S2H Motherboard - 38 -
Manual
Page 40
MS-DOS, for example, will use only this item will show the system memory size automatically allocated for the onboard graphics controller. GA-MA69GM-S2H Motherboard - 40 - PCI Slot Sets the PCI graphics card as the first display. (Default) OnChipVGA Sets the onboard VGA as ...) Disabled Always disables the onboard VGA, whether or not a PCI Express card is installed. Away Mode allows the system to Auto, this memory for the onboard graphics controller. This option is configurable only if an ATI graphics card is installed. (Default: Disabled) Internal Graphics Mode Auto...
MS-DOS, for example, will use only this item will show the system memory size automatically allocated for the onboard graphics controller. GA-MA69GM-S2H Motherboard - 40 - PCI Slot Sets the PCI graphics card as the first display. (Default) OnChipVGA Sets the onboard VGA as ...) Disabled Always disables the onboard VGA, whether or not a PCI Express card is installed. Away Mode allows the system to Auto, this memory for the onboard graphics controller. This option is configurable only if an ATI graphics card is installed. (Default: Disabled) Internal Graphics Mode Auto...

Manual
Page 45
... function, you need an ATX power supply providing at which the system will be effective. (Note) Supported on the system, enter the password and press . Memory The system returns to clear the password settings.
... function, you need an ATX power supply providing at which the system will be effective. (Note) Supported on the system, enter the password and press . Memory The system returns to clear the password settings.

Manual
Page 57
System Requirements: • Intel® x86 platform • At least 64 MB of system memory • VESA compatible graphics card • Windows® 2000 with SP1 or later • Xpress Recovery and Xpress Recovery2 are different utilities. "*" Xpress Recovery2 checks ...
System Requirements: • Intel® x86 platform • At least 64 MB of system memory • VESA compatible graphics card • Windows® 2000 with SP1 or later • Xpress Recovery and Xpress Recovery2 are different utilities. "*" Xpress Recovery2 checks ...

Manual
Page 67
...of CPU frequency Shows the information of the current function Visits GIGABYTE website Displays EasyTuneTM 5 help screen Quits or minimizes EasyTuneTM 5 Incorrectly doing overclock/overvoltage may provide optimizations for CPU and memory, enhancing the performance of these components. - 67 - ...SMART FAN 4. may result in damage to CPU, chipset, or memory and reduce the useful life of these components. EasyTune 5 provides ...
...of CPU frequency Shows the information of the current function Visits GIGABYTE website Displays EasyTuneTM 5 help screen Quits or minimizes EasyTuneTM 5 Incorrectly doing overclock/overvoltage may provide optimizations for CPU and memory, enhancing the performance of these components. - 67 - ...SMART FAN 4. may result in damage to CPU, chipset, or memory and reduce the useful life of these components. EasyTune 5 provides ...

Manual
Page 68
...ReadyBoost. • The USB flash drive must have at least 256 MB of space. • The recommended amount of memory to use for ReadyBoost using the slider or spin box. GA-MA69GM-S2H Motherboard - 68 - Right-click on a Windows Vista certified USB flash drive to boost your computer's performance. Follow the... computer. Step 2: In the ReadyBoost tab, select Use this device. Under Space to reserve for system speed, set the amount of memory space to use flash memory on the USB flash drive icon and choose Properties. You may enable ReadyBoost and allocate part of your USB flash drive...
...ReadyBoost. • The USB flash drive must have at least 256 MB of space. • The recommended amount of memory to use for ReadyBoost using the slider or spin box. GA-MA69GM-S2H Motherboard - 68 - Right-click on a Windows Vista certified USB flash drive to boost your computer's performance. Follow the... computer. Step 2: In the ReadyBoost tab, select Use this device. Under Space to reserve for system speed, set the amount of memory space to use flash memory on the USB flash drive icon and choose Properties. You may enable ReadyBoost and allocate part of your USB flash drive...

Manual
Page 71
... enter the ATI RAID BIOS setup utility. Hit the + key to configure a RAID array. Press to enter FastBuild (tm) Utility" (Figure 2). Step 1: After the POST memory test begins and before the operating system boot begins, look for a message which says "Press to enter FastBuild (tm) Utility... No Array is the first...
... enter the ATI RAID BIOS setup utility. Hit the + key to configure a RAID array. Press to enter FastBuild (tm) Utility" (Figure 2). Step 1: After the POST memory test begins and before the operating system boot begins, look for a message which says "Press to enter FastBuild (tm) Utility... No Array is the first...
Manual
Page 94
...AV composite and YPbPr component. The table below . • CPU: AMD AthlonTM 64 X2 Dual-Core processor (4200+) • Memory: Two 1 GB DDR2 800 memory modules with dual channel mode enabled • BIOS Setup: At least 256 MB of the TV out bracket, the motherboard can be... VC1) Blu-ray (MPEG 2) Suitable Resolution Windows XP Windows Vista 1920 x 1080p 1920 x 1080p 1920 x 1080i 1280 x 720p 1280 x 720p 1280 x 720p GA-MA69GM-S2H Motherboard - 94 - English D. F. Via the use of Frame Buffer Size (refer to Chapter 2, "BIOS Setup," "Advanced BIOS Features," for video output: DVI-D, ...
...AV composite and YPbPr component. The table below . • CPU: AMD AthlonTM 64 X2 Dual-Core processor (4200+) • Memory: Two 1 GB DDR2 800 memory modules with dual channel mode enabled • BIOS Setup: At least 256 MB of the TV out bracket, the motherboard can be... VC1) Blu-ray (MPEG 2) Suitable Resolution Windows XP Windows Vista 1920 x 1080p 1920 x 1080p 1920 x 1080i 1280 x 720p 1280 x 720p 1280 x 720p GA-MA69GM-S2H Motherboard - 94 - English D. F. Via the use of Frame Buffer Size (refer to Chapter 2, "BIOS Setup," "Advanced BIOS Features," for video output: DVI-D, ...
Manual
Page 95
...descriptions may help you identify possible computer problems. (For reference only.) 1 short: System boots successfully 2 short: CMOS setting error 1 long, 1 short: Memory or motherboard error 1 long, 2 short: Monitor or graphics card error 1 long, 3 short: Keyboard error 1 long, 9 short: BIOS ROM error ... inserted properly Continuous short beeps: Power error - 95 - A: If your motherboard has a clearing CMOS jumper, refer to the instructions on GIGABYTE's website. Refer to show the advanced options. Q: Why do I have this jumper, refer to the instructions on after the computer shuts...
...descriptions may help you identify possible computer problems. (For reference only.) 1 short: System boots successfully 2 short: CMOS setting error 1 long, 1 short: Memory or motherboard error 1 long, 2 short: Monitor or graphics card error 1 long, 3 short: Keyboard error 1 long, 9 short: BIOS ROM error ... inserted properly Continuous short beeps: Power error - 95 - A: If your motherboard has a clearing CMOS jumper, refer to the instructions on GIGABYTE's website. Refer to show the advanced options. Q: Why do I have this jumper, refer to the instructions on after the computer shuts...

Manual
Page 96
No Check if the CPU cooler is attached to the motherboard. Yes Check if the memory is verified and solved. The problem is verified and solved. Secure the CPU No cooler on the memory slot. Connect the CPU cooler power cable to the CPU securely. Select "Load ...the CPU cooler connected to solve the problem. Yes Insert the graphics card. No Correctly insert the memory into the memory socket. Select "Save & Exit Setup" to enter BIOS Setup. A (Continued...) GA-MA69GM-S2H Motherboard - 96 - Yes Isolate the short circuit. The problem is verified and solved. Press ...
No Check if the CPU cooler is attached to the motherboard. Yes Check if the memory is verified and solved. The problem is verified and solved. Secure the CPU No cooler on the memory slot. Connect the CPU cooler power cable to the CPU securely. Select "Load ...the CPU cooler connected to solve the problem. Yes Insert the graphics card. No Correctly insert the memory into the memory socket. Select "Save & Exit Setup" to enter BIOS Setup. A (Continued...) GA-MA69GM-S2H Motherboard - 96 - Yes Isolate the short circuit. The problem is verified and solved. Press ...


