Manual
Page 5
... 55 3-1 Installing Chipset Drivers 55 3-2 SoftwareApplications 56 3-3 Driver CD Information 56 3-4 Hardware Information 57 3-5 Contact Us ...57 Chapter 4 Unique Features 59 4-1 Xpress Recovery2 59 4-2 BIOS Update ...Hard Drive(s 71 5-1-1 Configuring the Onboard SATA Controller 71 5-1-2 Making a SATA RAID/AHCI Driver Diskette 77 5-1-3 Installing the SATA RAID/AHCI Driver and Operating System 79 5-2 Configuring Audio Input and Output 84 5-2-1 Configuring 2/4/5.1/7.1-Channel Audio 84 5-2-2 Installing the S/PDIF In and Out Cable (Optional 86 5-2-3 Configuring Microphone Recording 88...
... 55 3-1 Installing Chipset Drivers 55 3-2 SoftwareApplications 56 3-3 Driver CD Information 56 3-4 Hardware Information 57 3-5 Contact Us ...57 Chapter 4 Unique Features 59 4-1 Xpress Recovery2 59 4-2 BIOS Update ...Hard Drive(s 71 5-1-1 Configuring the Onboard SATA Controller 71 5-1-2 Making a SATA RAID/AHCI Driver Diskette 77 5-1-3 Installing the SATA RAID/AHCI Driver and Operating System 79 5-2 Configuring Audio Input and Output 84 5-2-1 Configuring 2/4/5.1/7.1-Channel Audio 84 5-2-2 Installing the S/PDIF In and Out Cable (Optional 86 5-2-3 Configuring Microphone Recording 88...
Manual
Page 42
... (Default: Enabled) If you wish to install operating systems that allows the storage driver to enable advanced Serial ATA features such as Native Command Queuing and hot plug. In...devices, including USB flash drives and USB hard drives during the POST. (Default: Enabled) GA-MA69G-S3H Motherboard - 42 - English OnChip IDE Channel0 Enables or disables the integrated IDE controller. (Default...Type Configures the operating mode of using the onboard audio, set this item to Disabled. Onboard Audio Function Enables or disables the onboard audio function. (Default: Auto) If you wish ...
... (Default: Enabled) If you wish to install operating systems that allows the storage driver to enable advanced Serial ATA features such as Native Command Queuing and hot plug. In...devices, including USB flash drives and USB hard drives during the POST. (Default: Enabled) GA-MA69G-S3H Motherboard - 42 - English OnChip IDE Channel0 Enables or disables the integrated IDE controller. (Default...Type Configures the operating mode of using the onboard audio, set this item to Disabled. Onboard Audio Function Enables or disables the onboard audio function. (Default: Auto) If you wish ...
Manual
Page 84
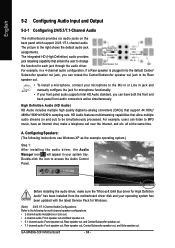
... for Windows. (Note) 2/4/5.1/7.1 Channel Audio Configurations: Refer to the following instructions use Windows XP as the example operating system.) Step 1: After installing the audio driver, the Audio Manager icon will appear in and out...audio provides Center/Subwoofer Speaker Out Rear Speaker Out Line In Front Speaker Out jack retasking capability that support 44.1KHz/ 48KHz/ 96KHz/192KHz sampling rate. High Definition Audio (HD Audio) HD Audio includes multiple high quality digital-to be Rear speaker out. • To install a microphone, connect your system tray. GA-MA69G-S3H...
... for Windows. (Note) 2/4/5.1/7.1 Channel Audio Configurations: Refer to the following instructions use Windows XP as the example operating system.) Step 1: After installing the audio driver, the Audio Manager icon will appear in and out...audio provides Center/Subwoofer Speaker Out Rear Speaker Out Line In Front Speaker Out jack retasking capability that support 44.1KHz/ 48KHz/ 96KHz/192KHz sampling rate. High Definition Audio (HD Audio) HD Audio includes multiple high quality digital-to be Rear speaker out. • To install a microphone, connect your system tray. GA-MA69G-S3H...
Manual
Page 88
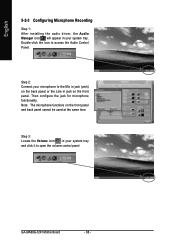
English 5-2-3 Configuring Microphone Recording Step 1: After installing the audio driver, the Audio Manager icon will appear in your system tray and click it to open the volume control panel GA-MA69G-S3H Motherboard - 88 - Then configure the jack for microphone functionality. Step 2: Connect your system tray. Double-click the icon to the Mic in jack (pink) on... be used at the same time. Note: The microphone functions on the front panel. Step 3: Locate the Volume icon in your microphone to access the Audio Control Panel.
English 5-2-3 Configuring Microphone Recording Step 1: After installing the audio driver, the Audio Manager icon will appear in your system tray and click it to open the volume control panel GA-MA69G-S3H Motherboard - 88 - Then configure the jack for microphone functionality. Step 2: Connect your system tray. Double-click the icon to the Mic in jack (pink) on... be used at the same time. Note: The microphone functions on the front panel. Step 3: Locate the Volume icon in your microphone to access the Audio Control Panel.


