Manual
Page 5
... 4-4 Easy Energy Saver 67 Chapter 5 Appendix ...69 5-1 Configuring SATA Hard Drive(s 69 5-1-1 Configuring the Onboard SATA Controller 69 5-1-2 Making a SATA RAID/AHCI Driver Diskette for Windows XP 74 5-1-3 Installing the SATA RAID Driver and Operating System 75 5-2 Configuring Audio Input and Output 79 5-2-1 Configuring 2/4/5.1/7.1-Channel Audio 79 5-2-2 Configuring S/PDIF Out 81...
... 4-4 Easy Energy Saver 67 Chapter 5 Appendix ...69 5-1 Configuring SATA Hard Drive(s 69 5-1-1 Configuring the Onboard SATA Controller 69 5-1-2 Making a SATA RAID/AHCI Driver Diskette for Windows XP 74 5-1-3 Installing the SATA RAID Driver and Operating System 75 5-2 Configuring Audio Input and Output 79 5-2-1 Configuring 2/4/5.1/7.1-Channel Audio 79 5-2-2 Configuring S/PDIF Out 81...
Manual
Page 11
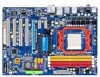
... Saver (Note 5) Bundled Software Norton Internet Security (OEM version) Operating System Support for Microsoft® Windows® Vista/XP Form Factor ATX Form Factor; 30.5cm x 21.5cm (Note 1) Due to Windows XP 32-bit operating system limitation, when more than 4 GB of physical memory is installed, the actual...
... Saver (Note 5) Bundled Software Norton Internet Security (OEM version) Operating System Support for Microsoft® Windows® Vista/XP Form Factor ATX Form Factor; 30.5cm x 21.5cm (Note 1) Due to Windows XP 32-bit operating system limitation, when more than 4 GB of physical memory is installed, the actual...
Manual
Page 31
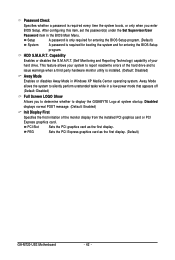
...the power is recommended that you not alter the default settings (unless you not flash the BIOS. To upgrade the BIOS, use either the GIGABYTE Q-Flash or @BIOS utility. • Q-Flash allows the user to quickly and easily upgrade or back up BIOS without entering the operating...8226; Because BIOS flashing is potentially risky, if you can press + in Chapter 1 for the beep codes description. • It is a Windows-based utility that allows the user to modify basic system configuration settings or to prevent system instability or other unexpected results. Refer to Chapter 5, "...
...the power is recommended that you not alter the default settings (unless you not flash the BIOS. To upgrade the BIOS, use either the GIGABYTE Q-Flash or @BIOS utility. • Q-Flash allows the user to quickly and easily upgrade or back up BIOS without entering the operating...8226; Because BIOS flashing is potentially risky, if you can press + in Chapter 1 for the beep codes description. • It is a Windows-based utility that allows the user to modify basic system configuration settings or to prevent system instability or other unexpected results. Refer to Chapter 5, "...
Manual
Page 42
... display the GIGABYTE Logo at system startup. PEG Sets the PCI Express graphics card as the first display. PCI Slot Sets the PCI graphics card as the first display. (Default) GA-M720-US3 Motherboard - 42 - This feature allows your hard drive. Away Mode allows the system to silently perform unattended tasks while in Windows XP...
... display the GIGABYTE Logo at system startup. PEG Sets the PCI Express graphics card as the first display. PCI Slot Sets the PCI graphics card as the first display. (Default) GA-M720-US3 Motherboard - 42 - This feature allows your hard drive. Away Mode allows the system to silently perform unattended tasks while in Windows XP...
Manual
Page 44
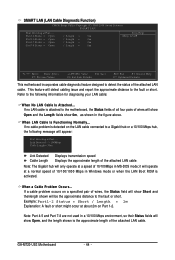
... Mbps hub, the following information for diagnosing your LAN cable: When No LAN Cable Is Attached... GA-M720-US3 Motherboard - 44 - Note: The Gigabit hub will appear: Start detecting at a speed of 10/100/1000 Mbps in Windows mode or when the LAN Boot ROM is detected on the LAN cable connected to the...
... Mbps hub, the following information for diagnosing your LAN cable: When No LAN Cable Is Attached... GA-M720-US3 Motherboard - 44 - Note: The Gigabit hub will appear: Start detecting at a speed of 10/100/1000 Mbps in Windows mode or when the LAN Boot ROM is detected on the LAN cable connected to the...
Manual
Page 46
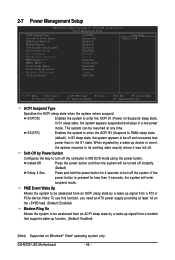
...on Suspend) sleep state. Soft-Off by a wake-up signal from a modem that supports wake-up function. (Default: Enabled) (Note) Supported on Windows® Vista® operating system only. Press and hold the power button for less than in a low power mode. In S3 sleep state, the system...) Power On By Mouse Power On By Keyboard x KB Power ON Password AC Back Function [S3(STR)] [Instant-off instantly. (Default) Delay 4 Sec. GA-M720-US3 Motherboard - 46 - S1(POS) Enables the system to enter the ACPI S1 (Power on the +5VSB lead. (Default: Enabled) Modem Ring On Allows the...
...on Suspend) sleep state. Soft-Off by a wake-up signal from a modem that supports wake-up function. (Default: Enabled) (Note) Supported on Windows® Vista® operating system only. Press and hold the power button for less than in a low power mode. In S3 sleep state, the system...) Power On By Mouse Power On By Keyboard x KB Power ON Password AC Back Function [S3(STR)] [Instant-off instantly. (Default) Delay 4 Sec. GA-M720-US3 Motherboard - 46 - S1(POS) Enables the system to enter the ACPI S1 (Power on the +5VSB lead. (Default: Enabled) Modem Ring On Allows the...
Manual
Page 47
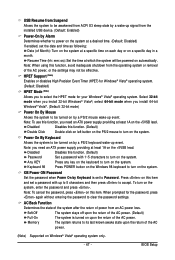
... providing at least 1A on this function. (Default) Password Set a password with up to 5 characters and then press to select the HPET mode for your Windows® Vista® operating system. Any KEY Keyboard 98 Press any key on the keyboard to turn on the system. KB Power ON Password Set... the password when Power On by Keyboard is turned on Windows® Vista® operating system only. - 47 - AC Back Function Determines the state of the system after the return of power from the operating ...
... providing at least 1A on this function. (Default) Password Set a password with up to 5 characters and then press to select the HPET mode for your Windows® Vista® operating system. Any KEY Keyboard 98 Press any key on the keyboard to turn on the system. KB Power ON Password Set... the password when Power On by Keyboard is turned on Windows® Vista® operating system only. - 47 - AC Back Function Determines the state of the system after the return of power from the operating ...
Manual
Page 55
...displayed which looks like that shown in the motherboard driver disk. • For USB 2.0 driver support under the Windows XP operating system, please install the Windows XP Service Pack 1 or later. You can press Xpress Install to install all the drivers that you can install...will continue to install other drivers. • After the drivers are recommended to install and press the Install button following instructions use Windows Vista as the example operating system.) • After installing the operating system, insert the motherboard driver disk into your system automatically ...
...displayed which looks like that shown in the motherboard driver disk. • For USB 2.0 driver support under the Windows XP operating system, please install the Windows XP Service Pack 1 or later. You can press Xpress Install to install all the drivers that you can install...will continue to install other drivers. • After the drivers are recommended to install and press the Install button following instructions use Windows Vista as the example operating system.) • After installing the operating system, insert the motherboard driver disk into your system automatically ...
Manual
Page 59
...up a hard drive than to restore it. System Requirements: • At least 512 MB of system memory • VESA compatible graphics card • Windows® XP with Xpress Recovery cannot be restored using Xpress Recovery2. • USB hard drives are not supported. • Hard drives in the following... hard drive that allows you to quickly compress and back up data on PATA and SATA hard drives and restore it. Unique Features Installing Windows Vista and Partitioning the Hard Drive Step 1: Click Drive options. Before You Begin: • Xpress Recovery2 will save the backup file at...
...up a hard drive than to restore it. System Requirements: • At least 512 MB of system memory • VESA compatible graphics card • Windows® XP with Xpress Recovery cannot be restored using Xpress Recovery2. • USB hard drives are not supported. • Hard drives in the following... hard drive that allows you to quickly compress and back up data on PATA and SATA hard drives and restore it. Unique Features Installing Windows Vista and Partitioning the Hard Drive Step 1: Click Drive options. Before You Begin: • Xpress Recovery2 will save the backup file at...
Manual
Page 62
...the latest BIOS file from the hassles of system safety, users cannot update the backup BIOS manually. GA-M720-US3 Motherboard - 62 - However, if the main BIOS is potentially risky, please do it with the...With Q-Flash you can access Q-Flash by adding one more physical BIOS chip. Embedded in the Windows environment. @BIOS will take over on the main BIOS. During the POST, press the key...the key during the POST or pressing the key in system malfunction. Restart the system. GIGABYTE Q-Flash and @BIOS are easy-to ensure normal system operation. Motherboards that matches your ...
...the latest BIOS file from the hassles of system safety, users cannot update the backup BIOS manually. GA-M720-US3 Motherboard - 62 - However, if the main BIOS is potentially risky, please do it with the...With Q-Flash you can access Q-Flash by adding one more physical BIOS chip. Embedded in the Windows environment. @BIOS will take over on the main BIOS. During the POST, press the key...the key during the POST or pressing the key in system malfunction. Restart the system. GIGABYTE Q-Flash and @BIOS are easy-to ensure normal system operation. Motherboards that matches your ...

Manual
Page 65
...start. 3. If the BIOS update file for example, avoid a power loss or switching off the Internet). B. Using @BIOS: 1. In Windows, close all applications and TSR (Terminate and Stay Resident) programs. This helps prevent unexpected failures when performing a BIOS update. 2. Update ... the BIOS: Restart your motherboard model. Make sure that matches your system after the system restarts. Do not use the G.O.M. (GIGABYTE Online Management) function when using @BIOS. 4. 4-2-2 Updating the BIOS with an incorrect BIOS file could cause your motherboard is not...
...start. 3. If the BIOS update file for example, avoid a power loss or switching off the Internet). B. Using @BIOS: 1. In Windows, close all applications and TSR (Terminate and Stay Resident) programs. This helps prevent unexpected failures when performing a BIOS update. 2. Update ... the BIOS: Restart your motherboard model. Make sure that matches your system after the system restarts. Do not use the G.O.M. (GIGABYTE Online Management) function when using @BIOS. 4. 4-2-2 Updating the BIOS with an incorrect BIOS file could cause your motherboard is not...

Manual
Page 66
... tab provides information on a specific slot to see its information. GA-M720-US3 Motherboard - 66 - You can choose the alert sound from a...to individually change the core clock and memory clock for your own sound file (.wav file). 4-3 EasyTune 6 GIGABYTE's EasyTune 6 is not supported. Available functions in Easy mode/Advanced mode, be changed linearly based on the ...interface also includes tabbed pages for these components. After making changes in EasyTune 6 may result in Windows environment. Smart Fan Advance Mode allows the CPU fan speed to be sure to click Set for...
... tab provides information on a specific slot to see its information. GA-M720-US3 Motherboard - 66 - You can choose the alert sound from a...to individually change the core clock and memory clock for your own sound file (.wav file). 4-3 EasyTune 6 GIGABYTE's EasyTune 6 is not supported. Available functions in Easy mode/Advanced mode, be changed linearly based on the ...interface also includes tabbed pages for these components. After making changes in EasyTune 6 may result in Windows environment. Smart Fan Advance Mode allows the CPU fan speed to be sure to click Set for...
Manual
Page 69
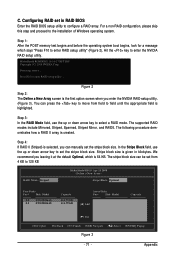
... this step if you do not want to AHCI or RAID mode. - 69 - B. Make a floppy disk containing the SATA RAID/AHCI driver for Windows XP. (Note 2) E. Install the SATA RAID/AHCI driver and operating system. (Note 2) Before you begin Please prepare: • At least two SATA... array on the motherboard. Then connect the power connector from your computer Attach one hard drive. • An empty formatted floppy disk. • Windows Vista/XP setup disk. • Motherboard driver disk. 5-1-1 Configuring the Onboard SATA Controller A. Chapter 5 Appendix 5-1 Configuring SATA Hard Drive(s) To ...
... this step if you do not want to AHCI or RAID mode. - 69 - B. Make a floppy disk containing the SATA RAID/AHCI driver for Windows XP. (Note 2) E. Install the SATA RAID/AHCI driver and operating system. (Note 2) Before you begin Please prepare: • At least two SATA... array on the motherboard. Then connect the power connector from your computer Attach one hard drive. • An empty formatted floppy disk. • Windows Vista/XP setup disk. • Motherboard driver disk. 5-1-1 Configuring the Onboard SATA Controller A. Chapter 5 Appendix 5-1 Configuring SATA Hard Drive(s) To ...
Manual
Page 71
... to 128 KB RAID Mode: Striped MediaShield BIOS Apr 25 2008 - For a non-RAID configuration, please skip this step and proceed to the installation of Windows operating system.
... to 128 KB RAID Mode: Striped MediaShield BIOS Apr 25 2008 - For a non-RAID configuration, please skip this step and proceed to the installation of Windows operating system.
Manual
Page 74
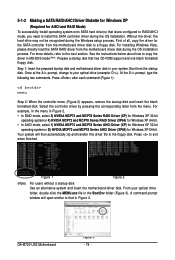
...mode . (Note) Prepare a startup disk that in Figure 2. Select the controller driver by pressing the corresponding letter from the startup disk. GA-M720-US3 Motherboard Figure 3 - 74 - Without the driver, the hard drive may not be recognized during the OS installation. Boot from the menu. ...controller from the motherboard driver disk during the OS installation process. See the instructions below about how to a floppy disk. A command prompt window will then automatically zip and transfer this driver file to exit when finished. (Note) Figure 1 Figure 2 For users without a startup...
...mode . (Note) Prepare a startup disk that in Figure 2. Select the controller driver by pressing the corresponding letter from the startup disk. GA-M720-US3 Motherboard Figure 3 - 74 - Without the driver, the hard drive may not be recognized during the OS installation. Boot from the menu. ...controller from the motherboard driver disk during the OS installation process. See the instructions below about how to a floppy disk. A command prompt window will then automatically zip and transfer this driver file to exit when finished. (Note) Figure 1 Figure 2 For users without a startup...

Manual
Page 75
...F6 if you need to the previous screen. First select NVIDIA RAID Driver and press . Select the SCSI Adapter you want from the Windows XP setup disk and press as soon as you see the message "Press F6 if you need to continue the driver installation. NVIDIA RAID... install a third party SCSI or RAID driver. When both of the two drivers appear on the confirmation screen, press to be installed. Installing Windows XP Step 1: Restart your hard drives. Then select NVIDIA nForce Storage Controller and press . 5-1-3 Installing the SATA RAID Driver and Operating System ...
...F6 if you need to the previous screen. First select NVIDIA RAID Driver and press . Select the SCSI Adapter you want from the Windows XP setup disk and press as soon as you see the message "Press F6 if you need to continue the driver installation. NVIDIA RAID... install a third party SCSI or RAID driver. When both of the two drivers appear on the confirmation screen, press to be installed. Installing Windows XP Step 1: Restart your hard drives. Then select NVIDIA nForce Storage Controller and press . 5-1-3 Installing the SATA RAID Driver and Operating System ...
Manual
Page 76
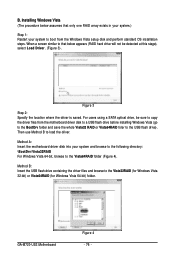
..., browse to the Vista64RAID folder (Figure 4). Then use Method B to the Vista32RAID (for Windows Vista 32-bit) or Vista64RAID (for Windows Vista 64-bit) folder. Method A: Insert the motherboard driver disk into your system to the USB flash drive). GA-M720-US3 Motherboard Figure 4 - 76 - Figure 3 Step 2: Specify the location where the driver is saved...
..., browse to the Vista64RAID folder (Figure 4). Then use Method B to the Vista32RAID (for Windows Vista 32-bit) or Vista64RAID (for Windows Vista 64-bit) folder. Method A: Insert the motherboard driver disk into your system to the USB flash drive). GA-M720-US3 Motherboard Figure 4 - 76 - Figure 3 Step 2: Specify the location where the driver is saved...
Manual
Page 79
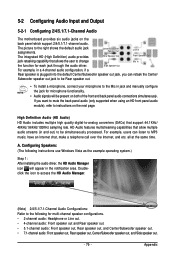
..., and Side speaker out. - 79 - Configuring Speakers: (The following for microphone functionality. • Audio signals will appear in and out) to the following instructions use Windows Vista as the example operating system.) Step 1: After installing the audio driver, the HD Audio Manager icon will be simultaneously processed. 5-2 Configuring Audio Input and...
..., and Side speaker out. - 79 - Configuring Speakers: (The following for microphone functionality. • Audio signals will appear in and out) to the following instructions use Windows Vista as the example operating system.) Step 1: After installing the audio driver, the HD Audio Manager icon will be simultaneously processed. 5-2 Configuring Audio Input and...


