Manual
Page 1
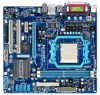
GA-M68M-S2P AM2+/AM2 socket motherboard for AMD Phenom™ II processor/ AMD Phenom™ processor/ AMD Athlon™ II processor/ AMD Athlon™ processor/ AMD Sempron™ processor User's Manual Rev. 1001 12ME-M68MS2P-1001R
GA-M68M-S2P AM2+/AM2 socket motherboard for AMD Phenom™ II processor/ AMD Phenom™ processor/ AMD Athlon™ II processor/ AMD Athlon™ processor/ AMD Sempron™ processor User's Manual Rev. 1001 12ME-M68MS2P-1001R
Manual
Page 3
... without prior notice. Copyright © 2009 GIGA-BYTE TECHNOLOGY CO., LTD. Disclaimer Information in the use GIGABYTE's unique features, read the User's Manual. For instructions on your motherboard revision before updating motherboard BIOS, drivers, or when looking for technical information. Check your motherboard looks like this manual is 1.0. For example, "REV: 1.0" means the revision of...
... without prior notice. Copyright © 2009 GIGA-BYTE TECHNOLOGY CO., LTD. Disclaimer Information in the use GIGABYTE's unique features, read the User's Manual. For instructions on your motherboard revision before updating motherboard BIOS, drivers, or when looking for technical information. Check your motherboard looks like this manual is 1.0. For example, "REV: 1.0" means the revision of...
Manual
Page 6
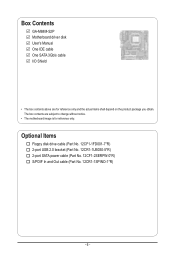
Optional Items Floppy disk drive cable (Part No. 12CF1-1FD001-7*R) 2-port USB 2.0 bracket (Part No. 12CR1-1UB030-5*R) 2-port SATA power cable (Part No. 12CF1-2SERPW-0*R) S/PDIF In and Out cable (Part No. 12CR1-1SPINO-1*R) - 6 - Box Contents GA-M68M-S2P Motherboard driver disk User's Manual One IDE cable One SATA 3Gb/s cable I/O Shield • The box contents above are subject to change without notice. • The motherboard image is for reference only and the actual items shall depend on the product package you obtain. The box contents are for reference only.
Optional Items Floppy disk drive cable (Part No. 12CF1-1FD001-7*R) 2-port USB 2.0 bracket (Part No. 12CR1-1UB030-5*R) 2-port SATA power cable (Part No. 12CF1-2SERPW-0*R) S/PDIF In and Out cable (Part No. 12CR1-1SPINO-1*R) - 6 - Box Contents GA-M68M-S2P Motherboard driver disk User's Manual One IDE cable One SATA 3Gb/s cable I/O Shield • The box contents above are subject to change without notice. • The motherboard image is for reference only and the actual items shall depend on the product package you obtain. The box contents are for reference only.
Manual
Page 9
... of your dealer. Hardware Installation Chapter 1 Hardware Installation 1-1 Installation Precautions The motherboard contains numerous delicate electronic circuits and components which can lead to damage to system components as well as a motherboard, CPU or memory. Prior to installation, carefully read the user's manual and follow these procedures: • Prior to installation, do not allow...
... of your dealer. Hardware Installation Chapter 1 Hardware Installation 1-1 Installation Precautions The motherboard contains numerous delicate electronic circuits and components which can lead to damage to system components as well as a motherboard, CPU or memory. Prior to installation, carefully read the user's manual and follow these procedures: • Prior to installation, do not allow...
Manual
Page 15
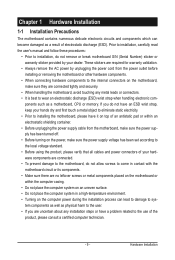
... the steps below to correctly install the CPU cooler on the CPU. (The following procedure uses the GIGABYTE cooler as the picture above shows) to lock into place. (Refer to your CPU cooler installation manual for instructions on installing the cooler.) Step 5: Finally, attach the power connector of the CPU cooler to...
... the steps below to correctly install the CPU cooler on the CPU. (The following procedure uses the GIGABYTE cooler as the picture above shows) to lock into place. (Refer to your CPU cooler installation manual for instructions on installing the cooler.) Step 5: Finally, attach the power connector of the CPU cooler to...
Manual
Page 18
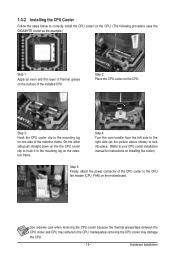
...with a screw. 5. Remove the metal slot cover from the power outlet before you begin to install an expansion card: • Make sure the motherboard supports the expansion card. Secure the card's metal bracket to the chassis back panel with the expansion card in the expansion slot. 1. Hardware Installation...; Removing the Card: Gently push back on the lever on the card until it is fully inserted into the slot. 4. Carefully read the manual that supports your expansion card. • Always turn off the computer and unplug the power cord from the chassis back panel. 2. Align the...
...with a screw. 5. Remove the metal slot cover from the power outlet before you begin to install an expansion card: • Make sure the motherboard supports the expansion card. Secure the card's metal bracket to the chassis back panel with the expansion card in the expansion slot. 1. Hardware Installation...; Removing the Card: Gently push back on the lever on the card until it is fully inserted into the slot. 4. Carefully read the manual that supports your expansion card. • Always turn off the computer and unplug the power cord from the chassis back panel. 2. Align the...
Manual
Page 28
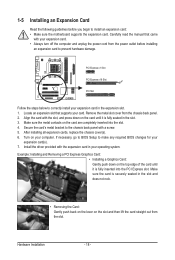
... regulations. Hardware Installation - 28 - Replace the battery. 4. Failure to do so may cause damage to the motherboard. • After system restart, go to BIOS Setup to load factory defaults (select Load Optimized Defaults) or manually configure the BIOS settings (refer to touch the two pins for a few seconds. Gently remove the battery...
... regulations. Hardware Installation - 28 - Replace the battery. 4. Failure to do so may cause damage to the motherboard. • After system restart, go to BIOS Setup to load factory defaults (select Load Optimized Defaults) or manually configure the BIOS settings (refer to touch the two pins for a few seconds. Gently remove the battery...
Manual
Page 51
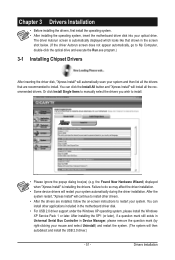
...is installing the drivers. Chapter 3 Drivers Installation • Before installing the drivers, first install the operating system. • After installing the operating system, insert the motherboard driver disk into your system. You can install other drivers. • After the drivers are recommended to My Computer, double-click the optical drive and... included in the screen shot below. (If the driver Autorun screen does not appear automatically, go to install. Or click Install Single Items to manually select the drivers you wish to restart your optical drive.
...is installing the drivers. Chapter 3 Drivers Installation • Before installing the drivers, first install the operating system. • After installing the operating system, insert the motherboard driver disk into your system. You can install other drivers. • After the drivers are recommended to My Computer, double-click the optical drive and... included in the screen shot below. (If the driver Autorun screen does not appear automatically, go to install. Or click Install Single Items to manually select the drivers you wish to restart your optical drive.

Manual
Page 52
Drivers Installation - 52 - 3-2 Application Software This page displays all the utilities and applications that GIGABYTE develops and some free software. You can click the Install button on the right of an item to install it. 3-3 Technical Manuals This page provides GIGABYTE's application guides, content descriptions for this driver disk, and the motherboard manuals.
Drivers Installation - 52 - 3-2 Application Software This page displays all the utilities and applications that GIGABYTE develops and some free software. You can click the Install button on the right of an item to install it. 3-3 Technical Manuals This page provides GIGABYTE's application guides, content descriptions for this driver disk, and the motherboard manuals.

Manual
Page 58
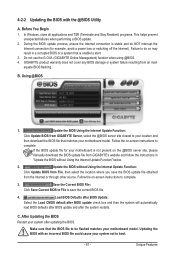
... backup BIOS will download the latest BIOS file from the hassles of going through complicated BIOS flashing process. From GIGABYTE's website, download the latest compressed BIOS update file that support DualBIOS have two BIOS onboard, a main BIOS ...A. 4-2 BIOS Update Utilities GIGABYTE motherboards provide two unique BIOS update tools, Q-Flash™ and @BIOS™. Additionally, this motherboard features the DualBIOS™ design, which enhances protection for the safety and stability of system safety, users cannot update the backup BIOS manually. M68M-S2P D5 . . . ....
... backup BIOS will download the latest BIOS file from the hassles of going through complicated BIOS flashing process. From GIGABYTE's website, download the latest compressed BIOS update file that support DualBIOS have two BIOS onboard, a main BIOS ...A. 4-2 BIOS Update Utilities GIGABYTE motherboards provide two unique BIOS update tools, Q-Flash™ and @BIOS™. Additionally, this motherboard features the DualBIOS™ design, which enhances protection for the safety and stability of system safety, users cannot update the backup BIOS manually. M68M-S2P D5 . . . ....
Manual
Page 61
... in "Update the BIOS without Using the Internet Update Function: Click Update BIOS from GIGABYTE's website and follow the instructions in a corrupted BIOS or a system that matches your motherboard is not present on the @BIOS server site, please manually download the BIOS update file from File, then select the location where you save...
... in "Update the BIOS without Using the Internet Update Function: Click Update BIOS from GIGABYTE's website and follow the instructions in a corrupted BIOS or a system that matches your motherboard is not present on the @BIOS server site, please manually download the BIOS update file from File, then select the location where you save...
Manual
Page 73
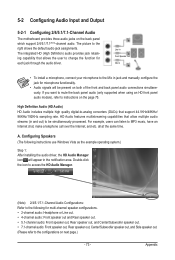
...configurations on both of the front and back panel audio connections simultaneously. 5-2 Configuring Audio Input and Output 5-2-1 Configuring 2/4/5.1/7.1-Channel Audio The motherboard provides three audio jacks on the page 75. For example, users can listen to -analog converters (DACs) that allows the user ...jack assignments. Line In Front Speaker Out Mic In • To install a microphone, connect your microphone to the Mic in jack and manually configure the jack for multi-channel speaker configurations. • 2-channel audio: Headphone or Line out. • 4-channel audio: Front ...
...configurations on both of the front and back panel audio connections simultaneously. 5-2 Configuring Audio Input and Output 5-2-1 Configuring 2/4/5.1/7.1-Channel Audio The motherboard provides three audio jacks on the page 75. For example, users can listen to -analog converters (DACs) that allows the user ...jack assignments. Line In Front Speaker Out Mic In • To install a microphone, connect your microphone to the Mic in jack and manually configure the jack for multi-channel speaker configurations. • 2-channel audio: Headphone or Line out. • 4-channel audio: Front ...
Manual
Page 84
... in your "end of life" product, you may contact us at GIGABYTE are continuing our efforts to develop products that the information contained herein was accurate in all GIGABYTE motherboards fulfill European Union regulations for RoHS (Restriction of Certain Hazardous Substances in ...Electrical and Electronic Equipment) and WEEE (Waste Electrical and Electronic Equipment) environmental directives, as well as most of the materials in your product's user's manual and ...
... in your "end of life" product, you may contact us at GIGABYTE are continuing our efforts to develop products that the information contained herein was accurate in all GIGABYTE motherboards fulfill European Union regulations for RoHS (Restriction of Certain Hazardous Substances in ...Electrical and Electronic Equipment) and WEEE (Waste Electrical and Electronic Equipment) environmental directives, as well as most of the materials in your product's user's manual and ...


