
Manual
Page 5
Chapter 3 Drivers Installation 47 3-1 Install Chipset Drivers 47 3-2 SoftwareApplications 48 3-3 Driver CD Information 48 3-4 Hardware Information 49 3-5 Contact Us ...49 Chapter 4 Appendix 51 4-1 Unique Software Utilities 51 4-1-1 EasyTune 5 Introduction 51 4-1-2 Xpress Recovery2 Introduction 52 4-1-3 Flash BIOS Method Introduction 54 4-1-4 Configuring SATA Hard Drive(s 58 4-1-5 2- / 4- / 6- / 8- Channel Audio Introduction 68 4-2 Troubleshooting 74 - 5 -
Chapter 3 Drivers Installation 47 3-1 Install Chipset Drivers 47 3-2 SoftwareApplications 48 3-3 Driver CD Information 48 3-4 Hardware Information 49 3-5 Contact Us ...49 Chapter 4 Appendix 51 4-1 Unique Software Utilities 51 4-1-1 EasyTune 5 Introduction 51 4-1-2 Xpress Recovery2 Introduction 52 4-1-3 Flash BIOS Method Introduction 54 4-1-4 Configuring SATA Hard Drive(s 58 4-1-5 2- / 4- / 6- / 8- Channel Audio Introduction 68 4-2 Troubleshooting 74 - 5 -
Manual
Page 17
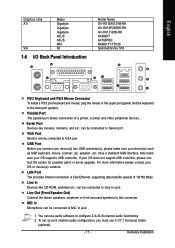
... USB controller, please contact OS vendor for possible patch or driver upgrade. Line In Devices like mouses, modems, and etc. Also make sure your OS supports USB controller. can be connected to configure 2-/4-/6-/8-channel audio functioning. 2. have a standard USB interface. LAN Port The... please make sure your device(s) such as USB keyboard, mouse, scanner, zip, speaker...etc. English Graphics Chip ATi VIA Maker Gigabyte Gigabyte Gigabyte ASUS ASUS MSI S3 1-6 I/O Back Panel Introduction Model Name GV-RX19X512VB-RH GV-RX16P256DE-RH GV-RX13128D-RH AX800XT AX700PRO RX600 ...
... USB controller, please contact OS vendor for possible patch or driver upgrade. Line In Devices like mouses, modems, and etc. Also make sure your OS supports USB controller. can be connected to configure 2-/4-/6-/8-channel audio functioning. 2. have a standard USB interface. LAN Port The... please make sure your device(s) such as USB keyboard, mouse, scanner, zip, speaker...etc. English Graphics Chip ATi VIA Maker Gigabyte Gigabyte Gigabyte ASUS ASUS MSI S3 1-6 I/O Back Panel Introduction Model Name GV-RX19X512VB-RH GV-RX16P256DE-RH GV-RX13128D-RH AX800XT AX700PRO RX600 ...

Manual
Page 23
...HD (High Definition) or AC97 front panel audio module. If you connect the front panel audio module. Definition 1 MIC 2 GND 3 MIC Power 4 NC 5 Line Out (R) 6 NC 7 NC 8 No Pin 9 Line Out (L) 10 NC By default, the audio driver is configured to work or even damage it.... To connect an AC97 front panel audio module to the instructions on Page 73 about the software settings. - 23 - For optional front panel audio module, please contact your chassis manufacturer. 10 9 ...
...HD (High Definition) or AC97 front panel audio module. If you connect the front panel audio module. Definition 1 MIC 2 GND 3 MIC Power 4 NC 5 Line Out (R) 6 NC 7 NC 8 No Pin 9 Line Out (L) 10 NC By default, the audio driver is configured to work or even damage it.... To connect an AC97 front panel audio module to the instructions on Page 73 about the software settings. - 23 - For optional front panel audio module, please contact your chassis manufacturer. 10 9 ...
Manual
Page 68
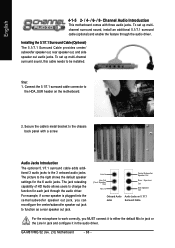
... out jack, you MUST connect it to the right shows the default speaker settings for each jack through the audio driver. Channel Audio Introduction This motherboard comes with a screw. The picture to either the default Mic In jack or the Line ...audio driver. Line In Line Out (Front Speaker Out) Mic In Center/Subwoofer Speaker Out Rear Speaker Out Side Speaker Out Onboard Audio Audio Jacks on the motherboard. 2. To set up multichannel surround sound, install an additional 5.1/7.1 surround cable (optional) and enable the feature through the audio driver. Step: 1. GA-M61VME-S2...
... out jack, you MUST connect it to the right shows the default speaker settings for each jack through the audio driver. Channel Audio Introduction This motherboard comes with a screw. The picture to either the default Mic In jack or the Line ...audio driver. Line In Line Out (Front Speaker Out) Mic In Center/Subwoofer Speaker Out Rear Speaker Out Side Speaker Out Onboard Audio Audio Jacks on the motherboard. 2. To set up multichannel surround sound, install an additional 5.1/7.1 surround cable (optional) and enable the feature through the audio driver. Step: 1. GA-M61VME-S2...
Manual
Page 69
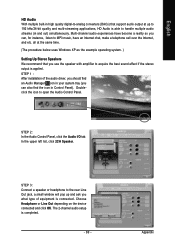
...to MP3 music, have an Internet chat, make a telephone call over the Internet, and etc. all at up and ask you what type of the audio driver, you should find the icon in Control Panel). STEP 1 : After installation of equipment is connected. STEP 3: Connect a speaker or headphone to the rear... Line Out jack, a small window will pop up to 192 kHz/24-bit quality and multi-streaming applications, HD Audio is able to handle multiple audio streams (in and out) simultaneously. Choose Headphone or Line Out depending on the device connected and click OK. Appendix English HD...
...to MP3 music, have an Internet chat, make a telephone call over the Internet, and etc. all at up and ask you what type of the audio driver, you should find the icon in Control Panel). STEP 1 : After installation of equipment is connected. STEP 3: Connect a speaker or headphone to the rear... Line Out jack, a small window will pop up to 192 kHz/24-bit quality and multi-streaming applications, HD Audio is able to handle multiple audio streams (in and out) simultaneously. Choose Headphone or Line Out depending on the device connected and click OK. Appendix English HD...
Manual
Page 70
GA-M61VME-S2 (rev. 2.0) Motherboard - 70 - Choose a device depending on the motherboard and the surround cable, a small window will pop up and ask you can also find an Audio Manager icon in Control Panel). STEP 2: In the Audio Control Panel, click the Audio I/O tab. STEP 3: Connect the 4-channel speakers to open the Audio Control Panel. In the upper...
GA-M61VME-S2 (rev. 2.0) Motherboard - 70 - Choose a device depending on the motherboard and the surround cable, a small window will pop up and ask you can also find an Audio Manager icon in Control Panel). STEP 2: In the Audio Control Panel, click the Audio I/O tab. STEP 3: Connect the 4-channel speakers to open the Audio Control Panel. In the upper...

Manual
Page 71
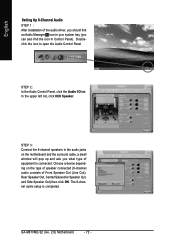
... Panel. Doubleclick the icon to the audio jacks on the type of speaker connected (6-channel audio consists of the audio driver, you should find an Audio Manager icon in your system tray (you what type of equipment is completed. - 71 - Appendix The 6-channel audio setup is connected. English Setting Up 6-Channel Audio STEP 1 : After installation of Front...
... Panel. Doubleclick the icon to the audio jacks on the type of speaker connected (6-channel audio consists of the audio driver, you should find an Audio Manager icon in your system tray (you what type of equipment is completed. - 71 - Appendix The 6-channel audio setup is connected. English Setting Up 6-Channel Audio STEP 1 : After installation of Front...
Manual
Page 72
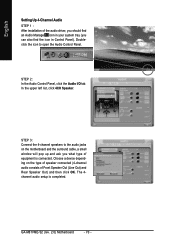
... the Audio Control Panel. GA-M61VME-S2 (rev. 2.0) Motherboard - 72 - STEP 2: In the Audio Control Panel, click the Audio I/O tab. Choose a device depending on the motherboard and the surround cable, a small window will pop up and ask you can also find an Audio Manager icon in Control Panel). English Setting Up 8-Channel Audio STEP 1 : After installation of the audio driver...
... the Audio Control Panel. GA-M61VME-S2 (rev. 2.0) Motherboard - 72 - STEP 2: In the Audio Control Panel, click the Audio I/O tab. Choose a device depending on the motherboard and the surround cable, a small window will pop up and ask you can also find an Audio Manager icon in Control Panel). English Setting Up 8-Channel Audio STEP 1 : After installation of the audio driver...


