Manual
Page 5
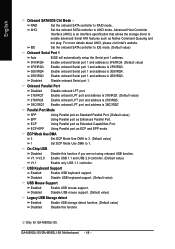
Realtek ALC888DD CODEC 104 B. nVIDIA® nForce 590SLI Southbridge 79 B. GIGABYTE SATA2 Controller 92 4-1-5 2- / 4- / 6- / 8- Channel Audio Function Introduction 104 A. Realtek ALC883 CODEC 111 4-2 Troubleshooting 116 Only for GA-M59SLI-S4. - 5 - Only for GA-M59SLI-S5. Chapter 3 Drivers Installation 61 3-1 Install Chipset Drivers 61 3-2 SoftwareApplications 62 3-3 Driver CD Information 62 3-4 Hardware Information 63 3-5 Contact Us ...63 Chapter 4 Appendix 65 4-1 Unique Software Utilities...
Realtek ALC888DD CODEC 104 B. nVIDIA® nForce 590SLI Southbridge 79 B. GIGABYTE SATA2 Controller 92 4-1-5 2- / 4- / 6- / 8- Channel Audio Function Introduction 104 A. Realtek ALC883 CODEC 111 4-2 Troubleshooting 116 Only for GA-M59SLI-S4. - 5 - Only for GA-M59SLI-S5. Chapter 3 Drivers Installation 61 3-1 Install Chipset Drivers 61 3-2 SoftwareApplications 62 3-3 Driver CD Information 62 3-4 Hardware Information 63 3-5 Contact Us ...63 Chapter 4 Appendix 65 4-1 Unique Software Utilities...
Manual
Page 22
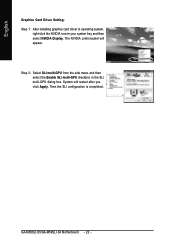
The NVIDIA control panel will restart after you click Apply. English Graphics Card Driver Setting: Step 1: After installing graphics card driver in operating system, right-click the NVIDIA icon in the SLI multi-GPU dialog box. GA-M59SLI-S5/GA-M59SLI-S4 Motherboard - 22 - Then the SLI configuration is completed. System will appear. Step 2: Select SLI multi-GPU from the side menu and then select the Enable SLI multi-GPU checkbox in your system tray and then select NVIDIA Display.
The NVIDIA control panel will restart after you click Apply. English Graphics Card Driver Setting: Step 1: After installing graphics card driver in operating system, right-click the NVIDIA icon in the SLI multi-GPU dialog box. GA-M59SLI-S5/GA-M59SLI-S4 Motherboard - 22 - Then the SLI configuration is completed. System will appear. Step 2: Select SLI multi-GPU from the side menu and then select the Enable SLI multi-GPU checkbox in your system tray and then select NVIDIA Display.

Manual
Page 23
...) Connects to Surround Speaker Out (Rear Speaker Out) jack. Also make sure your OS or device(s) vendors. Only for possible patch or driver upgrade. If your OS supports USB controller. Surround Speaker Out (Rear Speaker Out) The default Surround Speaker Out (Rear Speaker Out) jack.... port Before you connect your device(s) into USB connector(s), please make sure your OS does not support USB controller, please contact OS vendor for GA-M59SLI-S5. - 23 - For more information please contact your device(s) such as USB keyboard, mouse, scanner, zip, speaker...etc. can be connected ...
...) Connects to Surround Speaker Out (Rear Speaker Out) jack. Also make sure your OS or device(s) vendors. Only for possible patch or driver upgrade. If your OS supports USB controller. Surround Speaker Out (Rear Speaker Out) The default Surround Speaker Out (Rear Speaker Out) jack.... port Before you connect your device(s) into USB connector(s), please make sure your OS does not support USB controller, please contact OS vendor for GA-M59SLI-S5. - 23 - For more information please contact your device(s) such as USB keyboard, mouse, scanner, zip, speaker...etc. can be connected ...
Manual
Page 29
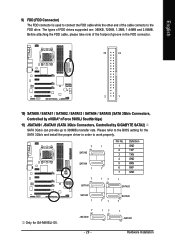
...The types of the cable connects to the FDD drive. Please refer to the BIOS setting for the SATA 3Gb/s and install the proper driver in the FDD connector. 34 33 2 1 10) SATAII0 / SATAII1 / SATAII2 / SATAII3 / SATAII4 / SATAII5 (SATA 3Gb/s Connectors,...GIGABYTE SATA2) SATA 3Gb/s can provide up to 300MB/s transfer rate. Before attaching the FDD cable, please take note of the foolproof groove in order to work properly. 7 1 SATAII5 SATAII4 1 7 Pin No. 1 2 3 4 5 6 7 Definition GND TXP TXN GND RXN RXP GND 7 17 1 SATAII1 SATAII3 SATAII0 1 71 SATAII2 7 Only for GA-M59SLI-S5...
...The types of the cable connects to the FDD drive. Please refer to the BIOS setting for the SATA 3Gb/s and install the proper driver in the FDD connector. 34 33 2 1 10) SATAII0 / SATAII1 / SATAII2 / SATAII3 / SATAII4 / SATAII5 (SATA 3Gb/s Connectors,...GIGABYTE SATA2) SATA 3Gb/s can provide up to 300MB/s transfer rate. Before attaching the FDD cable, please take note of the foolproof groove in order to work properly. 7 1 SATAII5 SATAII4 1 7 Pin No. 1 2 3 4 5 6 7 Definition GND TXP TXN GND RXN RXP GND 7 17 1 SATAII1 SATAII3 SATAII0 1 71 SATAII2 7 Only for GA-M59SLI-S5...
Manual
Page 48
...Using Parallel port as Enhanced Parallel Port. V1.1+V2.0 Enable USB 1.1 and USB 2.0 controller. (Default value) V1.1 Enable only USB 1.1 controller. GA-M59SLI-S5/GA-M59SLI-S4 Motherboard - 48 - Enable onboard LPT port and address is 378/IRQ7. (Default value) 278/IRQ5 3BC/IRQ7 Enable onboard LPT port and address is...port 1 and address is 3F8/IRQ4. (Default value) Enable onboard Serial port 1 and address is an interface specification that allows the storage driver to AHCI mode. Enable onboard Serial port 1 and address is 3E8/IRQ4. 2E8/IRQ3 Enable onboard Serial port 1 and address is 2E8/...
...Using Parallel port as Enhanced Parallel Port. V1.1+V2.0 Enable USB 1.1 and USB 2.0 controller. (Default value) V1.1 Enable only USB 1.1 controller. GA-M59SLI-S5/GA-M59SLI-S4 Motherboard - 48 - Enable onboard LPT port and address is 378/IRQ7. (Default value) 278/IRQ5 3BC/IRQ7 Enable onboard LPT port and address is...port 1 and address is 3F8/IRQ4. (Default value) Enable onboard Serial port 1 and address is an interface specification that allows the storage driver to AHCI mode. Enable onboard Serial port 1 and address is 3E8/IRQ4. 2E8/IRQ3 Enable onboard Serial port 1 and address is 2E8/...

Manual
Page 62
English 3-2 Software Applications This page displays all the tools that Gigabyte developed and some free software, you can choose anyone you want and press "install" to install them. 3-3 Driver CD Information This page lists the contents of software and drivers in this CD-title. GA-M59SLI-S5/GA-M59SLI-S4 Motherboard - 62 -
English 3-2 Software Applications This page displays all the tools that Gigabyte developed and some free software, you can choose anyone you want and press "install" to install them. 3-3 Driver CD Information This page lists the contents of software and drivers in this CD-title. GA-M59SLI-S5/GA-M59SLI-S4 Motherboard - 62 -
Manual
Page 66
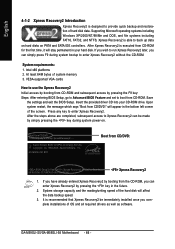
...restart, the message which says "Boot from CD-ROM. If you complete installations of OS and all required drivers as well as software. It is recommended that Xpress Recovery2 be made by pressing the F9 key: Steps...System storage capacity and the reading/writing speed of the screen. Insert the provided driver CD into your hard disk. Press any key to enter Xpress Recovery2 without the CD-ROM. GA-M59SLI-S5 E18 . . . . :BIOS Setup/Q-Flash, : Xpress Recovery2, For Boot.../DVD: Press any key to back up data on hard disks on . . . GA-M59SLI-S5/GA-M59SLI-S4 Motherboard - 66 -
...restart, the message which says "Boot from CD-ROM. If you complete installations of OS and all required drivers as well as software. It is recommended that Xpress Recovery2 be made by pressing the F9 key: Steps...System storage capacity and the reading/writing speed of the screen. Insert the provided driver CD into your hard disk. Press any key to enter Xpress Recovery2 without the CD-ROM. GA-M59SLI-S5 E18 . . . . :BIOS Setup/Q-Flash, : Xpress Recovery2, For Boot.../DVD: Press any key to back up data on hard disks on . . . GA-M59SLI-S5/GA-M59SLI-S4 Motherboard - 66 -
Manual
Page 84
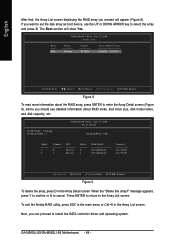
...(Figure 9), where you want to set the disk array as boot device, use the UP or DOWN ARROW key to install the SATA controller driver and operating system. The Boot section will appear (Figure 8). RAID Mode: Striping Striping Width : 2 MediaShield Utility Mar 22 2006 - Status ... Exit [ ] Select [B] Set Boot [N] New Array [ENTER] Detail Figure 8 To read more information about the RAID array, press ENTER to cancel. GA-M59SLI-S5/GA-M59SLI-S4 Motherboard - 84 - Boot BBS MediaShield Utility Mar 22 2006 - To exit the Nvidia RAID utility, press ESC in the main menu or Ctrl+X in ...
...(Figure 9), where you want to set the disk array as boot device, use the UP or DOWN ARROW key to install the SATA controller driver and operating system. The Boot section will appear (Figure 8). RAID Mode: Striping Striping Width : 2 MediaShield Utility Mar 22 2006 - Status ... Exit [ ] Select [B] Set Boot [N] New Array [ENTER] Detail Figure 8 To read more information about the RAID array, press ENTER to cancel. GA-M59SLI-S5/GA-M59SLI-S4 Motherboard - 84 - Boot BBS MediaShield Utility Mar 22 2006 - To exit the Nvidia RAID utility, press ESC in the main menu or Ctrl+X in ...
Manual
Page 86
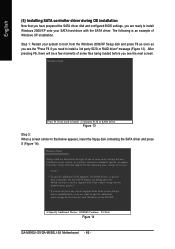
... will be a few moments of Windows XP installation. English (5) Installing SATA controller driver during OS installation Now that below appears, insert the floppy disk containing the SATA driver and press S (Figure 14). S=Specify Additional Device ENTER=Continue F3=Exit Figure 14 GA-M59SLI-S5/GA-M59SLI-S4 Motherboard - 86 - The following mass storage devices(s) * To specify additional SCSI...
... will be a few moments of Windows XP installation. English (5) Installing SATA controller driver during OS installation Now that below appears, insert the floppy disk containing the SATA driver and press S (Figure 14). S=Specify Additional Device ENTER=Continue F3=Exit Figure 14 GA-M59SLI-S5/GA-M59SLI-S4 Motherboard - 86 - The following mass storage devices(s) * To specify additional SCSI...
Manual
Page 88
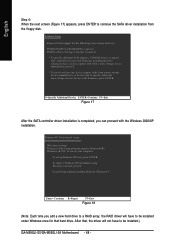
...a mass storage device manufacturer, press S. * If you add a new hard drive to a RAID array, the RAID driver will have any device support disks from the floppy disk. WindowsXP Professional Setup Welcome to run on your computer. Enter= ...Continue R=Repair F3=Exit Figure 18 (Note: Each time you do not have to continue the SATA driver installation from a mass storage device manufacturer, or do not want to be installed under Windows once for use...English Step 4: When the next screen (Figure 17) appears, press ENTER to be installed.) GA-M59SLI-S5/GA-M59SLI-S4 Motherboard - 88 -
...a mass storage device manufacturer, press S. * If you add a new hard drive to a RAID array, the RAID driver will have any device support disks from the floppy disk. WindowsXP Professional Setup Welcome to run on your computer. Enter= ...Continue R=Repair F3=Exit Figure 18 (Note: Each time you do not have to continue the SATA driver installation from a mass storage device manufacturer, or do not want to be installed under Windows once for use...English Step 4: When the next screen (Figure 17) appears, press ENTER to be installed.) GA-M59SLI-S5/GA-M59SLI-S4 Motherboard - 88 -
Manual
Page 100
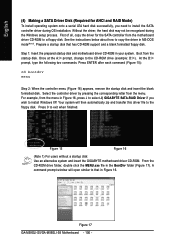
...: Use an alternative system and insert the GIGABYTE motherboard driver CD-ROM. A command prompt window will then automatically zip and transfer this driver file to that has CD-ROM support and a blank formatted floppy disk. Without the driver, the hard disk may not be recognized during... your system. Figure 17 GA-M59SLI-S5/GA-M59SLI-S4 Motherboard - 100 - English (4) Making a SATA Driver Disk (Required for the SATA controller from the motherboard driver CD-ROM to install the SATA controller driver during the Windows setup process. First of all, copy the driver for AHCI and RAID Mode...
...: Use an alternative system and insert the GIGABYTE motherboard driver CD-ROM. A command prompt window will then automatically zip and transfer this driver file to that has CD-ROM support and a blank formatted floppy disk. Without the driver, the hard disk may not be recognized during... your system. Figure 17 GA-M59SLI-S5/GA-M59SLI-S4 Motherboard - 100 - English (4) Making a SATA Driver Disk (Required for the SATA controller from the motherboard driver CD-ROM to install the SATA controller driver during the Windows setup process. First of all, copy the driver for AHCI and RAID Mode...

Manual
Page 102
... continue the SATA driver installation from the motherboard driver CD. GA-M59SLI-S5/GA-M59SLI-S4 Motherboard - 102 - Use the ARROW keys to specify additional mass storage devices for use with Windows, using a device support disk provided by an adapter manufacturer. S=Specify Additional Device ENTER=Continue F3=Exit Figure 21 "*" If you want to select GIGABYTE GBB363 RAID Controller...
... continue the SATA driver installation from the motherboard driver CD. GA-M59SLI-S5/GA-M59SLI-S4 Motherboard - 102 - Use the ARROW keys to specify additional mass storage devices for use with Windows, using a device support disk provided by an adapter manufacturer. S=Specify Additional Device ENTER=Continue F3=Exit Figure 21 "*" If you want to select GIGABYTE GBB363 RAID Controller...
Manual
Page 104
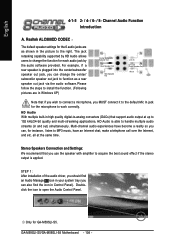
...-analog converters (DACs) that support audio output at the same time. English 4-1-5 2- / 4- / 6- / 8- STEP 1 : After installation of the audio driver, you should find the icon in high quality digital-to MP3 music, have an Internet chat, make a telephone call over the Internet, and etc. Channel... allows users to change the center/ subwoofer speaker out jack to fucntion as shown in the picture to the right. Only for GA-M59SLI-S5. GA-M59SLI-S5/GA-M59SLI-S4 Motherboard - 104 - all at up to 192 kHz/24-bit quality and multi-streaming applications, HD Audio is applied. Stereo ...
...-analog converters (DACs) that support audio output at the same time. English 4-1-5 2- / 4- / 6- / 8- STEP 1 : After installation of the audio driver, you should find the icon in high quality digital-to MP3 music, have an Internet chat, make a telephone call over the Internet, and etc. Channel... allows users to change the center/ subwoofer speaker out jack to fucntion as shown in the picture to the right. Only for GA-M59SLI-S5. GA-M59SLI-S5/GA-M59SLI-S4 Motherboard - 104 - all at up to 192 kHz/24-bit quality and multi-streaming applications, HD Audio is applied. Stereo ...
Manual
Page 106
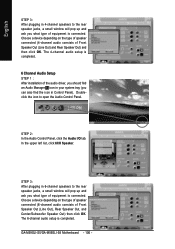
.../Subwoofer Speaker Out) then click OK. The 6-channel audio setup is completed. 6 Channel Audio Setup STEP 1 : After installation of the audio driver, you should find an Audio Manager icon in your system tray (you can also find the icon in Control Panel). The 4-channel audio setup ...speaker jacks, a small window will pop up and ask you what type of equipment is connected. Doubleclick the icon to open the Audio Control Panel. GA-M59SLI-S5/GA-M59SLI-S4 Motherboard - 106 - STEP 2: In the Audio Control Panel, click the Audio I/O tab. In the upper left list, click 6CH Speaker. English ...
.../Subwoofer Speaker Out) then click OK. The 6-channel audio setup is completed. 6 Channel Audio Setup STEP 1 : After installation of the audio driver, you should find an Audio Manager icon in your system tray (you can also find the icon in Control Panel). The 4-channel audio setup ...speaker jacks, a small window will pop up and ask you what type of equipment is connected. Doubleclick the icon to open the Audio Control Panel. GA-M59SLI-S5/GA-M59SLI-S4 Motherboard - 106 - STEP 2: In the Audio Control Panel, click the Audio I/O tab. In the upper left list, click 6CH Speaker. English ...
Manual
Page 112
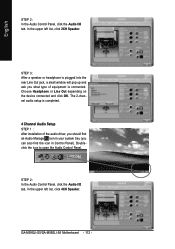
In the upper left list, click 2CH Speaker. GA-M59SLI-S5/GA-M59SLI-S4 Motherboard - 112 - Doubleclick the icon to open the Audio Control Panel. The 2-channel audio setup is completed. 4 Channel Audio Setup STEP 1 : After installation of the audio driver, you should find the icon in your system tray (you what type of equipment is plugged into...
In the upper left list, click 2CH Speaker. GA-M59SLI-S5/GA-M59SLI-S4 Motherboard - 112 - Doubleclick the icon to open the Audio Control Panel. The 2-channel audio setup is completed. 4 Channel Audio Setup STEP 1 : After installation of the audio driver, you should find the icon in your system tray (you what type of equipment is plugged into...
Manual
Page 114
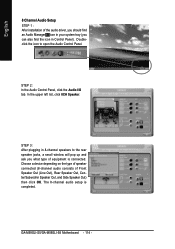
... audio setup is connected. Doubleclick the icon to the rear speaker jacks, a small window will pop up and ask you what type of the audio driver, you should find an Audio Manager icon in your system tray (you can also find the icon in Control Panel). STEP 3: After plugging in 8-channel... Out), Rear Speaker Out, Center/Subwoofer Speaker Out, and Side Speaker Out) then click OK. STEP 2: In the Audio Control Panel, click the Audio I/O tab. GA-M59SLI-S5/GA-M59SLI-S4 Motherboard - 114 -
... audio setup is connected. Doubleclick the icon to the rear speaker jacks, a small window will pop up and ask you what type of the audio driver, you should find an Audio Manager icon in your system tray (you can also find the icon in Control Panel). STEP 3: After plugging in 8-channel... Out), Rear Speaker Out, Center/Subwoofer Speaker Out, and Side Speaker Out) then click OK. STEP 2: In the Audio Control Panel, click the Audio I/O tab. GA-M59SLI-S5/GA-M59SLI-S4 Motherboard - 114 -


