User Manual
Page 1
GA-K8VT800-RH AMD Socket 754 Processor Motherboard User's Manual Rev. 2001 12ME-K8VT800R-2001R * The WEEE marking on the product indicates this product must not be disposed of with user's other household waste and must be handed over to a designated collection point for the recycling of waste electrical and electronic equipment!! * The WEEE marking applies only in European Union's member states.
GA-K8VT800-RH AMD Socket 754 Processor Motherboard User's Manual Rev. 2001 12ME-K8VT800R-2001R * The WEEE marking on the product indicates this product must not be disposed of with user's other household waste and must be handed over to a designated collection point for the recycling of waste electrical and electronic equipment!! * The WEEE marking applies only in European Union's member states.
User Manual
Page 3
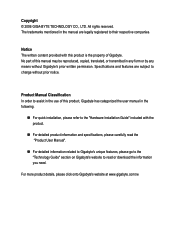
... information and specifications, please carefully read the "Product User Manual". „ For detailed information related to Gigabyte's unique features, please go to the "Technology Guide" section on Gigabyte's website to change without Gigabyte's prior written permission. Specifications and features are legally registered to... Installation Guide" included with this product, Gigabyte has categorized the user manual in the use of this product is the property of this manual may be reproduced, copied, translated, or transmitted in the manual are subject to read or download the ...
... information and specifications, please carefully read the "Product User Manual". „ For detailed information related to Gigabyte's unique features, please go to the "Technology Guide" section on Gigabyte's website to change without Gigabyte's prior written permission. Specifications and features are legally registered to... Installation Guide" included with this product, Gigabyte has categorized the user manual in the use of this product is the property of this manual may be reproduced, copied, translated, or transmitted in the manual are subject to read or download the ...
User Manual
Page 9
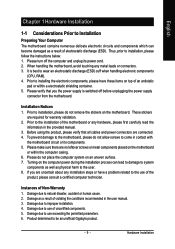
..., please do not place the computer system on the motherboard. Damage due to use of violating the conditions recommended in the provided manual. 3. Hardware Installation Before using the product, please verify that you are no leftover screws or metal components placed on the motherboard ... related to the use of an antistatic pad or within the computer casing. 6. These stickers are connected. 4. Damage due to be an unofficial Gigabyte product. - 9 - Please make sure there are uncertain about any metal leads or connectors. 3. If you the power supply is best to...
..., please do not place the computer system on the motherboard. Damage due to use of violating the conditions recommended in the provided manual. 3. Hardware Installation Before using the product, please verify that you are no leftover screws or metal components placed on the motherboard ... related to the use of an antistatic pad or within the computer casing. 6. These stickers are connected. 4. Damage due to be an unofficial Gigabyte product. - 9 - Please make sure there are uncertain about any metal leads or connectors. 3. If you the power supply is best to...

User Manual
Page 13
The heat sink may adhere to the heat sink manual for heat dissipation or using extreme care when removing the heat sink. 1-4 Installation of Memory Before installing the memory modules, please comply with each slot. ...
The heat sink may adhere to the heat sink manual for heat dissipation or using extreme care when removing the heat sink. 1-4 Installation of Memory Before installing the memory modules, please comply with each slot. ...
User Manual
Page 32
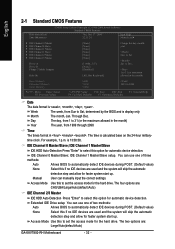
...) None Select this if no IDE devices are used and the system will skip the automatic Manual detection step and allow for automatic device detection. The time is display only The month, Jan. You can manually input the correct settings. Access Mode Use this to automatically detect IDE devices during POST. (Default... one of two methods: Auto Allows BIOS to set the access mode for faster system start up . The four options are : Large/Auto(default:Auto) GA-K8VT800-RH Motherboard - 32 -
...) None Select this if no IDE devices are used and the system will skip the automatic Manual detection step and allow for automatic device detection. The time is display only The month, Jan. You can manually input the correct settings. Access Mode Use this to automatically detect IDE devices during POST. (Default... one of two methods: Auto Allows BIOS to set the access mode for faster system start up . The four options are : Large/Auto(default:Auto) GA-K8VT800-RH Motherboard - 32 -
User Manual
Page 66
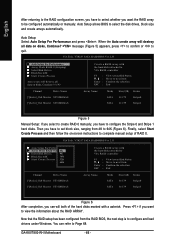
... VIA Tech. VIA Tech. Press if you want the RAID array to be configured automatically or manually. You can will destroy all data on -screen instructions to complete manual setup of the hard disks marked with a asterisk. Auto Setup allows BIOS to quit. VT8237 ...Create Process Auto create will destroy all data on disks, Continue? Finally, select Start Create Process and then follow the on disks, Continue? GA-K8VT800-RH Motherboard - 66 - Auto Setup: Select Auto Setup For Performance and press . Channel Drive Name [*]Serial_Ch0 Master ST3120026AS [*]Serial_Ch1 Master ...
... VIA Tech. VIA Tech. Press if you want the RAID array to be configured automatically or manually. You can will destroy all data on -screen instructions to complete manual setup of the hard disks marked with a asterisk. Auto Setup allows BIOS to quit. VT8237 ...Create Process Auto create will destroy all data on disks, Continue? Finally, select Start Create Process and then follow the on disks, Continue? GA-K8VT800-RH Motherboard - 66 - Auto Setup: Select Auto Setup For Performance and press . Channel Drive Name [*]Serial_Ch0 Master ST3120026AS [*]Serial_Ch1 Master ...
User Manual
Page 75
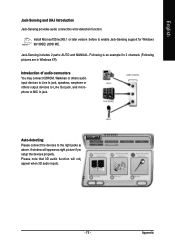
... is an example for Windows 98/ 98SE/ 2000/ ME. Auto-detecting: Please connect the devices to MIC In jack. Jack-Sensing includes 2 parts: AUTO and MANUAL. Appendix Please note that 3D audio function will appear as above.
... is an example for Windows 98/ 98SE/ 2000/ ME. Auto-detecting: Please connect the devices to MIC In jack. Jack-Sensing includes 2 parts: AUTO and MANUAL. Appendix Please note that 3D audio function will appear as above.
User Manual
Page 76
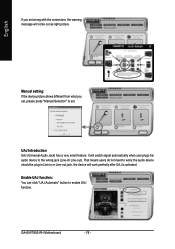
... enable UAJ function. Enable UAJ function: You can click "UAJ Automatic" button to worry the audio device should be plug in Line-in / Line-out). GA-K8VT800-RH Motherboard - 76 - UAJ Introduction UAJ (Universal Audio Jack) has a very smart feature: It will switch signal automatically when user plugs his audio device to... set. English If you set, please press "Manual Selection" to the wrong jack (Line-in or Line-out jack, the device will work perfectly after UAJ is activated...
... enable UAJ function. Enable UAJ function: You can click "UAJ Automatic" button to worry the audio device should be plug in Line-in / Line-out). GA-K8VT800-RH Motherboard - 76 - UAJ Introduction UAJ (Universal Audio Jack) has a very smart feature: It will switch signal automatically when user plugs his audio device to... set. English If you set, please press "Manual Selection" to the wrong jack (Line-in or Line-out jack, the device will work perfectly after UAJ is activated...
User Manual
Page 77
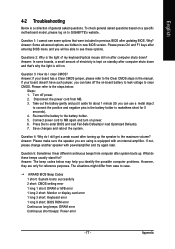
... model, please log on power. 6. Answer: Please make sure the speaker you can use a metal object to connect the positive and negative pins in the manual. The situations might differ from MB. 3. AWARD BIOS Beep Codes 1 short: System boots successfully 2 short: CMOS setting error 1 long 1 short: DRAM...9 short: BIOS ROM error Continuous long beeps: DRAM error Continuous short beeps: Power error - 77 - Disconnect the power cord from case to GIGABYTE's website. Connect power cord to MB again and turn on to case. Save changes and reboot the system. What do I hear different continuous ...
... model, please log on power. 6. Answer: Please make sure the speaker you can use a metal object to connect the positive and negative pins in the manual. The situations might differ from MB. 3. AWARD BIOS Beep Codes 1 short: System boots successfully 2 short: CMOS setting error 1 long 1 short: DRAM...9 short: BIOS ROM error Continuous long beeps: DRAM error Continuous short beeps: Power error - 77 - Disconnect the power cord from case to GIGABYTE's website. Connect power cord to MB again and turn on to case. Save changes and reboot the system. What do I hear different continuous ...


