User Manual
Page 71
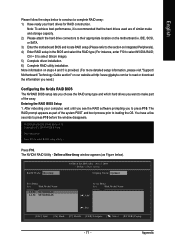
...is provided. (For more detailed setup information, please visit "Support\ Motherboard\ Technology Guide section" on our website at http:\\www.gigabyte.com.tw to read or download the information you need.) Configuring the Nvidia RAID BIOS The NVRAID BIOS setup lets you choose ... Appendix Striping Block: Optimal Free Disks Loc Disk Model Name 2.0.M ST3120026AS 2.1.M ST3120026AS Array Disks Loc Disk Model Name [ ] Add [ ] Del [ESC] Quit [F6] Back [F7] Finish [TAB] Navigate [ ] Select [ENTER] Popup - 71 - Press F10 to select NVIDIA RAID; English Please follow the steps below ). ...
...is provided. (For more detailed setup information, please visit "Support\ Motherboard\ Technology Guide section" on our website at http:\\www.gigabyte.com.tw to read or download the information you need.) Configuring the Nvidia RAID BIOS The NVRAID BIOS setup lets you choose ... Appendix Striping Block: Optimal Free Disks Loc Disk Model Name 2.0.M ST3120026AS 2.1.M ST3120026AS Array Disks Loc Disk Model Name [ ] Add [ ] Del [ESC] Quit [F6] Back [F7] Finish [TAB] Navigate [ ] Select [ENTER] Popup - 71 - Press F10 to select NVIDIA RAID; English Please follow the steps below ). ...
User Manual
Page 72
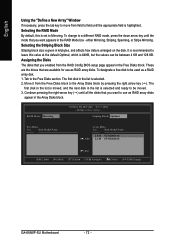
..., 1. Striping Block: Optimal Free Disks Loc Disk Model Name Array Disks Loc Disk Model Name [ ] Add 2.0.M ST3120026AS 2.1.M ST3120026AS [ ] Del [ESC] Quit [F6] Back [F7] Finish [TAB] Navigate [ ] Select [ENTER] Popup GA-K8NXP-SLI Motherboard - 72 - Tab to be moved. 3. The first disk in the list is moved, and the next disk in the Array...
..., 1. Striping Block: Optimal Free Disks Loc Disk Model Name Array Disks Loc Disk Model Name [ ] Add 2.0.M ST3120026AS 2.1.M ST3120026AS [ ] Del [ESC] Quit [F6] Back [F7] Finish [TAB] Navigate [ ] Select [ENTER] Popup GA-K8NXP-SLI Motherboard - 72 - Tab to be moved. 3. The first disk in the list is moved, and the next disk in the Array...

User Manual
Page 73
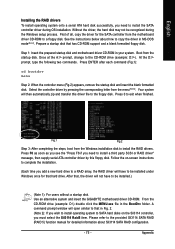
...: Optimal Free Disks Loc Disk Model Name Clear disk daAtrar?ay Disks Loc Disk Model Name [Y[] Y]EASdd [N] N11..O01..MM ST3120026AS ST3120026AS [ ] Del [ESC] Quit [F6] Back [F7] Finish [TAB] Navigate [ ] Select [ENTER] Popup Press Y if you want to specify the array as bootable. The Clear disk data prompt appears. Use...
...: Optimal Free Disks Loc Disk Model Name Clear disk daAtrar?ay Disks Loc Disk Model Name [Y[] Y]EASdd [N] N11..O01..MM ST3120026AS ST3120026AS [ ] Del [ESC] Quit [F6] Back [F7] Finish [TAB] Navigate [ ] Select [ENTER] Popup Press Y if you want to specify the array as bootable. The Clear disk data prompt appears. Use...
User Manual
Page 75
...CD-ROM drive (example: D:\) double click the MENU.exe file in your system. Prepare a startup disk that hard drive. Press F6 as soon as you see the "Press F6 if you add a new hard drive to the floppy disk. Press ENTER after each command (Fig.1): cd bootdrv menu Step 2: ...a floppy disk. Step 1: Insert the prepared startup disk and motherboard driver CD-ROM in the BootDrv folder. Use an alternative system and insert the GIGABYTE motherboard driver CD-ROM. Your system will have to install the RAID drivers. Once at the A:\> prompt, change to exit when finished. Follow the...
...CD-ROM drive (example: D:\) double click the MENU.exe file in your system. Prepare a startup disk that hard drive. Press F6 as soon as you see the "Press F6 if you add a new hard drive to the floppy disk. Press ENTER after each command (Fig.1): cd bootdrv menu Step 2: ...a floppy disk. Step 1: Insert the prepared startup disk and motherboard driver CD-ROM in the BootDrv folder. Use an alternative system and insert the GIGABYTE motherboard driver CD-ROM. Your system will have to install the RAID drivers. Once at the A:\> prompt, change to exit when finished. Follow the...