User Manual
Page 29
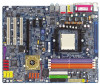
... Status Page Setup Menu / Option Page Setup Menu Press to quickly and easily update or backup BIOS without entering the operating system. @BIOS is turned on, pushing the button during the BIOS POST (Power-On Self Test) will take you save changes into CMOS Status Page...to upgrade to activate certain system features. BIOS Setup English Chapter 2 BIOS Setup BIOS (Basic Input and Output System) includes a CMOS SETUP utility which allows user to configure required settings or to a new BIOS, either Gigabyte's Q-Flash or @BIOS utility can enter the BIOS setup screen by pressing "Ctrl + F1"....
... Status Page Setup Menu / Option Page Setup Menu Press to quickly and easily update or backup BIOS without entering the operating system. @BIOS is turned on, pushing the button during the BIOS POST (Power-On Self Test) will take you save changes into CMOS Status Page...to upgrade to activate certain system features. BIOS Setup English Chapter 2 BIOS Setup BIOS (Basic Input and Output System) includes a CMOS SETUP utility which allows user to configure required settings or to a new BIOS, either Gigabyte's Q-Flash or @BIOS utility can enter the BIOS setup screen by pressing "Ctrl + F1"....
User Manual
Page 55
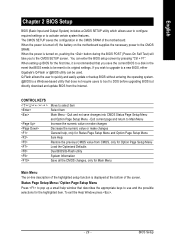
... to Backup Load Default Settings Save Settings to CMOS Q-Flash Utility Update Main BIOS from Floppy Update Backup BIOS from Floppy Save Main BIOS to Floppy Save Backup BIOS to use Dual BIOS and Q-Flash Utility? Appendix If the Main BIOS is corrupted or damaged, the Backup BIOS can take over while the system is powered on the Main...
... to Backup Load Default Settings Save Settings to CMOS Q-Flash Utility Update Main BIOS from Floppy Update Backup BIOS from Floppy Save Main BIOS to Floppy Save Backup BIOS to use Dual BIOS and Q-Flash Utility? Appendix If the Main BIOS is corrupted or damaged, the Backup BIOS can take over while the system is powered on the Main...
User Manual
Page 56
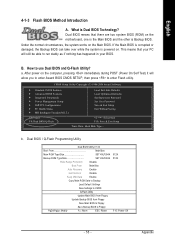
...automatically and can set to the Backup BIOS. SCSI Cards, LAN Cards,..) emits signals torequest restart of the main BIOS or the Backup BIOS fails, this item will be changed by user.) Load Default Settings Load dual BIOS default value. Update ESCD failure, checksum error or reset...error and Halt On Error set to CMOS Save revised setting. GA-K8NXP-9 Motherboard - 56 - If Auto Recovery :Disable, it will show If Auto Recovery :Enable, it , the boot up BIOS will boot from Backup BIOS automatically. Dual BIOS Item explanation: Wide Range Protection: Disable(Default), Enable Status ...
...automatically and can set to the Backup BIOS. SCSI Cards, LAN Cards,..) emits signals torequest restart of the main BIOS or the Backup BIOS fails, this item will be changed by user.) Load Default Settings Load dual BIOS default value. Update ESCD failure, checksum error or reset...error and Halt On Error set to CMOS Save revised setting. GA-K8NXP-9 Motherboard - 56 - If Auto Recovery :Disable, it will show If Auto Recovery :Enable, it , the boot up BIOS will boot from Backup BIOS automatically. Dual BIOS Item explanation: Wide Range Protection: Disable(Default), Enable Status ...
User Manual
Page 57
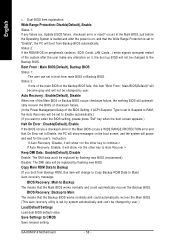
... instructions and operating system since it with any utility in the BIOS menu. Please note that Gigabyte Technology Co., Ltd is in DOS or Windows. The BIOS upgrading guides below first. 1. Some of updating BIOS to avoid any claims from Fa3 to Part One. Using Q-... Reboot your motherboard has dual-BIOS, please refer to Fba. Intel i875P AGPset BIOS for your motherboard has single-BIOS, please refer to guide you start updating BIOS with Q-FlashTM Utility on Dual BIOS Motherboards. Appendix In the following sections, we take GA-8KNXP Ultra as the example ...
... instructions and operating system since it with any utility in the BIOS menu. Please note that Gigabyte Technology Co., Ltd is in DOS or Windows. The BIOS upgrading guides below first. 1. Some of updating BIOS to avoid any claims from Fa3 to Part One. Using Q-... Reboot your motherboard has dual-BIOS, please refer to Fba. Intel i875P AGPset BIOS for your motherboard has single-BIOS, please refer to guide you start updating BIOS with Q-FlashTM Utility on Dual BIOS Motherboards. Appendix In the following sections, we take GA-8KNXP Ultra as the example ...

User Manual
Page 59
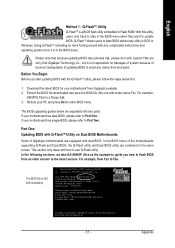
If you how to update BIOS using the Q-Flash utility. Press arrow buttons on your keyboard to move the light bar to "Load Main BIOS from Floppy Save Main BIOS to Floppy Save Backup BIOS to Floppy Enter : Run :Move ESC:Reset F10:Power Off Do not trun off power ... to CMOS Q-Flash Utility Load Main BIOS from Floppy Load Backup BIOS from Floppy" item in the Q-Flash menu and press Enter button. Steps: 1. After BIOS file is listed. Please confirm again you sure to update BIOS?" - 59 - Dual BIOS Utility Boot From Main Bios Main ROM Type/Size SST 49LF003A Backup...
If you how to update BIOS using the Q-Flash utility. Press arrow buttons on your keyboard to move the light bar to "Load Main BIOS from Floppy Save Main BIOS to Floppy Save Backup BIOS to Floppy Enter : Run :Move ESC:Reset F10:Power Off Do not trun off power ... to CMOS Q-Flash Utility Load Main BIOS from Floppy Load Backup BIOS from Floppy" item in the Q-Flash menu and press Enter button. Steps: 1. After BIOS file is listed. Please confirm again you sure to update BIOS?" - 59 - Dual BIOS Utility Boot From Main Bios Main ROM Type/Size SST 49LF003A Backup...

User Manual
Page 60
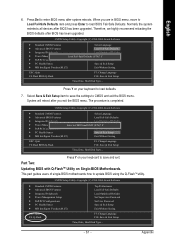
...DEL to the Q-Flash menu when the BIOS updating procedure is completed. Press any keys to return to enter SETUP / Dual BIOS / Q-Flash / F9 For Xpress Recovery 09/23/2003-i875P-6A79BG03C-00 GA-K8NXP-9 Motherboard - 60 - Dual BIOS Utility Boot From Main Bios Main ROM Type/Size SST 49LF003A Backup... ROM Type/Size SST 49LF003A 512K 512K Wide Range Protection Disable Boot From Main Bios !A! Dual BIOS Utility Boot From Main Bios Main ROM Type/Size ...
...DEL to the Q-Flash menu when the BIOS updating procedure is completed. Press any keys to return to enter SETUP / Dual BIOS / Q-Flash / F9 For Xpress Recovery 09/23/2003-i875P-6A79BG03C-00 GA-K8NXP-9 Motherboard - 60 - Dual BIOS Utility Boot From Main Bios Main ROM Type/Size SST 49LF003A Backup... ROM Type/Size SST 49LF003A 512K 512K Wide Range Protection Disable Boot From Main Bios !A! Dual BIOS Utility Boot From Main Bios Main ROM Type/Size ...
User Manual
Page 61
...-2004 Award Software Standard CMOS Features Select Language Advanced BIOS Features Load Fail-Safe Defaults Integrated Peripherals Load Optimized Defaults Power Management Setup Save to update BIOS using the Q-FlashTM utility. Therefore, we highly recommend reloading the BIOS defaults after BIOS has been upgraded. Part Two: Updating BIOS with Q-FlashTM Utility on your keyboard to save the...
...-2004 Award Software Standard CMOS Features Select Language Advanced BIOS Features Load Fail-Safe Defaults Integrated Peripherals Load Optimized Defaults Power Management Setup Save to update BIOS using the Q-FlashTM utility. Therefore, we highly recommend reloading the BIOS defaults after BIOS has been upgraded. Part Two: Updating BIOS with Q-FlashTM Utility on your keyboard to save the...

User Manual
Page 62
... or reset your keyboard to move the light bar to perform these actions. Pressing the buttons mentioned on your keyboards to "Update BIOS from Floppy Save BIOS to operate the Q-Flash utility. In this stage!! Action bar: Contains the names of four actions needed to Floppy :Move...have entered the Q-Flash utility, please follow the steps below to update BIOS using the Q-Flash utility. Later, you will see a confirmation dialog box asking you "Are you must prepare a floppy disk having the BIOS file for your computer. GA-K8NXP-9 Motherboard - 62 - Q-Flash Utility V1.30 Flash Type/...
... or reset your keyboard to move the light bar to perform these actions. Pressing the buttons mentioned on your keyboards to "Update BIOS from Floppy Save BIOS to operate the Q-Flash utility. In this stage!! Action bar: Contains the names of four actions needed to Floppy :Move...have entered the Q-Flash utility, please follow the steps below to update BIOS using the Q-Flash utility. Later, you will see a confirmation dialog box asking you "Are you must prepare a floppy disk having the BIOS file for your computer. GA-K8NXP-9 Motherboard - 62 - Q-Flash Utility V1.30 Flash Type/...

User Manual
Page 63
...SyCs:tRemeset F10:Power Off Do not trun off power or reset your keyboard after you exit Q-Flash. Press Del to update BIOS. Appendix The progress of updating BIOS will begin to Floppy Please:Mporevses any keys to return to exit the Q-Flash utility. Q-Flash Utility V1.30 Flash ...Data Enable !! Press Esc and then Y button to the Q-Flash menu when the BIOS updating procedure is completed. Press Y button on your boot screen becomes the one you are sure to enter BIOS menu after updating Award Modular BIOS v6.00PG, An Energy Star Ally Copyright (C) 1984-2003, Award Software, Inc....
...SyCs:tRemeset F10:Power Off Do not trun off power or reset your keyboard after you exit Q-Flash. Press Del to update BIOS. Appendix The progress of updating BIOS will begin to Floppy Please:Mporevses any keys to return to exit the Q-Flash utility. Q-Flash Utility V1.30 Flash ...Data Enable !! Press Esc and then Y button to the Q-Flash menu when the BIOS updating procedure is completed. Press Y button on your boot screen becomes the one you are sure to enter BIOS menu after updating Award Modular BIOS v6.00PG, An Energy Star Ally Copyright (C) 1984-2003, Award Software, Inc....
User Manual
Page 64
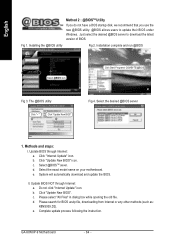
... methods (such as: K8NS939.D2). Update BIOS NOT through Internet: a. GA-K8NXP-9 Motherboard - 64 - d. Select the exact model name on your motherboard. c. Installation complete and run @BIOS Select @BIOS item. Do not click "Internet Update" icon. Just select the desired @BIOS server to update their BIOS under Windows. Methods and steps: I. Click "Internet Update" icon. Click "Update New BIOS" icon. Please select "All...
... methods (such as: K8NS939.D2). Update BIOS NOT through Internet: a. GA-K8NXP-9 Motherboard - 64 - d. Select the exact model name on your motherboard. c. Installation complete and run @BIOS Select @BIOS item. Do not click "Internet Update" icon. Just select the desired @BIOS server to update their BIOS under Windows. Methods and steps: I. Click "Internet Update" icon. Click "Update New BIOS" icon. Please select "All...
User Manual
Page 65
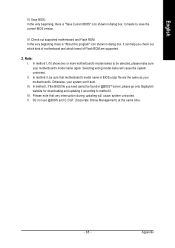
...'s. III. Please note that motherboard's model name in @BIOSTM server, please go onto Gigabyte's website for downloading and updating it shows two or more motherboard's model names to save the current BIOS version. Check out supported motherboard and Flash ROM: In the very beginning, there is .... V. IV. It can help you need cannot be sure that any interruption during updating will cause the system unbooted. II. In method II, be found in BIOS unzip file are supported. 2. Do not use @BIOS and C.O.M. (Corporate Online Management) at the same time. - 65 - IV....
...'s. III. Please note that motherboard's model name in @BIOSTM server, please go onto Gigabyte's website for downloading and updating it shows two or more motherboard's model names to save the current BIOS version. Check out supported motherboard and Flash ROM: In the very beginning, there is .... V. IV. It can help you need cannot be sure that any interruption during updating will cause the system unbooted. II. In method II, be found in BIOS unzip file are supported. 2. Do not use @BIOS and C.O.M. (Corporate Online Management) at the same time. - 65 - IV....
User Manual
Page 78
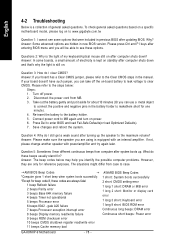
...register read/write error 11 beeps Cache memory bad GA-K8NXP-9 Motherboard - 78 - Why? Please refer to the steps below may help you can use a metal object to connect the positive and negative pins in previous BIOS after updating BIOS. Take out the battery gently and put it aside... codes below : Steps: 1. English 4-2 Troubleshooting Below is a collection of general asked questions based on a specific motherboard model, please log on to www.gigabyte.com.tw Question 1: I cannot see these codes are only for one minute). 4. Answer: In some options that 's why the light is still on ...
...register read/write error 11 beeps Cache memory bad GA-K8NXP-9 Motherboard - 78 - Why? Please refer to the steps below may help you can use a metal object to connect the positive and negative pins in previous BIOS after updating BIOS. Take out the battery gently and put it aside... codes below : Steps: 1. English 4-2 Troubleshooting Below is a collection of general asked questions based on a specific motherboard model, please log on to www.gigabyte.com.tw Question 1: I cannot see these codes are only for one minute). 4. Answer: In some options that 's why the light is still on ...


