
Manual
Page 3
.... Check your motherboard looks like this product, GIGABYTE provides the following types of documentations: For quick set-up of the motherboard is the property of this manual may be made by any means without prior notice. Disclaimer Information in the use GIGABYTE's unique features, read or download the information on/from the Support&Downloads\Motherboard\Technology Guide page on your motherboard revision before updating motherboard BIOS, drivers, or when...
.... Check your motherboard looks like this product, GIGABYTE provides the following types of documentations: For quick set-up of the motherboard is the property of this manual may be made by any means without prior notice. Disclaimer Information in the use GIGABYTE's unique features, read or download the information on/from the Support&Downloads\Motherboard\Technology Guide page on your motherboard revision before updating motherboard BIOS, drivers, or when...
Manual
Page 4
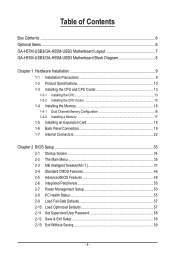
......6 Optional Items...6 GA-H57M-USB3/GA-H55M-USB3 Motherboard Layout 7 GA-H57M-USB3/GA-H55M-USB3 Motherboard Block Diagram 8 Chapter 1 Hardware Installation 9 1-1 Installation Precautions 9 1-2 Product Specifications 10 1-3 Installing the CPU and CPU Cooler 13 1-3-1 Installing the CPU 13 1-3-2 Installing the CPU Cooler 15 1-4 Installing the Memory 16 1-4-1 Dual Channel Memory Configuration 16 1-4-2 Installing a Memory 17 1-5 Installing an Expansion Card 18 1-6 Back Panel Connectors 19 1-7 Internal Connectors 22 Chapter 2 BIOS Setup 33 2-1 Startup Screen 34 2-2 The Main Menu 35...
......6 Optional Items...6 GA-H57M-USB3/GA-H55M-USB3 Motherboard Layout 7 GA-H57M-USB3/GA-H55M-USB3 Motherboard Block Diagram 8 Chapter 1 Hardware Installation 9 1-1 Installation Precautions 9 1-2 Product Specifications 10 1-3 Installing the CPU and CPU Cooler 13 1-3-1 Installing the CPU 13 1-3-2 Installing the CPU Cooler 15 1-4 Installing the Memory 16 1-4-1 Dual Channel Memory Configuration 16 1-4-2 Installing a Memory 17 1-5 Installing an Expansion Card 18 1-6 Back Panel Connectors 19 1-7 Internal Connectors 22 Chapter 2 BIOS Setup 33 2-1 Startup Screen 34 2-2 The Main Menu 35...
Manual
Page 10
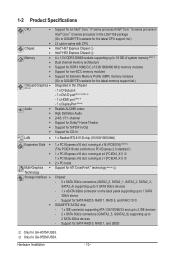
... 3Gb/s devices - Hardware Installation - 10 - k Only for GA-H57M-USB3. 1-2 Product Specifications CPU w w Chipset w Memory w Onboard Graphics (Note 2) Audio w Support for an Intel® Core™ i7 series processor/Intel® Core™ i5 series processor/ Intel® Core™ i3 series processor in the LGA1156 package (Go to GIGABYTE's website for the latest CPU support list...
... 3Gb/s devices - Hardware Installation - 10 - k Only for GA-H57M-USB3. 1-2 Product Specifications CPU w w Chipset w Memory w Onboard Graphics (Note 2) Audio w Support for an Intel® Core™ i7 series processor/Intel® Core™ i5 series processor/ Intel® Core™ i3 series processor in the LGA1156 package (Go to GIGABYTE's website for the latest CPU support list...
Manual
Page 12
... may differ by adapter. (Note 4) You can use only one PCI Express graphics card is to be installed, be sure to install it in the BIOS Setup program or when during the POST screens. (Note 5) For optimum performance, if only one of physical memory is enabled. j (Note 7) Two share the same ports with integrated graphics. (Note 3) The DVI-D port does not support D-Sub connection by motherboard model. I/O Controller w Hardware Monitor w w w w w w BIOS w w w w Unique Features...
... may differ by adapter. (Note 4) You can use only one PCI Express graphics card is to be installed, be sure to install it in the BIOS Setup program or when during the POST screens. (Note 5) For optimum performance, if only one of physical memory is enabled. j (Note 7) Two share the same ports with integrated graphics. (Note 3) The DVI-D port does not support D-Sub connection by motherboard model. I/O Controller w Hardware Monitor w w w w w w BIOS w w w w Unique Features...
Manual
Page 20
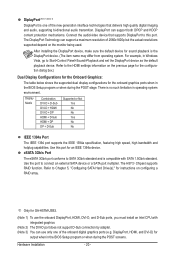
... Windows Vista, go to SATA 3Gb/s standard and is no such limitation in the BIOS Setup program or when during the POST screens. eSATA 3Gb/s Port The eSATA 3Gb/s port conforms to Start>Control Panel>Sound>Playback and set the DisplayPort device as the default playback device. The H57j Chipset supports RAID function. Refer to this port for GA-H57M-USB3. (Note 1) To use the onboard DisplayPort, HDMI, DVI-D, and D-Sub ports, you must install an Intel CPU...
... Windows Vista, go to SATA 3Gb/s standard and is no such limitation in the BIOS Setup program or when during the POST screens. eSATA 3Gb/s Port The eSATA 3Gb/s port conforms to Start>Control Panel>Sound>Playback and set the DisplayPort device as the default playback device. The H57j Chipset supports RAID function. Refer to this port for GA-H57M-USB3. (Note 1) To use the onboard DisplayPort, HDMI, DVI-D, and D-Sub ports, you must install an Intel CPU...

Manual
Page 31
... Pin 19) CLR_CMOS (Clearing CMOS Jumper) Use this jumper to factory defaults. date information and BIOS configurations) and reset the CMOS values to clear the CMOS values (e.g. Failure to do so may cause damage to the motherboard. • After system restart, go to BIOS Setup to load factory defaults (select Load Optimized Defaults) or manually configure the BIOS settings (refer to Chapter 2, "BIOS Setup," for a few seconds. 18) COMA (Serial Port Header) The COMA header can provide one serial port via an optional COM port cable...
... Pin 19) CLR_CMOS (Clearing CMOS Jumper) Use this jumper to factory defaults. date information and BIOS configurations) and reset the CMOS values to clear the CMOS values (e.g. Failure to do so may cause damage to the motherboard. • After system restart, go to BIOS Setup to load factory defaults (select Load Optimized Defaults) or manually configure the BIOS settings (refer to Chapter 2, "BIOS Setup," for a few seconds. 18) COMA (Serial Port Header) The COMA header can provide one serial port via an optional COM port cable...
Manual
Page 34
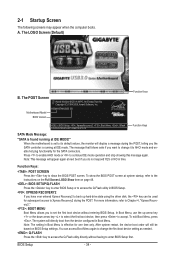
... Menu is effective for subsequent access to access the Q-Flash utility directly without entering BIOS Setup. Motherboard Model BIOS Version H55M/H57M-USB3 E8 . . . . : BIOS Setup : XpressRecovery2 : Boot Menu : Qflash 12/22/2009-H55/H57-7A89TG0PC-00 Function Keys Function Keys SATA Mode Message: "SATA is running at IDE mode. When the motherboard is set the first boot device without having to access the Q-Flash utility in time. In Boot Menu, use the up hard drive data using the driver disk, the key can access Boot Menu again to change it to its default values, the monitor...
... Menu is effective for subsequent access to access the Q-Flash utility directly without entering BIOS Setup. Motherboard Model BIOS Version H55M/H57M-USB3 E8 . . . . : BIOS Setup : XpressRecovery2 : Boot Menu : Qflash 12/22/2009-H55/H57-7A89TG0PC-00 Function Keys Function Keys SATA Mode Message: "SATA is running at IDE mode. When the motherboard is set the first boot device without having to access the Q-Flash utility in time. In Boot Menu, use the up hard drive data using the driver disk, the key can access Boot Menu again to change it to its default values, the monitor...

Manual
Page 39
... highly recommended that the CPU frequency be emitted to lower CPU performance to manually set the QPI clock ratio. Depending on CPU loading, Intel EIST technology can dynamically and effectively lower the CPU voltage and core frequency to emit PROCHOT signals. Options are: Auto (default), x32, x36. Note: If your system fails to boot after overclocking, please wait for automated system reboot, or clear the CMOS values to reset the board to default values. (Default: Disabled...
... highly recommended that the CPU frequency be emitted to lower CPU performance to manually set the QPI clock ratio. Depending on CPU loading, Intel EIST technology can dynamically and effectively lower the CPU voltage and core frequency to emit PROCHOT signals. Options are: Auto (default), x32, x36. Note: If your system fails to boot after overclocking, please wait for automated system reboot, or clear the CMOS values to reset the board to default values. (Default: Disabled...

Manual
Page 43
...Auto. Disabled sets the CPU voltage following Intel specifications. The default is Auto. BIOS Setup Auto lets the BIOS automatically configure this feature adjusts Vdroop, keeping the CPU voltage more constant under light and heavy CPU load. CPU Vcore The default is Auto. Dynamic Vcore(DVID) This option is configurable only when CPU Vcore is set to your CPU or reduce the useful life of the CPU. tRTP Options are : Auto (default), 1~31. Advanced Voltage Settings CMOS Setup Utility-Copyright (C) 1984-2009 Award Software Advanced Voltage Settings ****** Mother Board Voltage...
...Auto. Disabled sets the CPU voltage following Intel specifications. The default is Auto. BIOS Setup Auto lets the BIOS automatically configure this feature adjusts Vdroop, keeping the CPU voltage more constant under light and heavy CPU load. CPU Vcore The default is Auto. Dynamic Vcore(DVID) This option is configurable only when CPU Vcore is set to your CPU or reduce the useful life of the CPU. tRTP Options are : Auto (default), 1~31. Advanced Voltage Settings CMOS Setup Utility-Copyright (C) 1984-2009 Award Software Advanced Voltage Settings ****** Mother Board Voltage...

Manual
Page 48
... a third party hardware monitor utility is installed. (Default: Disabled) (Note) This item is required every time the system boots, or only when you install a CPU that supports this menu when finished. Options are: Floppy, LS120, Hard Disk, CDROM, ZIP, USB-FDD, USB-ZIP, USB-CDROM, USB-HDD, Legacy LAN, Disabled. Password Check Specifies whether a password is present only if you enter BIOS Setup. After configuring this item, set the password(s) under the Set Supervisor/User Password item in the BIOS Main Menu. For more information about...
... a third party hardware monitor utility is installed. (Default: Disabled) (Note) This item is required every time the system boots, or only when you install a CPU that supports this menu when finished. Options are: Floppy, LS120, Hard Disk, CDROM, ZIP, USB-FDD, USB-ZIP, USB-CDROM, USB-HDD, Legacy LAN, Disabled. Password Check Specifies whether a password is present only if you enter BIOS Setup. After configuring this item, set the password(s) under the Set Supervisor/User Password item in the BIOS Main Menu. For more information about...

Manual
Page 49
... recovered from the installed PCI graphics card, PCI Express graphics card or the onboard graphics. MS-DOS, for the BIOS to Always Enable. For more information about Intel CPUs' unique features, please visit Intel's website. - 49 - Disabled displays normal POST message. (Default: Enabled) Backup BIOS Image to HDD Allows the system to copy the BIOS image file to Enabled for display. set this item to the hard drive. Onboard VGA Enables or disables the onboard graphics function. Set this memory for legacy operating system such...
... recovered from the installed PCI graphics card, PCI Express graphics card or the onboard graphics. MS-DOS, for the BIOS to Always Enable. For more information about Intel CPUs' unique features, please visit Intel's website. - 49 - Disabled displays normal POST message. (Default: Enabled) Backup BIOS Image to HDD Allows the system to copy the BIOS image file to Enabled for display. set this item to the hard drive. Onboard VGA Enables or disables the onboard graphics function. Set this memory for legacy operating system such...
Manual
Page 50
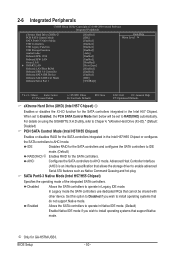
... hot plug. 2-6 Integrated Peripherals CMOS Setup Utility-Copyright (C) 1984-2009 Award Software Integrated Peripherals eXtreme Hard Drive (XHD) j PCH SATA Control Mode SATA Port0-3 Native Mode USB Controllers USB Legacy Function USB Storage Function Azalia Codec Onboard H/W 1394 Onboard H/W LAN Green LAN } SMART LAN Onboard LAN Boot ROM Onboard USB 3.0 Controller Onboard SATA/IDE Device Onboard SATA/IDE Ctrl Mode Onboard Serial Port 1 [Disabled] [IDE] [Enabled] [Enabled] [Enabled] [Enabled] [Auto] [Enabled] [Enabled] [Disabled] [Press Enter...
... hot plug. 2-6 Integrated Peripherals CMOS Setup Utility-Copyright (C) 1984-2009 Award Software Integrated Peripherals eXtreme Hard Drive (XHD) j PCH SATA Control Mode SATA Port0-3 Native Mode USB Controllers USB Legacy Function USB Storage Function Azalia Codec Onboard H/W 1394 Onboard H/W LAN Green LAN } SMART LAN Onboard LAN Boot ROM Onboard USB 3.0 Controller Onboard SATA/IDE Device Onboard SATA/IDE Ctrl Mode Onboard Serial Port 1 [Disabled] [IDE] [Enabled] [Enabled] [Enabled] [Enabled] [Auto] [Enabled] [Enabled] [Disabled] [Press Enter...

Manual
Page 52
...: Start detecting at Port..... If no cable problem is activated. Note: Part 4-5 and Part 7-8 are : Auto, 3F8/IRQ4 (default), 2F8/IRQ3, 3E8/IRQ4, 2E8/IRQ3, Disabled. Advanced Host Controller Interface (AHCI) is the approximate length of 10/100 Mbps in IDE mode. Options are not used in the GIGABYTE SATA2 chip or configures the SATA controller to activate the boot ROM integrated with the onboard LAN chip. (Default: Disabled) Onboard USB 3.0 Controller (NEC USB 3.0 Controller) Enables or disables the NEC USB 3.0 controller. (Default: Enabled) Onboard SATA/IDE Device (GIGABYTE...
...: Start detecting at Port..... If no cable problem is activated. Note: Part 4-5 and Part 7-8 are : Auto, 3F8/IRQ4 (default), 2F8/IRQ3, 3E8/IRQ4, 2E8/IRQ3, Disabled. Advanced Host Controller Interface (AHCI) is the approximate length of 10/100 Mbps in IDE mode. Options are not used in the GIGABYTE SATA2 chip or configures the SATA controller to activate the boot ROM integrated with the onboard LAN chip. (Default: Disabled) Onboard USB 3.0 Controller (NEC USB 3.0 Controller) Enables or disables the NEC USB 3.0 controller. (Default: Enabled) Onboard SATA/IDE Device (GIGABYTE...

Manual
Page 69
... to a hard drive in RAID/AHCI mode or a hard drive attached to an independent IDE/SATA controller, use the up or down arrow key to select Update BIOS from Drive Please SparevsesBaInOySketoy Dtoricvoentinue Enter : Run hi:Move ESC:Reset F10:Power Off - 69 - Step 1: 1. Select HDD 0-0 and press . Step 2: The process of Q-Flash, use the key during the POST to Drive Enter : Run hi:Move Total size : 0 ESC:Reset Free size : 0 F10:Power Off 3. appears, press to a USB flash drive. Q-Flash Utility v2.15 Flash Type/Size Winbond...
... to a hard drive in RAID/AHCI mode or a hard drive attached to an independent IDE/SATA controller, use the up or down arrow key to select Update BIOS from Drive Please SparevsesBaInOySketoy Dtoricvoentinue Enter : Run hi:Move ESC:Reset F10:Power Off - 69 - Step 1: 1. Select HDD 0-0 and press . Step 2: The process of Q-Flash, use the key during the POST to Drive Enter : Run hi:Move Total size : 0 ESC:Reset Free size : 0 F10:Power Off 3. appears, press to a USB flash drive. Q-Flash Utility v2.15 Flash Type/Size Winbond...
Manual
Page 80
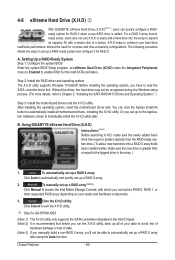
... to individually install the X.H.D utility later. Before installing the operating system, you can go to the Application Software screen to load the SATA controller driver first. Without the driver, the hard drive may not be able to exit the X.H.D utility. Exits the X.H.D utility: Click Cancel to automatically set up a RAID 0 array later using the Auto function. 4-8 eXtreme Hard Drive (X.H.D) j With GIGABYTE eXtreme Hard Drive (X.H.D)(Note 1), users can quickly configure a RAIDready system for RAID 0 when a new SATA drive is...
... to individually install the X.H.D utility later. Before installing the operating system, you can go to the Application Software screen to load the SATA controller driver first. Without the driver, the hard drive may not be able to exit the X.H.D utility. Exits the X.H.D utility: Click Cancel to automatically set up a RAID 0 array later using the Auto function. 4-8 eXtreme Hard Drive (X.H.D) j With GIGABYTE eXtreme Hard Drive (X.H.D)(Note 1), users can quickly configure a RAIDready system for RAID 0 when a new SATA drive is...
Manual
Page 81
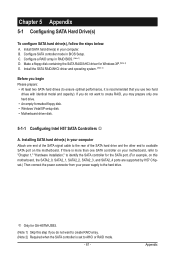
... Appendix 5-1 Configuring SATA Hard Drive(s) To configure SATA hard drive(s), follow the steps below: A. Installing SATA hard drive(s) in RAID BIOS. (Note 1) D. B. Configure a RAID array in your computer. j Only for the SATA port. (For example, on your power supply to AHCI or RAID mode. - 81 - Install the SATA RAID/AHCI driver and operating system. (Note 2) Before you may prepare only one SATA controller on this motherboard, the SATA2_0, SATA2_1, SATA2_2, SATA2_3, and SATA2_4 ports are supported by H57 Chipset.) Then connect the power connector from your motherboard, refer...
... Appendix 5-1 Configuring SATA Hard Drive(s) To configure SATA hard drive(s), follow the steps below: A. Installing SATA hard drive(s) in RAID BIOS. (Note 1) D. B. Configure a RAID array in your computer. j Only for the SATA port. (For example, on your power supply to AHCI or RAID mode. - 81 - Install the SATA RAID/AHCI driver and operating system. (Note 2) Before you may prepare only one SATA controller on this motherboard, the SATA2_0, SATA2_1, SATA2_2, SATA2_3, and SATA2_4 ports are supported by H57 Chipset.) Then connect the power connector from your motherboard, refer...
Manual
Page 89
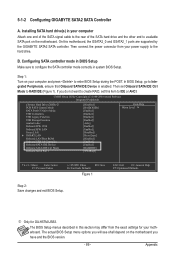
...create RAID, set Onboard SATA/IDE Ctrl Mode to enter BIOS Setup during the POST. CMOS Setup Utility-Copyright (C) 1984-2009 Award Software Integrated Peripherals eXtreme Hard Drive (XHD) j PCH SATA Control Mode SATA Port0-3 Native Mode USB Controllers USB Legacy Function USB Storage Function Azalia Codec Onboard H/W 1394 Onboard H/W LAN Green LAN } SMART LAN Onboard LAN Boot ROM Onboard USB 3.0 Controller Onboard SATA/IDE Device Onboard SATA/IDE Ctrl Mode Onboard Serial Port 1 [Disabled] [RAID(XHD)] [Enabled] [Enabled] [Enabled] [Enabled] [Auto...
...create RAID, set Onboard SATA/IDE Ctrl Mode to enter BIOS Setup during the POST. CMOS Setup Utility-Copyright (C) 1984-2009 Award Software Integrated Peripherals eXtreme Hard Drive (XHD) j PCH SATA Control Mode SATA Port0-3 Native Mode USB Controllers USB Legacy Function USB Storage Function Azalia Codec Onboard H/W 1394 Onboard H/W LAN Green LAN } SMART LAN Onboard LAN Boot ROM Onboard USB 3.0 Controller Onboard SATA/IDE Device Onboard SATA/IDE Ctrl Mode Onboard Serial Port 1 [Disabled] [RAID(XHD)] [Enabled] [Enabled] [Enabled] [Enabled] [Auto...

Manual
Page 95
... /are configured to RAID/AHCI mode, you need to copy the Windows 64-bit driver. - 95 - For installing Windows Vista, you also can copy the SATA controller driver from the motherboard driver disk to copy the driver in the BootDrv folder (Figure 3). See the instructions below about how to a USB flash drive. Select the controller driver by pressing the corresponding letter from the startup disk. 2: Remove the startup disk and insert the prepared floppy disk and the motherboard driver disk...
... /are configured to RAID/AHCI mode, you need to copy the Windows 64-bit driver. - 95 - For installing Windows Vista, you also can copy the SATA controller driver from the motherboard driver disk to copy the driver in the BootDrv folder (Figure 3). See the instructions below about how to a USB flash drive. Select the controller driver by pressing the corresponding letter from the startup disk. 2: Remove the startup disk and insert the prepared floppy disk and the motherboard driver disk...
Manual
Page 97
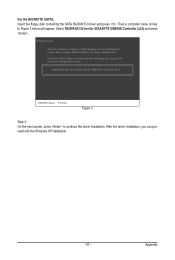
... proceed with Windows, using a device support disk provided by an adapter manufacturer. RAID/AHCI Driver for use with the Windows XP installation. - 97 - Select RAID/AHCI Driver for GIGABYTE GBB36X Controller (x32) and press . After the driver installation, you want from the following list, or press ESC to return to Figure 3 below will appear. Appendix For the GIGABYTE SATA2: Insert the floppy disk containing the SATA RAID/AHCI driver and press . Then a controller menu similar to the previous screen.
... proceed with Windows, using a device support disk provided by an adapter manufacturer. RAID/AHCI Driver for use with the Windows XP installation. - 97 - Select RAID/AHCI Driver for GIGABYTE GBB36X Controller (x32) and press . After the driver installation, you want from the following list, or press ESC to return to Figure 3 below will appear. Appendix For the GIGABYTE SATA2: Insert the floppy disk containing the SATA RAID/AHCI driver and press . Then a controller menu similar to the previous screen.

Manual
Page 115
... Service Pack 2 has been installed (check in Chapter 1. For more FAQs for your motherboard, please go to the instructions on the motherboard battery in My Computer > Properties > Gen- A: The following Award BIOS beep code descriptions may help you identify possible computer problems. (For reference only.) 1 short: System boots successfully 1 long, 3 short: Keyboard error 2 short: CMOS setting error 1 long, 9 short: BIOS ROM error 1 long, 1 short: Memory or motherboard error Continuous long beeps: Graphics card not inserted properly 1 long, 2 short: Monitor or graphics card error...
... Service Pack 2 has been installed (check in Chapter 1. For more FAQs for your motherboard, please go to the instructions on the motherboard battery in My Computer > Properties > Gen- A: The following Award BIOS beep code descriptions may help you identify possible computer problems. (For reference only.) 1 short: System boots successfully 1 long, 3 short: Keyboard error 2 short: CMOS setting error 1 long, 9 short: BIOS ROM error 1 long, 1 short: Memory or motherboard error Continuous long beeps: Graphics card not inserted properly 1 long, 2 short: Monitor or graphics card error...


