
Manual
Page 1
GA-G33M-S2H LGA775 socket motherboard for Intel® CoreTM processor family/ Intel® Pentium® processor family/Intel® Celeron® processor family User's Manual Rev. 1001 12ME-G33MS2H-1001R * The WEEE marking on the product indicates this product must not be disposed of with user's other household waste and must be handed over to a designated collection point for the recycling of waste electrical and electronic equipment!! * The WEEE marking applies only in European Union's member states.
GA-G33M-S2H LGA775 socket motherboard for Intel® CoreTM processor family/ Intel® Pentium® processor family/Intel® Celeron® processor family User's Manual Rev. 1001 12ME-G33MS2H-1001R * The WEEE marking on the product indicates this product must not be disposed of with user's other household waste and must be handed over to a designated collection point for the recycling of waste electrical and electronic equipment!! * The WEEE marking applies only in European Union's member states.

Manual
Page 3
... part of this : "REV: X.X." is exclusively licensed to use of this product, GIGABYTE provides the following types of GIGABYTE. Check your motherboard looks like this manual may be reproduced, copied, translated, transmitted, or published in this manual may be made by any form or by GIGABYTE without GIGABYTE's prior written permission. Changes to their respective owners.
... part of this : "REV: X.X." is exclusively licensed to use of this product, GIGABYTE provides the following types of GIGABYTE. Check your motherboard looks like this manual may be reproduced, copied, translated, transmitted, or published in this manual may be made by any form or by GIGABYTE without GIGABYTE's prior written permission. Changes to their respective owners.

Manual
Page 6
... No. 12CR1-1SPDIN-01/R) COM port cable (Part No. 12CF1-1CM001-31/R) LPT port cable (Part No. 12CF1-1LP001-01R) - 6 - Box Contents GA-G33M-S2H motherboard Motherboard driver disk User's Manual Intel® LGA775 CPU Installation Guide One IDE cable and one floppy disk drive cable Two SATA 3Gb/s cables I/O Shield The box contents...
... No. 12CR1-1SPDIN-01/R) COM port cable (Part No. 12CF1-1CM001-31/R) LPT port cable (Part No. 12CF1-1LP001-01R) - 6 - Box Contents GA-G33M-S2H motherboard Motherboard driver disk User's Manual Intel® LGA775 CPU Installation Guide One IDE cable and one floppy disk drive cable Two SATA 3Gb/s cables I/O Shield The box contents...
Manual
Page 9
... (ESD) wrist strap when handling electronic components such as a result of the product, please consult a certified computer technician. - 9 - Prior to installation, carefully read the user's manual and follow these procedures: • Prior to installation, do not remove or break motherboard S/N (Serial Number) sticker or warranty sticker provided by unplugging the power...
... (ESD) wrist strap when handling electronic components such as a result of the product, please consult a certified computer technician. - 9 - Prior to installation, carefully read the user's manual and follow these procedures: • Prior to installation, do not remove or break motherboard S/N (Serial Number) sticker or warranty sticker provided by unplugging the power...

Manual
Page 15
Check that the Male and Female push pins are joined closely. (Refer to your CPU cooler installation manual for instructions on the motherboard. Step 6: Finally, attach the power connector of the CPU cooler to the CPU fan header (CPU_FAN) on installing the cooler.) ...
Check that the Male and Female push pins are joined closely. (Refer to your CPU cooler installation manual for instructions on the motherboard. Step 6: Finally, attach the power connector of the CPU cooler to the CPU fan header (CPU_FAN) on installing the cooler.) ...
Manual
Page 18
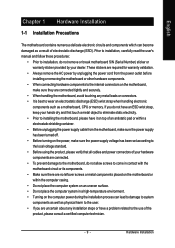
... slot that came with a screw. 5. Carefully read the manual that supports your computer. Secure the card's metal bracket to the chassis back panel with your operating system. Remove the metal slot cover from the slot. After installing all expansion cards, replace the chassis cover(s). 6. GA-G33M-S2H Motherboard - 18 - English 1-5 Installing an Expansion Card...
... slot that came with a screw. 5. Carefully read the manual that supports your computer. Secure the card's metal bracket to the chassis back panel with your operating system. Remove the metal slot cover from the slot. After installing all expansion cards, replace the chassis cover(s). 6. GA-G33M-S2H Motherboard - 18 - English 1-5 Installing an Expansion Card...
Manual
Page 31
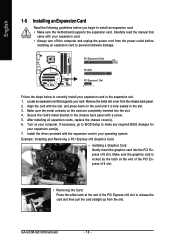
... that supports digital audio out via an optional S/PDIF in cable. Pin No. For information about connecting the S/PDIF digital audio cable, carefully read the manual for digital audio output from your motherboard to your graphics card if you to use an S/PDIF digital audio cable for your motherboard to certain...
... that supports digital audio out via an optional S/PDIF in cable. Pin No. For information about connecting the S/PDIF digital audio cable, carefully read the manual for digital audio output from your motherboard to your graphics card if you to use an S/PDIF digital audio cable for your motherboard to certain...
Manual
Page 34
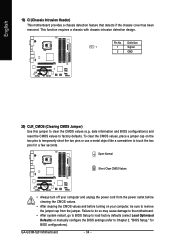
... two pins to temporarily short the two pins or use a metal object like a screwdriver to Chapter 2, "BIOS Setup," for a few seconds. GA-G33M-S2H Motherboard - 34 - Open: Normal Short: Clear CMOS Values • Always turn off your computer and unplug the power cord from the jumper. ... cause damage to the motherboard. • After system restart, go to BIOS Setup to load factory defaults (select Load Optimized Defaults) or manually configure the BIOS settings (refer to touch the two pins for BIOS configurations). Definition 1 1 Signal 2 GND 20) CLR_CMOS (Clearing CMOS Jumper...
... two pins to temporarily short the two pins or use a metal object like a screwdriver to Chapter 2, "BIOS Setup," for a few seconds. GA-G33M-S2H Motherboard - 34 - Open: Normal Short: Clear CMOS Values • Always turn off your computer and unplug the power cord from the jumper. ... cause damage to the motherboard. • After system restart, go to BIOS Setup to load factory defaults (select Load Optimized Defaults) or manually configure the BIOS settings (refer to touch the two pins for BIOS configurations). Definition 1 1 Signal 2 GND 20) CLR_CMOS (Clearing CMOS Jumper...

Manual
Page 39
.../SATA devices during the POST for faster system startup. BIOS Setup Select the desired field and use the up arrow or down arrow key to manually enter the specifications of the device during the POST. (Default) If no IDE/SATA devices are : Auto (default), CHS, LBA, Large. IDE Channel 0, ... Mode Sets the hard drive access mode. is set this item to CHS. Options are used , set to None so the system will • Manual Access Mode skip the detection of the hard drive when the hard drive access mode is 13:0:0. For example, 1 p.m. Time Sets the system time...
.../SATA devices during the POST for faster system startup. BIOS Setup Select the desired field and use the up arrow or down arrow key to manually enter the specifications of the device during the POST. (Default) If no IDE/SATA devices are : Auto (default), CHS, LBA, Large. IDE Channel 0, ... Mode Sets the hard drive access mode. is set this item to CHS. Options are used , set to None so the system will • Manual Access Mode skip the detection of the hard drive when the hard drive access mode is 13:0:0. For example, 1 p.m. Time Sets the system time...
Manual
Page 40
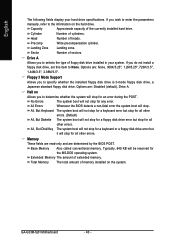
Head Number of cylinders. Drive A Allows you to None. If you wish to enter the parameters manually, refer to specify whether the installed floppy disk drive is 3-mode floppy disk drive, a Japanese standard floppy disk drive. Whenever the BIOS ...for a floppy disk drive error but stop for the MS-DOS operating system. Options are : None, 360K/5.25", 1.2M/5.25", 720K/3.5", 1.44M/3.5", 2.88M/3.5". GA-G33M-S2H Motherboard - 40 - Options are : Disabled (default), Drive A. Halt on Allows you to the information on the system. Extended Memory The amount of sectors. ...
Head Number of cylinders. Drive A Allows you to None. If you wish to enter the parameters manually, refer to specify whether the installed floppy disk drive is 3-mode floppy disk drive, a Japanese standard floppy disk drive. Whenever the BIOS ...for a floppy disk drive error but stop for the MS-DOS operating system. Options are : None, 360K/5.25", 1.2M/5.25", 720K/3.5", 1.44M/3.5", 2.88M/3.5". GA-G33M-S2H Motherboard - 40 - Options are : Disabled (default), Drive A. Halt on Allows you to the information on the system. Extended Memory The amount of sectors. ...

Manual
Page 51
... Control DDR2 OverVoltage Control FSB OverVoltage Control (G)MCH OverVoltage Control CPU Voltage Control Normal CPU Vcore ******** [Auto] [16X] [Disabled] 266 [Auto] [Auto] 667 [Option 1] [Standard] [Manual] [Normal] [Normal] [Normal] [Normal] 1.4000V Item Help Menu Level` KLJI: Move Enter: Select F5: Previous Values +/-/PU/PD: Value F10: Save F6: Fail-Safe Defaults...
... Control DDR2 OverVoltage Control FSB OverVoltage Control (G)MCH OverVoltage Control CPU Voltage Control Normal CPU Vcore ******** [Auto] [16X] [Disabled] 266 [Auto] [Auto] 667 [Option 1] [Standard] [Manual] [Normal] [Normal] [Normal] [Normal] 1.4000V Item Help Menu Level` KLJI: Move Enter: Select F5: Previous Values +/-/PU/PD: Value F10: Save F6: Fail-Safe Defaults...

Manual
Page 52
... Allows the system to 150 MHz. For a 1333 MHz FSB CPU, set the system voltages. Auto sets memory multiplier according to manually set this item to the memory. Option 1 Memory Timing Configuration 1. (Default) Option 2 Memory Timing Configuration 2. System Voltage Control Determines... Standard Turbo Lets the system operate at its basic performance level. (Default) Lets the system operate at its good performance level. GA-G33M-S2H Motherboard - 52 - the second is enabled. English CPU Host Frequency (Mhz) Allows you to the CPU Host Frequency (Mhz)...
... Allows the system to 150 MHz. For a 1333 MHz FSB CPU, set the system voltages. Auto sets memory multiplier according to manually set this item to the memory. Option 1 Memory Timing Configuration 1. (Default) Option 2 Memory Timing Configuration 2. System Voltage Control Determines... Standard Turbo Lets the system operate at its basic performance level. (Default) Lets the system operate at its good performance level. GA-G33M-S2H Motherboard - 52 - the second is enabled. English CPU Host Frequency (Mhz) Allows you to the CPU Host Frequency (Mhz)...
Manual
Page 59
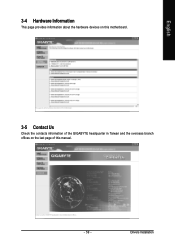
English 3-4 Hardware Information This page provides information about the hardware devices on this motherboard. 3-5 Contact Us Check the contacts information of the GIGABYTE headquarter in Taiwan and the overseas branch offices on the last page of this manual. - 59 - Drivers Installation
English 3-4 Hardware Information This page provides information about the hardware devices on this motherboard. 3-5 Contact Us Check the contacts information of the GIGABYTE headquarter in Taiwan and the overseas branch offices on the last page of this manual. - 59 - Drivers Installation

Manual
Page 70
F1) obtained from GIGABYTE's website and follow the instructions in an unbootable system. Select Load Optimized Defaults and ... Update New BIOS. the Files of type list. Press OK to load BIOS defaults. Upon completion, restart your motherboard model. GA-G33M-S2H Motherboard - 70 - Make sure the extracted BIOS file matches your motherboard is correct, then click OK. Select Load Optimized Defaults... the model name on the screen is not present on the @BIOS server site, please manually download the BIOS update file from the Internet or through other Step 3: source.
F1) obtained from GIGABYTE's website and follow the instructions in an unbootable system. Select Load Optimized Defaults and ... Update New BIOS. the Files of type list. Press OK to load BIOS defaults. Upon completion, restart your motherboard model. GA-G33M-S2H Motherboard - 70 - Make sure the extracted BIOS file matches your motherboard is correct, then click OK. Select Load Optimized Defaults... the model name on the screen is not present on the @BIOS server site, please manually download the BIOS update file from the Internet or through other Step 3: source.

Manual
Page 73
Side Speaker Out Mic In For example, in jack and manually configure the jack for microphone functionality. • If your microphone to the Mic in or Line in a 4-channel audio configuration, if a Rear speaker is plugged ...
Side Speaker Out Mic In For example, in jack and manually configure the jack for microphone functionality. • If your microphone to the Mic in or Line in a 4-channel audio configuration, if a Rear speaker is plugged ...


