Manual
Page 33
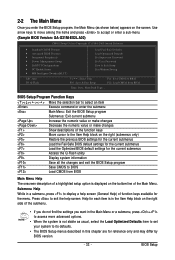
... appears on the screen. Use arrow keys to move among the items and press to accept or enter a sub-menu. (Sample BIOS Version: GA-G31M-ES2L A02) CMOS Setup Utility-Copyright (C) 1984-2009 Award Software Standard CMOS Features Advanced BIOS Features Integrated Peripherals &#...Safe BIOS default settings for the current submenus Load the Optimized BIOS default settings for the current submenus Access the Q-Flash utility Display system information Save all the changes and exit the BIOS Setup program Save CMOS to select an item Execute command or enter...
... appears on the screen. Use arrow keys to move among the items and press to accept or enter a sub-menu. (Sample BIOS Version: GA-G31M-ES2L A02) CMOS Setup Utility-Copyright (C) 1984-2009 Award Software Standard CMOS Features Advanced BIOS Features Integrated Peripherals &#...Safe BIOS default settings for the current submenus Load the Optimized BIOS default settings for the current submenus Access the Q-Flash utility Display system information Save all the changes and exit the BIOS Setup program Save CMOS to select an item Execute command or enter...
Manual
Page 34
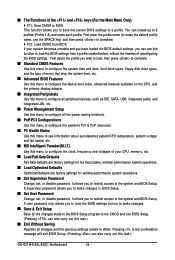
You can also carry out this task.) GA-G31M-ES2L/ES2C Motherboard - 34 - It allows you wish to load, then press to complete. Standard CMOS Features Use this menu to configure the system time and ... system boot, etc. Advanced BIOS Features Use this menu to configure the device boot order, advanced features available on the CPU, and the primary display adapter. Integrated Peripherals Use this menu to configure all peripheral devices, such as IDE, SATA, USB, integrated audio, and integrated LAN, etc. Power...
You can also carry out this task.) GA-G31M-ES2L/ES2C Motherboard - 34 - It allows you wish to load, then press to complete. Standard CMOS Features Use this menu to configure the system time and ... system boot, etc. Advanced BIOS Features Use this menu to configure the device boot order, advanced features available on the CPU, and the primary display adapter. Integrated Peripherals Use this menu to configure all peripheral devices, such as IDE, SATA, USB, integrated audio, and integrated LAN, etc. Power...
Manual
Page 36
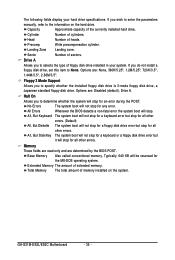
...25", 1.2M/5.25", 720K/3.5", 1.44M/3.5", 2.88M/3.5". Total Memory The total amount of the currently installed hard drive. The following fields display your system. Precomp Write precompensation cylinder. Landing Zone Landing zone. Drive A Allows you to specify whether the installed floppy disk drive is...of extended memory. Options are : Disabled (default), Drive A. No Errors The system boot will stop for all other errors. GA-G31M-ES2L/ES2C Motherboard - 36 - Base Memory Also called conventional memory. If you to selects the type of floppy disk drive installed in your...
...25", 1.2M/5.25", 720K/3.5", 1.44M/3.5", 2.88M/3.5". Total Memory The total amount of the currently installed hard drive. The following fields display your system. Precomp Write precompensation cylinder. Landing Zone Landing zone. Drive A Allows you to specify whether the installed floppy disk drive is...of extended memory. Options are : Disabled (default), Drive A. No Errors The system boot will stop for all other errors. GA-G31M-ES2L/ES2C Motherboard - 36 - Base Memory Also called conventional memory. If you to selects the type of floppy disk drive installed in your...
Manual
Page 37
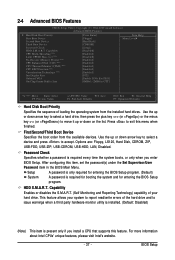
... to 3 (Note) No-Execute Memory Protect (Note) CPU Enhanced Halt (C1E) (Note) CPU Thermal Monitor 2(TM2) (Note) CPU EIST Function (Note) Virtualization Technology (Note) Init Display First Onboard VGA On-Chip Frame Buffer Size [Press Enter] [Floppy] [Hard Disk] [CDROM] [Setup] [Disabled] [Enabled] [Disabled] [Enabled] [Enabled] [Enabled] [Enabled] [Enabled] [PCI] [Enable...
... to 3 (Note) No-Execute Memory Protect (Note) CPU Enhanced Halt (C1E) (Note) CPU Thermal Monitor 2(TM2) (Note) CPU EIST Function (Note) Virtualization Technology (Note) Init Display First Onboard VGA On-Chip Frame Buffer Size [Press Enter] [Floppy] [Hard Disk] [CDROM] [Setup] [Disabled] [Enabled] [Disabled] [Enabled] [Enabled] [Enabled] [Enabled] [Enabled] [PCI] [Enable...

Manual
Page 39
... VGA Enables or disables the onboard VGA function. BIOS Setup PEG Sets PCI Express graphics card as the first display. If you wish to set up a dual view configuration, set this memory for example, will use only this item to Always Enable. On-Chip Frame ...Buffer Size Frame buffer size is installed. PCI Sets the PCI graphics card as the first display. (Default) Onboard Sets the onboard VGA as the first display. Options are: 8MB+1~2MB for GTT (default), 1MB+1~2MB for the onboard graphics controller. Enable If No Ext PEG Activates...
... VGA Enables or disables the onboard VGA function. BIOS Setup PEG Sets PCI Express graphics card as the first display. If you wish to set up a dual view configuration, set this memory for example, will use only this item to Always Enable. On-Chip Frame ...Buffer Size Frame buffer size is installed. PCI Sets the PCI graphics card as the first display. (Default) Onboard Sets the onboard VGA as the first display. Options are: 8MB+1~2MB for GTT (default), 1MB+1~2MB for the onboard graphics controller. Enable If No Ext PEG Activates...
Manual
Page 42
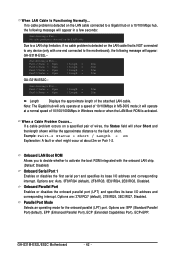
...detecting at Port..... Pair1-2 Status = Open Pair3-6 Status = Open / Length = 20m / Length = 20m Length Displays the approximate length of wires, the Status field will show Short and thenlength shown will be the approximate distance to the... problem is NOT connected to the motherboard), the following message will appear: GA-G31M-ES2L-- Pair1-2 Status = Open Pair3-6 Status = Open Pair4-5 Status = Open Pair7-8 Status = Open / Length = 20m / Length = 20m / Length = 20m / Length = 20m GA-G31M-ES2C-- Options are: SPP (Standard Parallel Port)(default), EPP (Enhanced Parallel Port...
...detecting at Port..... Pair1-2 Status = Open Pair3-6 Status = Open / Length = 20m / Length = 20m Length Displays the approximate length of wires, the Status field will show Short and thenlength shown will be the approximate distance to the... problem is NOT connected to the motherboard), the following message will appear: GA-G31M-ES2L-- Pair1-2 Status = Open Pair3-6 Status = Open Pair4-5 Status = Open Pair7-8 Status = Open / Length = 20m / Length = 20m / Length = 20m / Length = 20m GA-G31M-ES2C-- Options are: SPP (Standard Parallel Port)(default), EPP (Enhanced Parallel Port...
Manual
Page 46
...record of previous chassis intrusion status and the Case Opened field will show "No". Current CPU Temperature Displays current CPU temperature. Options are: Disabled (default), 60oC/140oF, 70oC/158oF, 80oC/ 176oF, 90oC/194oF. Current Voltage(V)...Displays the detection status of previous chassis intrusion status. Check the fan condition or fan connection when this field will show "Yes", otherwise it will emit warning sound. CPU Warning Temperature Sets the warning threshold for CPU temperature. Enabled allows the CPU fan to run at full speed. (Default: Enabled) GA-G31M-ES2L/ES2C...
...record of previous chassis intrusion status and the Case Opened field will show "No". Current CPU Temperature Displays current CPU temperature. Options are: Disabled (default), 60oC/140oF, 70oC/158oF, 80oC/ 176oF, 90oC/194oF. Current Voltage(V)...Displays the detection status of previous chassis intrusion status. Check the fan condition or fan connection when this field will show "Yes", otherwise it will emit warning sound. CPU Warning Temperature Sets the warning threshold for CPU temperature. Enabled allows the CPU fan to run at full speed. (Default: Enabled) GA-G31M-ES2L/ES2C...

Manual
Page 47
... F7: Optimized Defaults • Whether the system will allow for advanced users only and we recommend you set the R.G.B. This page is installed. CPU Frequency Displays the current operating CPU frequency. Enabled will work stably with unlocked clock ratio is for automated system reboot, or clear the CMOS values to reset...
... F7: Optimized Defaults • Whether the system will allow for advanced users only and we recommend you set the R.G.B. This page is installed. CPU Frequency Displays the current operating CPU frequency. Enabled will work stably with unlocked clock ratio is for automated system reboot, or clear the CMOS values to reset...

Manual
Page 49
The adjustable range is dependent on the CPU being installed. (Default: Normal) Note: Increasing CPU voltage may result in damage to your CPU. - 49 - Normal sets the CPU voltage as required. (Default) Increases FSB voltage by 0.1V to 0.3V at 0.1V increment. BIOS Setup Normal +0.1V ~ +0.3V Supplies the FSB voltage as required. Normal CPU Vcore Displays the normal operating voltage of your CPU or reduce the useful life of the CPU. FSB OverVoltage Control Allows you to set the Front Side Bus voltage. CPU Voltage Control Allows you to set the CPU voltage.
The adjustable range is dependent on the CPU being installed. (Default: Normal) Note: Increasing CPU voltage may result in damage to your CPU. - 49 - Normal sets the CPU voltage as required. (Default) Increases FSB voltage by 0.1V to 0.3V at 0.1V increment. BIOS Setup Normal +0.1V ~ +0.3V Supplies the FSB voltage as required. Normal CPU Vcore Displays the normal operating voltage of your CPU or reduce the useful life of the CPU. FSB OverVoltage Control Allows you to set the Front Side Bus voltage. CPU Voltage Control Allows you to set the CPU voltage.
Manual
Page 53
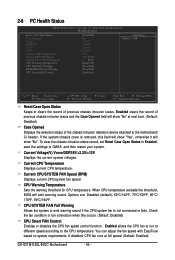
...) and restart the system. (The system will automatically scan your system and then list all the recommended drivers. the Found New Hardware Wizard) displayed when "Xpress Install" is automatically displayed which looks like that are installed, follow the onscreen instructions to restart your optical drive. You can install other drivers. • After...
...) and restart the system. (The system will automatically scan your system and then list all the recommended drivers. the Found New Hardware Wizard) displayed when "Xpress Install" is automatically displayed which looks like that are installed, follow the onscreen instructions to restart your optical drive. You can install other drivers. • After...
Manual
Page 54
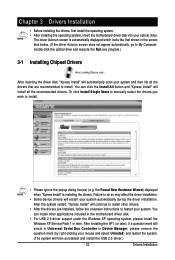
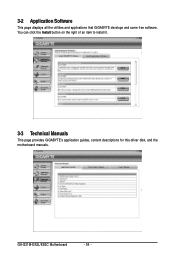
GA-G31M-ES2L/ES2C Motherboard - 54 - 3-2 Application Software This page displays all the utilities and applications that GIGABYTE develops and some free software. You can click the Install button on the right of an item to install it. 3-3 Technical Manuals This page provides GIGABYTE's application guides, content descriptions for this driver disk, and the motherboard manuals.
GA-G31M-ES2L/ES2C Motherboard - 54 - 3-2 Application Software This page displays all the utilities and applications that GIGABYTE develops and some free software. You can click the Install button on the right of an item to install it. 3-3 Technical Manuals This page provides GIGABYTE's application guides, content descriptions for this driver disk, and the motherboard manuals.
Manual
Page 56
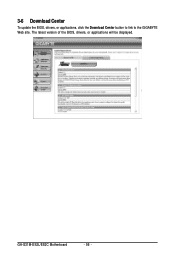
GA-G31M-ES2L/ES2C Motherboard - 56 - The latest version of the BIOS, drivers, or applications will be displayed. 3-6 Download Center To update the BIOS, drivers, or applications, click the Download Center button to link to the GIGABYTE Web site.
GA-G31M-ES2L/ES2C Motherboard - 56 - The latest version of the BIOS, drivers, or applications will be displayed. 3-6 Download Center To update the BIOS, drivers, or applications, click the Download Center button to link to the GIGABYTE Web site.
Manual
Page 61
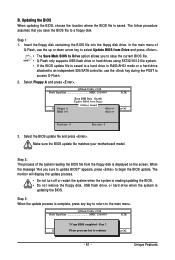
... Drive and press . • The Save Main BIOS to Drive option allows you to save the BIOS file to the main menu. The monitor will display the update process. • Do not turn off or restart the system when the system is reading/updating the BIOS. • Do not remove the... system reading the BIOS file from the floppy disk is complete, press any keEyStCo:Rcoensettinue F10:Power Off - 61 - Step 3: When the update process is displayed on the screen. Step 1: 1.
... Drive and press . • The Save Main BIOS to Drive option allows you to save the BIOS file to the main menu. The monitor will display the update process. • Do not turn off or restart the system when the system is reading/updating the BIOS. • Do not remove the... system reading the BIOS file from the floppy disk is complete, press any keEyStCo:Rcoensettinue F10:Power Off - 61 - Step 3: When the update process is displayed on the screen. Step 1: 1.

Manual
Page 65
...Actual performance may vary based on testing method. - 65 - The Easy Energy Saver Interface A. Meter Mode In Meter Mode, GIGABYTE Easy Energy Saver shows how much power they have saved in taskbar) 14 INFO/Help 15 Live Utility Update (Check for the ...1 Easy Energy Saver On/Off Switch (Default: Off) 2 Dynamic CPU Frequency Function On/Off Switch (Default: Off) (Note 2) 3 CPU Throttling Display 4 CPU Voltage Display 5 3-Level CPU Voltage Switch (Default:1) (Note 3) 6 Current CPU Power Consumption 7 Meter Time 8 Power Saving (Calculate power savings based on motherboard...
...Actual performance may vary based on testing method. - 65 - The Easy Energy Saver Interface A. Meter Mode In Meter Mode, GIGABYTE Easy Energy Saver shows how much power they have saved in taskbar) 14 INFO/Help 15 Live Utility Update (Check for the ...1 Easy Energy Saver On/Off Switch (Default: Off) 2 Dynamic CPU Frequency Function On/Off Switch (Default: Off) (Note 2) 3 CPU Throttling Display 4 CPU Voltage Display 5 3-Level CPU Voltage Switch (Default:1) (Note 3) 6 Current CPU Power Consumption 7 Meter Time 8 Power Saving (Calculate power savings based on motherboard...

Manual
Page 66
... under the enable status, and power savings meter is restarted. GA-G31M-ES2L/ES2C Motherboard - 66 - B. Total Mode - Button Information Table Button Description 1 Easy Energy Saver On/Off Switch (Default: Off) 2 Dynamic CPU Frequency Function On/Off Switch (Default: Off) 3 CPU Throttling Display 4 CPU Voltage Display 5 3-Level CPU Voltage Switch (Default:1) (Note 3) 6 Current CPU Power...
... under the enable status, and power savings meter is restarted. GA-G31M-ES2L/ES2C Motherboard - 66 - B. Total Mode - Button Information Table Button Description 1 Easy Energy Saver On/Off Switch (Default: Off) 2 Dynamic CPU Frequency Function On/Off Switch (Default: Off) 3 CPU Throttling Display 4 CPU Voltage Display 5 3-Level CPU Voltage Switch (Default:1) (Note 3) 6 Current CPU Power...
Manual
Page 67
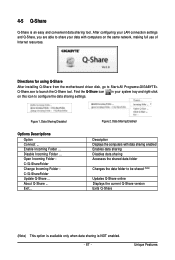
... - Directions for using Q-Share After installing Q-Share from the motherboard driver disk, go to Start>All Programs>GIGABYTE> Q-Share.exe to be shared (Note) Updates Q-Share online Displays the current Q-Share version Exits Q-Share (Note) This option is available only when data sharing is an easy... Disabled Options Descriptions Option Connect ... Open Incoming Folder : C:\Q-ShareFolder Change Incoming Folder : C:\Q-ShareFolder Update Q-Share ... Data Sharing Enabled Description Displays the computers with computers on this icon to configure the data sharing settings. Exit...
... - Directions for using Q-Share After installing Q-Share from the motherboard driver disk, go to Start>All Programs>GIGABYTE> Q-Share.exe to be shared (Note) Updates Q-Share online Displays the current Q-Share version Exits Q-Share (Note) This option is available only when data sharing is an easy... Disabled Options Descriptions Option Connect ... Open Incoming Folder : C:\Q-ShareFolder Change Incoming Folder : C:\Q-ShareFolder Update Q-Share ... Data Sharing Enabled Description Displays the computers with computers on this icon to configure the data sharing settings. Exit...

Manual
Page 68
... up at the bottom of the screen to view the system data backed up and restore your system data in the Windows Vista operating system. GA-G31M-ES2L/ES2C Motherboard - 68 - Time Repair supports NTFS file system and can choose file(s)/directory(ies) and click the Copy button to restore the file(s)/directory... points Sets the percentage of hard drive space used for saving shadow copies Creates a system restore point upon the first boot up of the day Displays the Time Repair help file • The hard drive used must have more than 1 GB of capacity and over 300 MB of a shadow copy. System...
... up at the bottom of the screen to view the system data backed up and restore your system data in the Windows Vista operating system. GA-G31M-ES2L/ES2C Motherboard - 68 - Time Repair supports NTFS file system and can choose file(s)/directory(ies) and click the Copy button to restore the file(s)/directory... points Sets the percentage of hard drive space used for saving shadow copies Creates a system restore point upon the first boot up of the day Displays the Time Repair help file • The hard drive used must have more than 1 GB of capacity and over 300 MB of a shadow copy. System...
Manual
Page 75
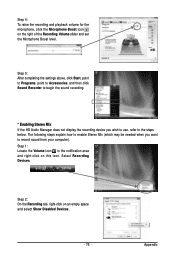
... to Programs, point to Accessories, and then click Sound Recorder to begin the sound recording. * Enabling Stereo Mix If the HD Audio Manager does not display the recording device you want to the steps below. The following steps explain how to enable Stereo Mix (which may be needed when you wish...
... to Programs, point to Accessories, and then click Sound Recorder to begin the sound recording. * Enabling Stereo Mix If the HD Audio Manager does not display the recording device you want to the steps below. The following steps explain how to enable Stereo Mix (which may be needed when you wish...
Manual
Page 79
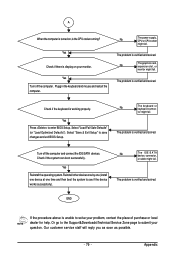
... Service Zone page to enter BIOS Setup. Our customer service staff will reply you as soon as possible. - 79 - END If the procedure above is display on , is verified and solved. No The power supply, CPU or CPU socket might fail. Check if the system can boot successfully. Yes Press to...
... Service Zone page to enter BIOS Setup. Our customer service staff will reply you as soon as possible. - 79 - END If the procedure above is display on , is verified and solved. No The power supply, CPU or CPU socket might fail. Check if the system can boot successfully. Yes Press to...


