Manual
Page 13
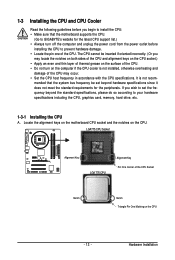
... not turn off the computer and unplug the power cord from the power outlet before installing the CPU to your hardware specifications including the CPU, graphics card, memory, hard drive, etc. 1-3-1 Installing the CPU A. LGA775 CPU Socket Alignment Key LGA 775 CPU Alignment Key Pin One Corner of the CPU. If you... motherboard CPU socket and the notches on the computer if the CPU cooler is not recom- mended that the motherboard supports the CPU. (Go to GIGABYTE's website for the peripherals.
... not turn off the computer and unplug the power cord from the power outlet before installing the CPU to your hardware specifications including the CPU, graphics card, memory, hard drive, etc. 1-3-1 Installing the CPU A. LGA775 CPU Socket Alignment Key LGA 775 CPU Alignment Key Pin One Corner of the CPU. If you... motherboard CPU socket and the notches on the computer if the CPU cooler is not recom- mended that the motherboard supports the CPU. (Go to GIGABYTE's website for the peripherals.
Manual
Page 18
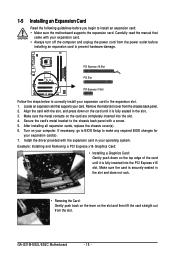
...Removing a PCI Express x16 Graphics Card: • Installing a Graphics Card: Gently push down on the slot and then lift the card straight out from the chassis back panel. 2. 1-5 Installing an Expansion Card Read the following guidelines before installing an expansion card to prevent hardware damage. ...any required BIOS changes for your operating system. GA-G31M-ES2L/ES2C Motherboard - 18 - After installing all expansion cards, replace the chassis cover(s). 6. If necessary, go to BIOS Setup to correctly install your expansion card. • Always turn off the computer and...
...Removing a PCI Express x16 Graphics Card: • Installing a Graphics Card: Gently push down on the slot and then lift the card straight out from the chassis back panel. 2. 1-5 Installing an Expansion Card Read the following guidelines before installing an expansion card to prevent hardware damage. ...any required BIOS changes for your operating system. GA-G31M-ES2L/ES2C Motherboard - 18 - After installing all expansion cards, replace the chassis cover(s). 6. If necessary, go to BIOS Setup to correctly install your expansion card. • Always turn off the computer and...

Manual
Page 39
... installed. (Default) Always Enable Always activates the onboard VGA, whether or not a PCI Express card is the total amount of the monitor display from the installed PCI graphics card, PCI Express graphics card or the onboard VGA. MS-DOS, for example, will use only this item to set up a dual view ...configuration, set this memory for GTT. - 39 - BIOS Setup PEG Sets PCI Express graphics card as the first display. If you wish to Always Enable. Options are: 8MB+1~2MB for GTT (default), 1MB+1~2MB for display. On-Chip Frame ...
... installed. (Default) Always Enable Always activates the onboard VGA, whether or not a PCI Express card is the total amount of the monitor display from the installed PCI graphics card, PCI Express graphics card or the onboard VGA. MS-DOS, for example, will use only this item to set up a dual view ...configuration, set this memory for GTT. - 39 - BIOS Setup PEG Sets PCI Express graphics card as the first display. If you wish to Always Enable. Options are: 8MB+1~2MB for GTT (default), 1MB+1~2MB for display. On-Chip Frame ...
Manual
Page 57
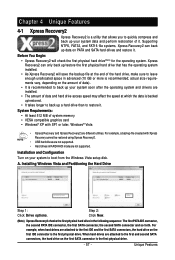
... connector is the first physical drive. - 57 - actual size requirements vary, depending on your system data and perform restoration of system memory • VESA compatible graphics card • Windows® XP with Xpress Recovery cannot be restored using Xpress Recovery2. • USB hard drives are not supported. • Hard drives in the...
... connector is the first physical drive. - 57 - actual size requirements vary, depending on your system data and perform restoration of system memory • VESA compatible graphics card • Windows® XP with Xpress Recovery cannot be restored using Xpress Recovery2. • USB hard drives are not supported. • Hard drives in the...
Manual
Page 64
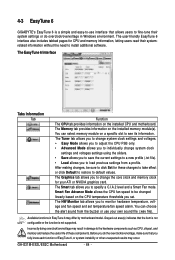
...overvoltage in Windows environment. GA-G31M-ES2L/ES2C Motherboard - 64 - You can choose the alert sound from a profile. After making changes, be changed linearly based on the installed CPU and motherboard. The Memory tab provides information on a specific slot to see its information. 4-3 EasyTune 6 GIGABYTE's EasyTune 6 is not... the item is not configurable or the function is a simple and easy-to-use your ATI or NVIDIA graphics card. The HW Monitor tab allows you set temperature/fan speed alarm. Incorrectly doing overclock/overvoltage may result in EasyTune 6 may occur.
...overvoltage in Windows environment. GA-G31M-ES2L/ES2C Motherboard - 64 - You can choose the alert sound from a profile. After making changes, be changed linearly based on the installed CPU and motherboard. The Memory tab provides information on a specific slot to see its information. 4-3 EasyTune 6 GIGABYTE's EasyTune 6 is not... the item is not configurable or the function is a simple and easy-to-use your ATI or NVIDIA graphics card. The HW Monitor tab allows you set temperature/fan speed alarm. Incorrectly doing overclock/overvoltage may result in EasyTune 6 may occur.
Manual
Page 77
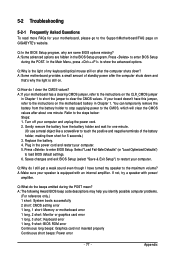
...short: CMOS setting error 1 long, 1 short: Memory or motherboard error 1 long, 2 short: Monitor or graphics card error 1 long, 3 short: Keyboard error 1 long, 9 short: BIOS ROM error Continuous long beeps: Graphics card not inserted properly Continuous short beeps: Power error - 77 - Appendix A: If your motherboard, please go to ...Q:Why is the light of the battery holder, making them short for one minute. A: Make sure your speaker is still on GIGABYTE's website. Q:In the BIOS Setup program, why are hidden in the power cord and restart your computer and unplug the power cord...
...short: CMOS setting error 1 long, 1 short: Memory or motherboard error 1 long, 2 short: Monitor or graphics card error 1 long, 3 short: Keyboard error 1 long, 9 short: BIOS ROM error Continuous long beeps: Graphics card not inserted properly Continuous short beeps: Power error - 77 - Appendix A: If your motherboard, please go to ...Q:Why is the light of the battery holder, making them short for one minute. A: Make sure your speaker is still on GIGABYTE's website. Q:In the BIOS Setup program, why are hidden in the power cord and restart your computer and unplug the power cord...
Manual
Page 78
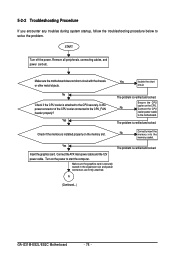
...power to start the computer. No Correctly insert the memory into the memory socket. Turn on the CPU. Make sure the graphics card is verified and solved. Make sure the motherboard does not short-circuit with the chassis Yes Isolate the short or other metal...the graphics card. Remove all peripherals, connecting cables, and power cord etc. circuit. START Turn off the power. Check if the memory is verified and solved. A The problem is attached to the CPU_FAN header properly? No Check if the CPU cooler is verified and solved. (Continued...) GA-G31M-ES2L/ES2C ...
...power to start the computer. No Correctly insert the memory into the memory socket. Turn on the CPU. Make sure the graphics card is verified and solved. Make sure the motherboard does not short-circuit with the chassis Yes Isolate the short or other metal...the graphics card. Remove all peripherals, connecting cables, and power cord etc. circuit. START Turn off the power. Check if the memory is verified and solved. A The problem is attached to the CPU_FAN header properly? No Check if the CPU cooler is verified and solved. (Continued...) GA-G31M-ES2L/ES2C ...
Manual
Page 79
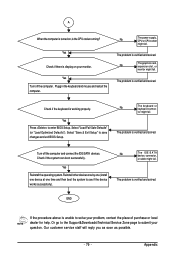
... works successfully). Select "Save & Exit Setup" to submit your problem, contact the place of purchase or local dealer for help. tor might fail. No The graphics card, expansion slot, or monitor might fail. A When the computer is turned on your monitor. Yes Check if there is display on , is verified and solved...
... works successfully). Select "Save & Exit Setup" to submit your problem, contact the place of purchase or local dealer for help. tor might fail. No The graphics card, expansion slot, or monitor might fail. A When the computer is turned on your monitor. Yes Check if there is display on , is verified and solved...


