
Manual
Page 5
...Intel(R) Matrix Storage Manager option ROM V5.0.0.1032 ICH7R wRAID5 Copyright(C) 2003-05 Intel Corporation. RAID Volumes : None Defined. All Rights Reversed. [ MAIN MENU ] 1.Create RAID Volume 2. Exit RAID Volumes : None Defined. [ DISK/VOLUME INFORMATION ] Physical Disks : Port Driver Model 0 ST3120026AS ... 5 [ENTER]-Select Menu - 5 - Delete RAID Volume 3. SATA Hard Drives Configurations (Intel ICH7R) (3) Configuring RAID set in Main Menu and press ENTER. Step 1: After the POST memory test begins and before the operating system boot begins, look for a message...
...Intel(R) Matrix Storage Manager option ROM V5.0.0.1032 ICH7R wRAID5 Copyright(C) 2003-05 Intel Corporation. RAID Volumes : None Defined. All Rights Reversed. [ MAIN MENU ] 1.Create RAID Volume 2. Exit RAID Volumes : None Defined. [ DISK/VOLUME INFORMATION ] Physical Disks : Port Driver Model 0 ST3120026AS ... 5 [ENTER]-Select Menu - 5 - Delete RAID Volume 3. SATA Hard Drives Configurations (Intel ICH7R) (3) Configuring RAID set in Main Menu and press ENTER. Step 1: After the POST memory test begins and before the operating system boot begins, look for a message...

Manual
Page 8
... creation is completed, you can proceed to Non-RAID 4. Reset Disks to the installation of the SATA driver and operating system. All Rights Reversed. [ MAIN MENU ] 1. Exit RAID Volumes : ID Name 0 Volume0 [ DISK/VOLUME INFORMATION ] Level RAID(Stripe) Strip 128KB Size Status Bootable 223.6GB Normal...8GB Member Disk(0) 111.8GB Member Disk(0) [KL]-Select [ESC]-Exit [ENTER]-Select Menu To exit the ICH7R RAID BIOS utility, press ESC in Main Menu. Now, you want to Non-RAID 4. Exit RAID Volumes : ID Name 0 Volume0 [ DISK/VOLUME INFORMATION ] Level RAID(Stripe) Strip ...
... creation is completed, you can proceed to Non-RAID 4. Reset Disks to the installation of the SATA driver and operating system. All Rights Reversed. [ MAIN MENU ] 1. Exit RAID Volumes : ID Name 0 Volume0 [ DISK/VOLUME INFORMATION ] Level RAID(Stripe) Strip 128KB Size Status Bootable 223.6GB Normal...8GB Member Disk(0) 111.8GB Member Disk(0) [KL]-Select [ESC]-Exit [ENTER]-Select Menu To exit the ICH7R RAID BIOS utility, press ESC in Main Menu. Now, you want to Non-RAID 4. Exit RAID Volumes : ID Name 0 Volume0 [ DISK/VOLUME INFORMATION ] Level RAID(Stripe) Strip ...
Manual
Page 4
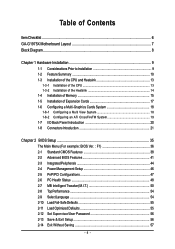
Table of Contents ItemChecklist ...6 GA-G1975X Motherboard Layout 7 Block Diagram ...8 Chapter 1 Hardware Installation 9 1-1 Considerations Prior to Installation 9 1-2 Feature Summary 10 1-3 Installation of the CPU and Heatsink 13 ...1-6-1 Configuring a Multi View System 18 1-6-2 Configuring an ATi CrossFireTM System 19 1-7 I/O Back Panel Introduction 20 1-8 Connectors Introduction 21 Chapter 2 BIOS Setup 35 The Main Menu (For example: BIOS Ver. : F1 36 2-1 Standard CMOS Features 38 2-2 Advanced BIOS Features 41 2-3 IntegratedPeripherals 44 2-4 Power Management Setup 46 2-5 PnP/...
Table of Contents ItemChecklist ...6 GA-G1975X Motherboard Layout 7 Block Diagram ...8 Chapter 1 Hardware Installation 9 1-1 Considerations Prior to Installation 9 1-2 Feature Summary 10 1-3 Installation of the CPU and Heatsink 13 ...1-6-1 Configuring a Multi View System 18 1-6-2 Configuring an ATi CrossFireTM System 19 1-7 I/O Back Panel Introduction 20 1-8 Connectors Introduction 21 Chapter 2 BIOS Setup 35 The Main Menu (For example: BIOS Ver. : F1 36 2-1 Standard CMOS Features 38 2-2 Advanced BIOS Features 41 2-3 IntegratedPeripherals 44 2-4 Power Management Setup 46 2-5 PnP/...
Manual
Page 7
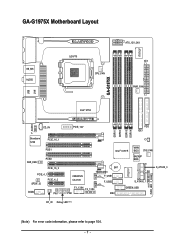
GA-G1975X PWR_FAN IT8712F GA-G1975X Motherboard Layout KB_MS AUDIO LGA775 CPU_FAN ATX_12V_2X4 ATX PWR_FAN USB F_AUDIO LAN Intel® 975X CD_IN Broadcom 5789 PCIE_16_1 PCIE1 SUR_CEN PCIE2 PCIE_16_2 PCIE_4_1 SPDIF_IO PCIE_4_2 COMA PW1 PCIE_12V FDD IDE1 DDRII1 DDRII2 DDRII3 DDRII4 CI Intel® ICH7R MAIN BIOS SYS_FAN BACKUP BIOS CREATIVE CA0106 BAT TSB43AB23 F_USB1 F_USB2 F1_1394 F2_1394 PW2 IDE2 S_ATAII0_1 GREEN_USB IT8211F PWR_LED F_PANEL S_ATAII2_3 RF_ID Debug LED (Note) (Note) For error code information, please refer to page 104. - 7 -
GA-G1975X PWR_FAN IT8712F GA-G1975X Motherboard Layout KB_MS AUDIO LGA775 CPU_FAN ATX_12V_2X4 ATX PWR_FAN USB F_AUDIO LAN Intel® 975X CD_IN Broadcom 5789 PCIE_16_1 PCIE1 SUR_CEN PCIE2 PCIE_16_2 PCIE_4_1 SPDIF_IO PCIE_4_2 COMA PW1 PCIE_12V FDD IDE1 DDRII1 DDRII2 DDRII3 DDRII4 CI Intel® ICH7R MAIN BIOS SYS_FAN BACKUP BIOS CREATIVE CA0106 BAT TSB43AB23 F_USB1 F_USB2 F1_1394 F2_1394 PW2 IDE2 S_ATAII0_1 GREEN_USB IT8211F PWR_LED F_PANEL S_ATAII2_3 RF_ID Debug LED (Note) (Note) For error code information, please refer to page 104. - 7 -

Manual
Page 22
... the CPU. Align the power connector with its proper location on the motherboard. Definition 1 GND 2 GND 1 4 3 GND 4 GND 5 +12V 6 +12V 7 +12V 8 +12V 13 1 24 12 GA-G1975X Motherboard Pin No. 1 2 3 4 5 6 7 8 9 10 11 12 Definition 3.3V 3.3V GND +5V GND +5V GND Power Good 5V SB(stand by processor manufacturer when using Intel... connector, the power supply can lead to an unstable system or a system that is unable to the pin definitions. The ATX 12V (2x4) power connector mainly supplies power to handle the system voltage requirements.
... the CPU. Align the power connector with its proper location on the motherboard. Definition 1 GND 2 GND 1 4 3 GND 4 GND 5 +12V 6 +12V 7 +12V 8 +12V 13 1 24 12 GA-G1975X Motherboard Pin No. 1 2 3 4 5 6 7 8 9 10 11 12 Definition 3.3V 3.3V GND +5V GND +5V GND Power Good 5V SB(stand by processor manufacturer when using Intel... connector, the power supply can lead to an unstable system or a system that is unable to the pin definitions. The ATX 12V (2x4) power connector mainly supplies power to handle the system voltage requirements.
Manual
Page 35
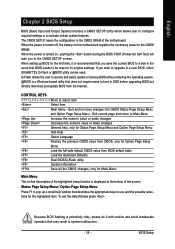
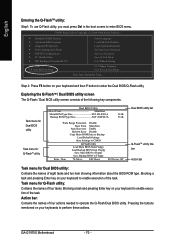
... value from the Internet. If you wish to upgrade to select item Select Item Main Menu - CONTROL KEYS Move to a new BIOS, either GIGABYTE's Q-Flash or @BIOS utility can be reset to Main Menu Increase the numeric value or make changes Decrease the numeric value or make changes... BIOS from BIOS default table Load the Optimized Defaults Dual BIOS/Q-Flash utility System Information Save all the CMOS changes, only for Main Menu Main Menu The on-line description of the highlighted setup function is displayed at the bottom of the motherboard. Status Page Setup Menu ...
... value from the Internet. If you wish to upgrade to select item Select Item Main Menu - CONTROL KEYS Move to a new BIOS, either GIGABYTE's Q-Flash or @BIOS utility can be reset to Main Menu Increase the numeric value or make changes Decrease the numeric value or make changes... BIOS from BIOS default table Load the Optimized Defaults Dual BIOS/Q-Flash utility System Information Save all the CMOS changes, only for Main Menu Main Menu The on-line description of the highlighted setup function is displayed at the bottom of the motherboard. Status Page Setup Menu ...

Manual
Page 36
... for your motherboard. Use arrow keys to select among the items and press to accept . This action makes the system reset to the default for G1975X F1 . . . . :BIOS Setup/Q-Flash, : Xpress Recovery2, For Boot Menu 11/07/2005-I945-6A79HG0GC-00 For Boot Menu Use < > or < > to select a device,... Floppy LS120 Hard Disk CDROM ZIP USB-FDD USB-ZIP USB-CDROM USB-HDD LAN KL:Move Enter :Accept ESC:Exit The Main Menu (For example: BIOS Ver. : F1) Once you enter Award BIOS CMOS Setup Utility, the Main Menu (as usual. Please Load Optimized Defaults in this menu. GA-G1975X Motherboard - 36 -
... for your motherboard. Use arrow keys to select among the items and press to accept . This action makes the system reset to the default for G1975X F1 . . . . :BIOS Setup/Q-Flash, : Xpress Recovery2, For Boot Menu 11/07/2005-I945-6A79HG0GC-00 For Boot Menu Use < > or < > to select a device,... Floppy LS120 Hard Disk CDROM ZIP USB-FDD USB-ZIP USB-CDROM USB-HDD LAN KL:Move Enter :Accept ESC:Exit The Main Menu (For example: BIOS Ver. : F1) Once you enter Award BIOS CMOS Setup Utility, the Main Menu (as usual. Please Load Optimized Defaults in this menu. GA-G1975X Motherboard - 36 -
Manual
Page 66
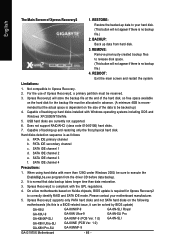
...Windows 2000, be sure to be solved by BIOS update) GA-K8U GA-K8U-9 GA-K8NXP-SLI GA-K8N Ultra-SLI GA-K8N Pro-SLI GA-K8NXP-9 GA-K8N Ultra-9 GA-K8NF-9 (PCB Ver. 1.0) GA-K8NE (PCB Ver. 1.0) GA-K8NMF-9 GA-8N-SLI Royal GA-8N-SLI Pro GA-8N-SLI GA-G1975X Motherboard - 66 - SATA IDE channel 2 e. SATA ... data to correctly identify RAID and SATA IDE mode. PATA IDE secondary channel c . The Main Screen of the data to execute the EnableBigLba.exe program from hard disk. 3. REBOOT: Exit the main screen and restart the system. It is as follows: a. Limitations: 1. Does not support ...
...Windows 2000, be sure to be solved by BIOS update) GA-K8U GA-K8U-9 GA-K8NXP-SLI GA-K8N Ultra-SLI GA-K8N Pro-SLI GA-K8NXP-9 GA-K8N Ultra-9 GA-K8NF-9 (PCB Ver. 1.0) GA-K8NE (PCB Ver. 1.0) GA-K8NMF-9 GA-8N-SLI Royal GA-8N-SLI Pro GA-8N-SLI GA-G1975X Motherboard - 66 - SATA IDE channel 2 e. SATA ... data to correctly identify RAID and SATA IDE mode. PATA IDE secondary channel c . The Main Screen of the data to execute the EnableBigLba.exe program from hard disk. 3. REBOOT: Exit the main screen and restart the system. It is as follows: a. Limitations: 1. Does not support ...
Manual
Page 67
... 512K F10: Power Off - 67 - This means that there are two system BIOS (ROM) on . b. What is Backup BIOS. After power on the Main BIOS. CMOS Setup Utility-Copyright (C) 1984-2004 Award Software ` Standard CMOS Features ` Advanced BIOS Features ` Integrated Peripherals ` Power Management Setup ` PnP/PCI Configurations... is corrupted or damaged, the Backup BIOS can take over while the system is powered on the motherboard, one is the Main BIOS and the other is Dual BIOS Technology? Appendix B. a. Under the normal circumstances, the system works on the computer, pressing ...
... 512K F10: Power Off - 67 - This means that there are two system BIOS (ROM) on . b. What is Backup BIOS. After power on the Main BIOS. CMOS Setup Utility-Copyright (C) 1984-2004 Award Software ` Standard CMOS Features ` Advanced BIOS Features ` Integrated Peripherals ` Power Management Setup ` PnP/PCI Configurations... is corrupted or damaged, the Backup BIOS can take over while the system is powered on the motherboard, one is the Main BIOS and the other is Dual BIOS Technology? Appendix B. a. Under the normal circumstances, the system works on the computer, pressing ...
Manual
Page 68
... replaced by flashing new BIOS. GA-G1975X Motherboard - 68 - Update ESCD failure, checksum error or reset? Save Settings to boot from Backup BIOS automatically. Dual BIOS Item explanation: Wide Range Protection: Disable(Default), Enable Status 1: If any alteration on peripherals cards(ex. BIOS Recovery: Backup to Main The means that the Backup BIOS...
... replaced by flashing new BIOS. GA-G1975X Motherboard - 68 - Update ESCD failure, checksum error or reset? Save Settings to boot from Backup BIOS automatically. Dual BIOS Item explanation: Wide Range Protection: Disable(Default), Enable Status 1: If any alteration on peripherals cards(ex. BIOS Recovery: Backup to Main The means that the Backup BIOS...
Manual
Page 69
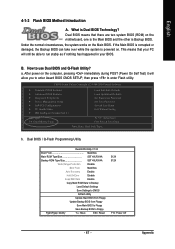
...Energy Star Ally Copyright (C) 1984-2003, Award Software, Inc. In the BIOS menu of Gigabyte motherboards are separated into two parts. If your motherboard has dual-BIOS, please refer to ...Part One. Intel i875P AGPset BIOS for 8KNXP Ultra Fa3 Check System Health OK , VCore = 1.5250 Main Processor : Intel Pentium(R) 4 1.6GHz (133x12) Memory Testing : 131072K OK Memory Frequency 266 MHz ...BIOS file (the one with Q-FlashTM Utility on Dual BIOS Motherboards. In the following sections, we take GA-8KNXP Ultra as the example to a floppy disk. 3. English Method 1 : Q-FlashTM Utility Q-FlashTM...
...Energy Star Ally Copyright (C) 1984-2003, Award Software, Inc. In the BIOS menu of Gigabyte motherboards are separated into two parts. If your motherboard has dual-BIOS, please refer to ...Part One. Intel i875P AGPset BIOS for 8KNXP Ultra Fa3 Check System Health OK , VCore = 1.5250 Main Processor : Intel Pentium(R) 4 1.6GHz (133x12) Memory Testing : 131072K OK Memory Frequency 266 MHz ...BIOS file (the one with Q-FlashTM Utility on Dual BIOS Motherboards. In the following sections, we take GA-8KNXP Ultra as the example to a floppy disk. 3. English Method 1 : Q-FlashTM Utility Q-FlashTM...
Manual
Page 70
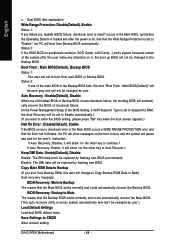
... Q-FlashTM utility Dual BIOS Utility Boot From Main Bios Main ROM Type/Size SST 49LF003A Backup ROM Type/Size SST 49LF003A 512K 512K Wide Range Protection Disable Boot From Main Bios Auto Recovery Enable Halt On Error Disable Copy Main ROM Data to Backup Load Default Settings Save...the Q-FlashTM / Dual BIOS utility screen The Q-Flash / Dual BIOS utility screen consists of four actions needed to enable execution of four tasks. GA-G1975X Motherboard - 70 - Blocking a task and pressing Enter key on your keyboard to operate the Q-Flash/Dual BIOS utility. Pressing the buttons mentioned...
... Q-FlashTM utility Dual BIOS Utility Boot From Main Bios Main ROM Type/Size SST 49LF003A Backup ROM Type/Size SST 49LF003A 512K 512K Wide Range Protection Disable Boot From Main Bios Auto Recovery Enable Halt On Error Disable Copy Main ROM Data to Backup Load Default Settings Save...the Q-FlashTM / Dual BIOS utility screen The Q-Flash / Dual BIOS utility screen consists of four actions needed to enable execution of four tasks. GA-G1975X Motherboard - 70 - Blocking a task and pressing Enter key on your keyboard to operate the Q-Flash/Dual BIOS utility. Pressing the buttons mentioned...
Manual
Page 71
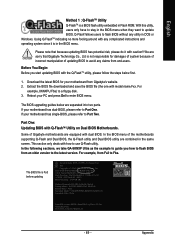
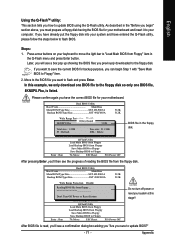
... BIOS file for your motherboard and insert it to flash and press Enter. Dual BIOS Utility Boot From Main Bios Main ROM Type/Size SST 49LF003A Backup ROM Type/Size SST 49LF003A 512K 512K Wide Range Protection Disable 8KNXPU.FAbuatoBRooetcoF1vroefrimlye...(s)MEfnoaauibnnldeBios 512K TFo5t:alRseifzreeCs:ho1Hp.3ay9ltMMOLanoianEdRrDrOoerMfauDDltaiStsaaFeDbttrtEoleieneLBgs:asicDzkeeul:pe9te11.50K Save Settings to CMOS Q-Flash Utility Load Main BIOS from Floppy Load Backup BIOS from Floppy" item in the Q-Flash menu and press Enter button. After ...
... BIOS file for your motherboard and insert it to flash and press Enter. Dual BIOS Utility Boot From Main Bios Main ROM Type/Size SST 49LF003A Backup ROM Type/Size SST 49LF003A 512K 512K Wide Range Protection Disable 8KNXPU.FAbuatoBRooetcoF1vroefrimlye...(s)MEfnoaauibnnldeBios 512K TFo5t:alRseifzreeCs:ho1Hp.3ay9ltMMOLanoianEdRrDrOoerMfauDDltaiStsaaFeDbttrtEoleieneLBgs:asicDzkeeul:pe9te11.50K Save Settings to CMOS Q-Flash Utility Load Main BIOS from Floppy Load Backup BIOS from Floppy" item in the Q-Flash menu and press Enter button. After ...
Manual
Page 72
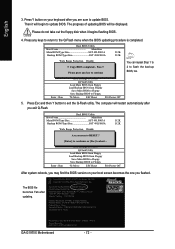
... SST 49LF003A 512K 512K Wide Range Protection Disable Boot From Main Bios !A! Press Esc and then Y button to enter SETUP / Dual BIOS / Q-Flash / F9 For Xpress Recovery 09/23/2003-i875P-6A79BG03C-00 GA-G1975X Motherboard - 72 - The BIOS file becomes Fab after you... flashed. uCtopRyecBoIvOeSrycomEnpalebtled - Intel i875P AGPset BIOS for 8KNXP Ultra Fba Check System Health OK , VCore = 1.5250 Main Processor : Intel Pentium(R) 4 1.6GHz (133x12) Memory Testing ...
... SST 49LF003A 512K 512K Wide Range Protection Disable Boot From Main Bios !A! Press Esc and then Y button to enter SETUP / Dual BIOS / Q-Flash / F9 For Xpress Recovery 09/23/2003-i875P-6A79BG03C-00 GA-G1975X Motherboard - 72 - The BIOS file becomes Fab after you... flashed. uCtopRyecBoIvOeSrycomEnpalebtled - Intel i875P AGPset BIOS for 8KNXP Ultra Fba Check System Health OK , VCore = 1.5250 Main Processor : Intel Pentium(R) 4 1.6GHz (133x12) Memory Testing ...
Manual
Page 75
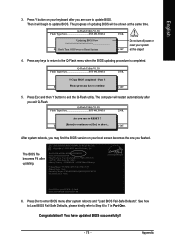
... Y button on your boot screen becomes the one you are sure to update BIOS. Intel 845GE AGPSet BIOS for 8GE800 F4 Check System Health OK Main Processor : Intel Pentium(R) 4 1.7GHz (100x17.0) Memory Testing : 122880K OK + 8192K Shared Memory Primary Master : FUJITSU MPE3170AT ED-03-08 Primary Slave : None Secondary Master : CREATIVEDVD...
... Y button on your boot screen becomes the one you are sure to update BIOS. Intel 845GE AGPSet BIOS for 8GE800 F4 Check System Health OK Main Processor : Intel Pentium(R) 4 1.7GHz (100x17.0) Memory Testing : 122880K OK + 8192K Shared Memory Primary Master : FUJITSU MPE3170AT ED-03-08 Primary Slave : None Secondary Master : CREATIVEDVD...
Manual
Page 82
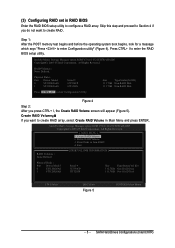
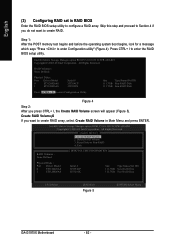
...MAIN MENU ] 1.Create RAID Volume 2. Delete RAID Volume 3. Exit RAID Volumes : None Defined. [ DISK/VOLUME INFORMATION ] Physical Disks : Port Driver Model 0 ST3120026AS 1 ST3120026AS Serial # 3JT354CP 3JT329JX Size Type/Status(Vol ID) 111.7GB Non-RAID Disk 111.7GB Non-RAID Disk [ ]-Select [ESC]-Exit Figure 5 [ENTER]-Select Menu GA-G1975X... Enter the RAID BIOS setup utility to enter the RAID BIOS setup utility. English (3) Configuring RAID set in Main Menu and press ENTER. Press CTRL+ I , the Create RAID Volume screen will appear (Figure 5). Reset Disks...
...MAIN MENU ] 1.Create RAID Volume 2. Delete RAID Volume 3. Exit RAID Volumes : None Defined. [ DISK/VOLUME INFORMATION ] Physical Disks : Port Driver Model 0 ST3120026AS 1 ST3120026AS Serial # 3JT354CP 3JT329JX Size Type/Status(Vol ID) 111.7GB Non-RAID Disk 111.7GB Non-RAID Disk [ ]-Select [ESC]-Exit Figure 5 [ENTER]-Select Menu GA-G1975X... Enter the RAID BIOS setup utility to enter the RAID BIOS setup utility. English (3) Configuring RAID set in Main Menu and press ENTER. Press CTRL+ I , the Create RAID Volume screen will appear (Figure 5). Reset Disks...

Manual
Page 85
... 2003-05 Intel Corporation. Intel(R) Matrix Storage Manager option ROM V5.0.0.1032 ICH7R wRAID5 Copyright(C) 2003-05 Intel Corporation. All Rights Reversed. [ MAIN MENU ] 1. Exit RAID Volumes : ID Name 0 Volume0 [ DISK/VOLUME INFORMATION ] Level RAID(Stripe) Strip 128KB Size Status Bootable 223....-RAID 4. Appendix English After the creation is completed, you want to delete a RAID volume, select the Delete RAID Volume option in Main Menu. Delete RAID Volume 3. Exit RAID Volumes : ID Name 0 Volume0 [ DISK/VOLUME INFORMATION ] Level RAID(Stripe) Strip 128KB Size...
... 2003-05 Intel Corporation. Intel(R) Matrix Storage Manager option ROM V5.0.0.1032 ICH7R wRAID5 Copyright(C) 2003-05 Intel Corporation. All Rights Reversed. [ MAIN MENU ] 1. Exit RAID Volumes : ID Name 0 Volume0 [ DISK/VOLUME INFORMATION ] Level RAID(Stripe) Strip 128KB Size Status Bootable 223....-RAID 4. Appendix English After the creation is completed, you want to delete a RAID volume, select the Delete RAID Volume option in Main Menu. Delete RAID Volume 3. Exit RAID Volumes : ID Name 0 Volume0 [ DISK/VOLUME INFORMATION ] Level RAID(Stripe) Strip 128KB Size...
Manual
Page 96
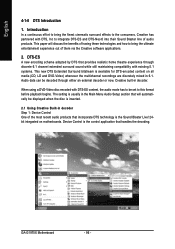
.... This new DTS Extended Surround bitstream is usually in the Main Menu Audio Setup section that will discuss the benefits of having these technologies and how to this format before playback begins. The setting is available for DTS-encoded content on motherboards. GA-G1975X Motherboard - 96 - DTS-ES A new encoding scheme adopted by...
.... This new DTS Extended Surround bitstream is usually in the Main Menu Audio Setup section that will discuss the benefits of having these technologies and how to this format before playback begins. The setting is available for DTS-encoded content on motherboards. GA-G1975X Motherboard - 96 - DTS-ES A new encoding scheme adopted by...