Manual
Page 5
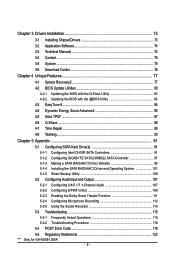
...Chapter 5 Appendix ...91 5-1 Configuring SATA Hard Drive(s 91 5-1-1 Configuring Intel ICH10R SATA Controllers 91 5-1-2 Configuring GIGABYTE SATA2/JMB322 SATA Controller 97 5-1-3 Making a SATA RAID/AHCI Driver Diskette 99 5-1-4 Installing the SATA RAID/AHCI Driver and Operating System 101 5-1-5 Smart Backup Utility 106 5-2 Configuring AudioInput and Output 107 5-2-1 Configuring 2/4/5.1/7.1-Channel... 114 5-3 Troubleshooting 115 5-3-1 Frequently Asked Questions 115 5-3-2 Troubleshooting Procedure 116 5-4 POST Error Code 118 5-5 Regulatory Statements 122 "*" Only for GA-EX58-UD5P. - 5 -
...Chapter 5 Appendix ...91 5-1 Configuring SATA Hard Drive(s 91 5-1-1 Configuring Intel ICH10R SATA Controllers 91 5-1-2 Configuring GIGABYTE SATA2/JMB322 SATA Controller 97 5-1-3 Making a SATA RAID/AHCI Driver Diskette 99 5-1-4 Installing the SATA RAID/AHCI Driver and Operating System 101 5-1-5 Smart Backup Utility 106 5-2 Configuring AudioInput and Output 107 5-2-1 Configuring 2/4/5.1/7.1-Channel... 114 5-3 Troubleshooting 115 5-3-1 Frequently Asked Questions 115 5-3-2 Troubleshooting Procedure 116 5-4 POST Error Code 118 5-5 Regulatory Statements 122 "*" Only for GA-EX58-UD5P. - 5 -

Manual
Page 10
...system memory (Note 1) Dual/3 channel memory architecture Support for DDR3 2100/1333/1066/800 MHz memory modules (Go to GIGABYTE's website for the latest memory support list.) Realtek ALC889A codec High Definition Audio 2/4/5.1/7.1-channel Support ...) supporting up to 4 SA TA 3Gb/s devices (Note 4) - Support for SATA RAID 0, RAID 1 and JBOD iTE IT8720 chip: - 1 x floppy disk drive connector supporting up to the internal IEEE 1394a headers) GA-EX58-UD5P/UD5 Motherboard - 10 - TSB43AB23 chip Up to 3 IEEE 1394a ports (1 on...
...system memory (Note 1) Dual/3 channel memory architecture Support for DDR3 2100/1333/1066/800 MHz memory modules (Go to GIGABYTE's website for the latest memory support list.) Realtek ALC889A codec High Definition Audio 2/4/5.1/7.1-channel Support ...) supporting up to 4 SA TA 3Gb/s devices (Note 4) - Support for SATA RAID 0, RAID 1 and JBOD iTE IT8720 chip: - 1 x floppy disk drive connector supporting up to the internal IEEE 1394a headers) GA-EX58-UD5P/UD5 Motherboard - 10 - TSB43AB23 chip Up to 3 IEEE 1394a ports (1 on...

Manual
Page 31
... hard drives and the total number of the SATA 3Gb/s cable to your SATA hard drive. • A RAID 0 or RAID 1 configuration requires at least two hard drives. The ICH10R controller supports RAID 0, RAID 1, RAID 5 and RAID 10. If more than two hard drives are compatible with SA TA 1.5Gb/s standard. 9) SATA2_0/1/2/3/4/5 (SATA ... conform to SA TA 3Gb/s standard and are to be used, the total number of hard drives must be an even number. • A RAID 5 configuration requires at least three hard drives. (The total number of hard drives does not have to be an even number. - 31 - ...
... hard drives and the total number of the SATA 3Gb/s cable to your SATA hard drive. • A RAID 0 or RAID 1 configuration requires at least two hard drives. The ICH10R controller supports RAID 0, RAID 1, RAID 5 and RAID 10. If more than two hard drives are compatible with SA TA 1.5Gb/s standard. 9) SATA2_0/1/2/3/4/5 (SATA ... conform to SA TA 3Gb/s standard and are to be used, the total number of hard drives must be an even number. • A RAID 5 configuration requires at least three hard drives. (The total number of hard drives does not have to be an even number. - 31 - ...

Manual
Page 32
...(s)," for instructions on when the system is on configuring a RAID array . The GIGABYTE SATA2/JMB322 controller supports RAID 0, RAID 1 and JBOD. GSATA2_3 7 GSATA2_1 1 7 GSATA2_2 1 GSATA2_0 Pin No. 1 2 3 4 5 6 7 Definition GND TXP TXN GND RXN RXP GND A RAID 0 or RAID 1 configuration requires two hard drives. The LED is operating....to indicate system power status. The LED is off when the system is in S3/S4 sleep state or powered off (S5). 1 GA-EX58-UD5P/UD5 Motherboard - 32 - The LED keeps blinking when the system is in S1 sleep state. Pin No. 1 2 3 Definition MPD...
...(s)," for instructions on when the system is on configuring a RAID array . The GIGABYTE SATA2/JMB322 controller supports RAID 0, RAID 1 and JBOD. GSATA2_3 7 GSATA2_1 1 7 GSATA2_2 1 GSATA2_0 Pin No. 1 2 3 4 5 6 7 Definition GND TXP TXN GND RXN RXP GND A RAID 0 or RAID 1 configuration requires two hard drives. The LED is operating....to indicate system power status. The LED is off when the system is in S3/S4 sleep state or powered off (S5). 1 GA-EX58-UD5P/UD5 Motherboard - 32 - The LED keeps blinking when the system is in S1 sleep state. Pin No. 1 2 3 Definition MPD...

Manual
Page 59
...turn off all of the integrated SA TA controllers. 2-6 Integrated Peripherals CMOS Setup Utility-Copyright (C) 1984-2008 Award Software Integrated Peripherals SATA RAID/AHCI Mode SATA Port0-3 Native Mode USB 1.0 Controller USB 2.0 Controller USB Keyboard Function USB Mouse Function USB Storage Function Azalia Codec ... you wish to AHCI mode. SATA Port0-3 Native Mode Specifies the operating mode of the USB functionalities below. Disabled Disables RAID for the SATA controllers and configures the SATA controllers to PATA mode. (Default) AHCI Configures the SATA controllers to install...
...turn off all of the integrated SA TA controllers. 2-6 Integrated Peripherals CMOS Setup Utility-Copyright (C) 1984-2008 Award Software Integrated Peripherals SATA RAID/AHCI Mode SATA Port0-3 Native Mode USB 1.0 Controller USB 2.0 Controller USB Keyboard Function USB Mouse Function USB Storage Function Azalia Codec ... you wish to AHCI mode. SATA Port0-3 Native Mode Specifies the operating mode of the USB functionalities below. Disabled Disables RAID for the SATA controllers and configures the SATA controllers to PATA mode. (Default) AHCI Configures the SATA controllers to install...

Manual
Page 62
...in the operating system. You can install the Smart Backup utility (refer to Chapter 5, "Configuring SA TA Hard Drive(s)," to configure a RAID array. The Controller 0 (GSATA2 0/1) supports the GSATA2_0 and GSATA2_1 connectors and the Controller 1 (GSATA2 2/3) supports the GSATA2_2 and GSATA2_3 connectors...61565; Disk/RAID Status Smart Backup Config [Press Enter] [Press Enter] Item Help Menu Level Move Enter: Select F5: Previous Values +/-/PU/PD: Value F10: Save F6: Fail-Safe Defaults ESC: Exit F1: General Help F7: Optimized Defaults GA-EX58-UD5P/UD5 Motherboard -...
...in the operating system. You can install the Smart Backup utility (refer to Chapter 5, "Configuring SA TA Hard Drive(s)," to configure a RAID array. The Controller 0 (GSATA2 0/1) supports the GSATA2_0 and GSATA2_1 connectors and the Controller 1 (GSATA2 2/3) supports the GSATA2_2 and GSATA2_3 connectors...61565; Disk/RAID Status Smart Backup Config [Press Enter] [Press Enter] Item Help Menu Level Move Enter: Select F5: Previous Values +/-/PU/PD: Value F10: Save F6: Fail-Safe Defaults ESC: Exit F1: General Help F7: Optimized Defaults GA-EX58-UD5P/UD5 Motherboard -...

Manual
Page 63
...: Fail-Safe Defaults This menu allows you to configure your SA TA hard drives or to build a RAID array . BIOS Setup message appears, press to confirm. (Note: If you want to erase an existing RAID array and set up a new array, make sure to set Smart Backup Config to Normal first, and... then select the RAID mode you want.) (Note) When the hard drive(s) is set to Normal mode, make sure to install the SA TA controller driver in the operating ...
...: Fail-Safe Defaults This menu allows you to configure your SA TA hard drives or to build a RAID array . BIOS Setup message appears, press to confirm. (Note: If you want to erase an existing RAID array and set up a new array, make sure to set Smart Backup Config to Normal first, and... then select the RAID mode you want.) (Note) When the hard drive(s) is set to Normal mode, make sure to install the SA TA controller driver in the operating ...

Manual
Page 77
A. "*" Xpress Recovery2 checks the first physical hard drive in RAID/AHCI mode are not supported. • Hard drives in the following sequence: The first PATA IDE connector, the second PATA IDE connector, the first SATA ...
A. "*" Xpress Recovery2 checks the first physical hard drive in RAID/AHCI mode are not supported. • Hard drives in the following sequence: The first PATA IDE connector, the second PATA IDE connector, the first SATA ...

Manual
Page 80
... BIOS while in BIOS Setup. What is potentially risky, please do it with the Q-Flash Utility A. Inadequate BIOS flashing may result in RAID/AHCI mode or a hard drive attached to an independent IDE/SA TA controller, use the key during the POST or pressing the key ...your computer by either pressing the key during the POST to enter operating systems like MS-DOS or Window first. GA-EX58-UD5P/UD5 Motherboard - 80 - What is saved to enter Q-Flash. From GIGABYTE's website, download the latest compressed BIOS update file that support DualBIOS have two BIOS onboard, a main BIOS ...
... BIOS while in BIOS Setup. What is potentially risky, please do it with the Q-Flash Utility A. Inadequate BIOS flashing may result in RAID/AHCI mode or a hard drive attached to an independent IDE/SA TA controller, use the key during the POST or pressing the key ...your computer by either pressing the key during the POST to enter operating systems like MS-DOS or Window first. GA-EX58-UD5P/UD5 Motherboard - 80 - What is saved to enter Q-Flash. From GIGABYTE's website, download the latest compressed BIOS update file that support DualBIOS have two BIOS onboard, a main BIOS ...

Manual
Page 81
.../updating the BIOS. • Do not remove the floppy disk , USB flash drive, or hard drive when the system is saved to a hard drive in RAID/AHCI mode or a hard drive attached to an independent IDE/SATA controller, use the key during the POST to the main menu. In the main...
.../updating the BIOS. • Do not remove the floppy disk , USB flash drive, or hard drive when the system is saved to a hard drive in RAID/AHCI mode or a hard drive attached to an independent IDE/SATA controller, use the key during the POST to the main menu. In the main...

Manual
Page 91
...end to ensure optimal performance, it is more than one SA TA controller on your motherboard, refer to "Chapter 1," "Hardware Installation," to create RAID array on the motherboard. Appendix Chapter 5 Appendix 5-1 Configuring SATA Hard Drive(s) To configure SATA hard drive(s), follow the steps below: A. If ...you do not want to create RAID, you begin Please prepare: • At least two SATA hard drives (to available SATA port on the SA TA controller. (Note 2) For ...
...end to ensure optimal performance, it is more than one SA TA controller on your motherboard, refer to "Chapter 1," "Hardware Installation," to create RAID array on the motherboard. Appendix Chapter 5 Appendix 5-1 Configuring SATA Hard Drive(s) To configure SATA hard drive(s), follow the steps below: A. If ...you do not want to create RAID, you begin Please prepare: • At least two SATA hard drives (to available SATA port on the SA TA controller. (Note 2) For ...

Manual
Page 92
...Power-On Self-T est). If you will see shall depend on your motherboard. GA-EX58-UD5P/UD5 Motherboard - 92 - CMOS Setup Utility-Copyright (C) 1984-2008 Award Software Integrated Peripherals SATA RAID/AHCI Mode SATA Port0-3 Native Mode USB 1.0 Controller USB 2.0 Controller USB Keyboard...; SMART LAN1 SMART LAN2 Onboard LAN1 Boot ROM Onboard LAN2 Boot ROM Onboard SATA/IDE Device Onboard SATA/IDE Ctrl Mode Smart Backup [RAID] [Disabled] [Enabled] [Enabled] [Disabled] [Disabled] [Enabled] [Auto] [Enabled] [Enabled] [Enabled] [Disabled] [Press Enter] [Press Enter] [Disabled] [...
...Power-On Self-T est). If you will see shall depend on your motherboard. GA-EX58-UD5P/UD5 Motherboard - 92 - CMOS Setup Utility-Copyright (C) 1984-2008 Award Software Integrated Peripherals SATA RAID/AHCI Mode SATA Port0-3 Native Mode USB 1.0 Controller USB 2.0 Controller USB Keyboard...; SMART LAN1 SMART LAN2 Onboard LAN1 Boot ROM Onboard LAN2 Boot ROM Onboard SATA/IDE Device Onboard SATA/IDE Ctrl Mode Smart Backup [RAID] [Disabled] [Enabled] [Enabled] [Disabled] [Disabled] [Enabled] [Auto] [Enabled] [Enabled] [Enabled] [Disabled] [Press Enter] [Press Enter] [Disabled] [...

Manual
Page 93
... 0 ST3120026AS 1 ST3120026AS Serial # 3JT354CP 3JT329JX Size Type/Status(Vol ID) 111.7GB Non-RAID Disk 111.7GB Non-RAID Disk Press to enter the RAID Configuration Utility. Create RAID Volume 2. Press + to enter Configuration Utility.. All Rights Reversed. Intel(R) Matrix Storage Manager option...of Windows operating system for a message which says "Press to configure a RAID array. Appendix Create RAID Volume If you press + , the MAIN MENU screen will appear (Figure 3). Configuring a RAID array in MAIN MENU and press . Step 1: After the POST memory test...
... 0 ST3120026AS 1 ST3120026AS Serial # 3JT354CP 3JT329JX Size Type/Status(Vol ID) 111.7GB Non-RAID Disk 111.7GB Non-RAID Disk Press to enter the RAID Configuration Utility. Create RAID Volume 2. Press + to enter Configuration Utility.. All Rights Reversed. Intel(R) Matrix Storage Manager option...of Windows operating system for a message which says "Press to configure a RAID array. Appendix Create RAID Volume If you press + , the MAIN MENU screen will appear (Figure 3). Configuring a RAID array in MAIN MENU and press . Step 1: After the POST memory test...

Manual
Page 94
... and stripes the mirror. Set the stripe block size (Figure 5) if necessary. The stripe block size can be included in the RAID array. Press to proceed. Step 3: After entering the CREATE VOLUME MENU screen, enter a volume name with 1~16 letters (letters ...typical values: RAID0 - 128KB RAID10 - 64KB RAID5 - 64KB [ ]-Change [TAB]-Next [ESC]-Previous Menu Figure 5 [ENTER]-Select GA-EX58-UD5P/UD5 Motherboard - 94 - Intel(R) Matrix Storage Manager option ROM v8.0.0.1039 ICH10R wRAID5 Copyright(C) 2003-08 Intel Corporation. All Rights Reversed. [ CREATE VOLUME...
... and stripes the mirror. Set the stripe block size (Figure 5) if necessary. The stripe block size can be included in the RAID array. Press to proceed. Step 3: After entering the CREATE VOLUME MENU screen, enter a volume name with 1~16 letters (letters ...typical values: RAID0 - 128KB RAID10 - 64KB RAID5 - 64KB [ ]-Change [TAB]-Next [ESC]-Previous Menu Figure 5 [ENTER]-Select GA-EX58-UD5P/UD5 Motherboard - 94 - Intel(R) Matrix Storage Manager option ROM v8.0.0.1039 ICH10R wRAID5 Copyright(C) 2003-08 Intel Corporation. All Rights Reversed. [ CREATE VOLUME...

Manual
Page 95
... to confirm whether to create this volume? (Y/N) : Press ENTER to begin creating the RAID array. Step 5: Enter the array capacity and press . Delete RAID Volume 3. Now, you can proceed to Non-RAID 4. Exit RAID Volumes : ID Name 0 Volume0 Physical Disks : Port Drive Model 0 ST3120026AS 1 ST3120026AS...(0) []-Select [ESC]-Exit Figure 7 [ENTER]-Select Menu To exit the ICH10R RAID BIOS utility , press or select Exit in the DISK/VOLUME INFORMATION section, including the RAID level, stripe block size, array name, and array capacity , etc. (Figure 7) Intel...
... to confirm whether to create this volume? (Y/N) : Press ENTER to begin creating the RAID array. Step 5: Enter the array capacity and press . Delete RAID Volume 3. Now, you can proceed to Non-RAID 4. Exit RAID Volumes : ID Name 0 Volume0 Physical Disks : Port Drive Model 0 ST3120026AS 1 ST3120026AS...(0) []-Select [ESC]-Exit Figure 7 [ENTER]-Select Menu To exit the ICH10R RAID BIOS utility , press or select Exit in the DISK/VOLUME INFORMATION section, including the RAID level, stripe block size, array name, and array capacity , etc. (Figure 7) Intel...

Manual
Page 96
In the DELETE VOLUME MENU section, use the up or down arrow key to select the array to non-RAID. Are you sure you want to delete "Volume0"? (Y/N) : Deleting a volume will reset the disks to be deleted and press . When prompted to ... wRAID5 Copyright(C) 2003-08 Intel Corporation. WARNING: ALL DISK DATA WILL BE DELETED. [ ]-Select [ESC]-Previous Menu Figure 8 [DEL]-Delete Volume GA-EX58-UD5P/UD5 Motherboard - 96 - All Rights Reversed. [ DELETE VOLUME MENU ] Name Volume0 Level RAID0(Stripe) Drives Capacity Status Bootable 2 223.6GB Normal Yes [ DELETE VOLUME...
In the DELETE VOLUME MENU section, use the up or down arrow key to select the array to non-RAID. Are you sure you want to delete "Volume0"? (Y/N) : Deleting a volume will reset the disks to be deleted and press . When prompted to ... wRAID5 Copyright(C) 2003-08 Intel Corporation. WARNING: ALL DISK DATA WILL BE DELETED. [ ]-Select [ESC]-Previous Menu Figure 8 [DEL]-Delete Volume GA-EX58-UD5P/UD5 Motherboard - 96 - All Rights Reversed. [ DELETE VOLUME MENU ] Name Volume0 Level RAID0(Stripe) Drives Capacity Status Bootable 2 223.6GB Normal Yes [ DELETE VOLUME...

Manual
Page 97
... (JBOD) and Normal (Port Multiplier) and use Apply RAID Config for your motherboard. Step 3: Select a RAID mode for the settings to use ( Controller 0 (GSATA2 0/1) controls the GSATA2_0~1 ports and Controller 1 (GSATA2 2/3) controls the GSATA2_2~3 ports). 5-1-2 Configuring GIGABYTE SATA2/JMB322 SATA Controller A. Installing SATA hard drive(s) in this motherboard, the GSATA2_0~3 ports are supported...
... (JBOD) and Normal (Port Multiplier) and use Apply RAID Config for your motherboard. Step 3: Select a RAID mode for the settings to use ( Controller 0 (GSATA2 0/1) controls the GSATA2_0~1 ports and Controller 1 (GSATA2 2/3) controls the GSATA2_2~3 ports). 5-1-2 Configuring GIGABYTE SATA2/JMB322 SATA Controller A. Installing SATA hard drive(s) in this motherboard, the GSATA2_0~3 ports are supported...

Manual
Page 98
GA-EX58-UD5P/UD5 Motherboard - 98 - Step 5: Then install the Smart Backup utility from the Application Software menu on the driver Autorun screen for monitoring the device/RAID status in the operating system (for the SA TA hard drives to section 5- 1-5, "Smart Backup Utility"). Smart Backup Config Apply RAID... Config CMOS Setup Utility-Copyright (C) 1984-2008 Award Software Smart Backup Config [Performance (RAID 0)] [Press Enter] Item Help Menu Level === Disk Info === [Port] [Model...
GA-EX58-UD5P/UD5 Motherboard - 98 - Step 5: Then install the Smart Backup utility from the Application Software menu on the driver Autorun screen for monitoring the device/RAID status in the operating system (for the SA TA hard drives to section 5- 1-5, "Smart Backup Utility"). Smart Backup Config Apply RAID... Config CMOS Setup Utility-Copyright (C) 1984-2008 Award Software Smart Backup Config [Performance (RAID 0)] [Press Enter] Item Help Menu Level === Disk Info === [Port] [Model...
Manual
Page 99
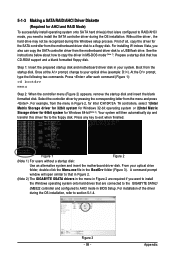
... Driver Diskette (Required for AHCI and RAID Mode) To successfully install operating system onto SA TA hard drive(s) that is/are connected to the GIGABYTE SATA2/ JMB322 controller and configured to a floppy disk. At the D:\> prompt, type the following two commands. Appendix Press any key...you want to install the Windows operating system onto hard drives that are configured to RAID/AHCI mode, you need to exit when finished. Prepare a startup disk that in Figure 2. (Note 2) The GIGABYTE GSATA drivers in the menu in BIOS Setup. Select the controller driver by pressing...
... Driver Diskette (Required for AHCI and RAID Mode) To successfully install operating system onto SA TA hard drive(s) that is/are connected to the GIGABYTE SATA2/ JMB322 controller and configured to a floppy disk. At the D:\> prompt, type the following two commands. Appendix Press any key...you want to install the Windows operating system onto hard drives that are configured to RAID/AHCI mode, you need to exit when finished. Prepare a startup disk that in Figure 2. (Note 2) The GIGABYTE GSATA drivers in the menu in BIOS Setup. Select the controller driver by pressing...

Manual
Page 100
... driver disk to your USB flash drive from the motherboard driver disk. Copying the SATA RAID/AHCI driver from the motherboard driver disk to a USB flash drive On an alternative system, copy the SATA RAID/AHCI driver to your USB flash drive. For example, to install the Windows Vista 32...-bit operating system (Note) onto hard drives connected to the ICH10R SA TA controller , copy all of the files (Figure 4) located in the BootDrv\iMSM\32Bit directory in the BootDrv\iMSM\64Bit directory GA-EX58-UD5P/UD5...
... driver disk to your USB flash drive from the motherboard driver disk. Copying the SATA RAID/AHCI driver from the motherboard driver disk to a USB flash drive On an alternative system, copy the SATA RAID/AHCI driver to your USB flash drive. For example, to install the Windows Vista 32...-bit operating system (Note) onto hard drives connected to the ICH10R SA TA controller , copy all of the files (Figure 4) located in the BootDrv\iMSM\32Bit directory in the BootDrv\iMSM\64Bit directory GA-EX58-UD5P/UD5...


