Manual
Page 1
GA-EX58-UD3R LGA1366 socket motherboard for Intel® Core™ i7 processor family User's Manual Rev. 1701 12ME-EX58UD3R-1701R
GA-EX58-UD3R LGA1366 socket motherboard for Intel® Core™ i7 processor family User's Manual Rev. 1701 12ME-EX58UD3R-1701R
Manual
Page 3
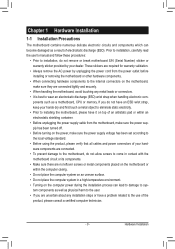
... any means without prior notice. All rights reserved. The trademarks mentioned in this product, GIGABYTE provides the following types of documentations: For quick set-up of the motherboard is the property of this manual may be made by GIGABYTE without GIGABYTE's prior written permission. Documentation Classifications In order to their respective owners. Disclaimer Information in...
... any means without prior notice. All rights reserved. The trademarks mentioned in this product, GIGABYTE provides the following types of documentations: For quick set-up of the motherboard is the property of this manual may be made by GIGABYTE without GIGABYTE's prior written permission. Documentation Classifications In order to their respective owners. Disclaimer Information in...
Manual
Page 6
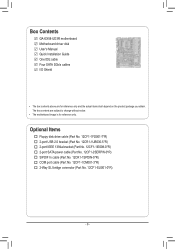
... port cable (Part No. 12CF1-1CM001-3*R) 2-Way SLI bridge connector (Part No. 12CF1-SLI001-0*R) - 6 - The box contents are for reference only. Box Contents GA-EX58-UD3R motherboard Motherboard driver disk User's Manual Quick Installation Guide One IDE cable Four SATA 3Gb/s cables I/O Shield • The box contents above are subject to change without notice. • The...
... port cable (Part No. 12CF1-1CM001-3*R) 2-Way SLI bridge connector (Part No. 12CF1-SLI001-0*R) - 6 - The box contents are for reference only. Box Contents GA-EX58-UD3R motherboard Motherboard driver disk User's Manual Quick Installation Guide One IDE cable Four SATA 3Gb/s cables I/O Shield • The box contents above are subject to change without notice. • The...
Manual
Page 9
...required for warranty validation. • Always remove the AC power by your hardware components are connected. • To prevent damage to the motherboard, do not have an ESD wrist strap, keep your hands dry and first touch a metal object to eliminate static electricity. •... please verify that all cables and power connectors of your dealer. Prior to installation, carefully read the user's manual and follow these procedures: • Prior to installation, do not remove or break motherboard S/N (Serial Number) sticker or warranty sticker provided by unplugging the power cord from the...
...required for warranty validation. • Always remove the AC power by your hardware components are connected. • To prevent damage to the motherboard, do not have an ESD wrist strap, keep your hands dry and first touch a metal object to eliminate static electricity. •... please verify that all cables and power connectors of your dealer. Prior to installation, carefully read the user's manual and follow these procedures: • Prior to installation, do not remove or break motherboard S/N (Serial Number) sticker or warranty sticker provided by unplugging the power cord from the...

Manual
Page 15
...(Refer to your CPU cooler installation manual for instructions on installing the cooler.) Step 5: After the installation, check the back of the CPU cooler to the CPU fan header (CPU_FAN) on the motherboard. Step 6: Finally, attach the power connector of the motherboard. Inadequately removing the CPU cooler may... adhere to the CPU. 1-3-2 Installing the CPU Cooler Follow the steps below to correctly install the CPU cooler on the motherboard. (The following procedure uses Intel® boxed cooler as the picture above shows, the installation is to install.) Step 3: Place the...
...(Refer to your CPU cooler installation manual for instructions on installing the cooler.) Step 5: After the installation, check the back of the CPU cooler to the CPU fan header (CPU_FAN) on the motherboard. Step 6: Finally, attach the power connector of the motherboard. Inadequately removing the CPU cooler may... adhere to the CPU. 1-3-2 Installing the CPU Cooler Follow the steps below to correctly install the CPU cooler on the motherboard. (The following procedure uses Intel® boxed cooler as the picture above shows, the installation is to install.) Step 3: Place the...
Manual
Page 18
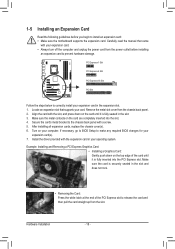
... of the card until it is fully inserted into the slot. 4. Secure the card's metal bracket to install an expansion card: • Make sure the motherboard supports the expansion card. 1-5 Installing an Expansion Card Read the following guidelines before installing an expansion card to correctly install your operating system. Make sure... BIOS Setup to release the card and then pull the card straight up from the slot. Align the card with your computer. Carefully read the manual that supports your expansion card(s). 7.
... of the card until it is fully inserted into the slot. 4. Secure the card's metal bracket to install an expansion card: • Make sure the motherboard supports the expansion card. 1-5 Installing an Expansion Card Read the following guidelines before installing an expansion card to correctly install your operating system. Make sure... BIOS Setup to release the card and then pull the card straight up from the slot. Align the card with your computer. Carefully read the manual that supports your expansion card(s). 7.
Manual
Page 19
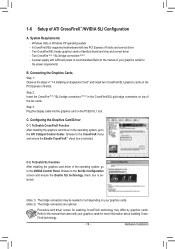
...(Note 1) The bridge connectors may differ by graphics cards. Procedure and driver screen for the power requirement) B. Refer to the manual that came with sufficient power is recommended (Refer to the NVIDIA Control Panel. Connecting the Graphics Cards Step 1: Observe the steps in...PCI Express x16 slots. Browse to the ATI Catalyst Control Center. Windows Vista or Windows XP operating system - A CrossFireX/SLI-supported motherboard with two PCI Express x16 slots and correct driver - C. 1-6 Setup of identical brand and chip and correct driver - Two CrossFireX...
...(Note 1) The bridge connectors may differ by graphics cards. Procedure and driver screen for the power requirement) B. Refer to the manual that came with sufficient power is recommended (Refer to the NVIDIA Control Panel. Connecting the Graphics Cards Step 1: Observe the steps in...PCI Express x16 slots. Browse to the ATI Catalyst Control Center. Windows Vista or Windows XP operating system - A CrossFireX/SLI-supported motherboard with two PCI Express x16 slots and correct driver - C. 1-6 Setup of identical brand and chip and correct driver - Two CrossFireX...
Manual
Page 29
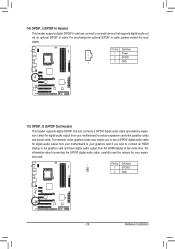
...the HDMI display at the same time. For example, some graphics cards may require you to use a S/PDIF digital audio cable for your motherboard to an audio device that supports digital audio out via an optional S/PDIF In cable. 14) SPDIF_I (S/PDIF In Header) This header supports .... Definition 1 SPDIFO 2 GND - 29 - Hardware Installation For information about connecting the S/PDIF digital audio cable, carefully read the manual for digital audio output from your motherboard to your graphics card if you wish to connect an HDMI display to the graphics card and have digital audio output from...
...the HDMI display at the same time. For example, some graphics cards may require you to use a S/PDIF digital audio cable for your motherboard to an audio device that supports digital audio out via an optional S/PDIF In cable. 14) SPDIF_I (S/PDIF In Header) This header supports .... Definition 1 SPDIFO 2 GND - 29 - Hardware Installation For information about connecting the S/PDIF digital audio cable, carefully read the manual for digital audio output from your motherboard to your graphics card if you wish to connect an HDMI display to the graphics card and have digital audio output from...

Manual
Page 31
... one serial port via an optional COM port cable. Failure to do so may cause damage to the motherboard. • After system restart, go to BIOS Setup to load factory defaults (select Load Optimized Defaults) or manually configure the BIOS settings (refer to remove the jumper cap from the jumper. Hardware Installation
... one serial port via an optional COM port cable. Failure to do so may cause damage to the motherboard. • After system restart, go to BIOS Setup to load factory defaults (select Load Optimized Defaults) or manually configure the BIOS settings (refer to remove the jumper cap from the jumper. Hardware Installation
Manual
Page 63
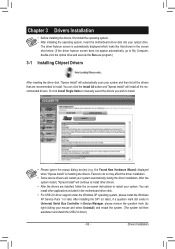
... under the Windows XP operating system, please install the Windows XP Service Pack 1 or later. Or click Install Single Items to manually select the drivers you wish to restart your system and then list all the recommended drivers. After the system restart, "Xpress Install... Drivers Installation • Before installing the drivers, first install the operating system. • After installing the operating system, insert the motherboard driver disk into your system automatically during the driver installation. You can click the Install All button and "Xpress Install" will install ...
... under the Windows XP operating system, please install the Windows XP Service Pack 1 or later. Or click Install Single Items to manually select the drivers you wish to restart your system and then list all the recommended drivers. After the system restart, "Xpress Install... Drivers Installation • Before installing the drivers, first install the operating system. • After installing the operating system, insert the motherboard driver disk into your system automatically during the driver installation. You can click the Install All button and "Xpress Install" will install ...
Manual
Page 64
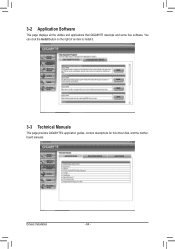
Drivers Installation - 64 - You can click the Install button on the right of an item to install it. 3-3 Technical Manuals This page provides GIGABYTE's application guides, content descriptions for this driver disk, and the motherboard manuals. 3-2 Application Software This page displays all the utilities and applications that GIGABYTE develops and some free software.
Drivers Installation - 64 - You can click the Install button on the right of an item to install it. 3-3 Technical Manuals This page provides GIGABYTE's application guides, content descriptions for this driver disk, and the motherboard manuals. 3-2 Application Software This page displays all the utilities and applications that GIGABYTE develops and some free software.
Manual
Page 70
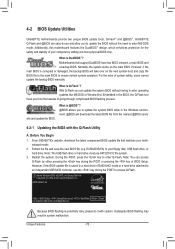
...;. GIGABYTE Q-Flash and @BIOS are easy-to-use FAT32/16/12 file system. 3. Additionally, this motherboard features the DualBIOS™ design, which enhances protection for the safety and stability of system safety, users cannot update the backup BIOS manually. ...Motherboards that matches your floppy disk, USB flash drive, or hard drive. However, if the main BIOS is potentially risky, please do it with the Q-Flash Utility A. From GIGABYTE's website, download the latest compressed BIOS update file that support DualBIOS have two BIOS onboard, a main BIOS and a backup BIOS. EX58-UD3R...
...;. GIGABYTE Q-Flash and @BIOS are easy-to-use FAT32/16/12 file system. 3. Additionally, this motherboard features the DualBIOS™ design, which enhances protection for the safety and stability of system safety, users cannot update the backup BIOS manually. ...Motherboards that matches your floppy disk, USB flash drive, or hard drive. However, if the main BIOS is potentially risky, please do it with the Q-Flash Utility A. From GIGABYTE's website, download the latest compressed BIOS update file that support DualBIOS have two BIOS onboard, a main BIOS and a backup BIOS. EX58-UD3R...
Manual
Page 73
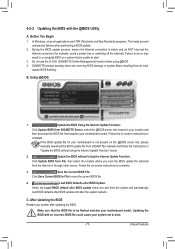
... from File, then select the location where you save the current BIOS file. 4. Follow the on the @BIOS server site, please manually download the BIOS update file from the Internet or through other source. Save the Current BIOS File: Click Save Current BIOS to File to...is not present on -screen instructions to complete. 3. Failure to do NOT interrupt the Internet connection (for your motherboard is unable to save the BIOS update file obtained from GIGABYTE's website and follow the instructions in a corrupted BIOS or a system that the BIOS file to be flashed matches...
... from File, then select the location where you save the current BIOS file. 4. Follow the on the @BIOS server site, please manually download the BIOS update file from the Internet or through other source. Save the Current BIOS File: Click Save Current BIOS to File to...is not present on -screen instructions to complete. 3. Failure to do NOT interrupt the Internet connection (for your motherboard is unable to save the BIOS update file obtained from GIGABYTE's website and follow the instructions in a corrupted BIOS or a system that the BIOS file to be flashed matches...
Manual
Page 102
...over the Internet, and etc. all at the same time. A. 5-2 Configuring Audio Input and Output 5-2-1 Configuring 2/4/5.1/7.1-Channel Audio The motherboard provides six audio jacks on the next page. The integrated HD (High Definition) audio provides jack retasking capability that support 44.1KHz/48KHz... Center/Sub- For example, in the notification area. HD Audio features multistreaming capabilities that allow multiple audio streams (in jack and manually configure the jack for multi-channel speaker configurations. • 2-channel audio: Headphone or Line out. • 4-channel audio:...
...over the Internet, and etc. all at the same time. A. 5-2 Configuring Audio Input and Output 5-2-1 Configuring 2/4/5.1/7.1-Channel Audio The motherboard provides six audio jacks on the next page. The integrated HD (High Definition) audio provides jack retasking capability that support 44.1KHz/48KHz... Center/Sub- For example, in the notification area. HD Audio features multistreaming capabilities that allow multiple audio streams (in jack and manually configure the jack for multi-channel speaker configurations. • 2-channel audio: Headphone or Line out. • 4-channel audio:...
Manual
Page 112
... of Certain Hazardous Substances in a manner that the information in your product's user's manual and we at the Customer Care number listed in all GIGABYTE motherboards fulfill European Union regulations for any responsibility for details of electric and electronic devices and ...of the treatment, collection, recycling and disposal procedure. Appendix - 112 - Waste Electrical & Electronic Equipment (WEEE) Directive Statement GIGABYTE will be taken to meet RoHS requirement. We believe that this text. Under the Directive, used for RoHS (Restriction of properly...
... of Certain Hazardous Substances in a manner that the information in your product's user's manual and we at the Customer Care number listed in all GIGABYTE motherboards fulfill European Union regulations for any responsibility for details of electric and electronic devices and ...of the treatment, collection, recycling and disposal procedure. Appendix - 112 - Waste Electrical & Electronic Equipment (WEEE) Directive Statement GIGABYTE will be taken to meet RoHS requirement. We believe that this text. Under the Directive, used for RoHS (Restriction of properly...


