Manual
Page 4
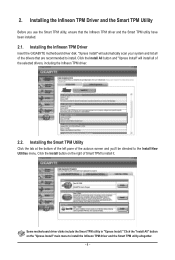
... the autorun screen and you use the Smart TPM utility, ensure that are recommended to install the Infineon TPM driver and the Smart TPM utility altogether. - 4 - Installing the Infineon TPM Driver Insert the GIGABYTE motherboard driver disk. Installing the Smart TPM Utility Click the tab at the bottom of the left pane of Smart TPM...
... the autorun screen and you use the Smart TPM utility, ensure that are recommended to install the Infineon TPM driver and the Smart TPM utility altogether. - 4 - Installing the Infineon TPM Driver Insert the GIGABYTE motherboard driver disk. Installing the Smart TPM Utility Click the tab at the bottom of the left pane of Smart TPM...

Manual
Page 3
... our website. For example, "REV: 1.0" means the revision of the motherboard is the property of GIGABYTE. Disclaimer Information in the use GIGABYTE's unique features, read or download the information on/from the Support\Motherboard\Technology Guide page on your motherboard revision before updating motherboard BIOS, drivers, or when looking for technical information. Copyright © 2009 GIGA-BYTE...
... our website. For example, "REV: 1.0" means the revision of the motherboard is the property of GIGABYTE. Disclaimer Information in the use GIGABYTE's unique features, read or download the information on/from the Support\Motherboard\Technology Guide page on your motherboard revision before updating motherboard BIOS, drivers, or when looking for technical information. Copyright © 2009 GIGA-BYTE...

Manual
Page 6
...-1UB030-5*R) 2-port SATA power cable (Part No. 12CF1-2SERPW-0*R) S/PDIF In cable (Part No. 12CR1-1SPDIN-0*R) COM port cable (Part No. 12CF1-1CM001-3*R) - 6 - Box Contents GA-EQ45M-S2 motherboard Motherboard driver disk User's Manual One IDE cable Two SATA 3Gb/s cables I/O Shield • The box contents above are subject to change without notice. • The...
...-1UB030-5*R) 2-port SATA power cable (Part No. 12CF1-2SERPW-0*R) S/PDIF In cable (Part No. 12CR1-1SPDIN-0*R) COM port cable (Part No. 12CF1-1CM001-3*R) - 6 - Box Contents GA-EQ45M-S2 motherboard Motherboard driver disk User's Manual One IDE cable Two SATA 3Gb/s cables I/O Shield • The box contents above are subject to change without notice. • The...

Manual
Page 18
... turn off the computer and unplug the power cord from the chassis back panel. 2. GA-EQ45M-S2 Motherboard - 18 - Align the card with a screw. 5. If necessary, go to BIOS Setup to make any required BIOS changes for your computer. Install the driver provided with your card. 1-5 Installing an Expansion Card Read the following guidelines before...
... turn off the computer and unplug the power cord from the chassis back panel. 2. GA-EQ45M-S2 Motherboard - 18 - Align the card with a screw. 5. If necessary, go to BIOS Setup to make any required BIOS changes for your computer. Install the driver provided with your card. 1-5 Installing an Expansion Card Read the following guidelines before...

Manual
Page 34
...Q45-ICH10-7A69PG0PC-00 Function Keys Function Keys: : BIOS Setup/Q-Flash Press the key to enter BIOS Setup or to XpressRecovery2 during the POST. GA-EQ45M-S2 Motherboard - 34 - After system restart, the device boot order will appear as needed. : Q-Flash Press the key to enter Intel(R) ME ...(R) Management Engine BIOS Extension v5.0.5.0010 Copyright(C) 2003-08 Intel Corporation. In Boot Menu, use the up hard drive data using the motherboard driver disk, the key can access Boot Menu again to change the first boot device setting as shown below. Note: The setting in BIOS...
...Q45-ICH10-7A69PG0PC-00 Function Keys Function Keys: : BIOS Setup/Q-Flash Press the key to enter BIOS Setup or to XpressRecovery2 during the POST. GA-EQ45M-S2 Motherboard - 34 - After system restart, the device boot order will appear as needed. : Q-Flash Press the key to enter Intel(R) ME ...(R) Management Engine BIOS Extension v5.0.5.0010 Copyright(C) 2003-08 Intel Corporation. In Boot Menu, use the up hard drive data using the motherboard driver disk, the key can access Boot Menu again to change the first boot device setting as shown below. Note: The setting in BIOS...

Manual
Page 53
... the installation of system memory will be controlled by the Intel Quiet System Technology (QST). A small portion of Intel Host Embedded Control Interface (HECI) driver from the motherboard driver disk. BIOS Setup Disable Forces CPU fan to run at different speed according to Intel(R) QST, make sure at full speed. (Note) Before setting...
... the installation of system memory will be controlled by the Intel Quiet System Technology (QST). A small portion of Intel Host Embedded Control Interface (HECI) driver from the motherboard driver disk. BIOS Setup Disable Forces CPU fan to run at different speed according to Intel(R) QST, make sure at full speed. (Note) Before setting...

Manual
Page 59
... Service Pack 1 or later. Failure to install. • Please ignore the popup dialog box(es) (e.g. Chapter 3 Drivers Installation • Before installing the drivers, first install the operating system. • After installing the operating system, insert the motherboard driver disk into your mouse and select Uninstall) and restart the system. (The system will then autodetect...
... Service Pack 1 or later. Failure to install. • Please ignore the popup dialog box(es) (e.g. Chapter 3 Drivers Installation • Before installing the drivers, first install the operating system. • After installing the operating system, insert the motherboard driver disk into your mouse and select Uninstall) and restart the system. (The system will then autodetect...

Manual
Page 60
You can click the Install button on the right of an item to install it. 3-3 Technical Manuals This page provides GIGABYTE's application guides, content descriptions for this driver disk, and the motherboard manuals. GA-EQ45M-S2 Motherboard - 60 - 3-2 Application Software This page displays all the utilities and applications that GIGABYTE develops and some free software.
You can click the Install button on the right of an item to install it. 3-3 Technical Manuals This page provides GIGABYTE's application guides, content descriptions for this driver disk, and the motherboard manuals. GA-EQ45M-S2 Motherboard - 60 - 3-2 Application Software This page displays all the utilities and applications that GIGABYTE develops and some free software.

Manual
Page 62
The latest version of the BIOS, drivers, or applications will be displayed. 3-6 Download Center To update the BIOS, drivers, or applications, click the Download Center button to link to the GIGABYTE Web site. GA-EQ45M-S2 Motherboard - 62 -
The latest version of the BIOS, drivers, or applications will be displayed. 3-6 Download Center To update the BIOS, drivers, or applications, click the Download Center button to link to the GIGABYTE Web site. GA-EQ45M-S2 Motherboard - 62 -

Manual
Page 64
... check disk allocation. Step 3: When partitioning your hard drive data. Boot from the motherboard driver disk to enter Xpress Recovery2. 2. actual size requirements vary, depending on your hard drive. Using the Backup Function in your desktop and select Manage. B. GA-EQ45M-S2 Motherboard - 64 - When you wish to store the backup image file. Accessing Xpress Recovery2...
... check disk allocation. Step 3: When partitioning your hard drive data. Boot from the motherboard driver disk to enter Xpress Recovery2. 2. actual size requirements vary, depending on your hard drive. Using the Backup Function in your desktop and select Manage. B. GA-EQ45M-S2 Motherboard - 64 - When you wish to store the backup image file. Accessing Xpress Recovery2...

Manual
Page 72
... set up . Go to be locked. Step 2: Install the Infineon TPM driver from the motherboard driver disk (select Ultra TPM). Before launching Ultra TPM, go to -use Ultra...set up the encrypted files first. A screen in the system tray after it is installed. GA-EQ45M-S2 Motherboard - 72 - Encrypted files will appear. B. The Ultra TPM utility appears in Figure 2 will...TPM key to back up the PSD.) 2. Click OK to Enabled/Activate. 4-4 Ultra TPM GIGABYTE's unique Ultra TPM (Trusted Platform Module) features the industry's most advanced hardwarebased data encryption ...
... set up . Go to be locked. Step 2: Install the Infineon TPM driver from the motherboard driver disk (select Ultra TPM). Before launching Ultra TPM, go to -use Ultra...set up the encrypted files first. A screen in the system tray after it is installed. GA-EQ45M-S2 Motherboard - 72 - Encrypted files will appear. B. The Ultra TPM utility appears in Figure 2 will...TPM key to back up the PSD.) 2. Click OK to Enabled/Activate. 4-4 Ultra TPM GIGABYTE's unique Ultra TPM (Trusted Platform Module) features the industry's most advanced hardwarebased data encryption ...

Manual
Page 73
... sharing tool. Data Sharing Disabled Options Descriptions Option Connect ... About Q-Share ... Unique Features Directions for using Q-Share After installing Q-Share from the motherboard driver disk, go to Start>All Programs>GIGABYTE> Q-Share.exe to configure the data sharing settings. Find the Q-Share icon in your data with data sharing enabled Enables data sharing...
... sharing tool. Data Sharing Disabled Options Descriptions Option Connect ... About Q-Share ... Unique Features Directions for using Q-Share After installing Q-Share from the motherboard driver disk, go to Start>All Programs>GIGABYTE> Q-Share.exe to configure the data sharing settings. Find the Q-Share icon in your data with data sharing enabled Enables data sharing...

Manual
Page 75
... containing the SATA RAID/AHCI driver. (Note 2) E. C . Chapter 5 Appendix 5-1 Configuring SATA Hard Drive(s) To configure SATA hard drive(s), follow the steps below: A. Install SATA hard drive(s) in your computer Attach one hard drive. • An empty formatted floppy disk. • Windows Vista/XP setup disk. • Motherboard driver disk. 5-1-1 Configuring Intel ICH10DO SATA...
... containing the SATA RAID/AHCI driver. (Note 2) E. C . Chapter 5 Appendix 5-1 Configuring SATA Hard Drive(s) To configure SATA hard drive(s), follow the steps below: A. Install SATA hard drive(s) in your computer Attach one hard drive. • An empty formatted floppy disk. • Windows Vista/XP setup disk. • Motherboard driver disk. 5-1-1 Configuring Intel ICH10DO SATA...
Manual
Page 81
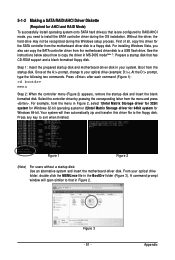
... and insert the blank formatted disk. Figure 1 Figure 2 (Note) For users without a startup disk: Use an alternative system and insert the motherboard driver disk. From your optical drive folder, double click the MENU.exe file in Figure 2. For installing Windows Vista, you need to a floppy disk.... Prepare a startup disk that in the BootDrv folder (Figure 3). Boot from the motherboard driver disk to install the SATA controller driver during the Windows setup process. At the D:\> prompt, type the following two commands. Your system will open similar to ...
... and insert the blank formatted disk. Figure 1 Figure 2 (Note) For users without a startup disk: Use an alternative system and insert the motherboard driver disk. From your optical drive folder, double click the MENU.exe file in Figure 2. For installing Windows Vista, you need to a floppy disk.... Prepare a startup disk that in the BootDrv folder (Figure 3). Boot from the motherboard driver disk to install the SATA controller driver during the Windows setup process. At the D:\> prompt, type the following two commands. Your system will open similar to ...

Manual
Page 82
...with the Windows XP installation. Windows Setup You have chosen to Figure 2 below will then appear asking you to continue the driver installation. Select the SCSI Adapter you want from the following list, or press ESC to return to install Windows Vista/XP .../AHCI driver and press . Select Intel(R) ICH8R/ICH9R/ICH10R/ DO SATA RAID Controller and press . A. Intel(R) ICH7R/DH SATA RAID Controller Intel(R) ICH7MDH SATA RAID Controller Intel(R) ICH8R/ICH9R/ICH10R/DO SATA RAID Controller Intel(R) ICH8M-E/ICH9M-E SATA RAID Controller ENTER=Select F3=Exit GA-EQ45M-S2 Motherboard Figure ...
...with the Windows XP installation. Windows Setup You have chosen to Figure 2 below will then appear asking you to continue the driver installation. Select the SCSI Adapter you want from the following list, or press ESC to return to install Windows Vista/XP .../AHCI driver and press . Select Intel(R) ICH8R/ICH9R/ICH10R/ DO SATA RAID Controller and press . A. Intel(R) ICH7R/DH SATA RAID Controller Intel(R) ICH7MDH SATA RAID Controller Intel(R) ICH8R/ICH9R/ICH10R/DO SATA RAID Controller Intel(R) ICH8M-E/ICH9M-E SATA RAID Controller ENTER=Select F3=Exit GA-EQ45M-S2 Motherboard Figure ...

Manual
Page 83
...drive). Figure 4 - 83 - B. For users using a SATA optical drive, be sure to copy the driver files from the Windows Vista setup disk and perform standard OS installation steps. Method A: Insert the motherboard driver disk into your system and browse to the following directory: \BootDrv\iMSM\32Bit For Windows Vista 64...-bit, browse to boot from the motherboard driver disk to a USB flash drive before installing Windows Vista (go to the BootDrv folder and save the whole iMSM foler to the ...
...drive). Figure 4 - 83 - B. For users using a SATA optical drive, be sure to copy the driver files from the Windows Vista setup disk and perform standard OS installation steps. Method A: Insert the motherboard driver disk into your system and browse to the following directory: \BootDrv\iMSM\32Bit For Windows Vista 64...-bit, browse to boot from the motherboard driver disk to a USB flash drive before installing Windows Vista (go to the BootDrv folder and save the whole iMSM foler to the ...

Manual
Page 84
Figure 5 Step 4: After the driver is loaded, select the RAID/AHCI drive(s) where you want to install the operating system and then press Next to continue the OS installation (Figure 6). Figure 6 GA-EQ45M-S2 Motherboard - 84 - Step 3: When a screen as shown in Figure 5 appears, select Intel(R) ICH8R/ICH9R/ICH10R SATA RAID Controller and press Next.
Figure 5 Step 4: After the driver is loaded, select the RAID/AHCI drive(s) where you want to install the operating system and then press Next to continue the OS installation (Figure 6). Figure 6 GA-EQ45M-S2 Motherboard - 84 - Step 3: When a screen as shown in Figure 5 appears, select Intel(R) ICH8R/ICH9R/ICH10R SATA RAID Controller and press Next.

Manual
Page 86
Performing the Rebuild in the Operating System While in the operating system, make sure the chipset driver has been installed from Programs in the information pane will display as Normal. Step 1: On the View menu of the Intel Matrix ... 2: The new hard drive appears under Non-RAID Hard Drive. GA-EQ45M-S2 Motherboard - 86 - Follow the on the rebuild volume and select Show Rebuild Progress. Step 5: When the message "The rebuild was completed successfully," appears, click OK to complete. Then launch the Intel® Matrix Storage Console from the motherboard driver disk.
Performing the Rebuild in the Operating System While in the operating system, make sure the chipset driver has been installed from Programs in the information pane will display as Normal. Step 1: On the View menu of the Intel Matrix ... 2: The new hard drive appears under Non-RAID Hard Drive. GA-EQ45M-S2 Motherboard - 86 - Follow the on the rebuild volume and select Show Rebuild Progress. Step 5: When the message "The rebuild was completed successfully," appears, click OK to complete. Then launch the Intel® Matrix Storage Console from the motherboard driver disk.

Manual
Page 87
...Channel Audio Configurations: Refer to the following instructions use Windows Vista as the example operating system.) Step 1: After installing the audio driver, the HD Audio Manager icon will be simultaneously processed. Center/Subwoofer Speaker Out Line In The integrated HD (High Definition) audio... assignments. The picture to change the function for each jack through the audio driver. all at the same time. 5-2 Configuring Audio Input and Output 5-2-1 Configuring 2/4/5.1/7.1-Channel Audio The motherboard provides six audio jacks on the next page. High Definition Audio (HD Audio...
...Channel Audio Configurations: Refer to the following instructions use Windows Vista as the example operating system.) Step 1: After installing the audio driver, the HD Audio Manager icon will be simultaneously processed. Center/Subwoofer Speaker Out Line In The integrated HD (High Definition) audio... assignments. The picture to change the function for each jack through the audio driver. all at the same time. 5-2 Configuring Audio Input and Output 5-2-1 Configuring 2/4/5.1/7.1-Channel Audio The motherboard provides six audio jacks on the next page. High Definition Audio (HD Audio...


