
Manual
Page 2
Configuring the System BIOS 3 2. Creating a USB Key 18 4.2. Installing the Infineon TPM Driver 4 2.2. Configuring the Smart TPM Utility 18 4.1. Other Bluetooth Settings 21 4.4. Installing the Infineon TPM Driver and the Smart TPM Utility 4 2.1. Advanced Mode...8 4. Table of Contents TPM Configuration Procedure 3 1. Creating a Bluetooth Cell Phone Key 19 4.3. Initializing the TPM chip 5 3.1. Other Features...21 - 2 - Installing the Smart TPM Utility 4 3. Initializing the TPM Chip with the Smart TPM Utility 5 3.2.
Configuring the System BIOS 3 2. Creating a USB Key 18 4.2. Installing the Infineon TPM Driver 4 2.2. Configuring the Smart TPM Utility 18 4.1. Other Bluetooth Settings 21 4.4. Installing the Infineon TPM Driver and the Smart TPM Utility 4 2.1. Advanced Mode...8 4. Table of Contents TPM Configuration Procedure 3 1. Creating a Bluetooth Cell Phone Key 19 4.3. Initializing the TPM chip 5 3.1. Other Features...21 - 2 - Installing the Smart TPM Utility 4 3. Initializing the TPM Chip with the Smart TPM Utility 5 3.2.
Manual
Page 3
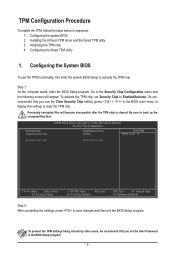
... the User Password in sequence: 1. Be sure to save changes and then exit the BIOS Setup program. Configuring the system BIOS 2. Installing the Infineon TPM driver and the Smart TPM utility 3. Initializing the TPM chip 4.
... the User Password in sequence: 1. Be sure to save changes and then exit the BIOS Setup program. Configuring the system BIOS 2. Installing the Infineon TPM driver and the Smart TPM utility 3. Initializing the TPM chip 4.
Manual
Page 4
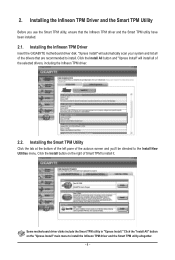
Installing the Infineon TPM Driver Insert the GIGABYTE motherboard driver disk. "Xpress Install" will install all of Smart TPM to the Install New Utilities menu. Some motherboard driver disks include the Smart TPM utility in "Xpress Install." Installing the Smart TPM Utility Click the tab at the bottom of the left pane of ...
Installing the Infineon TPM Driver Insert the GIGABYTE motherboard driver disk. "Xpress Install" will install all of Smart TPM to the Install New Utilities menu. Some motherboard driver disks include the Smart TPM utility in "Xpress Install." Installing the Smart TPM Utility Click the tab at the bottom of the left pane of ...
Manual
Page 5
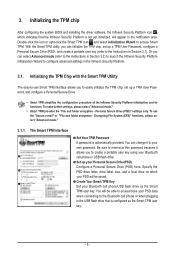
... simplifies the configuration procedure of the Infineon Security Platform initialization and its functions. Initializing the TPM chip After configuring the system BIOS and installing the driver software, the Infineon Security Platform icon , which your PSD will appear in Section 3.1). Initializing the TPM Chip with the Smart TPM Utility The easy-to...
... simplifies the configuration procedure of the Infineon Security Platform initialization and its functions. Initializing the TPM chip After configuring the system BIOS and installing the driver software, the Infineon Security Platform icon , which your PSD will appear in Section 3.1). Initializing the TPM Chip with the Smart TPM Utility The easy-to...
Manual
Page 1
Configuring the System BIOS 2 2. Initializing the TPM Chip 4 3.1. Advanced Mode ...6 4. Installing the Infineon TPM Driver and the GIGABYTE Ultra TPM Utility 3 3. Easy Mode ...4 3.2. Table of Contents TPM Configuration Procedure 2 1. Configuring the GIGABYTE Ultra TPM Utility 16 - 1 -
Configuring the System BIOS 2 2. Initializing the TPM Chip 4 3.1. Advanced Mode ...6 4. Installing the Infineon TPM Driver and the GIGABYTE Ultra TPM Utility 3 3. Easy Mode ...4 3.2. Table of Contents TPM Configuration Procedure 2 1. Configuring the GIGABYTE Ultra TPM Utility 16 - 1 -
Manual
Page 2
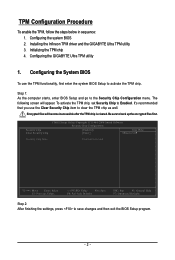
Configuring the GIGABYTE Ultra TPM utility 1. The following screen will become inaccessible after the TPM chip is cleared. It's recommended that you use the TPM functionality, first enter ... menu. Initializing the TPM chip 4. Encrypted files will appear. Be sure to activate the TPM chip. Configuring the system BIOS 2. Installing the Infineon TPM driver and the GIGABYTE Ultra TPM utility 3. TPM Configuration Procedure To enable the TPM, follow the steps below in sequence: 1. Configuring the System BIOS To use the Clear...
Configuring the GIGABYTE Ultra TPM utility 1. The following screen will become inaccessible after the TPM chip is cleared. It's recommended that you use the TPM functionality, first enter ... menu. Initializing the TPM chip 4. Encrypted files will appear. Be sure to activate the TPM chip. Configuring the system BIOS 2. Installing the Infineon TPM driver and the GIGABYTE Ultra TPM utility 3. TPM Configuration Procedure To enable the TPM, follow the steps below in sequence: 1. Configuring the System BIOS To use the Clear...
Manual
Page 3
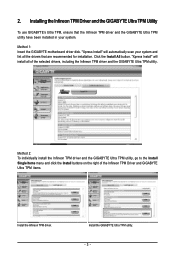
... the Install Single Items menu and click the Install buttons on the right of the selected drivers, including the Infineon TPM driver and the GIGABYTE Ultra TPM utility. Installing the Infineon TPM Driver and the GIGABYTE Ultra TPM Utility To use GIGABYTE's Ultra TPM, ensure that are recommended for installation. "Xpress Install" will install all the...
... the Install Single Items menu and click the Install buttons on the right of the selected drivers, including the Infineon TPM driver and the GIGABYTE Ultra TPM utility. Installing the Infineon TPM Driver and the GIGABYTE Ultra TPM Utility To use GIGABYTE's Ultra TPM, ensure that are recommended for installation. "Xpress Install" will install all the...
Manual
Page 4
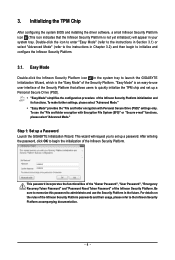
...the Security Platform that the Infineon Security Platform is not yet initialized.) will request you to set up a Password Launch the GIGABYTE Initialization Wizard. This password incorporates the functionalities of the "Owner Password", "User Password", "Emergency Recovery Token Password" and ... For details on the rules of the Infineon Security Platform. Initializing the TPM Chip After configuring the system BIOS and installing the driver software, a small Infineon Security Platform icon (This icon indicates that allows users to the Infineon Security Platform accompanying documentation. - ...
...the Security Platform that the Infineon Security Platform is not yet initialized.) will request you to set up a Password Launch the GIGABYTE Initialization Wizard. This password incorporates the functionalities of the "Owner Password", "User Password", "Emergency Recovery Token Password" and ... For details on the rules of the Infineon Security Platform. Initializing the TPM Chip After configuring the system BIOS and installing the driver software, a small Infineon Security Platform icon (This icon indicates that allows users to the Infineon Security Platform accompanying documentation. - ...
Manual
Page 3
...the Support\Motherboard\Technology Guide page on your motherboard revision before updating motherboard BIOS, drivers, or when looking for technical information. All rights reserved. No part of GIGABYTE. The logo is the property of this manual are legally registered to the ...specifications and features in this manual is protected by GIGABYTE without GIGABYTE's prior written permission. Changes to their respective owners. Disclaimer Information in this : "REV: X.X." Check your motherboard...
...the Support\Motherboard\Technology Guide page on your motherboard revision before updating motherboard BIOS, drivers, or when looking for technical information. All rights reserved. No part of GIGABYTE. The logo is the property of this manual are legally registered to the ...specifications and features in this manual is protected by GIGABYTE without GIGABYTE's prior written permission. Changes to their respective owners. Disclaimer Information in this : "REV: X.X." Check your motherboard...
Manual
Page 5
... 5 Appendix ...87 5-1 Configuring SATA Hard Drive(s 87 5-1-1 Configuring the Onboard SATA Controller 87 5-1-2 Making a SATA RAID/AHCI Driver Diskette 93 5-1-3 Installing the SATA RAID/AHCI Driver and Operating System 95 5-2 Configuring Audio Input and Output 100 5-2-1 5-2-2 5-2-3 5-2-4 5-2-5 Configuring 2/4/5.1/7.1-Channel Audio 100 Installing the S/PDIF... 5-3 Troubleshooting 108 5-3-1 Frequently Asked Questions 108 5-3-2 Troubleshooting Procedure 109 Regulatory Statements 111 Only for GA-EP45C-DS3R. (Note) This feature is optional due to different regional policy. - 5 -
... 5 Appendix ...87 5-1 Configuring SATA Hard Drive(s 87 5-1-1 Configuring the Onboard SATA Controller 87 5-1-2 Making a SATA RAID/AHCI Driver Diskette 93 5-1-3 Installing the SATA RAID/AHCI Driver and Operating System 95 5-2 Configuring Audio Input and Output 100 5-2-1 5-2-2 5-2-3 5-2-4 5-2-5 Configuring 2/4/5.1/7.1-Channel Audio 100 Installing the S/PDIF... 5-3 Troubleshooting 108 5-3-1 Frequently Asked Questions 108 5-3-2 Troubleshooting Procedure 109 Regulatory Statements 111 Only for GA-EP45C-DS3R. (Note) This feature is optional due to different regional policy. - 5 -
Manual
Page 6
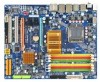
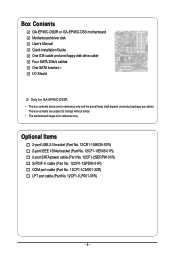
...COM port cable (Part No. 12CF1-1CM001-32R) LPT port cable (Part No. 12CF1-1LP001-01R) - 6 - Box Contents GA-EP45C-DS3R or GA-EP45C-DS3 motherboard Motherboard driver disk User's Manual Quick Installation Guide One IDE cable and one floppy disk drive cable Four SATA 3Gb/s cables One SATA bracket I/O... Shield Only for GA-EP45C-DS3R. • The box contents above are subject to change without notice. • The ...
...COM port cable (Part No. 12CF1-1CM001-32R) LPT port cable (Part No. 12CF1-1LP001-01R) - 6 - Box Contents GA-EP45C-DS3R or GA-EP45C-DS3 motherboard Motherboard driver disk User's Manual Quick Installation Guide One IDE cable and one floppy disk drive cable Four SATA 3Gb/s cables One SATA bracket I/O... Shield Only for GA-EP45C-DS3R. • The box contents above are subject to change without notice. • The ...
Manual
Page 18
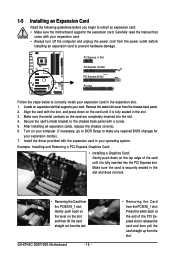
... chassis back panel with your expansion card. • Always turn off the computer and unplug the power cord from the slot. Install the driver provided with the slot, and press down on the top edge of the PCI Express slot to release the card and then pull the card... 1-5 Installing an Expansion Card Read the following guidelines before installing an expansion card to prevent hardware damage. Remove the metal slot cover from the slot. GA-EP45C-DS3R/DS3 Motherboard - 18 - • Removing the Card from the PCIEX8_1 slot: Press the white latch at the end of the card until it is...
... chassis back panel with your expansion card. • Always turn off the computer and unplug the power cord from the slot. Install the driver provided with the slot, and press down on the top edge of the PCI Express slot to release the card and then pull the card... 1-5 Installing an Expansion Card Read the following guidelines before installing an expansion card to prevent hardware damage. Remove the metal slot cover from the slot. GA-EP45C-DS3R/DS3 Motherboard - 18 - • Removing the Card from the PCIEX8_1 slot: Press the white latch at the end of the card until it is...
Manual
Page 36
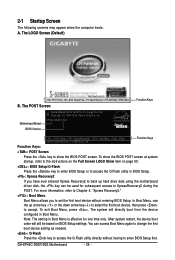
2-1 Startup Screen The following screens may appear when the computer boots. EP45C-DS3R D18c . . . . : BIOS Setup : XpressRecovery2 : Boot Menu : Qflash 06/06/2008-P45-ICH10-7A89PG02C-00 Function Keys Function Keys: : POST Screen Press the key to ...motherboard driver disk, the key can access Boot Menu again to change the first boot device setting as needed. : Q-Flash Press the key to access the Q-Flash utility directly without entering BIOS Setup. After system restart, the device boot order will directly boot from the device configured in Boot Menu. GA-EP45C-DS3R/...
2-1 Startup Screen The following screens may appear when the computer boots. EP45C-DS3R D18c . . . . : BIOS Setup : XpressRecovery2 : Boot Menu : Qflash 06/06/2008-P45-ICH10-7A89PG02C-00 Function Keys Function Keys: : POST Screen Press the key to ...motherboard driver disk, the key can access Boot Menu again to change the first boot device setting as needed. : Q-Flash Press the key to access the Q-Flash utility directly without entering BIOS Setup. After system restart, the device boot order will directly boot from the device configured in Boot Menu. GA-EP45C-DS3R/...
Manual
Page 51
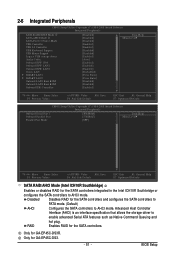
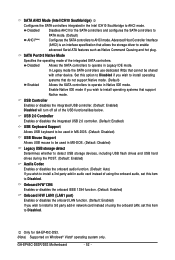
Advanced Host Controller Interface (AHCI) is an interface specification that allows the storage driver to AHCI mode. Only for GA-EP45C-DS3R. Only for GA-EP45C-DS3. - 51 - BIOS Setup 2-6 Integrated Peripherals CMOS Setup Utility-Copyright (C) 1984-2008 Award Software Integrated Peripherals SATA RAID/AHCI Mode 1 SATA AHCI Mode 2 SATA Port0-3 ...
Advanced Host Controller Interface (AHCI) is an interface specification that allows the storage driver to AHCI mode. Only for GA-EP45C-DS3R. Only for GA-EP45C-DS3. - 51 - BIOS Setup 2-6 Integrated Peripherals CMOS Setup Utility-Copyright (C) 1984-2008 Award Software Integrated Peripherals SATA RAID/AHCI Mode 1 SATA AHCI Mode 2 SATA Port0-3 ...
Manual
Page 52
...disables the onboard audio function. (Default: Auto) If you wish to install operating systems that allows the storage driver to be shared with other device. Disabled Disables AHCI for GA-EP45C-DS3. (Note) Supported on Windows® Vista® operating system only. Onboard H/W 1394 Enables or ... if you wish to install a 3rd party add-in audio card instead of using the onboard LAN, set this item to Disabled. GA-EP45C-DS3R/DS3 Motherboard - 52 - SATA AHCI Mode (Intel ICH10 Southbridge) Configures the SATA controllers integrated in the Intel ICH10 Southbridge to operate ...
...disables the onboard audio function. (Default: Auto) If you wish to install operating systems that allows the storage driver to be shared with other device. Disabled Disables AHCI for GA-EP45C-DS3. (Note) Supported on Windows® Vista® operating system only. Onboard H/W 1394 Enables or ... if you wish to install a 3rd party add-in audio card instead of using the onboard LAN, set this item to Disabled. GA-EP45C-DS3R/DS3 Motherboard - 52 - SATA AHCI Mode (Intel ICH10 Southbridge) Configures the SATA controllers integrated in the Intel ICH10 Southbridge to operate ...
Manual
Page 65
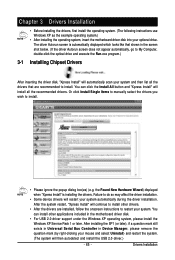
... your mouse and select Uninstall) and restart the system. (The system will install all the drivers that shown in the motherboard driver disk. • For USB 2.0 driver support under the Windows XP operating system, please install the Windows XP Service Pack 1 or ...Xpress Install" is automatically displayed which looks like that are installed, follow the onscreen instructions to install. Chapter 3 Drivers Installation • Before installing the drivers, first install the operating system. (The following instructions use Windows XP as the example operating system.) • After...
... your mouse and select Uninstall) and restart the system. (The system will install all the drivers that shown in the motherboard driver disk. • For USB 2.0 driver support under the Windows XP operating system, please install the Windows XP Service Pack 1 or ...Xpress Install" is automatically displayed which looks like that are installed, follow the onscreen instructions to install. Chapter 3 Drivers Installation • Before installing the drivers, first install the operating system. (The following instructions use Windows XP as the example operating system.) • After...
Manual
Page 66
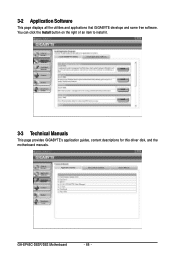
GA-EP45C-DS3R/DS3 Motherboard - 66 - You can click the Install button on the right of an item to install it. 3-3 Technical Manuals This page provides GIGABYTE's application guides, content descriptions for this driver disk, and the motherboard manuals. 3-2 Application Software This page displays all the utilities and applications that GIGABYTE develops and some free software.
GA-EP45C-DS3R/DS3 Motherboard - 66 - You can click the Install button on the right of an item to install it. 3-3 Technical Manuals This page provides GIGABYTE's application guides, content descriptions for this driver disk, and the motherboard manuals. 3-2 Application Software This page displays all the utilities and applications that GIGABYTE develops and some free software.
Manual
Page 67
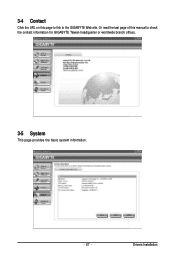
3-4 Contact Click the URL on this manual to the GIGABYTE Web site. Drivers Installation Or read the last page of this page to link to check the contact information for GIGABYTE Taiwan headquarter or worldwide branch offices. 3-5 System This page provides the basic system information. - 67 -
3-4 Contact Click the URL on this manual to the GIGABYTE Web site. Drivers Installation Or read the last page of this page to link to check the contact information for GIGABYTE Taiwan headquarter or worldwide branch offices. 3-5 System This page provides the basic system information. - 67 -
Manual
Page 68
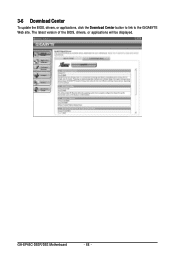
3-6 Download Center To update the BIOS, drivers, or applications, click the Download Center button to link to the GIGABYTE Web site. GA-EP45C-DS3R/DS3 Motherboard - 68 - The latest version of the BIOS, drivers, or applications will be displayed.
3-6 Download Center To update the BIOS, drivers, or applications, click the Download Center button to link to the GIGABYTE Web site. GA-EP45C-DS3R/DS3 Motherboard - 68 - The latest version of the BIOS, drivers, or applications will be displayed.

Manual
Page 69
... can only back up data on the amount of data). • It is recommended to back up your system soon after the operating system and drivers are installed. • The amount of data and hard drive access speed may affect the speed at the end of the hard drive, make sure...
... can only back up data on the amount of data). • It is recommended to back up your system soon after the operating system and drivers are installed. • The amount of data and hard drive access speed may affect the speed at the end of the hard drive, make sure...


