Manual
Page 9
... and power connectors of your dealer. If you are connected tightly and securely. • When handling the motherboard, avoid touching any installation steps or have a problem related to the use of electrostatic discharge (ESD). These stickers are required for warranty validation. • Always remove the AC power by unplugging the power...
... and power connectors of your dealer. If you are connected tightly and securely. • When handling the motherboard, avoid touching any installation steps or have a problem related to the use of electrostatic discharge (ESD). These stickers are required for warranty validation. • Always remove the AC power by unplugging the power...
Manual
Page 31
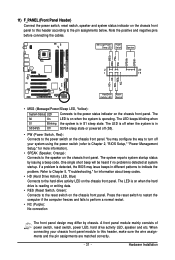
... header, make sure the wire assignments and the pin assignments are matched correctly. - 31 - One single short beep will be heard if no problem is reading or writing data. • RES (Reset Switch, Green): Connects to the reset switch on when the hard drive is detected at ... Chapter 2, "BIOS Setup," "Power Management Setup," for information about beep codes. • HD (Hard Drive Activity LED, Blue) Connects to indicate the problem. Note the positive and negative pins before connecting the cables. The S0 On LED is on the chassis front panel. The system reports system startup...
... header, make sure the wire assignments and the pin assignments are matched correctly. - 31 - One single short beep will be heard if no problem is reading or writing data. • RES (Reset Switch, Green): Connects to the reset switch on when the hard drive is detected at ... Chapter 2, "BIOS Setup," "Power Management Setup," for information about beep codes. • HD (Hard Drive Activity LED, Blue) Connects to indicate the problem. Note the positive and negative pins before connecting the cables. The S0 On LED is on the chassis front panel. The system reports system startup...

Manual
Page 37
...you do it is turned off, the battery on using the Q-Flash and @BIOS utilities, refer to boot. To upgrade the BIOS, use either the GIGABYTE Q-Flash or @BIOS utility. • Q-Flash allows the user to Chapter 5, "Troubleshooting," for how to activate certain system features. When the power ...allows the user to modify basic system configuration settings or to clear the CMOS values.) - 37 - To flash the BIOS, do not encounter problems using the current version of the battery/clearing CMOS jumper in the CMOS. If this chapter or introductions of BIOS, it with caution. BIOS ...
...you do it is turned off, the battery on using the Q-Flash and @BIOS utilities, refer to boot. To upgrade the BIOS, use either the GIGABYTE Q-Flash or @BIOS utility. • Q-Flash allows the user to Chapter 5, "Troubleshooting," for how to activate certain system features. When the power ...allows the user to modify basic system configuration settings or to clear the CMOS values.) - 37 - To flash the BIOS, do not encounter problems using the current version of the battery/clearing CMOS jumper in the CMOS. If this chapter or introductions of BIOS, it with caution. BIOS ...
Manual
Page 55
... four pairs of wires will show Open, and the length shown is the approximate length of the attached LAN cable. BIOS Setup If a cable problem occurs on a specified pair of 10/100 Mbps in Windows mode or when the LAN Boot ROM is detected on Part 1-2. Note: The Gigabit... Open and the Length fields show Short and then length shown will appear: Start detecting at a normal speed of the attached LAN cable. When a Cable Problem Occurs... Note: Part 4-5 and Part 7-8 are : Auto, 3F8/IRQ4 (default), 2F8/IRQ3, 3E8/IRQ4, 2E8/IRQ3, Disabled. - 55 - Onboard LAN1 Boot ROM (LAN1 port...
... four pairs of wires will show Open, and the length shown is the approximate length of the attached LAN cable. BIOS Setup If a cable problem occurs on a specified pair of 10/100 Mbps in Windows mode or when the LAN Boot ROM is detected on Part 1-2. Note: The Gigabit... Open and the Length fields show Short and then length shown will appear: Start detecting at a normal speed of the attached LAN cable. When a Cable Problem Occurs... Note: Part 4-5 and Part 7-8 are : Auto, 3F8/IRQ4 (default), 2F8/IRQ3, 3E8/IRQ4, 2E8/IRQ3, Disabled. - 55 - Onboard LAN1 Boot ROM (LAN1 port...

Manual
Page 106
... possible computer problems. (For reference only.) 1 short: System boots successfully 2 short: CMOS setting error 1 long, 1 short: Memory or motherboard error 1 long, 2 short: Monitor or graphics card error 1 long, 3 short: Keyboard error 1 long, 9 short: BIOS ROM error Continuous long beeps: Graphics card not inserted properly Continuous short beeps: Power error GA-EP45-EXTREME Motherboard - 106...
... possible computer problems. (For reference only.) 1 short: System boots successfully 2 short: CMOS setting error 1 long, 1 short: Memory or motherboard error 1 long, 2 short: Monitor or graphics card error 1 long, 3 short: Keyboard error 1 long, 9 short: BIOS ROM error Continuous long beeps: Graphics card not inserted properly Continuous short beeps: Power error GA-EP45-EXTREME Motherboard - 106...
Manual
Page 107
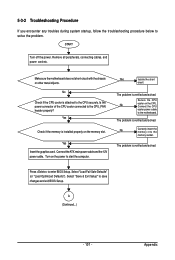
... (Continued...) - 107 - START Turn off the power. Turn on the power to enter BIOS Setup. Secure the CPU No cooler on the memory slot. The problem is verified and solved. Connect the ATX main power cable and the 12V power cable. Press to start the computer. No Check if the CPU... cooler is attached to save changes and exit BIOS Setup. The problem is verified and solved. The problem is installed properly on the CPU. Yes Check if the memory is verified and solved. Select "Save & Exit Setup" to the...
... (Continued...) - 107 - START Turn off the power. Turn on the power to enter BIOS Setup. Secure the CPU No cooler on the memory slot. The problem is verified and solved. Connect the ATX main power cable and the 12V power cable. Press to start the computer. No Check if the CPU... cooler is attached to save changes and exit BIOS Setup. The problem is verified and solved. The problem is installed properly on the CPU. Yes Check if the memory is verified and solved. Select "Save & Exit Setup" to the...
Manual
Page 108
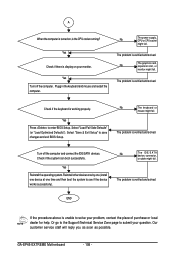
... save changes and exit BIOS Setup. No The keyboard or mouse might fail. The problem is verified and solved. Or go to the Support\Technical Service Zone page to submit your problem, contact the place of purchase or local dealer for help. Yes Check if there is...connector, or cable might fail. GA-EP45-EXTREME Motherboard - 108 - Turn off the computer. Our customer service staff will reply you as soon as possible. Yes Reinstall the operating system. A When the computer is turned on your monitor. The problem is verified and solved. The problem is verified and solved. No...
... save changes and exit BIOS Setup. No The keyboard or mouse might fail. The problem is verified and solved. Or go to the Support\Technical Service Zone page to submit your problem, contact the place of purchase or local dealer for help. Yes Check if there is...connector, or cable might fail. GA-EP45-EXTREME Motherboard - 108 - Turn off the computer. Our customer service staff will reply you as soon as possible. Yes Reinstall the operating system. A When the computer is turned on your monitor. The problem is verified and solved. The problem is verified and solved. No...


