Manual
Page 3
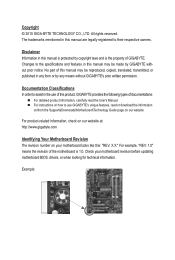
...any form or by GIGABYTE without GIGABYTE's prior written permission. For product-related information, check on our website at: http://www.gigabyte.com Identifying Your Motherboard Revision The revision number on how to their respective owners. Changes to the specifications and features in this... manual are legally registered to use of this manual may be made by any means without prior notice. The trademarks mentioned in this product, GIGABYTE provides the following types of GIGABYTE. All rights reserved. For...
...any form or by GIGABYTE without GIGABYTE's prior written permission. For product-related information, check on our website at: http://www.gigabyte.com Identifying Your Motherboard Revision The revision number on how to their respective owners. Changes to the specifications and features in this... manual are legally registered to use of this manual may be made by any means without prior notice. The trademarks mentioned in this product, GIGABYTE provides the following types of GIGABYTE. All rights reserved. For...

Manual
Page 4
Table of Contents Box Contents...6 Optional Items...6 GA-EG41MFT-US2H Motherboard Layout 7 GA-EG41MFT-US2H Motherboard Block Diagram 8 Chapter 1 Hardware Installation 9 1-1 Installation Precautions 9 1-2 Product Specifications 10 1-3 Installing the CPU and CPU Cooler 13 1-3-1 Installing the CPU 13 1-3-2 Installing the CPU Cooler 15 1-4 Installing the Memory 16 1-4-1 Dual Channel Memory Configuration ...
Table of Contents Box Contents...6 Optional Items...6 GA-EG41MFT-US2H Motherboard Layout 7 GA-EG41MFT-US2H Motherboard Block Diagram 8 Chapter 1 Hardware Installation 9 1-1 Installation Precautions 9 1-2 Product Specifications 10 1-3 Installing the CPU and CPU Cooler 13 1-3-1 Installing the CPU 13 1-3-2 Installing the CPU Cooler 15 1-4 Installing the Memory 16 1-4-1 Dual Channel Memory Configuration ...

Manual
Page 10
... 1394a ports (1 on the back panel, 4 via the IEEE 1394a bracket connected to 1 floppy disk drive USB South Bridge: - 1-2 Product Specifications CPU w w Support for an Intel® Core™ 2 Extreme processor/ Intel® Core™ 2 Quad processor/Intel® Core™ 2... Duo processor/ Intel® Pentium® processor/Intel® Celeron® processor in the LGA775 package (Go to GIGABYTE's website for the latest CPU support list.) L2 cache varies with CPU Front Side Bus w 1333/1066/800 MHz FSB Chipset w w Memory ...
... 1394a ports (1 on the back panel, 4 via the IEEE 1394a bracket connected to 1 floppy disk drive USB South Bridge: - 1-2 Product Specifications CPU w w Support for an Intel® Core™ 2 Extreme processor/ Intel® Core™ 2 Quad processor/Intel® Core™ 2... Duo processor/ Intel® Pentium® processor/Intel® Celeron® processor in the LGA775 package (Go to GIGABYTE's website for the latest CPU support list.) L2 cache varies with CPU Front Side Bus w 1333/1066/800 MHz FSB Chipset w w Memory ...
Manual
Page 13
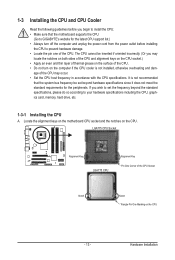
... the CPU: • Make sure that the system bus frequency be inserted if oriented incorrectly. (Or you wish to set beyond the standard specifications, please do so according to prevent hardware damage. • Locate the pin one of the CPU. Locate the alignment keys on the motherboard ... CPU. • Do not turn on the computer if the CPU cooler is not recommended that the motherboard supports the CPU. (Go to GIGABYTE's website for the peripherals. It is not installed, otherwise overheating and dam- 1-3 Installing the CPU and CPU Cooler Read the following guidelines before...
... the CPU: • Make sure that the system bus frequency be inserted if oriented incorrectly. (Or you wish to set beyond the standard specifications, please do so according to prevent hardware damage. • Locate the pin one of the CPU. Locate the alignment keys on the motherboard ... CPU. • Do not turn on the computer if the CPU cooler is not recommended that the motherboard supports the CPU. (Go to GIGABYTE's website for the peripherals. It is not installed, otherwise overheating and dam- 1-3 Installing the CPU and CPU Cooler Read the following guidelines before...

Manual
Page 16
... memory. DS/SS Four Modules SS SS SS SS (SS=Single-Sided, DS=Double-Sided, "- -"=No Memory) DDR3_1 DDR3_2 DDR3_3 DDR3_4 Due to GIGABYTE's website for the latest memory support list.) When memory modules of the same capacity, brand, speed, and chips be used . (Go to... memory mode will appear during the POST. When enabling Dual Channel mode with DDR3 1066 MHz modules, the memory speed will automatically detect the specifications and capacity of the same capacity, brand, speed, and chips be populated and remain in the same colored DDR3 sockets for the latest supported...
... memory. DS/SS Four Modules SS SS SS SS (SS=Single-Sided, DS=Double-Sided, "- -"=No Memory) DDR3_1 DDR3_2 DDR3_3 DDR3_4 Due to GIGABYTE's website for the latest memory support list.) When memory modules of the same capacity, brand, speed, and chips be used . (Go to... memory mode will appear during the POST. When enabling Dual Channel mode with DDR3 1066 MHz modules, the memory speed will automatically detect the specifications and capacity of the same capacity, brand, speed, and chips be populated and remain in the same colored DDR3 sockets for the latest supported...
Manual
Page 19
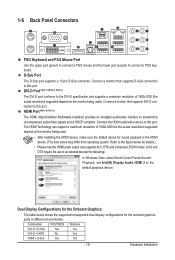
... DVI-D + D-Sub Yes Yes DVI-D + HDMI No Yes HDMI + D-Sub Yes Yes - 19 - DVI-D Port (Note 1) (Note 2) (Note 3) The DVI-D port conforms to the DVI-D specification and supports a maximum resolution of an external decoder for the onboard graphics ports in different environments. Dual Display Configurations for the Onboard Graphics: The table...
... DVI-D + D-Sub Yes Yes DVI-D + HDMI No Yes HDMI + D-Sub Yes Yes - 19 - DVI-D Port (Note 1) (Note 2) (Note 3) The DVI-D port conforms to the DVI-D specification and supports a maximum resolution of an external decoder for the onboard graphics ports in different environments. Dual Display Configurations for the Onboard Graphics: The table...

Manual
Page 20
.... Line In Jack (Blue) The default line in jack. Hardware Installation - 20 - USB Port The USB port supports the USB 2.0/1.1 specification. Connection/ Speed LED Activity LED Connection/Speed LED: State Description Orange 1 Gbps data rate Green 100 Mbps data rate LAN Port Off 10... to a back panel connector, first remove the cable from the connector. IEEE 1394a Port The IEEE 1394 port supports the IEEE 1394a specification, featuring high speed, high bandwidth and hotplug capabilities. Use this feature, ensure that supports digital optical audio. Rear Speaker Out Jack (Black...
.... Line In Jack (Blue) The default line in jack. Hardware Installation - 20 - USB Port The USB port supports the USB 2.0/1.1 specification. Connection/ Speed LED Activity LED Connection/Speed LED: State Description Orange 1 Gbps data rate Green 100 Mbps data rate LAN Port Off 10... to a back panel connector, first remove the cable from the connector. IEEE 1394a Port The IEEE 1394 port supports the IEEE 1394a specification, featuring high speed, high bandwidth and hotplug capabilities. Use this feature, ensure that supports digital optical audio. Rear Speaker Out Jack (Black...

Manual
Page 28
... to installing the IEEE 1394a bracket, be sure to turn off your computer and then attach the other end of the cable to USB 2.0/1.1 specification. For purchasing the optional IEEE 1394a bracket, please contact the local dealer. Each USB header can provide one end of the device cable to your... computer and unplug the power cord from the power outlet to prevent damage to IEEE 1394a specification. Pin No. The IEEE 1394a header can provide two USB ports via an optional IEEE 1394a bracket. 13) F_USB1/F_USB2 (USB Headers) The headers...
... to installing the IEEE 1394a bracket, be sure to turn off your computer and then attach the other end of the cable to USB 2.0/1.1 specification. For purchasing the optional IEEE 1394a bracket, please contact the local dealer. Each USB header can provide one end of the device cable to your... computer and unplug the power cord from the power outlet to prevent damage to IEEE 1394a specification. Pin No. The IEEE 1394a header can provide two USB ports via an optional IEEE 1394a bracket. 13) F_USB1/F_USB2 (USB Headers) The headers...
Manual
Page 36
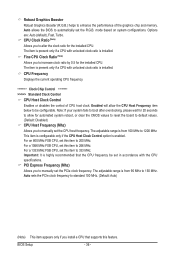
... to boot after overclocking, please wait for 20 seconds to allow the CPU Host Frequency item below to manually set in accordance with the CPU specifications. PCI Express Frequency (Mhz) Allows you to be set the CPU host frequency. Options are: Auto (default), Fast, Turbo. Auto sets the PCIe clock frequency...
... to boot after overclocking, please wait for 20 seconds to allow the CPU Host Frequency item below to manually set in accordance with the CPU specifications. PCI Express Frequency (Mhz) Allows you to be set the CPU host frequency. Options are: Auto (default), Fast, Turbo. Auto sets the PCIe clock frequency...

Manual
Page 42
Select the desired field and use the up arrow or down arrow key to set this item to manually enter the specifications of the device during the POST for faster system startup. • Manual Allows you wish to enter the parameters manually, refer to set the...) • None If no IDE/SATA devices are used , set the date. IDE Channel 0 Master/Slave IDE Channel 0 Master/Slave Configure your hard drive specifications. Precomp Write precompensation cylinder. The date format is set this item to CHS. Time (hh:mm:ss) Sets the system time. is 13:0:0.
Select the desired field and use the up arrow or down arrow key to set this item to manually enter the specifications of the device during the POST for faster system startup. • Manual Allows you wish to enter the parameters manually, refer to set the...) • None If no IDE/SATA devices are used , set the date. IDE Channel 0 Master/Slave IDE Channel 0 Master/Slave Configure your hard drive specifications. Precomp Write precompensation cylinder. The date format is set this item to CHS. Time (hh:mm:ss) Sets the system time. is 13:0:0.

Manual
Page 52
... system. When prompted for Windows 7/Vista operating system. (Default: Enabled) HPET Mode (Note) Allows you need an ATX power supply providing at a specific time on each day or on a specific day in a month. ErP Support Determines whether to let the system consume less than 1W power in S5 (shutdown) state. (Default: Disabled...
... system. When prompted for Windows 7/Vista operating system. (Default: Enabled) HPET Mode (Note) Allows you need an ATX power supply providing at a specific time on each day or on a specific day in a month. ErP Support Determines whether to let the system consume less than 1W power in S5 (shutdown) state. (Default: Disabled...

Manual
Page 70
...fan speed to be sure to click Set for your own sound file (.wav file). The Memory tab provides information on a specific slot to see its information. You can select memory module on the installed memory module(s). Incorrectly doing overclock/overvoltage may result ...mode, be changed linearly based on the installed CPU and motherboard. Before you do overclock/overvoltage in EasyTune 6 may occur. 4-3 EasyTune 6 GIGABYTE's EasyTune 6 is not supported. The user-friendly EasyTune 6 interface also includes tabbed pages for CPU and memory information, letting users read ...
...fan speed to be sure to click Set for your own sound file (.wav file). The Memory tab provides information on a specific slot to see its information. You can select memory module on the installed memory module(s). Incorrectly doing overclock/overvoltage may result ...mode, be changed linearly based on the installed CPU and motherboard. Before you do overclock/overvoltage in EasyTune 6 may occur. 4-3 EasyTune 6 GIGABYTE's EasyTune 6 is not supported. The user-friendly EasyTune 6 interface also includes tabbed pages for CPU and memory information, letting users read ...

Manual
Page 74
... scroll bar on the right or at least 25 percent of the hard drive space to optimize the storage space for copying files/folders from a specific backup on PATA and SATA hard drives (partitioned on NTFS file system) in the original partition of the data. The Smart Recovery Preference dialog box...
... scroll bar on the right or at least 25 percent of the hard drive space to optimize the storage space for copying files/folders from a specific backup on PATA and SATA hard drives (partitioned on NTFS file system) in the original partition of the data. The Smart Recovery Preference dialog box...