Manual
Page 5
... 6...54 4-4 Q-Share...55 4-5 SMART Recovery 56 4-6 Auto Green...57 Chapter 5 Appendix...59 5-1 Configuring SATA Hard Drive(s 59 5-1-1 Configuring GIGABYTE SATA2 SATA Controller 60 5-1-2 Making a SATA RAID/AHCI Driver Diskette 66 5-1-3 Installing the SATA RAID/AHCI Driver and Operating System 67 5-2 Configuring Audio Input and Output 72 5-2-1 Configuring 2/4/5.1/7.1-Channel Audio 72 5-2-2 Configuring Microphone Recording...
... 6...54 4-4 Q-Share...55 4-5 SMART Recovery 56 4-6 Auto Green...57 Chapter 5 Appendix...59 5-1 Configuring SATA Hard Drive(s 59 5-1-1 Configuring GIGABYTE SATA2 SATA Controller 60 5-1-2 Making a SATA RAID/AHCI Driver Diskette 66 5-1-3 Installing the SATA RAID/AHCI Driver and Operating System 67 5-2 Configuring Audio Input and Output 72 5-2-1 Configuring 2/4/5.1/7.1-Channel Audio 72 5-2-2 Configuring Microphone Recording...
Manual
Page 33
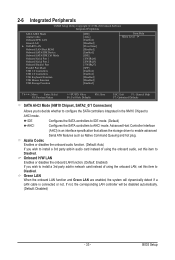
...such as Native Command Queuing and hot plug. 2-6 Integrated Peripherals CMOS Setup Utility-Copyright (C) 1984-2010 Award Software Integrated Peripherals SATA AHCI Mode Azalia Codec Onboard H/W LAN Green LAN } SMART LAN Onboard LAN Boot ROM Onboard SATA/IDE Device Onboard SATA/IDE Ctrl Mode...card instead of using the onboard audio, set this item to Disabled. IDE Configures the SATA controllers to IDE mode. (Default) AHCI Configures the SATA controllers to Disabled. Green LAN When the onboard LAN function and Green LAN are enabled, the system will be ...
...such as Native Command Queuing and hot plug. 2-6 Integrated Peripherals CMOS Setup Utility-Copyright (C) 1984-2010 Award Software Integrated Peripherals SATA AHCI Mode Azalia Codec Onboard H/W LAN Green LAN } SMART LAN Onboard LAN Boot ROM Onboard SATA/IDE Device Onboard SATA/IDE Ctrl Mode...card instead of using the onboard audio, set this item to Disabled. IDE Configures the SATA controllers to IDE mode. (Default) AHCI Configures the SATA controllers to Disabled. Green LAN When the onboard LAN function and Green LAN are enabled, the system will be ...
Manual
Page 35
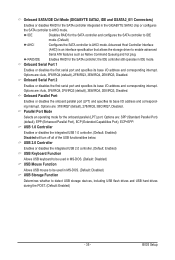
...be used in IDE mode. BIOS Setup the IDE controller still operates in MS-DOS. (Default: Disabled) USB Storage Function Determines whether to AHCI mode. Parallel Port Mode Selects an operating mode for the SATA controller; Options are : Auto, 3F8/IRQ4, 2F8/IRQ3 (default), 3E8...and specifies its base I/O address and corresponding interrupt. Onboard SATA/IDE Ctrl Mode (GIGABYTE SATA2, IDE and GSATA2_0/1 Connectors) Enables or disables RAID for the SATA controller integrated in the GIGABYTE SATA2 chip or configures the SATA controller to detect USB storage devices, including USB ...
...be used in IDE mode. BIOS Setup the IDE controller still operates in MS-DOS. (Default: Disabled) USB Storage Function Determines whether to AHCI mode. Parallel Port Mode Selects an operating mode for the SATA controller; Options are : Auto, 3F8/IRQ4, 2F8/IRQ3 (default), 3E8...and specifies its base I/O address and corresponding interrupt. Onboard SATA/IDE Ctrl Mode (GIGABYTE SATA2, IDE and GSATA2_0/1 Connectors) Enables or disables RAID for the SATA controller integrated in the GIGABYTE SATA2 chip or configures the SATA controller to detect USB storage devices, including USB ...

Manual
Page 47
... only back up a hard drive than to back up /restore the first physical hard drive that allows you to leave enough unallocated space in RAID/AHCI mode are attached to the first and second SATA connectors, the hard drive on PATA and SATA hard drives and restore it . actual size requirements...
... only back up a hard drive than to back up /restore the first physical hard drive that allows you to leave enough unallocated space in RAID/AHCI mode are attached to the first and second SATA connectors, the hard drive on PATA and SATA hard drives and restore it . actual size requirements...

Manual
Page 50
...backup BIOS manually. However, if the main BIOS is saved to a hard drive in RAID/AHCI mode or a hard drive attached to enter MS-DOS mode. Before You Begin 1. Extract...can access Q-Flash by adding one more physical BIOS chip. Restart the system. What is Q-Flash™? D525TUD E10c . . . . : BIOS Setup : XpressRecovery2 : Boot Menu : Qflash 06/25/2010-Pine-... the system BIOS while in system malfunction. Unique Features - 50 - 4-2 BIOS Update Utilities GIGABYTE motherboards provide two unique BIOS update tools, Q-Flash™ and @BIOS™. Motherboards that matches...
...backup BIOS manually. However, if the main BIOS is saved to a hard drive in RAID/AHCI mode or a hard drive attached to enter MS-DOS mode. Before You Begin 1. Extract...can access Q-Flash by adding one more physical BIOS chip. Restart the system. What is Q-Flash™? D525TUD E10c . . . . : BIOS Setup : XpressRecovery2 : Boot Menu : Qflash 06/25/2010-Pine-... the system BIOS while in system malfunction. Unique Features - 50 - 4-2 BIOS Update Utilities GIGABYTE motherboards provide two unique BIOS update tools, Q-Flash™ and @BIOS™. Motherboards that matches...
Manual
Page 51
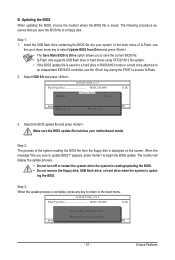
... USB flash drive or hard drives using FAT32/16/12 file system. • If the BIOS update file is saved to a hard drive in RAID/AHCI mode or a hard drive attached to an independent IDE/SATA controller, use the up or down arrow key to select Update BIOS from the floppy...
... USB flash drive or hard drives using FAT32/16/12 file system. • If the BIOS update file is saved to a hard drive in RAID/AHCI mode or a hard drive attached to an independent IDE/SATA controller, use the up or down arrow key to select Update BIOS from the floppy...
Manual
Page 59
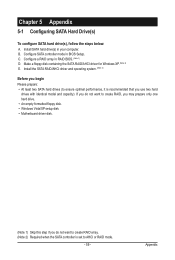
... is recommended that you begin Please prepare: • At least two SATA hard drives (to AHCI or RAID mode. - 59 - B. Make a floppy disk containing the SATA RAID/AHCI driver for Windows XP. (Note 2) E. Install the SATA RAID/AHCI driver and operating system. (Note 2) Before you use two hard drives with identical model and...
... is recommended that you begin Please prepare: • At least two SATA hard drives (to AHCI or RAID mode. - 59 - B. Make a floppy disk containing the SATA RAID/AHCI driver for Windows XP. (Note 2) E. Install the SATA RAID/AHCI driver and operating system. (Note 2) Before you use two hard drives with identical model and...

Manual
Page 60
... do not want to available SATA port on the motherboard. Then set this motherboard, the GSATA2_0 and GSATA2_1 ports are supported by the GIGABYTE SATA2 SATA controller. If you have and the BIOS version. CMOS Setup Utility-Copyright (C) 1984-2010 Award Software Integrated Peripherals Azalia Codec..., ensure that Onboard SATA/IDE Device is enabled. B. Appendix - 60 - The BIOS Setup menus described in your motherboard. 5-1-1 Configuring GIGABYTE SATA2 SATA Controller A. Installing SATA hard drive(s) in this section may differ from your computer and press to IDE or...
... do not want to available SATA port on the motherboard. Then set this motherboard, the GSATA2_0 and GSATA2_1 ports are supported by the GIGABYTE SATA2 SATA controller. If you have and the BIOS version. CMOS Setup Utility-Copyright (C) 1984-2010 Award Software Integrated Peripherals Azalia Codec..., ensure that Onboard SATA/IDE Device is enabled. B. Appendix - 60 - The BIOS Setup menus described in your motherboard. 5-1-1 Configuring GIGABYTE SATA2 SATA Controller A. Installing SATA hard drive(s) in this section may differ from your computer and press to IDE or...

Manual
Page 65
... [ESC]-Abort - 65 - a small triangle will move to Non-RAID Solve Mirror Conflict Rebuild Mirror Drive Save And Exit Setup Exit Without Saving Gigabyte Technology Corp. Delete the RAID Array: To delete the array, select Delete RAID Disk Drive in the main screen to save your selection (Figure 11...RAID Disk Drive Delete RAID Disk Drive Revert HDD to Non-RAID Solve Mirror Conflict Rebuild Mirror Drive Save And Exit Setup Exit Without Saving Gigabyte Technology Corp. Save and Exit Setup: After configuring the RAID array, select the Save And Exit Setup item in the main menu and press...
... [ESC]-Abort - 65 - a small triangle will move to Non-RAID Solve Mirror Conflict Rebuild Mirror Drive Save And Exit Setup Exit Without Saving Gigabyte Technology Corp. Delete the RAID Array: To delete the array, select Delete RAID Disk Drive in the main screen to save your selection (Figure 11...RAID Disk Drive Delete RAID Disk Drive Revert HDD to Non-RAID Solve Mirror Conflict Rebuild Mirror Drive Save And Exit Setup Exit Without Saving Gigabyte Technology Corp. Save and Exit Setup: After configuring the RAID array, select the Save And Exit Setup item in the main menu and press...
Manual
Page 66
... exit when finished. Press after the command: For the GIGABYTE SATA2, type (Figure 1): (Note) A:\>copy d:\bootdrv\gsata\32bit\*.* Figure 1 In Windows mode: Steps: 1: Use an alternative system and insert the motherboard driver disk. 2: From your optical drive is /are configured to RAID/AHCI mode, you also can copy the SATA controller driver...
... exit when finished. Press after the command: For the GIGABYTE SATA2, type (Figure 1): (Note) A:\>copy d:\bootdrv\gsata\32bit\*.* Figure 1 In Windows mode: Steps: 1: Use an alternative system and insert the motherboard driver disk. 2: From your optical drive is /are configured to RAID/AHCI mode, you also can copy the SATA controller driver...

Manual
Page 67
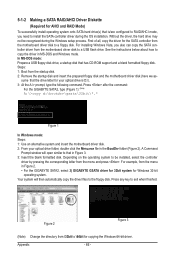
... asking you to continue the driver installation. Select the SCSI Adapter you need to install a third party SCSI or RAID driver. RAID/AHCI Driver for use with the Windows XP installation. - 67 - Windows Setup Press F6 if you want from the Windows XP setup disk...Figure 1 Step 2: Insert the floppy disk containing the SATA RAID/AHCI driver and press . Select RAID/AHCI Driver for GIGABYTE GBB36X Controller (x32) and press . 5-1-3 Installing the SATA RAID/AHCI Driver and Operating System With the SATA RAID/AHCI driver diskette and correct BIOS settings, you are examples of Windows ...
... asking you to continue the driver installation. Select the SCSI Adapter you need to install a third party SCSI or RAID driver. RAID/AHCI Driver for use with the Windows XP installation. - 67 - Windows Setup Press F6 if you want from the Windows XP setup disk...Figure 1 Step 2: Insert the floppy disk containing the SATA RAID/AHCI driver and press . Select RAID/AHCI Driver for GIGABYTE GBB36X Controller (x32) and press . 5-1-3 Installing the SATA RAID/AHCI Driver and Operating System With the SATA RAID/AHCI driver diskette and correct BIOS settings, you are examples of Windows ...

Manual
Page 68
...(Figure 3). Then use Method B to the USB flash drive). Appendix Figure 4 - 68 - Installing Windows Vista (The procedure below appears (RAID/AHCI hard drive(s) will not be sure to copy the driver files from the Windows Vista setup disk and perform standard OS installation steps. Figure 3 Step... the 64Bit folder. Method B: Insert the USB flash drive containing the driver files and browse to that below assumes that contains the SATA RAID/ AHCI driver (Method B), then specify the location of the driver (Figure 4). B. When a screen similar to \GSATA\32Bit (for Windows Vista 32-bit...
...(Figure 3). Then use Method B to the USB flash drive). Appendix Figure 4 - 68 - Installing Windows Vista (The procedure below appears (RAID/AHCI hard drive(s) will not be sure to copy the driver files from the Windows Vista setup disk and perform standard OS installation steps. Figure 3 Step... the 64Bit folder. Method B: Insert the USB flash drive containing the driver files and browse to that below assumes that contains the SATA RAID/ AHCI driver (Method B), then specify the location of the driver (Figure 4). B. When a screen similar to \GSATA\32Bit (for Windows Vista 32-bit...

Manual
Page 69
Figure 5 Step 4: After the driver is loaded, select the RAID/AHCI drive(s) where you want to install the operating system and then click Next to continue the OS installation (Figure 6). Appendix Step 3: When a screen as shown in this chapter are for reference only and may differ by driver version. - 69 - Figure 6 The install menus described in Figure 5 appears, select GIGABYTE GBB36X Controller and click Next.
Figure 5 Step 4: After the driver is loaded, select the RAID/AHCI drive(s) where you want to install the operating system and then click Next to continue the OS installation (Figure 6). Appendix Step 3: When a screen as shown in this chapter are for reference only and may differ by driver version. - 69 - Figure 6 The install menus described in Figure 5 appears, select GIGABYTE GBB36X Controller and click Next.

