Raid Configuration Guide
Page 2
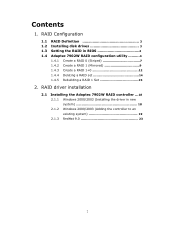
RAID driver installation 2.1 Installing the Adaptec 7902W RAID controller ...18 2.1.1 Windows 2000/2003 (Installing the driver in BIOS 4 1.4 Adaptec 7902W RAID configuration utility ..........4 1.4.1 Create a RAID 0 (Striped 7 1.4.2 Create a RAID 1 (Mirrored 9 1.4.3 Create a RAID 1+0 12 1.4.4 Deleting a RAID set 14 1.4.5 Rebuilding a RAID 1 Set 15 2. RAID Configuration 1.1 RAID Definition 3 1.2 Installing disk drives 3 1.3 Setting the RAID in new system 18 2.1.2 Windows 2000/2003 (Adding the controller to an existing system 19 2.1.3 RedHat 9.0 23 2 Contents 1.
RAID driver installation 2.1 Installing the Adaptec 7902W RAID controller ...18 2.1.1 Windows 2000/2003 (Installing the driver in BIOS 4 1.4 Adaptec 7902W RAID configuration utility ..........4 1.4.1 Create a RAID 0 (Striped 7 1.4.2 Create a RAID 1 (Mirrored 9 1.4.3 Create a RAID 1+0 12 1.4.4 Deleting a RAID set 14 1.4.5 Rebuilding a RAID 1 Set 15 2. RAID Configuration 1.1 RAID Definition 3 1.2 Installing disk drives 3 1.3 Setting the RAID in new system 18 2.1.2 Windows 2000/2003 (Adding the controller to an existing system 19 2.1.3 RedHat 9.0 23 2 Contents 1.
Raid Configuration Guide
Page 3
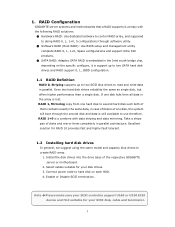
...mirror them contains exactly the same data, in case of failure of one disk fails then all data in parallel architecture. RAID Configuration GIGABYTE server systems and motherboards that a RAID supports is comply with data striping and data mirroring. If one disk, the system will ...boot through software utility. ● Software RAID (Host RAID): Use BIOS setup and management utility complete RAID 0, 1, 1+0, Spare configurations and support Ultra 320 products. ● SATA RAID: Adaptec SATA RAID is embedded in...
...mirror them contains exactly the same data, in case of failure of one disk fails then all data in parallel architecture. RAID Configuration GIGABYTE server systems and motherboards that a RAID supports is comply with data striping and data mirroring. If one disk, the system will ...boot through software utility. ● Software RAID (Host RAID): Use BIOS setup and management utility complete RAID 0, 1, 1+0, Spare configurations and support Ultra 320 products. ● SATA RAID: Adaptec SATA RAID is embedded in...
Raid Configuration Guide
Page 4
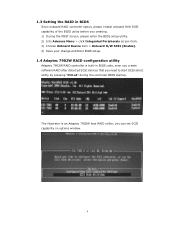
...onboard H/W SCSI capability of the BIOS utility before you creating. 1) During the POST screen, please enter the BIOS setup utility. 2) Into Advance Menu > click Integrated Peripherals screen item. 3) Choose Onboard Device item > Onboard H/W SCSI [Enable]. 4) Save your change and Exist BIOS setup. 1.4 Adaptec 7902W RAID ...configuration utility Adaptec 7902W RAID controller is an Adaptec 7902W host RAID utility; The illustrator is built-in BIOS code, even you create software RAID after detected SCSI devices that you can set SCSI capability on options window. 4 ...
...onboard H/W SCSI capability of the BIOS utility before you creating. 1) During the POST screen, please enter the BIOS setup utility. 2) Into Advance Menu > click Integrated Peripherals screen item. 3) Choose Onboard Device item > Onboard H/W SCSI [Enable]. 4) Save your change and Exist BIOS setup. 1.4 Adaptec 7902W RAID ...configuration utility Adaptec 7902W RAID controller is an Adaptec 7902W host RAID utility; The illustrator is built-in BIOS code, even you create software RAID after detected SCSI devices that you can set SCSI capability on options window. 4 ...
Raid Configuration Guide
Page 15
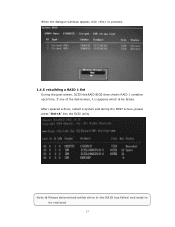
If one of the disk broken, it is appears which drive in the RAID has failed and need to proceed. 1.4.5 rebuilding a RAID 1 Set During the post screen, SCSI HostRAID BIOS does checks RAID 1 condition each time. When the dialogue windows appear, click to be replaced 15 After replaced a drive, restart a system and during the POST screen, please press "Ctrl+A" into the SCSI utility Note Please determined which drive failure.
If one of the disk broken, it is appears which drive in the RAID has failed and need to proceed. 1.4.5 rebuilding a RAID 1 Set During the post screen, SCSI HostRAID BIOS does checks RAID 1 condition each time. When the dialogue windows appear, click to be replaced 15 After replaced a drive, restart a system and during the POST screen, please press "Ctrl+A" into the SCSI utility Note Please determined which drive failure.


