Manual
Page 30
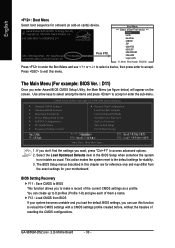
... Press to enter the Boot Menu and use this menu. This action makes the system reset to 8 profiles (Profile 1-8) and give each of them a name. You can use < > or < > to select a device, then press enter to exit this function to accept or enter the sub-menu. The... system becomes unstable and you load the default BIOS settings, you want, press "Ctrl+F1" to make a record of resetting the CMOS configurations. GA-965QM-DS2 (rev. 2.0) Motherboard - 30 - If you don't find the settings you can create up to the default settings for stability. 3. English : Boot Menu Select boot...
... Press to enter the Boot Menu and use this menu. This action makes the system reset to 8 profiles (Profile 1-8) and give each of them a name. You can use < > or < > to select a device, then press enter to exit this function to accept or enter the sub-menu. The... system becomes unstable and you load the default BIOS settings, you want, press "Ctrl+F1" to make a record of resetting the CMOS configurations. GA-965QM-DS2 (rev. 2.0) Motherboard - 30 - If you don't find the settings you can create up to the default settings for stability. 3. English : Boot Menu Select boot...

Manual
Page 58
Methods and steps: I. Select the exact model name on your motherboard e. Please select "All Files" in dialog box while opening the old file. Complete update process following the instruction. GA-965QM-DS2 (rev. 2.0) Motherboard - 58 - Update BIOS through Internet: a. Click "Update New BIOS" icon c . II...the BIOS. Click "Update New BIOS" c. e. Installation Complete and Run @BIOS Select @BIOS item than click Install Click Start/ Programs/ Gigabyte/ BIOS/ @BIOS Fig 3. The @BIOS Utility Click "3" Click "Update New BIOS" Fig 4. Click "Internet Update" icon b. Update ...
Methods and steps: I. Select the exact model name on your motherboard e. Please select "All Files" in dialog box while opening the old file. Complete update process following the instruction. GA-965QM-DS2 (rev. 2.0) Motherboard - 58 - Update BIOS through Internet: a. Click "Update New BIOS" icon c . II...the BIOS. Click "Update New BIOS" c. e. Installation Complete and Run @BIOS Select @BIOS item than click Install Click Start/ Programs/ Gigabyte/ BIOS/ @BIOS Fig 3. The @BIOS Utility Click "3" Click "Update New BIOS" Fig 4. Click "Internet Update" icon b. Update ...

Manual
Page 59
... cannot be found in @BIOSTM server, please go onto Gigabyte's web site for downloading and updating it shows two or more motherboard's model names to save the current BIOS version. Please note that motherboard's model name in dialog box. It means to be sure that any... interruption during updating will cause the system unbooted. IV. Appendix Selecting wrong model name will cause system unbooted. In method II, be selected, please make sure your motherboard's model name again. V. Do not use @BIOS and C.O.M. (Corporate Online Management) at the same time....
... cannot be found in @BIOSTM server, please go onto Gigabyte's web site for downloading and updating it shows two or more motherboard's model names to save the current BIOS version. Please note that motherboard's model name in dialog box. It means to be sure that any... interruption during updating will cause the system unbooted. IV. Appendix Selecting wrong model name will cause system unbooted. In method II, be selected, please make sure your motherboard's model name again. V. Do not use @BIOS and C.O.M. (Corporate Online Management) at the same time....

Manual
Page 64
... RAID10 - 64KB RAID5 - 64KB [ ]-Change [TAB]-Next [ESC]-Previous Menu Figure 6 [ENTER]-Select GA-965QM-DS2 (rev. 2.0) Motherboard - 64 - When finished, press ENTER to RAID0+1. Functionally equivalent to select a RAID level (Figure 5). English Step 3: After entering the Create Volume Menu screen, name the disk array with 1~16 letters (letters cannot be set array capacity. Data...
... RAID10 - 64KB RAID5 - 64KB [ ]-Change [TAB]-Next [ESC]-Previous Menu Figure 6 [ENTER]-Select GA-965QM-DS2 (rev. 2.0) Motherboard - 64 - When finished, press ENTER to RAID0+1. Functionally equivalent to select a RAID level (Figure 5). English Step 3: After entering the Create Volume Menu screen, name the disk array with 1~16 letters (letters cannot be set array capacity. Data...

Manual
Page 66
... information about the RAID Array in Main Menu. Intel(R) Matrix Storage Manager option ROM V6.0.0.1022 ICH8R wRAID5 Copyright(C) 2003-06 Intel Corporation. GA-965QM-DS2 (rev. 2.0) Motherboard - 66 - Create RAID Volume 2. Press ENTER and follow on-screen instructions. All Rights Reversed. [ MAIN MENU ] 1. Delete RAID ...volume, select the Delete RAID Volume option in the DISK/ VOLUME INFORMATION section, including RAID mode, disk block size, disk name, and disk capacity, etc. English After the creation is completed, you can proceed to Non-RAID 4. All Rights Reversed. [ MAIN MENU ...
... information about the RAID Array in Main Menu. Intel(R) Matrix Storage Manager option ROM V6.0.0.1022 ICH8R wRAID5 Copyright(C) 2003-06 Intel Corporation. GA-965QM-DS2 (rev. 2.0) Motherboard - 66 - Create RAID Volume 2. Press ENTER and follow on-screen instructions. All Rights Reversed. [ MAIN MENU ] 1. Delete RAID ...volume, select the Delete RAID Volume option in the DISK/ VOLUME INFORMATION section, including RAID mode, disk block size, disk name, and disk capacity, etc. English After the creation is completed, you can proceed to Non-RAID 4. All Rights Reversed. [ MAIN MENU ...


